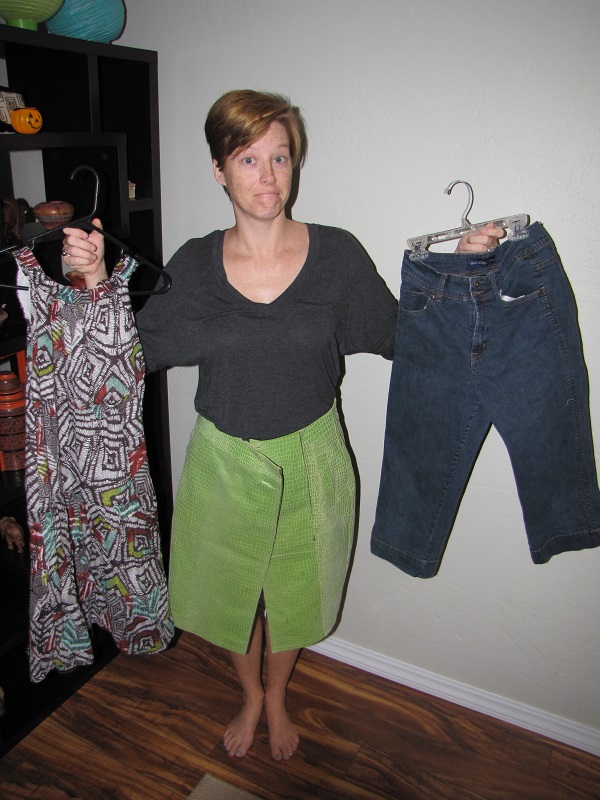
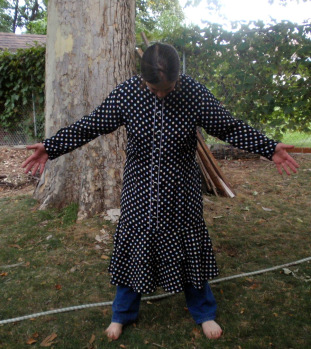
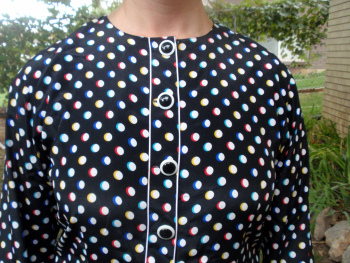
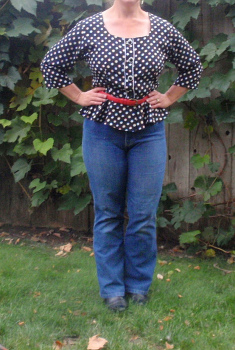
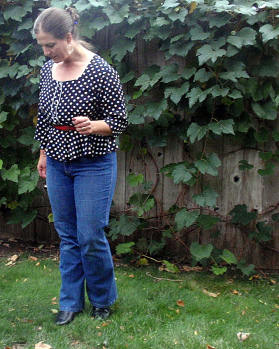
It’s that time of year again! Time to pull out a few thrift store finds from the bottom of the pile and create a fun costume for Halloween. My motto is quick and easy these days so I kept it pretty simple.
I started with a homemade fake suede skirt and a Roper dress that was a little too much of a good thing, but perfect for a sheriff costume.
First, I simply cut off the bottom of the dress to make it into a shirt.
Notice the horseshoe fabric and the fake leather trim? Perfectly cheesy!
I then used my rotary cutter to cut fringe around the bottom of the skirt.
Add a belt, bandana, badge, some boots and wha-la….. a sheriff costume is born.
Of course a sheriff costume wouldn’t be complete without a corny tin foil badge. 🙂
Whadda ya think- will I be able to keep those kindergarteners in line at our Halloween party now?
Thanks to my Ruggedly Handsome Husband for takin’ some time out outta his busy day to snap a few photos for me today.
Yeehaw, lookin’ good, honey!
*****
A big thank you to all of you who have already voted for The Renegade Seamstress over at the Craftsy site, but just in case you haven’t had a chance to vote for me yet, here is the information:
The Renegade Seamstress has been nominated for the “Best Tutorials in Sewing” award over at Craftsy. My lil’ ol’ blog is up against some pretty big blogs so the competition is fierce. The voting is open until October 29th and I really need your vote. If you haven’t had a chance to vote yet, here is the link:
Scroll down to The Best Tutorials in Sewing. Click on the vote button under The Renegade Seamstress. Scroll down in that box to enter your email address and click on the submit button.
If you have already voted, thank you, and I’d love it if you would get your friends to vote.
If you are new to The Renegade Seamstress, you can see my tutorials here:
*****
After you’ve voted over at the Craftsy site, be sure to check out this week’s incredible Refashion Runway entries. The theme is Halloween and you are sure to be inspired!!
“I really looked forward to this theme. I love costumes! So, any excuse to make
one, I’m all over it! It probably dates back to my childhood when the our old
steamer trunk would burst open in anticipation of Halloween. We would comb through
all the thrifted costumes that our grandmother picked up and and excitedly decided
what we would be for the evening. Over the past 34 years, having raised eight
children, I have to say that I have made my fair share of costumes. Costume
“season” always began with a trip to the thrift store for the perfect start to the
costumes. Well, right now I have a self-imposed break from the thrift stores so I
combed through my stash waiting for an idea to spark. As I found all of these
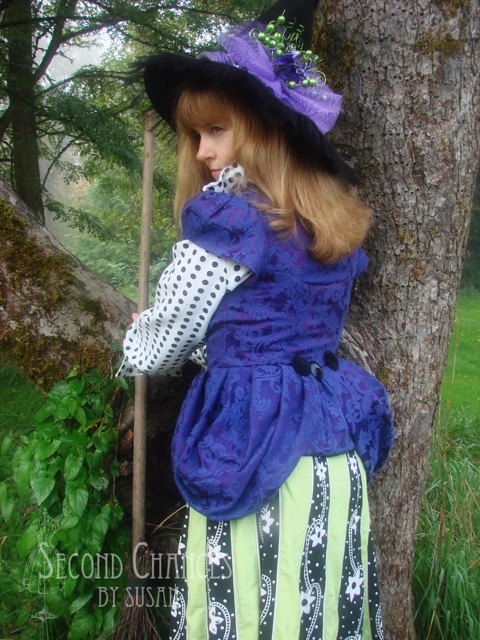
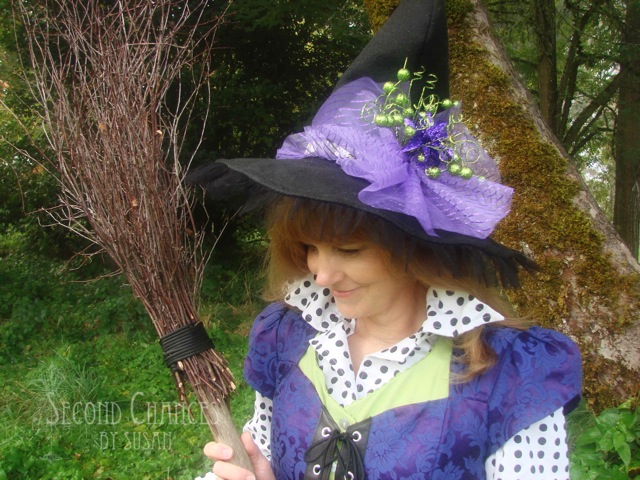
wonderful black and white, green, and purple goodies, I knew that I just had to make
a witch costume. But not your ordinary witch, a whimsical witch. I began with
these six pieces. A blouse that someone handmade with an extra big collar and
cuffs, a cotton skirt, a black and white dress with sequins in the front, a green
sleeveless jumper, a purple brocade dress with an open back, and and black and white
sweater. (Can I just say right now that I have quite a large stash…hence, the
self-imposed break from thrift stores!)
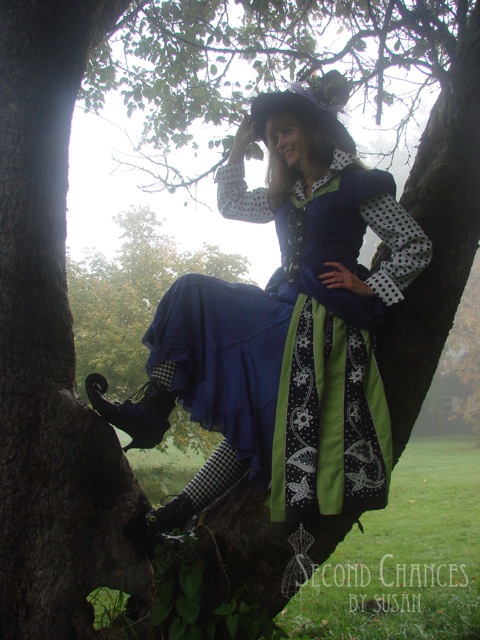
I cut the jumper at the waist, then cut the lower half into triangular strips. The
black and white dress was also cut up into triangular strips. Lucky for me, the
design was made that way! These strips were then sewn together and then reattached
to the upper part.
The purple brocade dress was disassembled at the waist, then cut up the front. This
was one refashion where the big shoulder pads were left intact! Leather and eyelets
were added to the front. I used the bottom of the dress to create pleated peplums
at each side (hey, peplum…leather, sound vaguely familiar?) Large vintage buttons
adorn the back. I also filled in the back with some of the left over fabric.
I cut the sleeves shorter, then used the excess pieces as a perfect start to a pair
of spats. Yes, I made another pair of spats! But these are not your ordinary
spats, these have curled toes! I have to admit these were a head scratcher, but a
proper whimsical witch must be dressed from head to toe!
Speaking of the head, the hat was made from some felt and trims that I already had.
In fact, the purple netting that was used came from a recently purchased bouquet of
flowers. The broom was a byproduct of doing fall clean-up in the yard. The fallen
branches were perfect. I put wire inside the edge of the blouse’s collar so that it
would stand up.
The underskirt was dyed a darker purple. The sweater sleeves made the perfect
leggings.
It was definitely witch weather this morning…foggy enough to make my toes curl!
And the moon tonight…WOW!”-Susan
*****
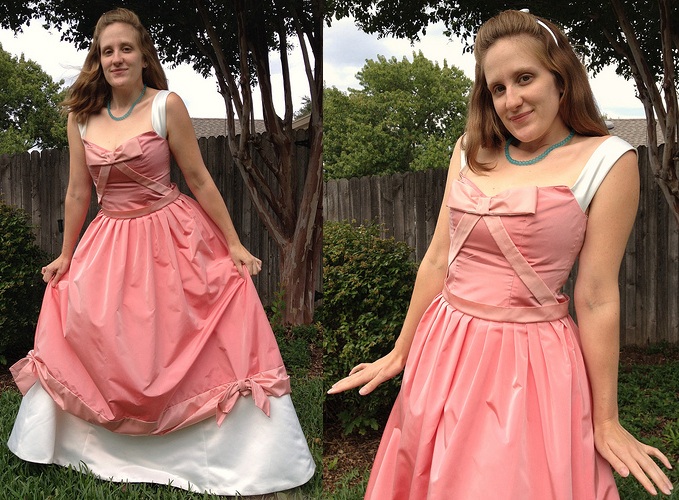
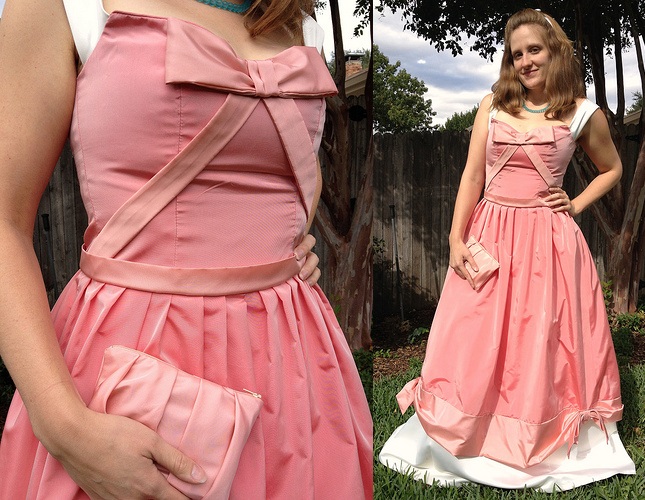
Carissa from Carissa Knits, is ready for the Royal Ball in her challenge entry this week:
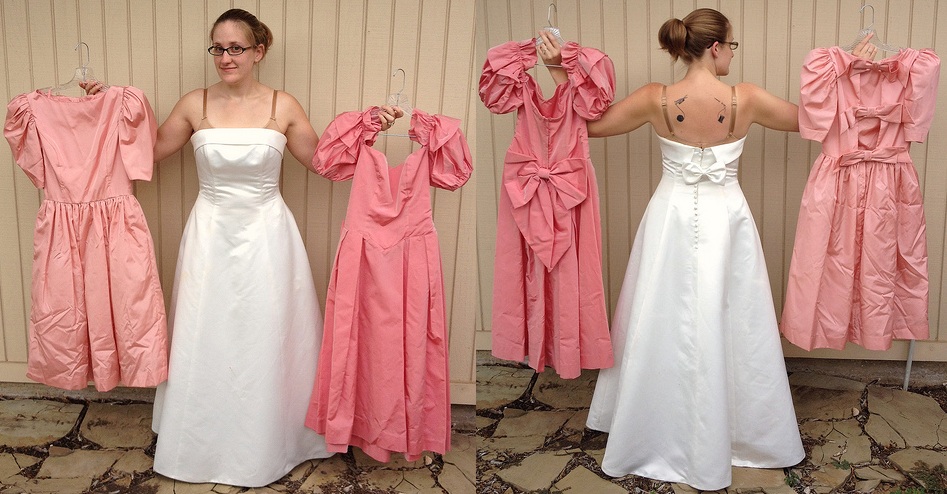
“Though I didn’t realize it at the time, I scored the *perfect *materials
for this challenge a few months back on Freecycle: a slightly-too-big
wedding gown and two slightly-too-small 80’s bridesmaid dresses. I had
absolutely no idea what I would do with them… until I was challenged to
make a smashing Halloween costume!
What better make-believe persona to assume than quite possibly the original
refashionista herself – Cinderella? If you recall, before the blue ball
gown her Fairy Godmother magicked up for her, there was the pink and white
dress of her mother’s, transformed into a gorgeous gown with the help of
her mouse and bird friends, and then relentlessly torn to shreds by her
evil step-sisters. I tackled my recreation all on my own though; no
cheating with tiny animal helpers.
I created a two-tone pink skirt – complete with bows – from the skirts of
the bridesmaid dresses. Then I removed the skirt from the wedding gown and
attached the two. I enlarged the dark pink bodice a smidge with side panels
and added pale pink sashes and a bow, as well as white straps made from the
flappy thing on top of the wedding gown’s bodice.
I used scraps of the white fabric to make a tiny bow and attached it to a
craft-store headband ($1). Blue glass beads ($3) became a simple yet
stunning necklace, and scraps of the pale pink dress were turned into a
cute pleated clutch to match my dress. A pair of thrifted pepto-pink kitten
heels ($4) bring the grand total for this ensemble to a whopping $8!
The entire (lengthy) transformation will be posted at CarissaKnits.com!“-Carissa
*****
Desarae from Gladness of Heart, stepped out of her costume box for us this week:
“I have a confession to make. No, I lied. I have two. Confession number 1- I don’t
celebrate Halloween. I know, I know, that may seem a little strange, but only as
strange as celebrating death and fear seems to me. This means that I’ve never had a
Halloween costume before. Which leads to Confession number 2- I love Disney.
Seriously, I do. Now, how this love was able to co-exist without the usual
expression of the yearly Halloween dress up, is a feet to be marveled at. So it
should come as no surprise that my Halloween project for Refashion Runway was
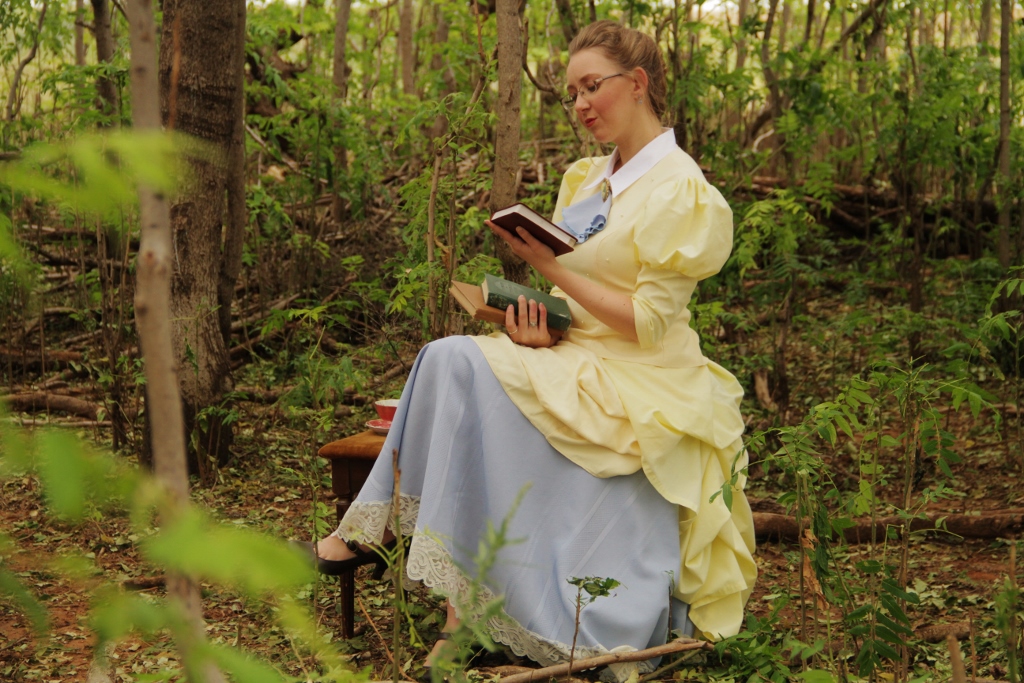
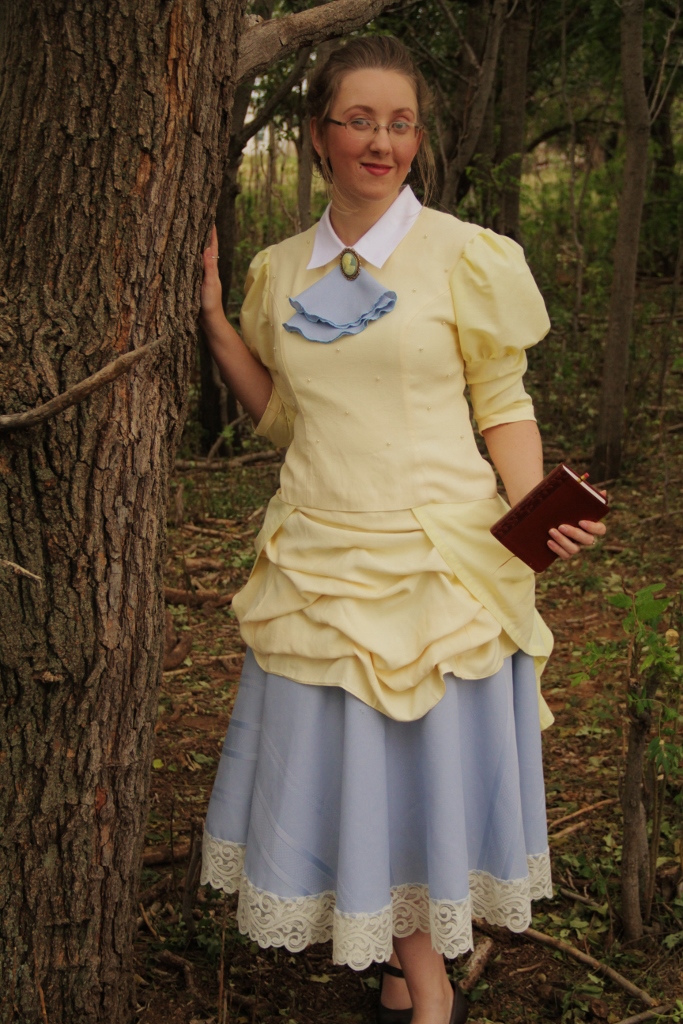
inspired by Jane’s dress in Disney’s ‘Tarzan’.
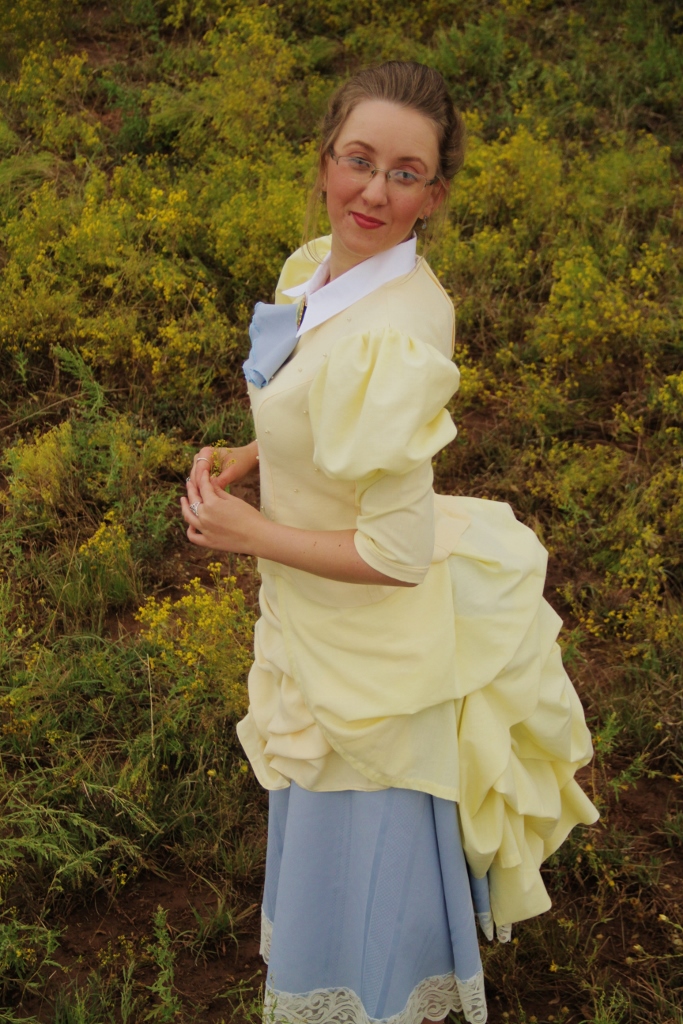
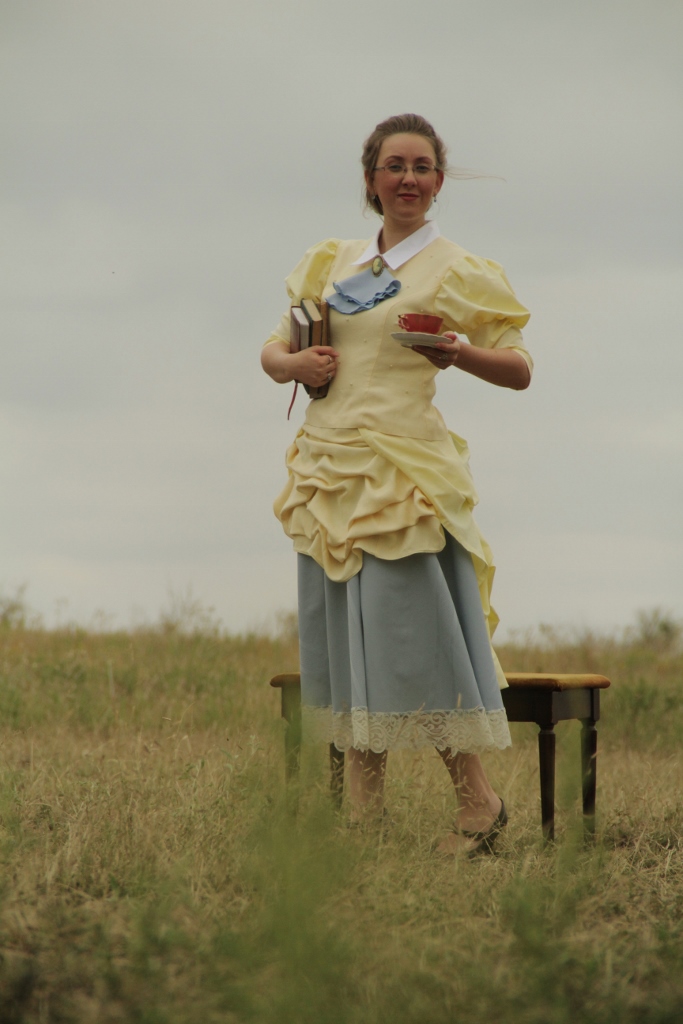
I started out with a fake layered two piece yellow dress suit, a white button up
shirt, and an old yellow sheet and lace trimmed circular blue tablecloth. In the
‘before’ picture, you will also notice a yellow button up shirt- I actually didn’t
end up using this, as I had plenty to work with otherwise.
To start things off, I separated the top from the skirt of my dress suite- removing
the shoulder pads, lace and sleeves. Using a self drafted pattern, I made and
attached Juliet sleeves (as I learned they are called) which were cut from the
yellow sheet. I hand sewed a couple of little dart tucks in the back, and shortened
the original zipper which used to run down into the skirt. Next, I filleted the
skirt portion and hemmed up all the edges. This piece would become the front
swooping panel on my new skirt.
To create the swoops and gathers, I pinched and
pulled sections of the fabric then pinned it to strips of gross grain ribbon running
down the inside of the material. These puckers were sewn to the ribbon by hand. The
same process was used to create the back bustle, which was made from a long
rectangular length cut from the sheet.
To create the blue skirt, I cut out a circle
from the center of the blue circular tablecloth- this created the waist opening. I
added a zipper to the back, then basted the front yellow swoop to the waist and
added a waistband, which I made from the sheet. I also added a waist band to my
yellow back bustle. To attach the bustle to the skirt, I created button holes on the
skirt waist band, then added buttons to the inside of the bustle waist band- this
way the buttons would be hidden inside.
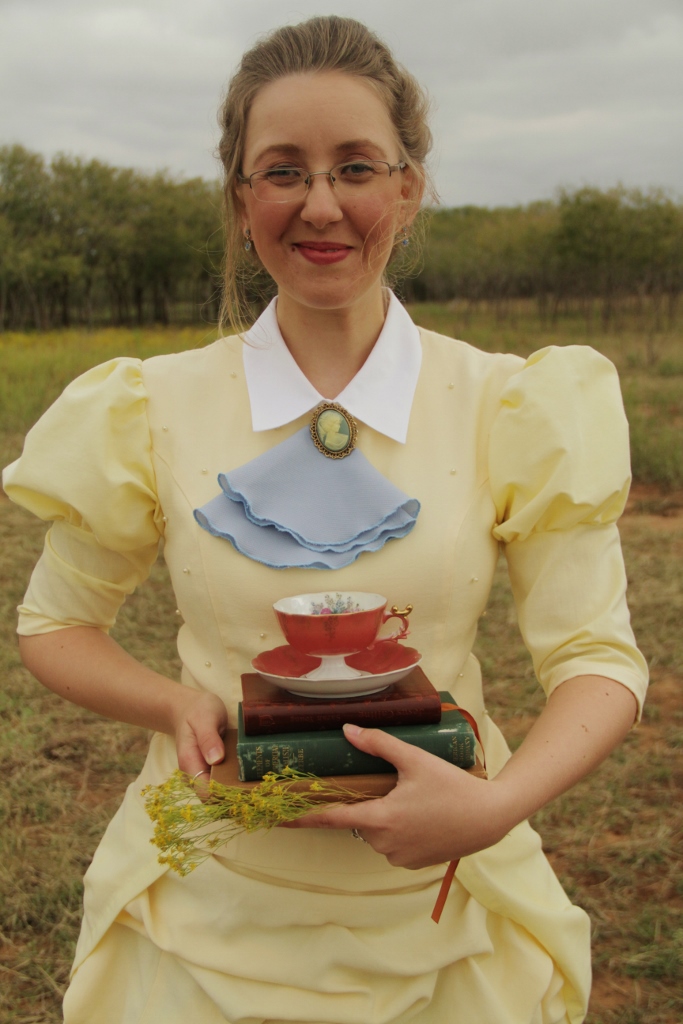
Next, I made a dickey out of my white button
up shirt, which tucked nicely under my yellow shirt to create the perfect collar.
Earlier, when I had cut out the waist opening in my tablecloth, I was left with a
perfect circle. After satin stitching around the edges and folding it into fourths,
it became my neckerchief, which I pinned on with a cameo broach of my mother’s.
And,
in keeping with Victorian Era fashion, I even made… for lack of a better term, a
butt pillow! Seriously, it is a pillow that rests on your rump with ribbon ties
attached at either side so you can tie it around your waist under your skirt. This
gives the back of the skirt that dramatic pouf!
And oh my goodness! Did I ever have fun wearing this outfit and taking pictures!!
You can see *lots* more photos and read more details at my blog!”-Desarae
*****
Trisha, from Feeling Kinda Thrifty, turned her Halloween Nightmare into a Dream Come True:
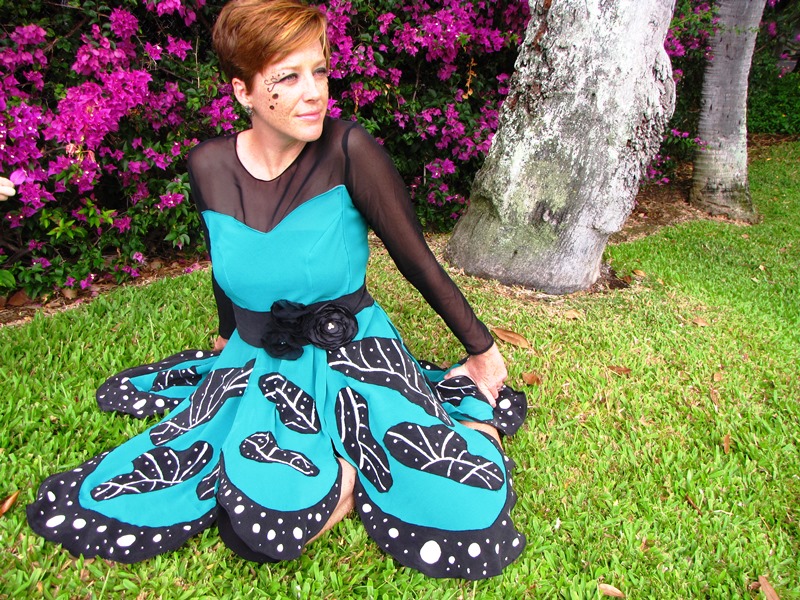
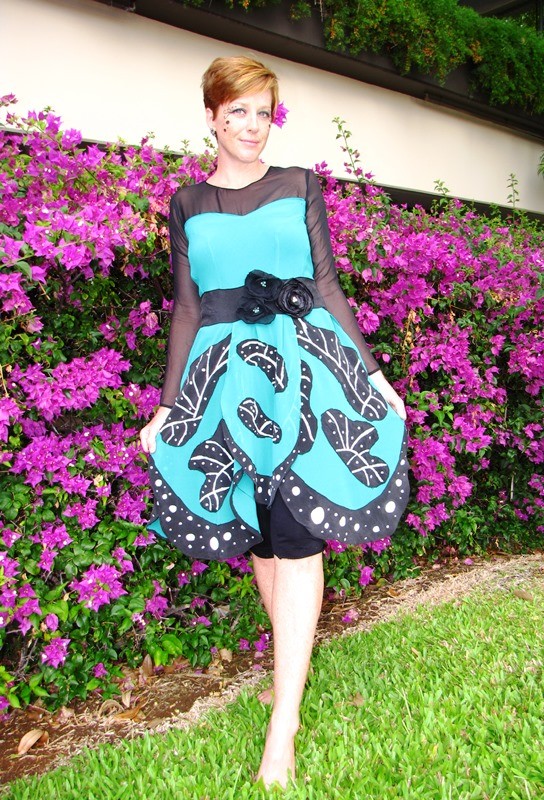
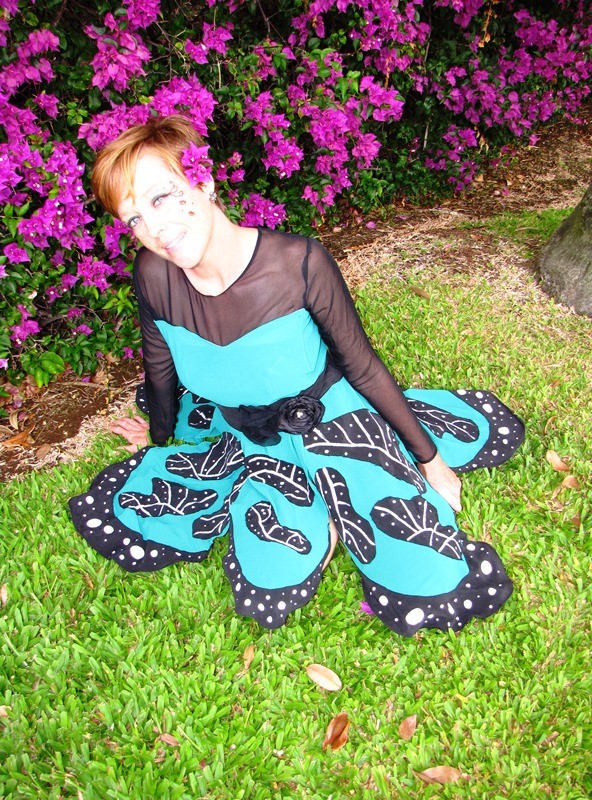
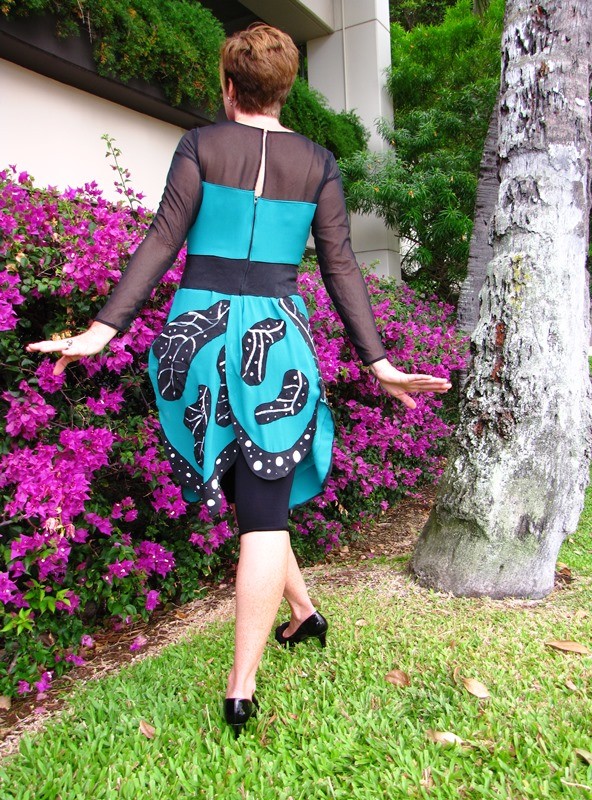
“For me, this week’s refashion was perfect for Halloween … a nightmare. Without
going into too much detail, I ended up scrapping my first refashion midweek
because I thought it looked a bit cliché and cheesy. At the last minute, I
made a bold decision to create a butterfly dress, using polyester crepe and
silk chiffon. My vision for this dress far outweighed my sewing ability,
and as I burned the midnight oil trying to complete it, I stumbled across
challenge after challenge. Throughout this process, there was a little
voice in the back of my head telling me to just let it go – throw in the
towel. Yet, I couldn’t. I had imagined this dress fitted with long silk
chiffon sleeves and a butterfly wing skirt, and I wasn’t going to stop
until it resembled the picture in my head. With a minimal amount of sleep
and an incredibly supportive and kind husband, I was able to complete a
Halloween refashion that I am proud of.
Here’s a brief breakdown of the transformation.
Top – I used a silk chiffon scarf that I found at Goodwill for $2 and part of a green crepe dress that I purchased at an estate sale for $0.25. To create a pattern for the chiffon top, I used a close-fitting t-shirt and traced it onto newspaper. I then cut this pattern across the top to create a sweetheart neckline for the crepe. I used the t-shirt again to trace a pattern for the sleeves, adding a curved edge at the top.
Wing Skirt – The base of the wings were cut from the green crepe dress. I
created a pattern on newspaper for the black appliqué, which came from a
black silk dress that I found at the same estate sale for $0.25. Using my
sewing machine, I stitched the appliqué onto each wing and hemmed up the
sides. I thought that the wings needed more detail, so I used Americana
multi-surface satin paint to add dots and veins.
Flowers – A tutorial will be posted on my blog in the near future, but
basically, I cut rough circles of different sizes and burned the edges
using a candle, creating petals. I then stacked the petals to create a
flower.
Now that my costume is out of the way, I can’t wait to start on one for my
little boy.
More details of my refashion can be found Sunday on my blog, Feeling Kinda Thrifty.” -Trish
*****
See what I meant when I said you would be blown away. Incredible!!!!
Use the poll below to vote for your favorite.
The voting will be open until Friday at midnight.
If you sewed along with us this week, send your before and after photos to bhunting@eoni.com. I love to see your version of the challenges.
Wow, next week will be the final challenge already: Winter White.
*****
Thank you to all of you who have already voted for The Renegade Seamstress over at the Craftsy site, but just in case you haven’t had a chance to vote for me yet, here is the information:
The Renegade Seamstress has been nominated for the “Best Tutorials in Sewing” award over at Craftsy. My lil’ ol’ blog is up against some pretty big blogs so the competition is fierce. The voting is open until October 29th and I really need your vote. If you haven’t had a chance to vote yet, here is the link:
Scroll down to The Best Tutorials in Sewing. Click on the vote button under The Renegade Seamstress. Scroll down in that box to enter your email address and click on the submit button.
If you have already voted, I’d love it if you would get your friends to vote.
If you are new to The Renegade Seamstress, you can see my tutorials here:
One of the most satisfying things about being a teacher is helping a child try something new and difficult, and being a part of the joy they experience when they succeed.
Watching our contestants change the way they felt about sewing on leather and seeing what they created this week was just as delightful. WOW!
Congratulations to Carissa, from Carissa Knits! You are the winner of the Leather Challenge this week!!!!
Now we must sadly say good-bye to Lauren from The Adventures of Lauren. We will miss her enthusiasm and her sewing skills. But as we know, it isn’t really good-bye it is more “see you later” because we can still see all of her amazing work on her blog.
Thank you for all of your hard work this season, Lauren!!
Lauren really burned the midnight oil to bring us this beautiful creation for the Halloween challenge:
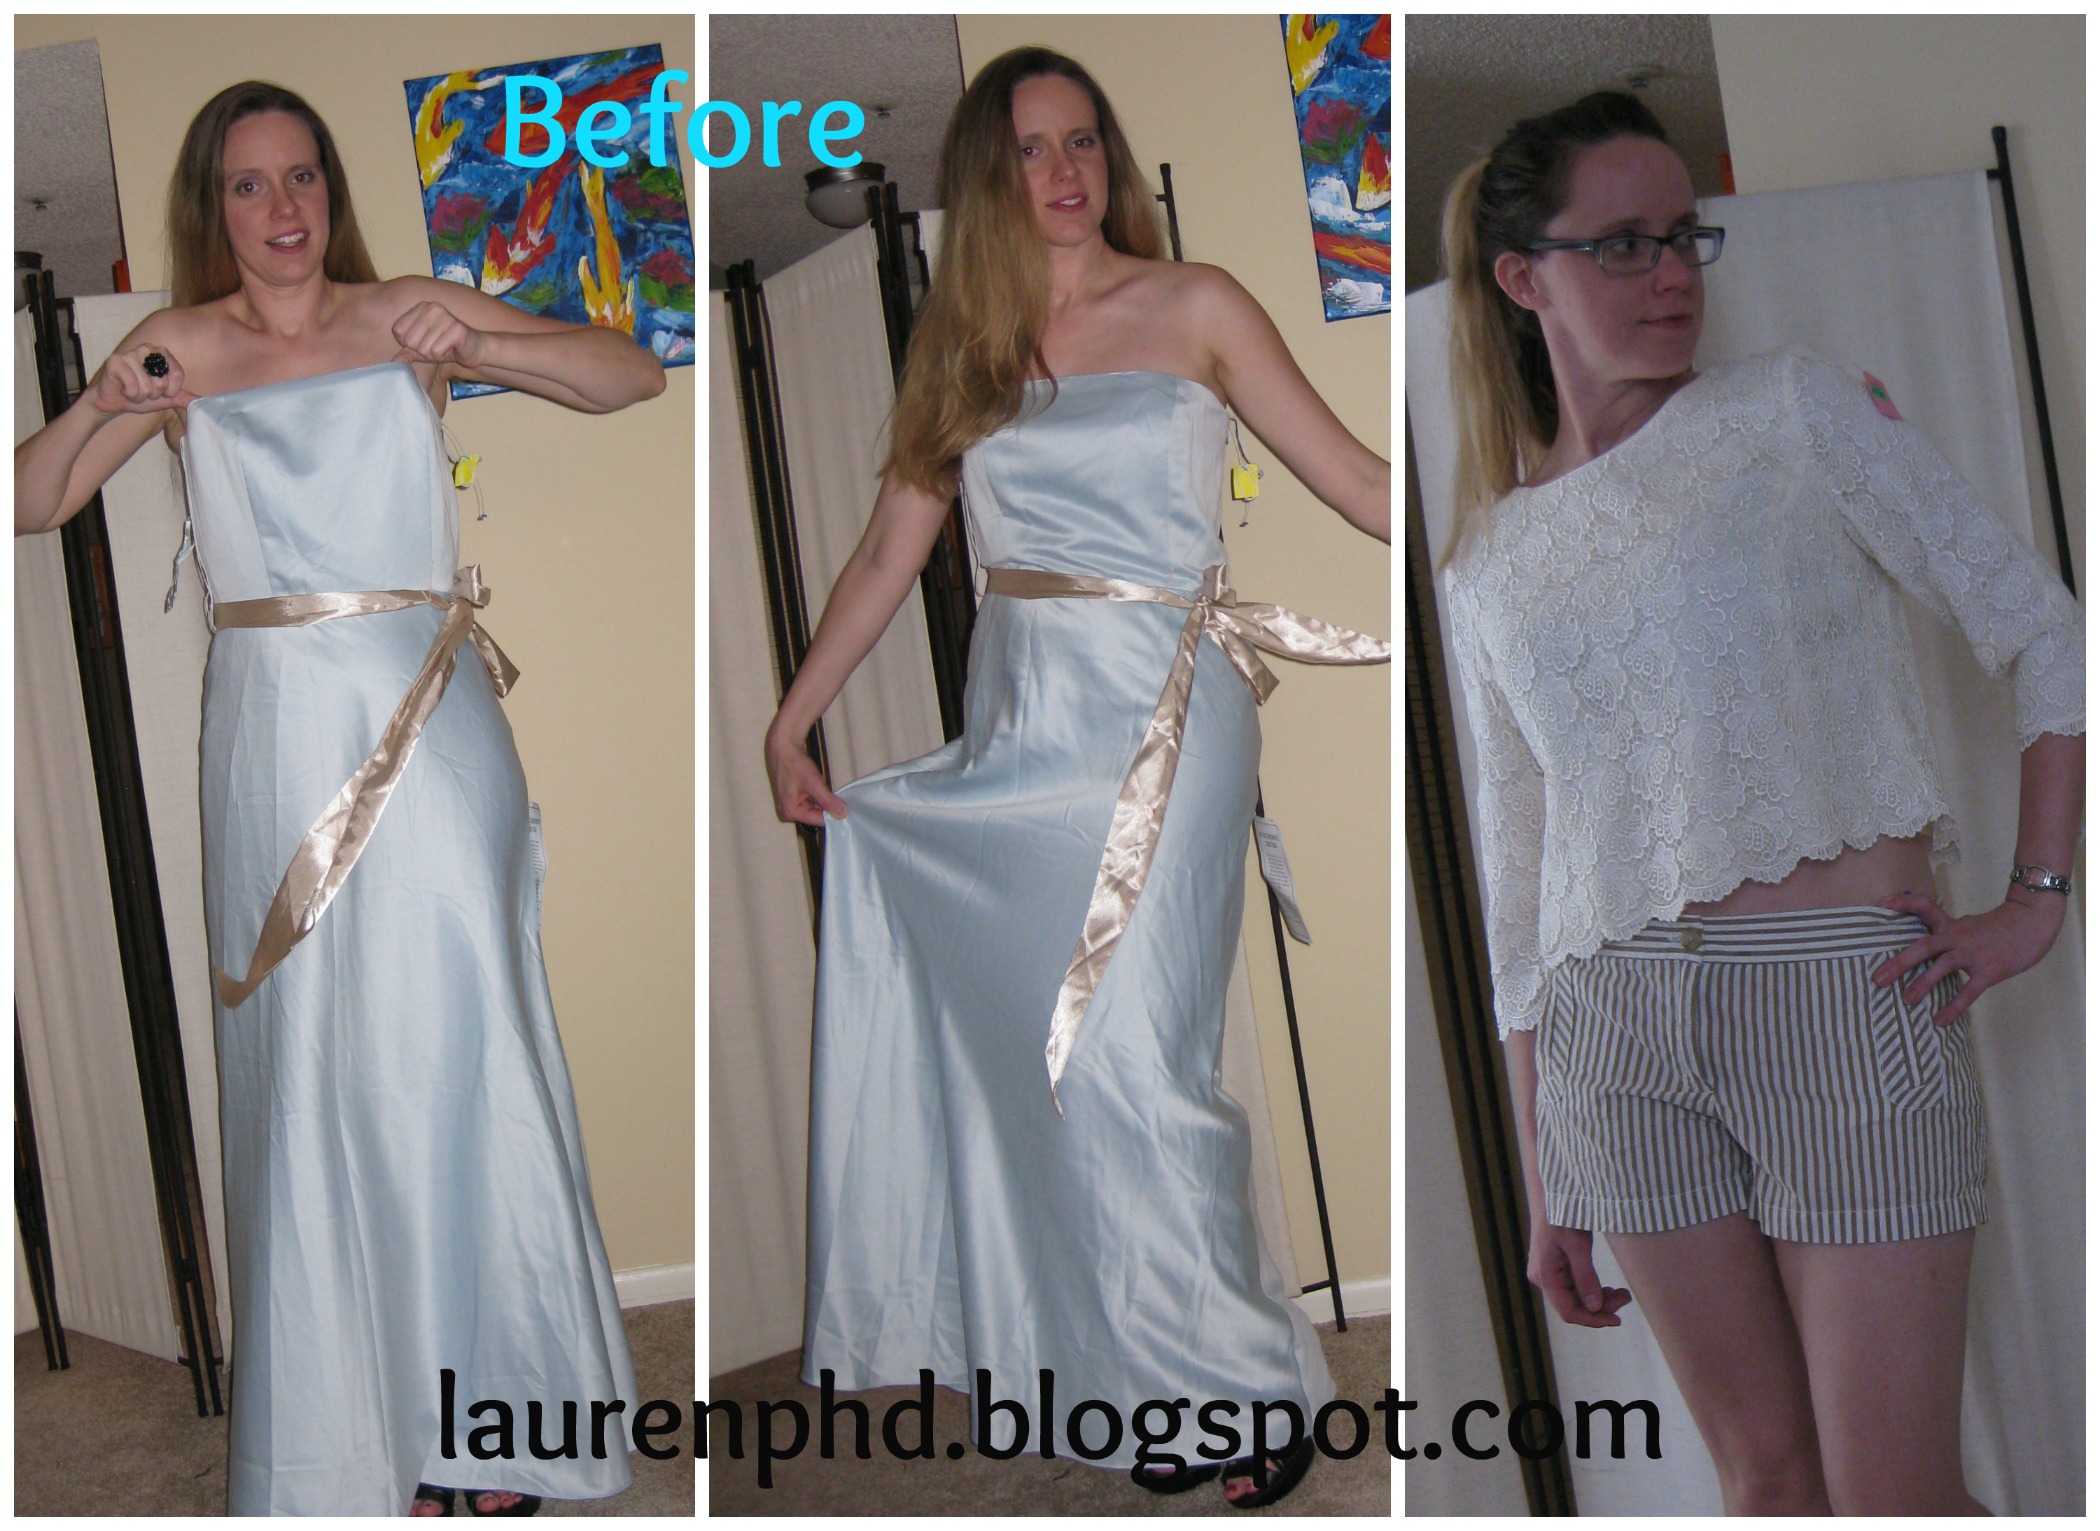
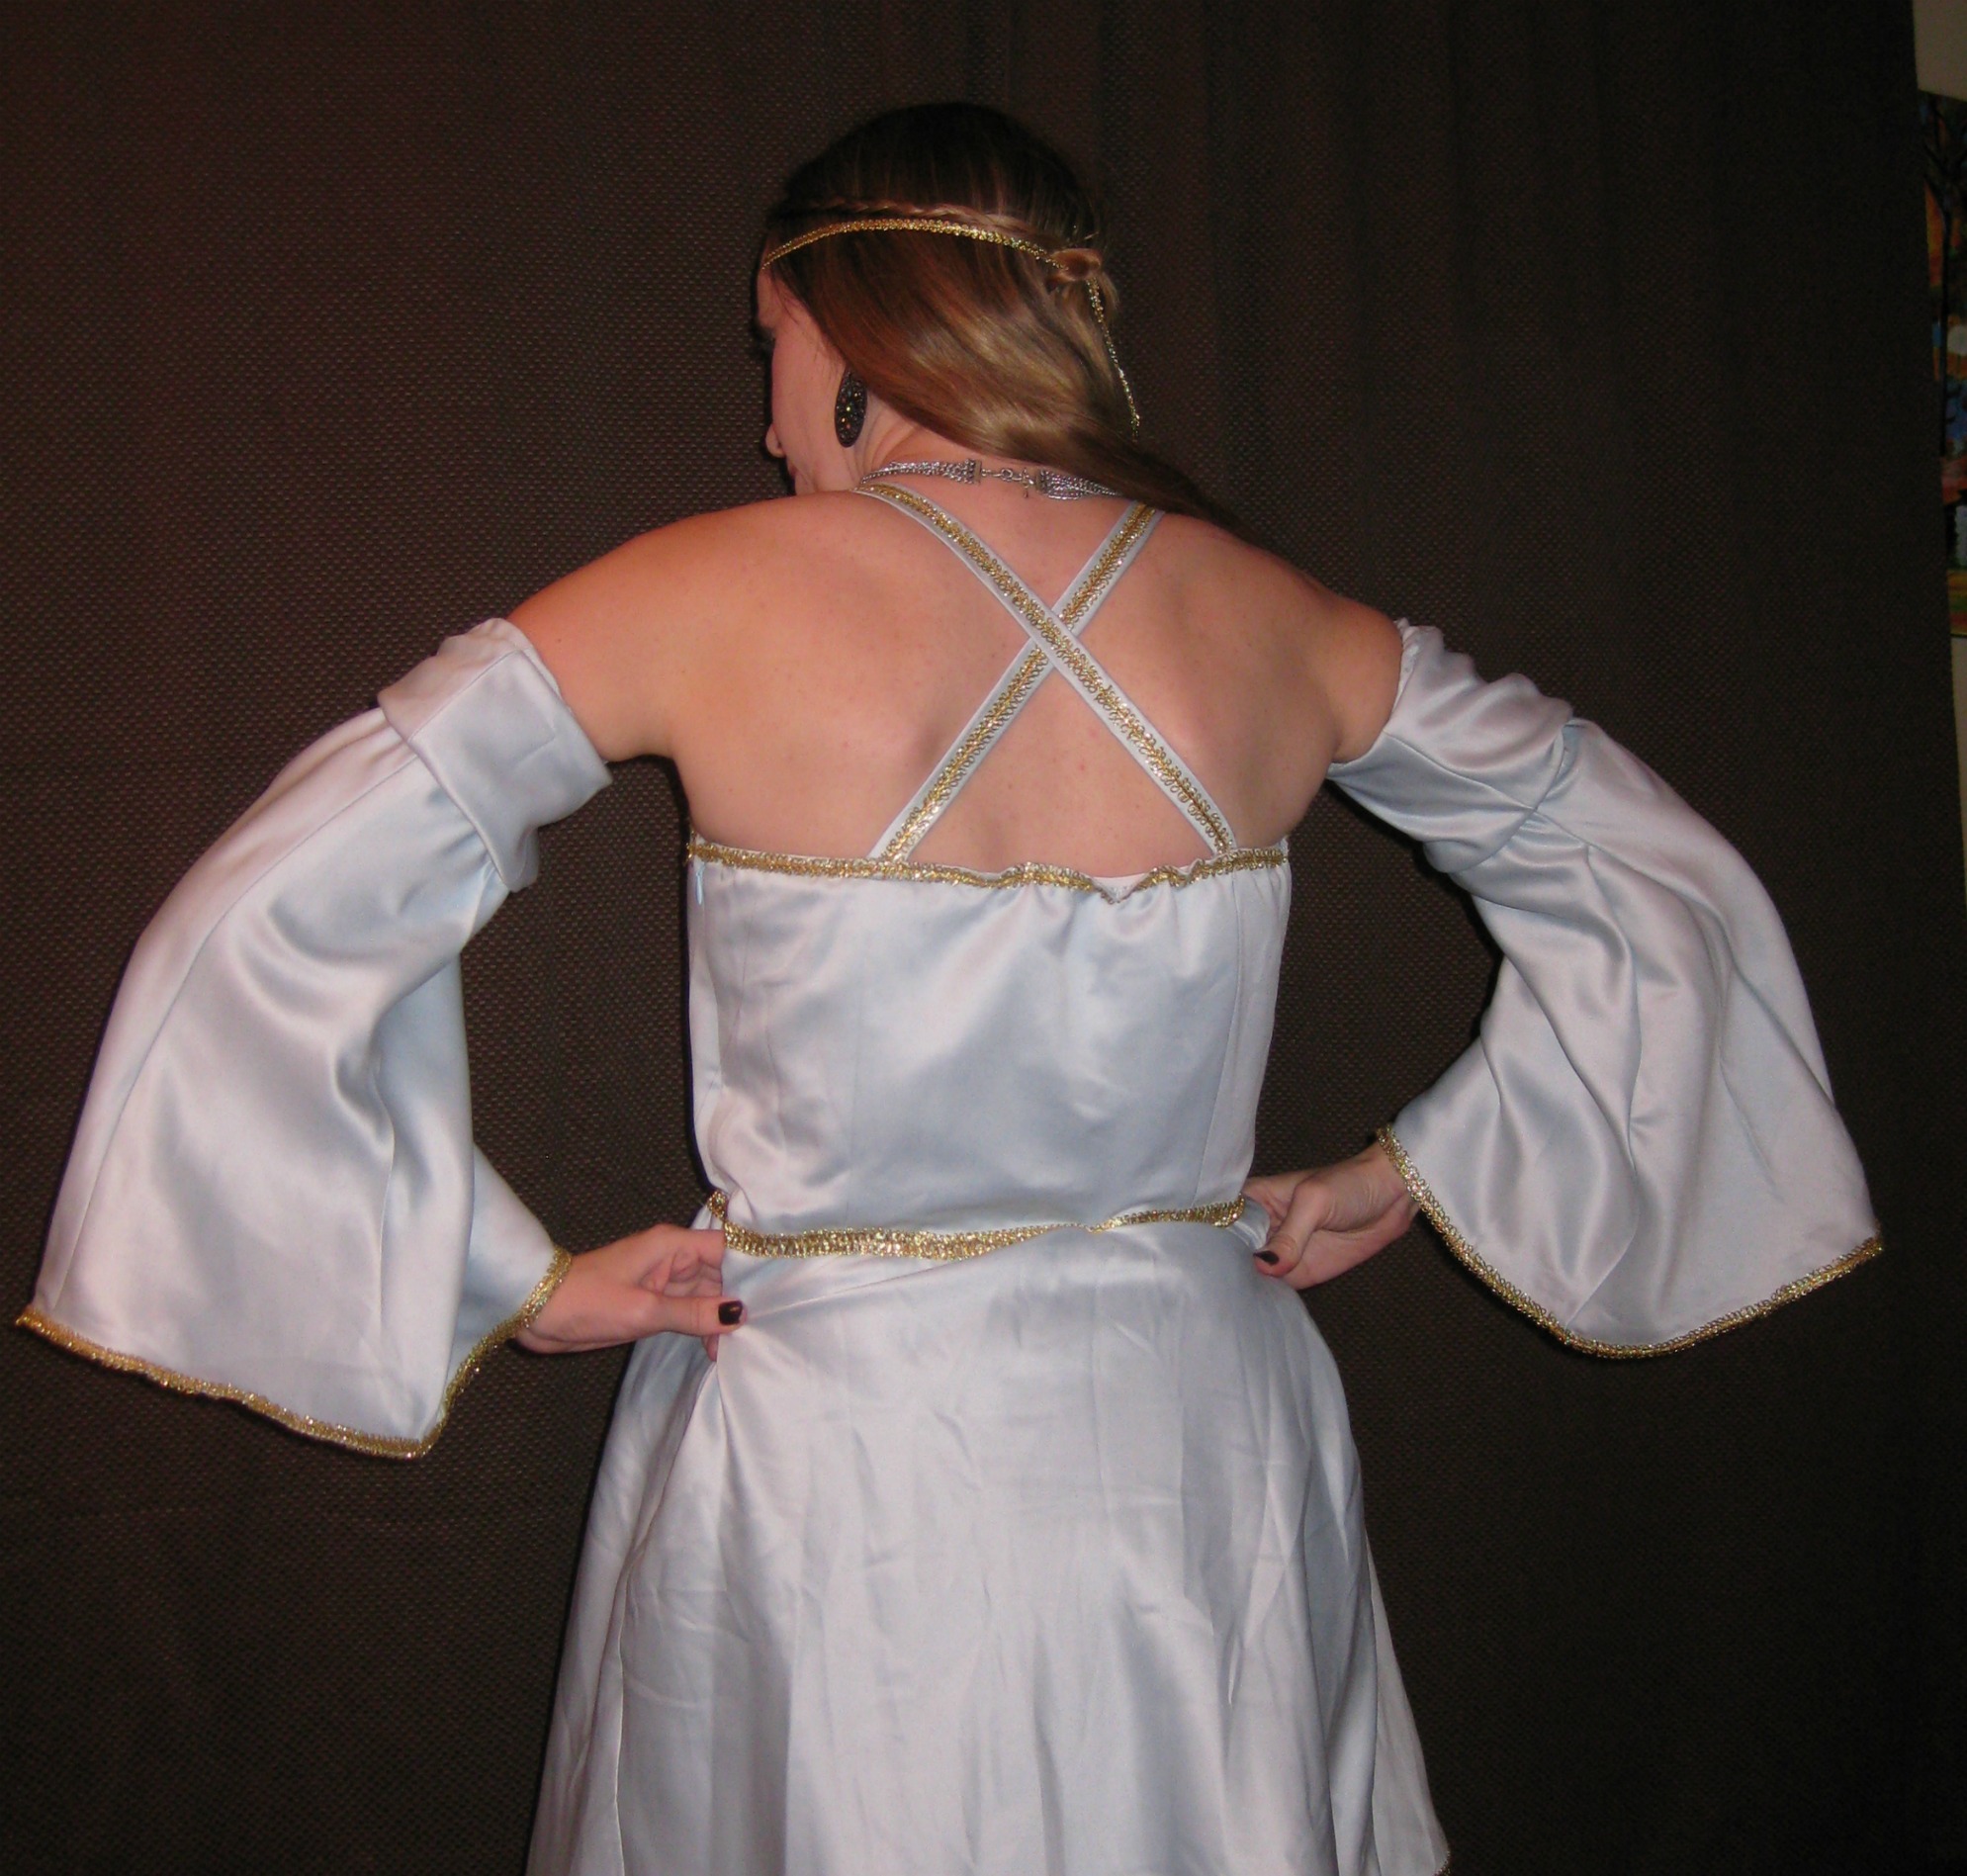
“Out of all the challenges for Refashion Runway- Halloween was the challenge I wasmost excited about. I had found this long baby blue satin formal gown on sale for$0.99 and it still had the tags on it! I quickly snatched it up. I knew that Iwanted to turn it into a Halloween costume. It sat in my closet for several monthsand last Halloween we actually moved so I never refashioned this dress. I knew Iwanted to try and turn it into either a Renaissance faire themed dress or MarieAntoinette. I could not make up my mind.
I still brought it with me when I moved but it languished in my closet. This challenge kicked myself in the rear to finally refashion it for Halloween!! But I actually did not have a vision of what I actually wanted to do. I just wanted to make it shorter. So now I had to come up with an idea. I decided I wanted some lace to go with it so I had to find cream or off-white lace. The only thing I found was this really nice top from Talbots which was just exquisitely sewn. I could not find anything else to thrift, which just surprised me because I found some white but no off white or cream.
First I cut the bottom of the dress off. The lining of the dress actually had a tulle netting attached which I am going to use for an underskirt. The lace shirt buttons down through the back, so I only had a limited amount of lace. It was also princess seamed on top of that. I attached the lace with the cream lining to the front of the dress between the 2 princess seams. I then added gold trim which I had thrifted in the past when I was a bellydancer from a bad, old costume. But it was in fabulous shape.
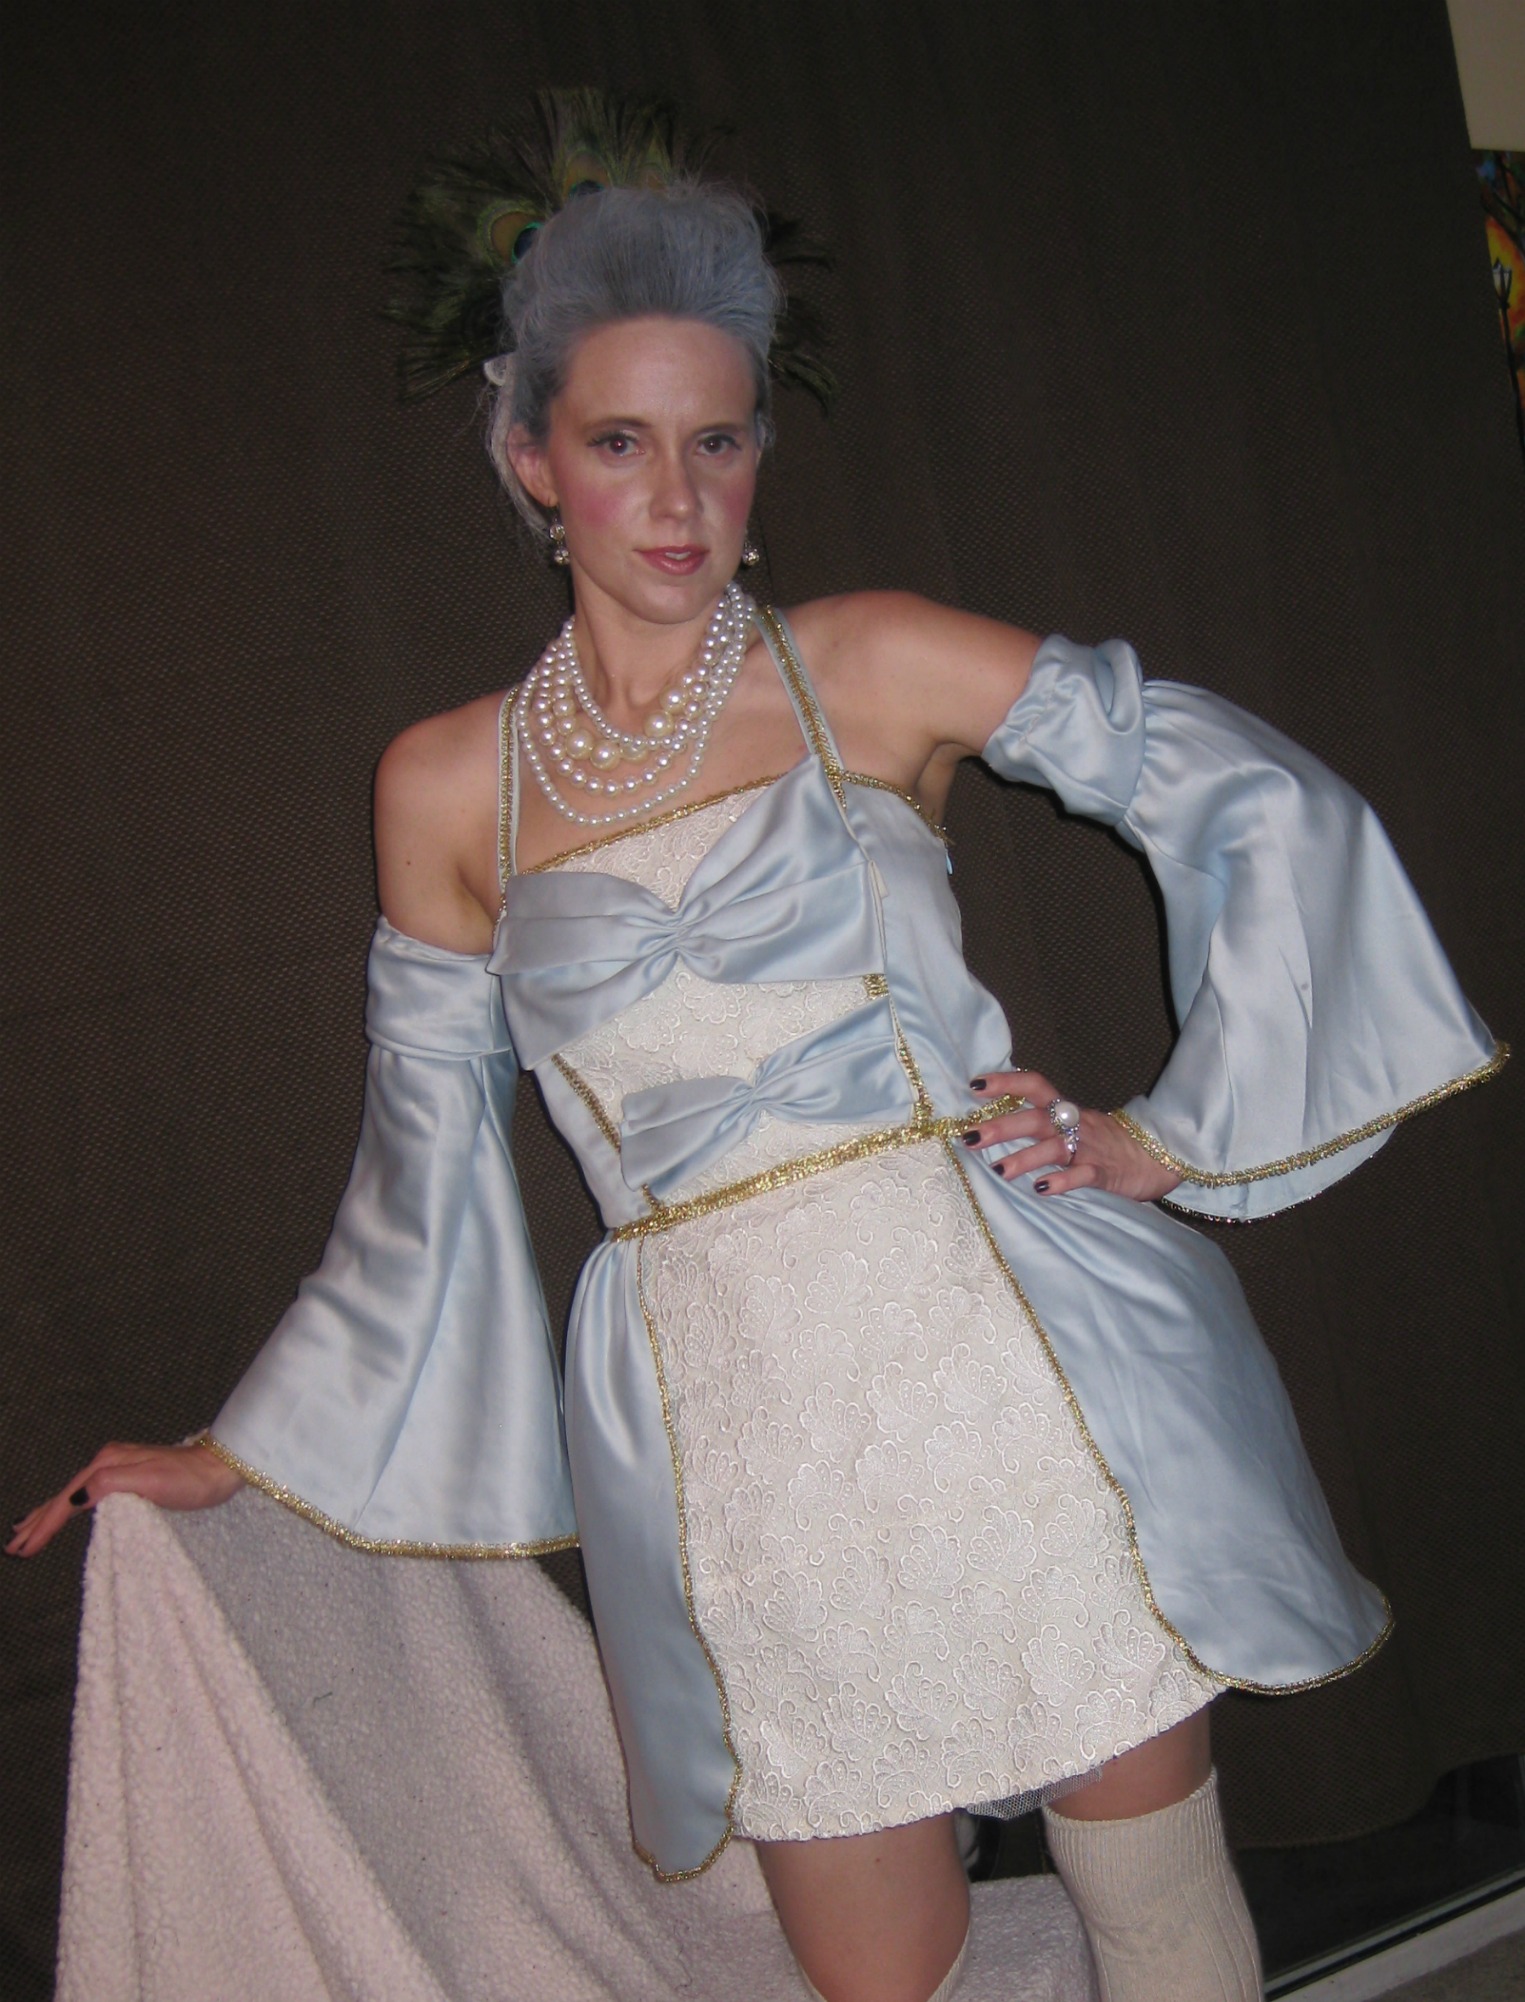
I detached the skirt from the bodice but only halfway, leaving the back alone. I then cut the skirt down the middle, splitting it in half. I gathered each side and reattached the skirt to the bodice. I curved the sides and then hemmed everything by hand since the fabric was super delicate. I then attached the gold trim to the edges to give it a nice finish. I wanted to have a portion of the skirt visually match and flow with the lace portion of the bodice. Try as I might, there was not enough lace from the rest of the bodice of the top. So I used the arms and connected the lace together. That gave me enough fabric, just barely.
I attached the tulle net lining with elastic to the inside of the dress. I also decided I wanted to make poofy arm sleeves that were separate from the dress. I used the bottom portion of the satin dress to cut and generate sleeves. I used elastic to gather and poof up before the elbow then had the remainder of the sleeves bell out. To have the costume fit me in the future or have it fit other friends I did not take the bodice in anymore. Instead to adjust to various sizes, I used elastic along the upper bodice portion to expand and contract- thus fit many people! I also made straps and created a halter. And to finish everything off I added the gold trim to the top of the dress, the waist, and the bottom of the sleeves.
Now the best part of this costume was I realized I could actually go in different directions with it. So if I left it as is- this dress had a bit of a Medieval feeling to it. I feel like a Renaissance Lady!!
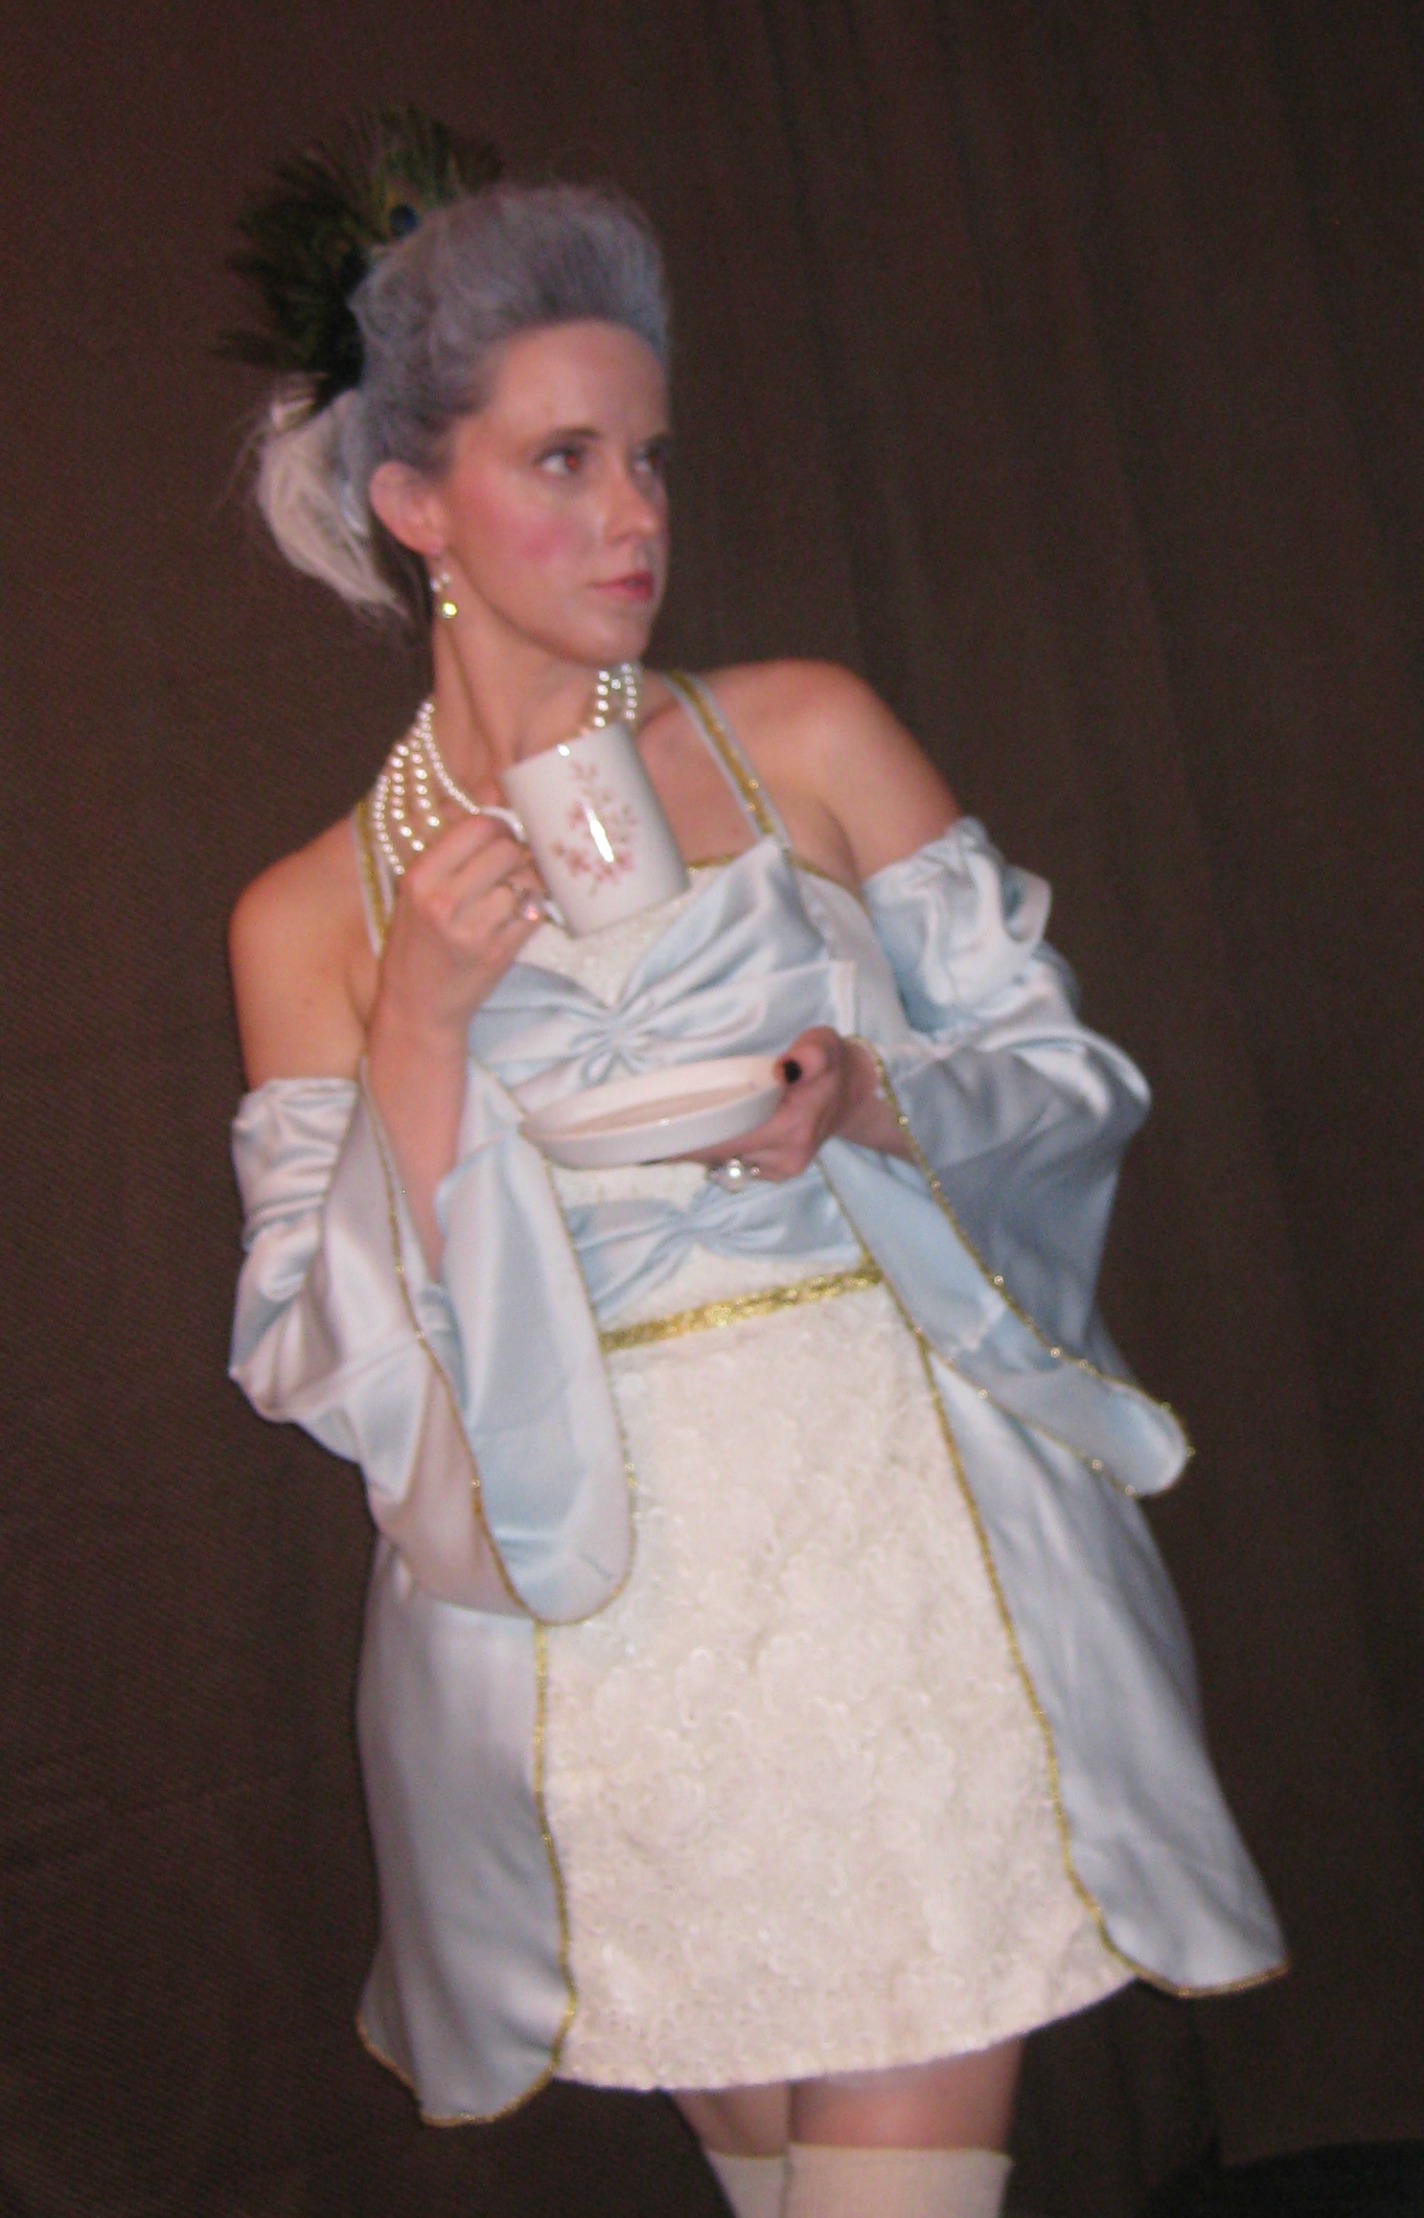
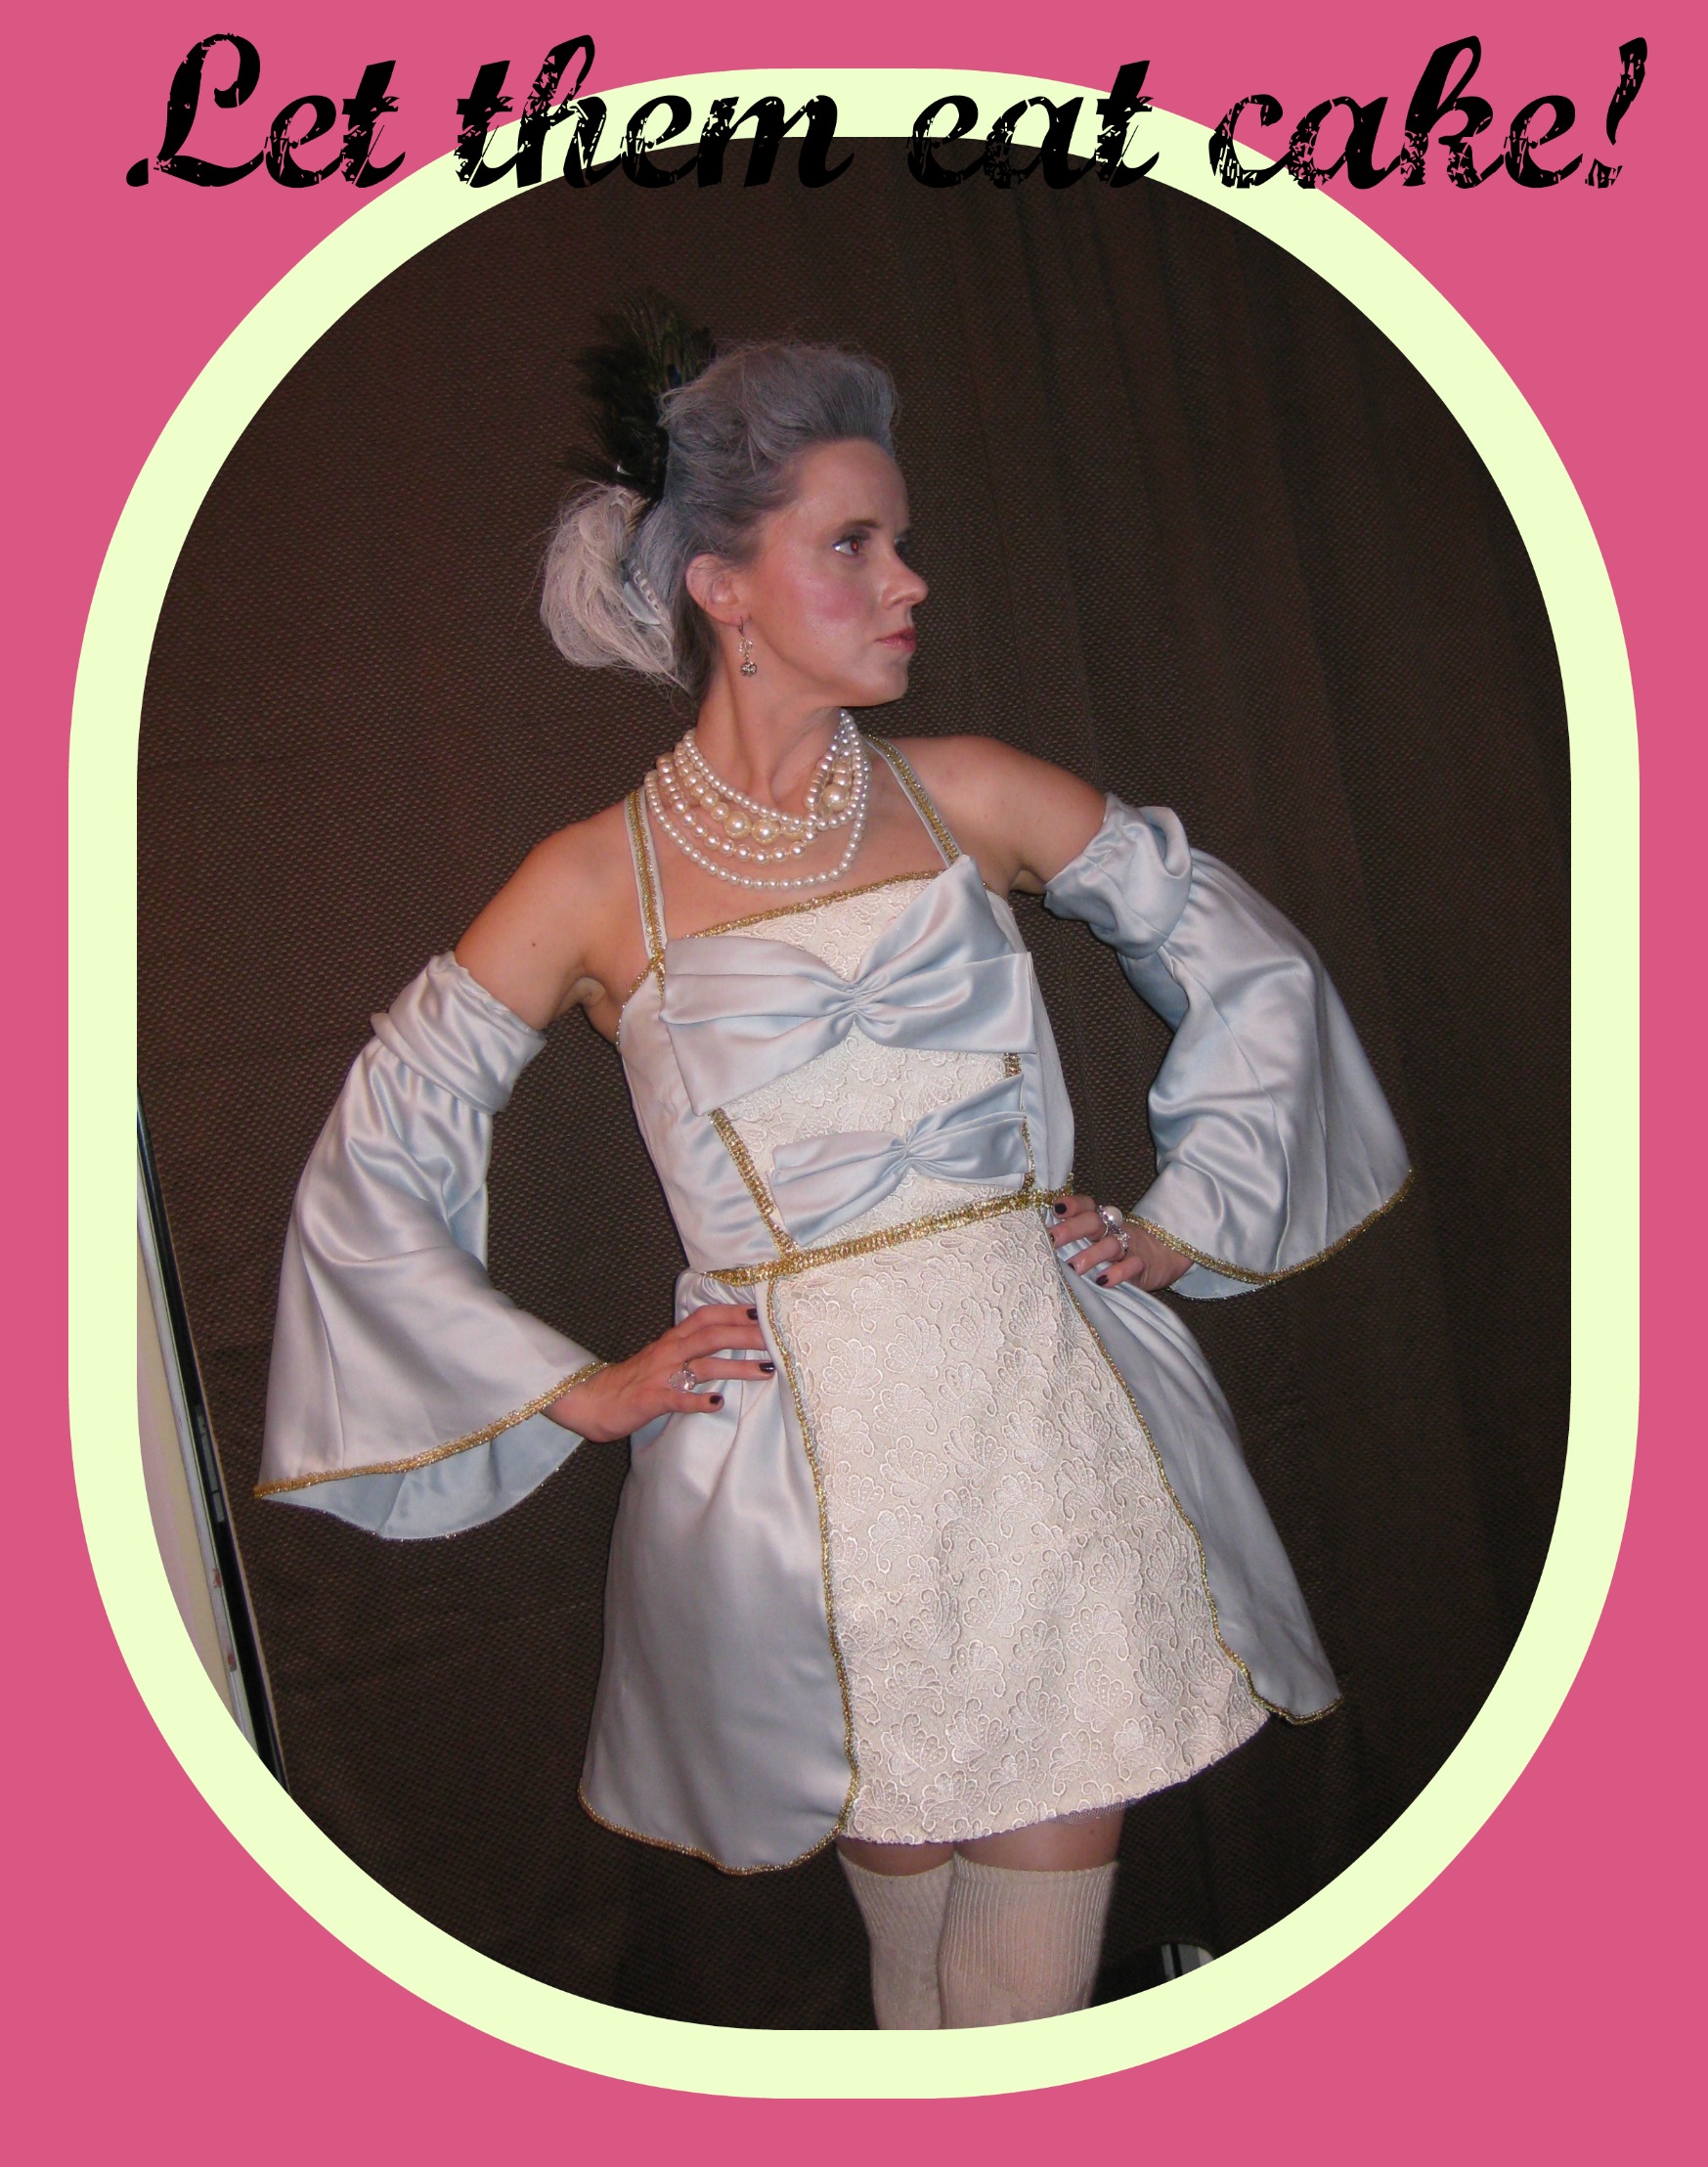
But with the leftover blue satin (which is not much) I made 2 bows. And with some quick hand tacks of the bows to the bodice, adding another petticoat underneath the dress, and some different styling- white hairspray, peacock feathers, and pearls. I totally felt French and like Marie Antoinette. Let them eat cake!!!
This costume cost me under $10 which is the best part and now I have 2 different Halloween costumes. Even though it was a lot of work with all the hand sewing, I really love my costume with options!”-Lauren
*****
Thanks for all of your hard work and beautiful creations this season, Lauren! I hope you had fun!
Here I am again, asking for your help. The Renegade Seamstress has been nominated for the “Best Tutorials in Sewing” award over at Craftsy. My lil’ ol’ blog is up against some pretty big blogs so the competition is fierce. The voting is open until October 29th and I really need your vote. If you haven’t had a chance to vote yet, here is the link:
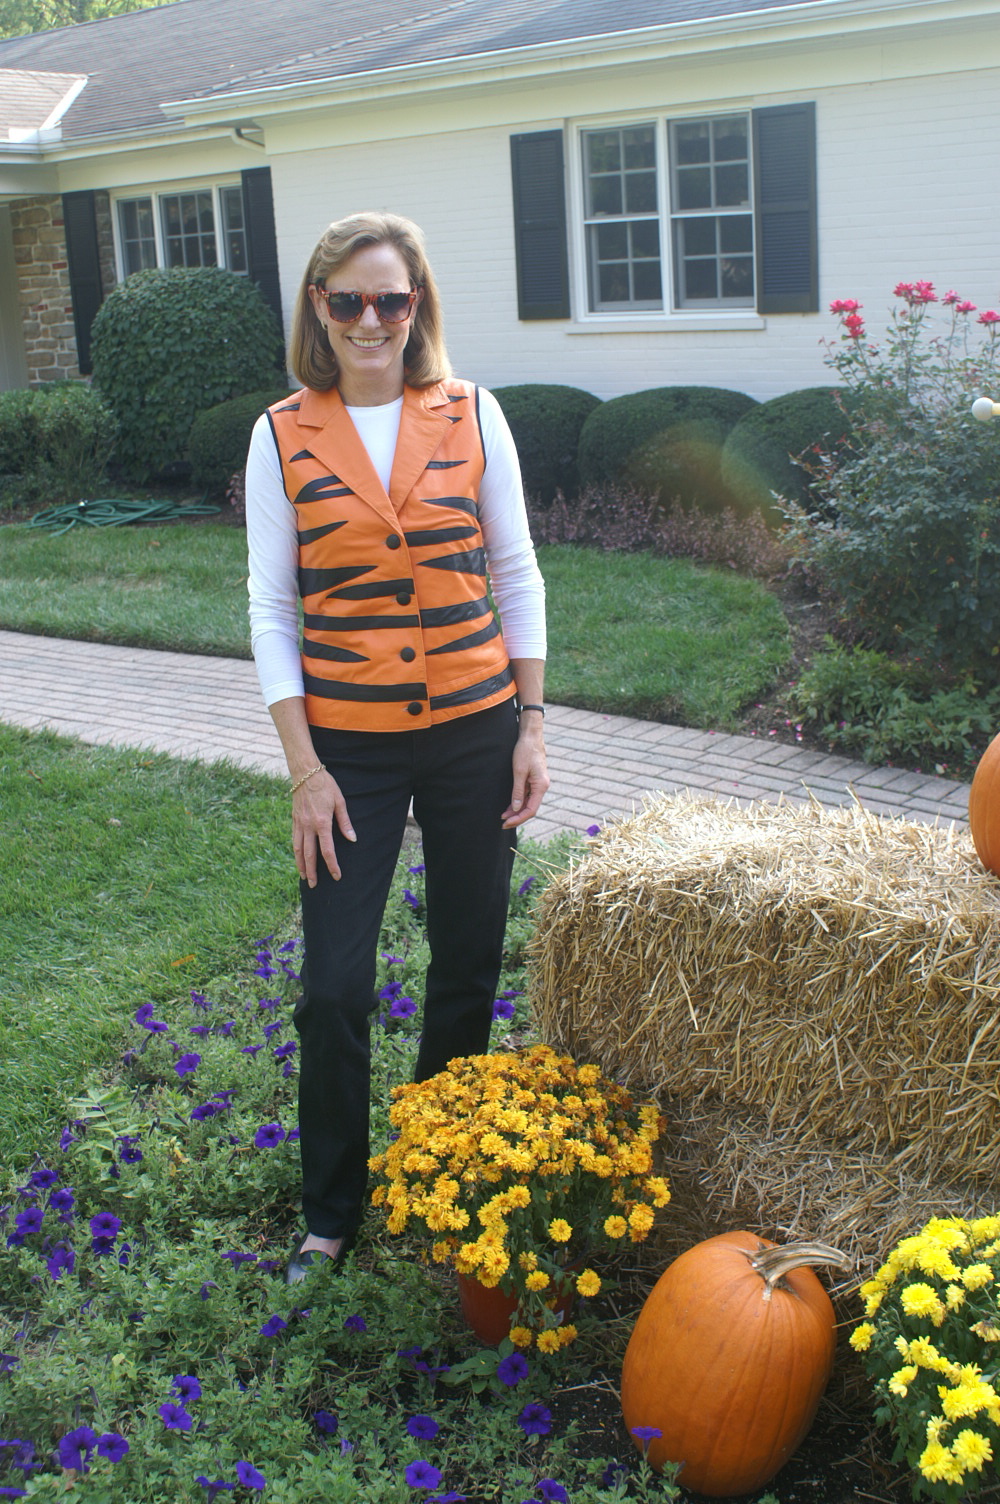
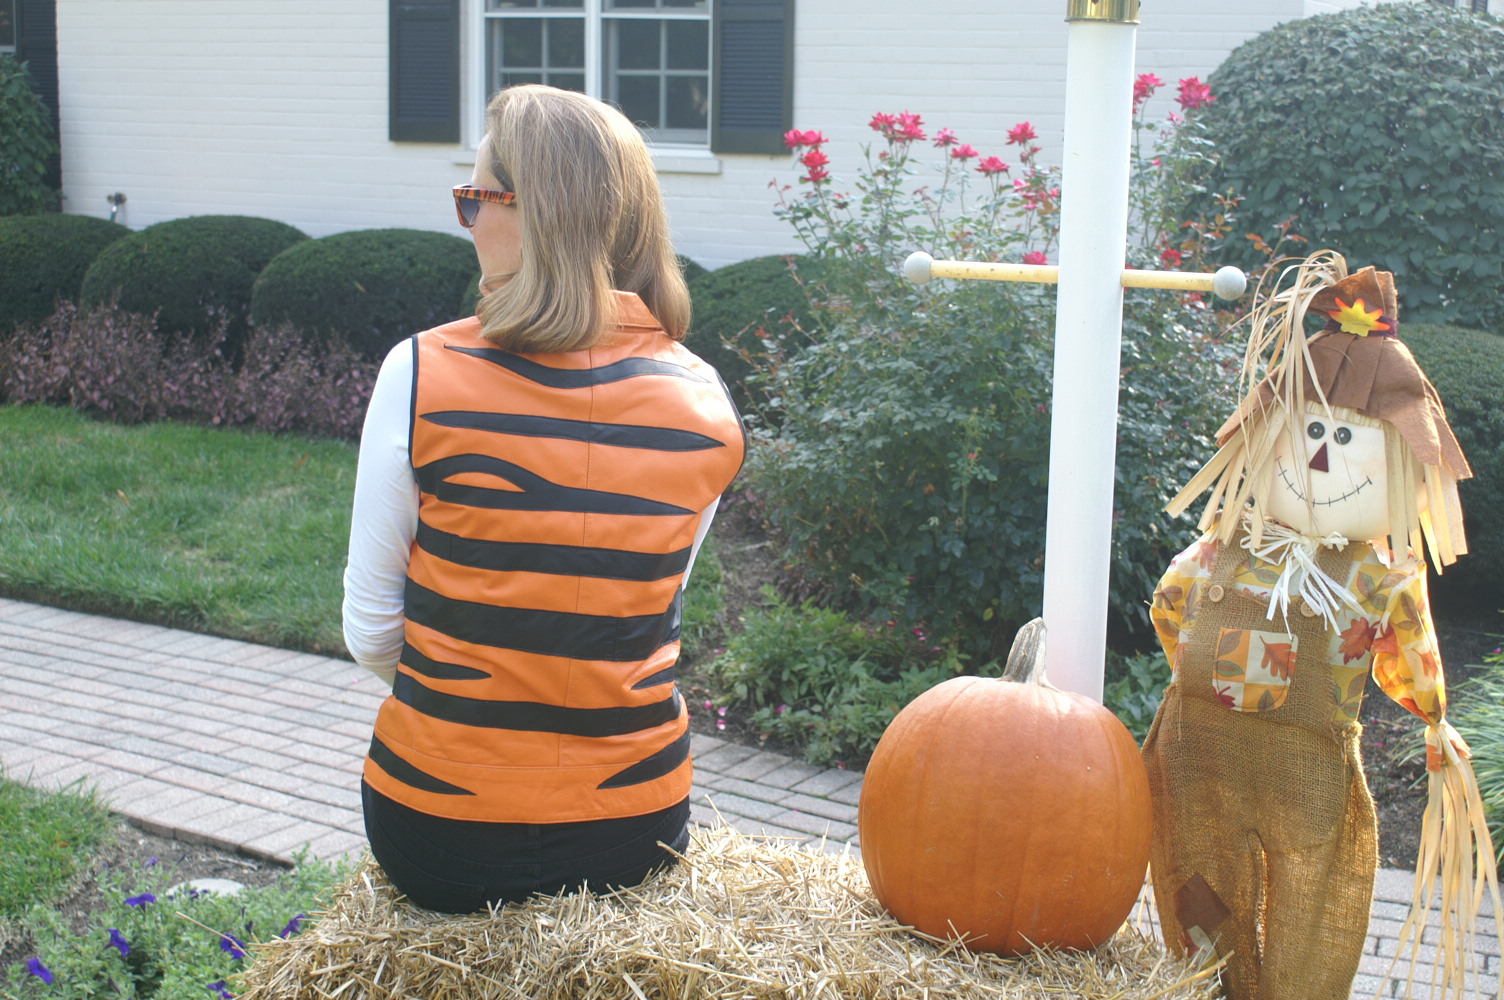
Molly sewed along with us again to make a leather vest in support of her local football team.
Here is what she had to say:
“The biggest challenge yet … sewing on leather!!! Needed to learn some
new tricks, and take some risks, but got through it to complete exactly
what I wanted.
Attached are my photos for the vest that I made in support of a local football team.
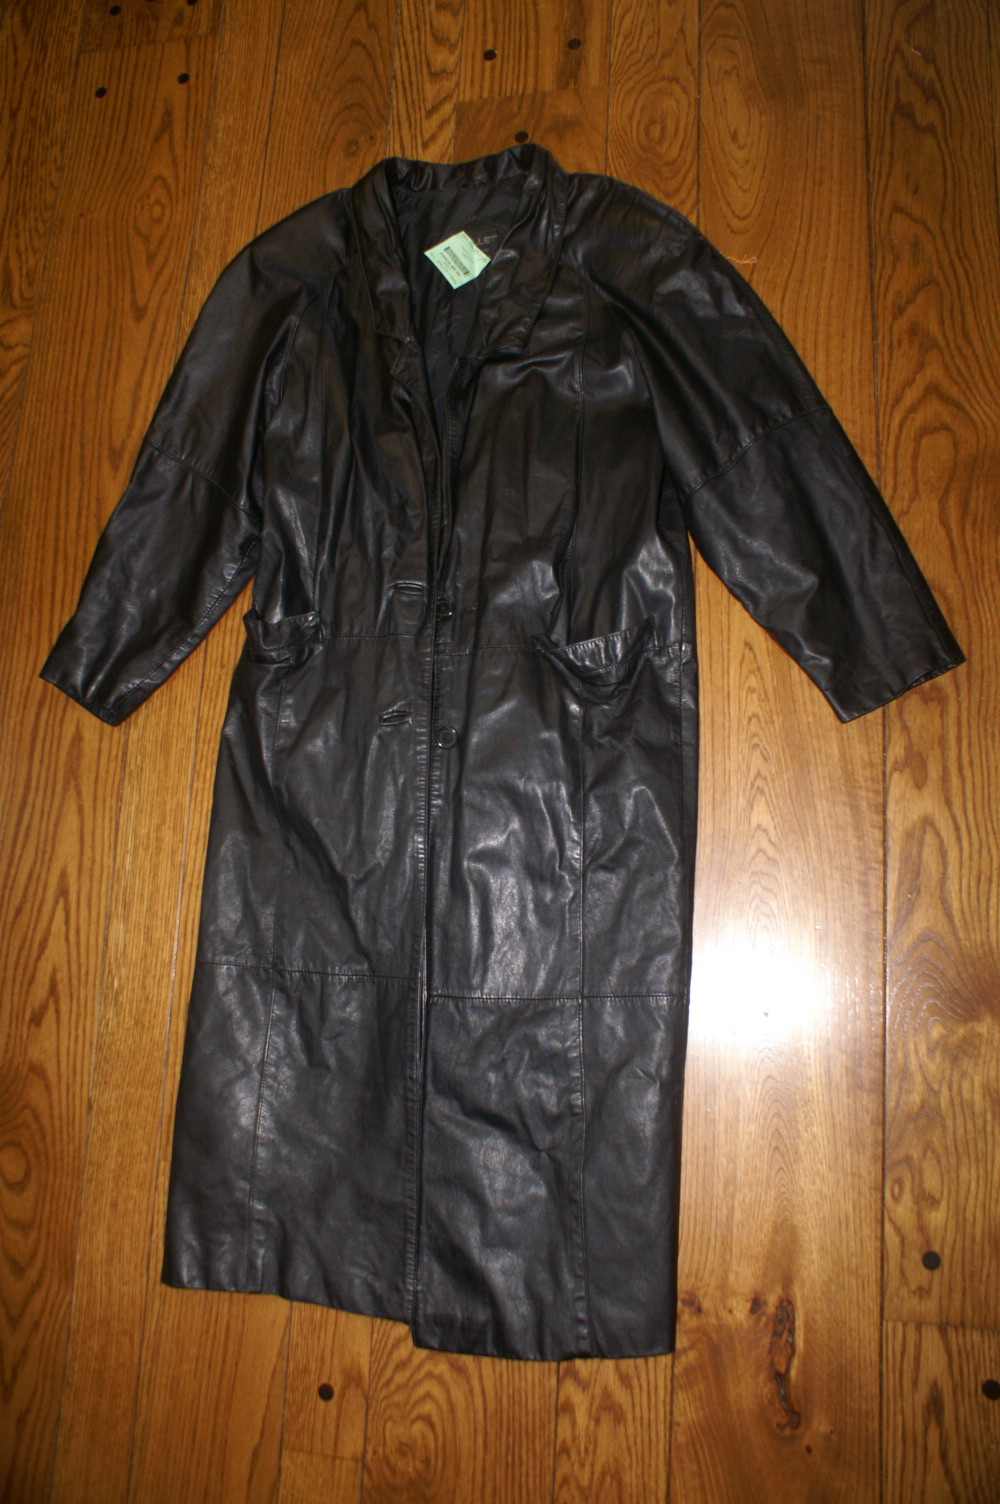
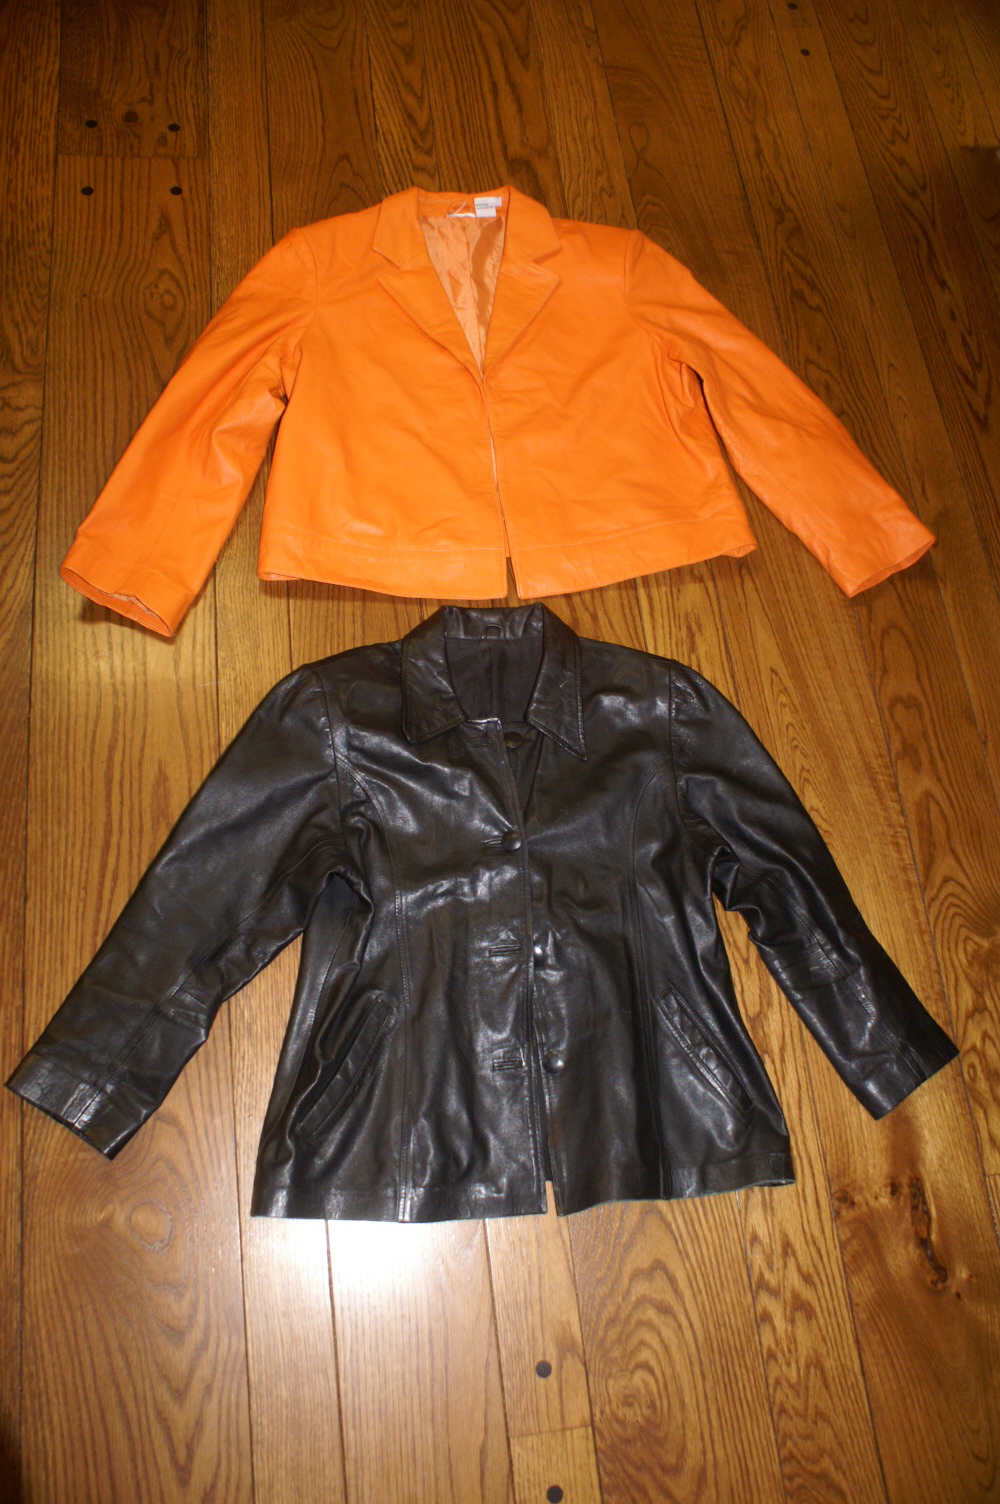
I couldn’t resist the huge orange leather coat that I came across in a size 18.
Removed the sleeves, and took the sides in to fit. Then, used that stretchy new
seam binding, and bound the armholes in black.
Had already purchased the short
black leather coat to create stripes, but needed a longer coat to make longer
stripes that could go around the entire vest, so I bought the long black coat as
well.
Made stripes out of black posterboard and taped them on for design, then used
those pieces of posterboard as my pattern pieces to cut the leather. Needed to
cover leather with wax paper to sew on the stripes, but that tore away easily.
Finally, was able to make bound buttonholes (surprisingly), with tear-away
stabilizer on top, to help the buttonhole foot travel. Sewed on the buttons from
one of the coats to complete the project.
Ready to root the football team on to victory … forever!!!” -Molly
Way to go, Molly!
*****
Eira, from Hoffi Coffi was a sport to sew along with us again this week, too.
*****
Deanna, from Wedding Dress Blue, created a unique scalloped leather skirt for her daughter this week.
(thank you so much for allowing a little “shameless self promotion” again 🙂 )
I’ve been nominated for “The Best Tutorials in Sewing” over at Craftsy, and if you haven’t had a chance to vote for The Renegade Seamstress, you can go here.
Be sure to scroll down and push the submit button after you click on vote.
I’m pretty excited and I’ve got some stiff competition, so I need all the votes I can get!!!
(While you’re over there voting, check out the Best Photography in Sewing and vote for my blogging friend, Sarah, from Good-bye Valentino.)
Thanks so much!!!!
Also, you have until Friday at midnight to cast your vote for your favorite leather refashion. The winner will be announced on Saturday.
There are four blogs competing for this honor. I would be ever so grateful if you found some time in your busy day to head over there and vote for The Renegade Seamstress.
If you are new to The Renegade Seamstress, you can see my tutorials here:
(When you vote, you will be entered to win a free Craftsy Class.)
The winners will be announced October 29.
Thank you for letting me do some, as my friend Linda calls it, shameless self promotion this morning. To me, it would be like winning an Oscar, an Emmy, or a Grammie. I am SUPER excited about this and I’d love to win!!!
I really do have the best subscribers on the planet!
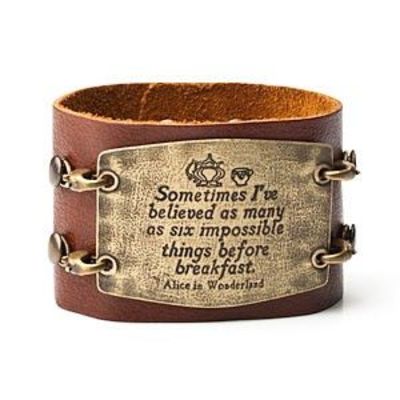
I love this leather cuff from Think Geek. (Hint, hint)
Not only is it leather, but it is precisely WHY I get up at 4:45 each morning.
***
This week, the five remaining competitors took those words to heart and believed in what some would have thought impossible- giving some pretty bad leather pieces a new life.
I think you’ll enjoy today’s show.
*****
Lauren from The Adventures of Lauren, actually found a clue to her old leather garment’s past life in the pocket. FUN!
“I was totally scared for this leather challenge. I have zero experience sewing
leather. I think it is above my sewing level and skills. The other challenge was
finding something leather (or faux leather) that was not too expensive. There was
surprisingly limited availability of leather here! And I am not paying $40 for it!
Eek!
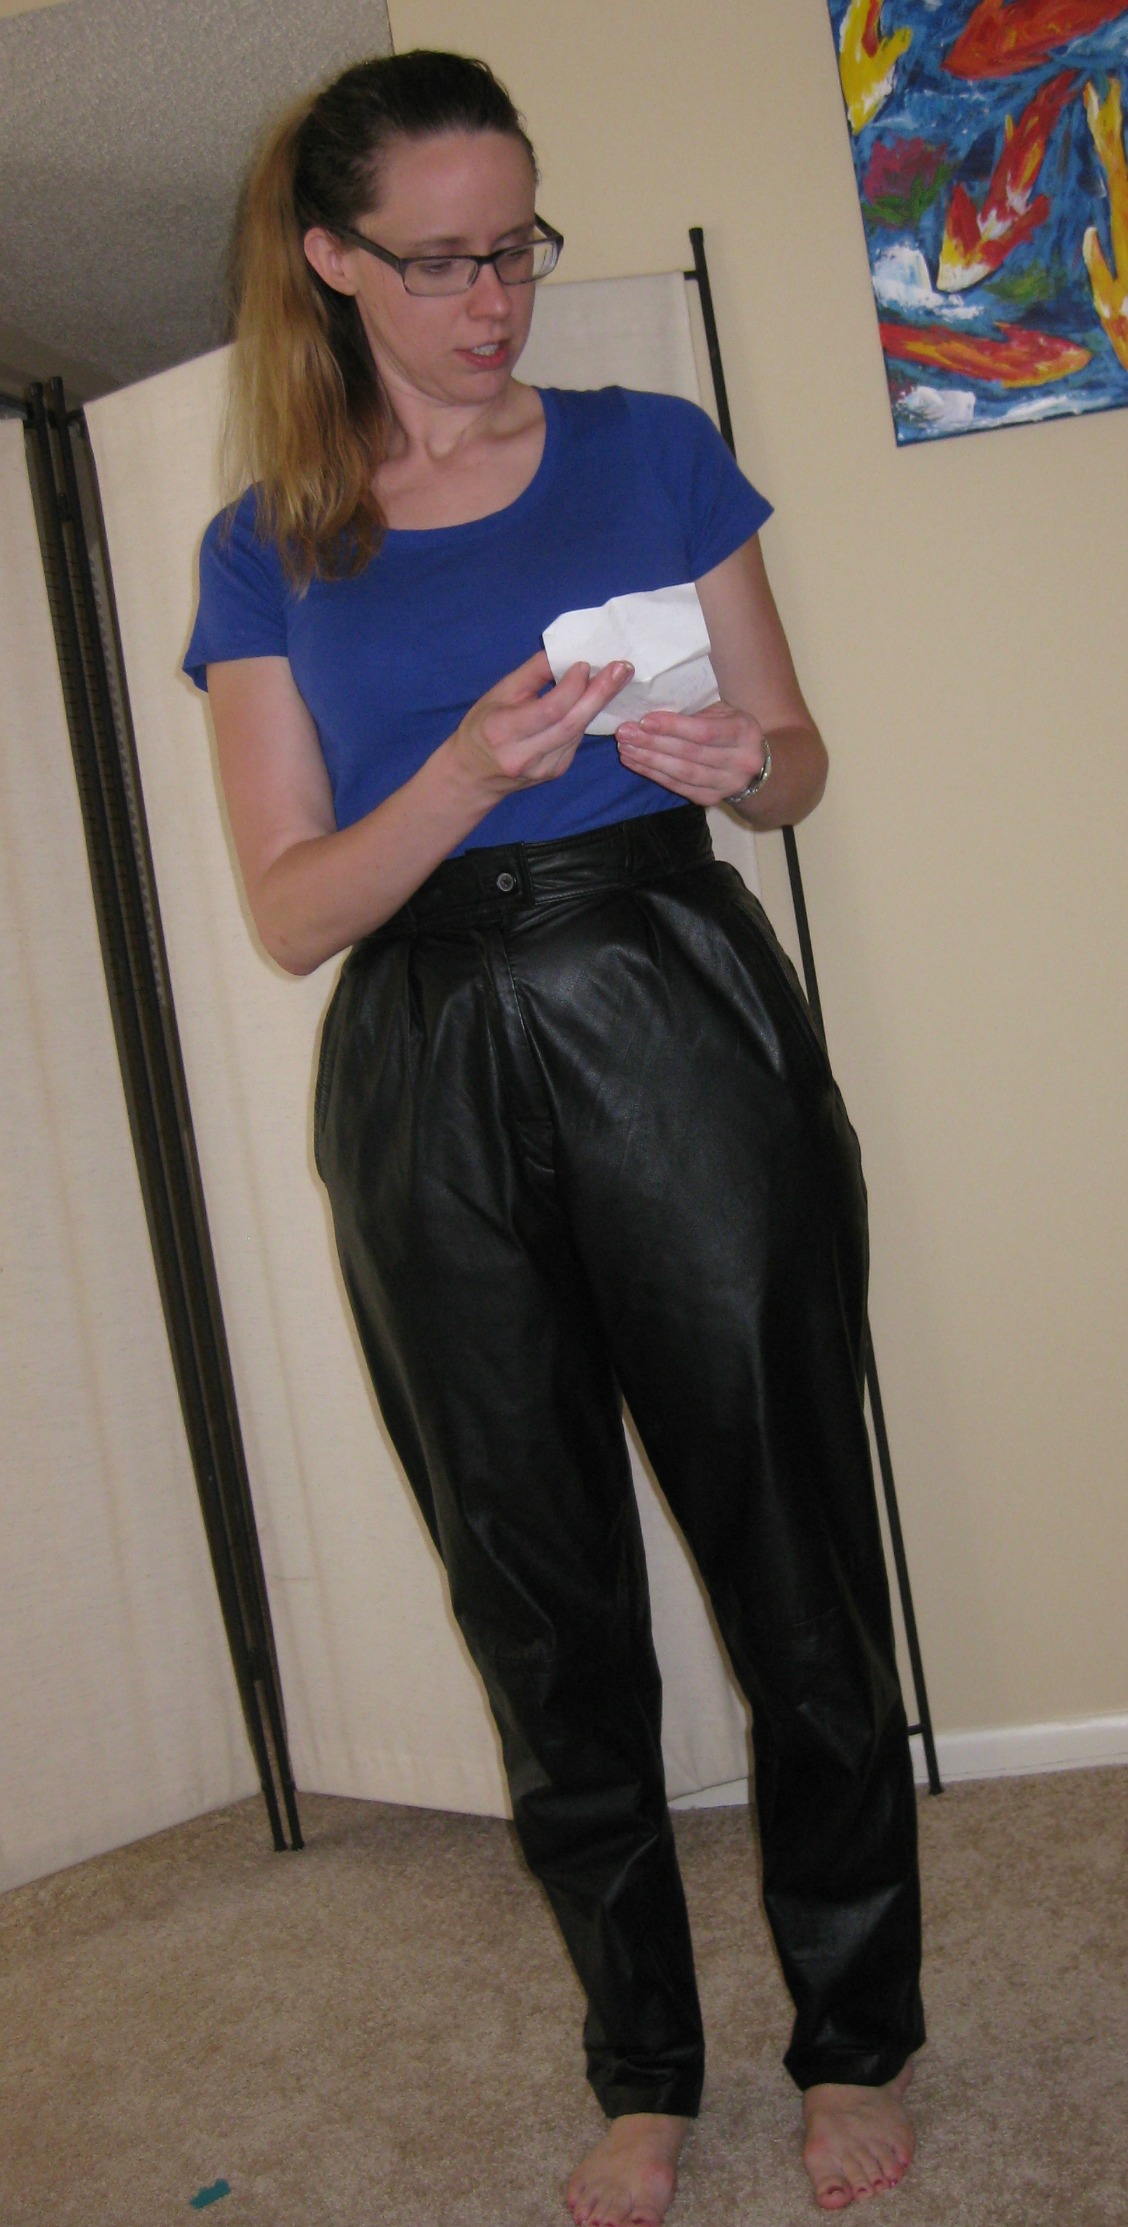
On my last stop and last ditch effort, I stumbled upon these leather, real leather,
pants that cost $10. Bingo. And wow they needed a lot of work.
The best part of
these pants was when I put my hand into the pockets, there was a piece of paper….
it was a log of expenses from New Years Eve 2001. Dinner, drinks, parking,
breakfast, and a car tow…. Must have been a great New Years!
So these pants may not have been worn since January 1, 2001. Which is scary. Not to
mention they looked like MC Hammer pants. High waisted, poofy in the belly. They
almost looked like a bad diaper. Pretty ugly. After thinking about it I decided to
turn them into shorts since I would wear them more as shorts then as a skirt. I
would not wear leather pants and I thought slimming them would not work out.
I first pulled off the waistband and the bottom part of the legs. I shortened the
height of the shorts and tried to keep the pockets as best as I could. I left the
back higher than the front so I could sit in them and not flash anything. I also
shortened the length of the shorts. I took in the sides of the shorts right behind
the pockets. Then using the leftover material from the legs, I made a waistband for
the shorts. The waistband was the hardest since the leather was several layers
thick. I actually had to hand turn the sewing wheel to get it to go through without
breaking a needle. I finished with a hook and eye to close the band. Then hemmed the
shorts and they were done. I decided to make a necklace from something I saw on
Pinterest. I made a feather necklace out of a scrap of leather.
Done! I could cry they worked out and my machine didn’t eat them. The tape on the
machine foot helped a lot. Had I not been knocking on pneumonia’s door and the
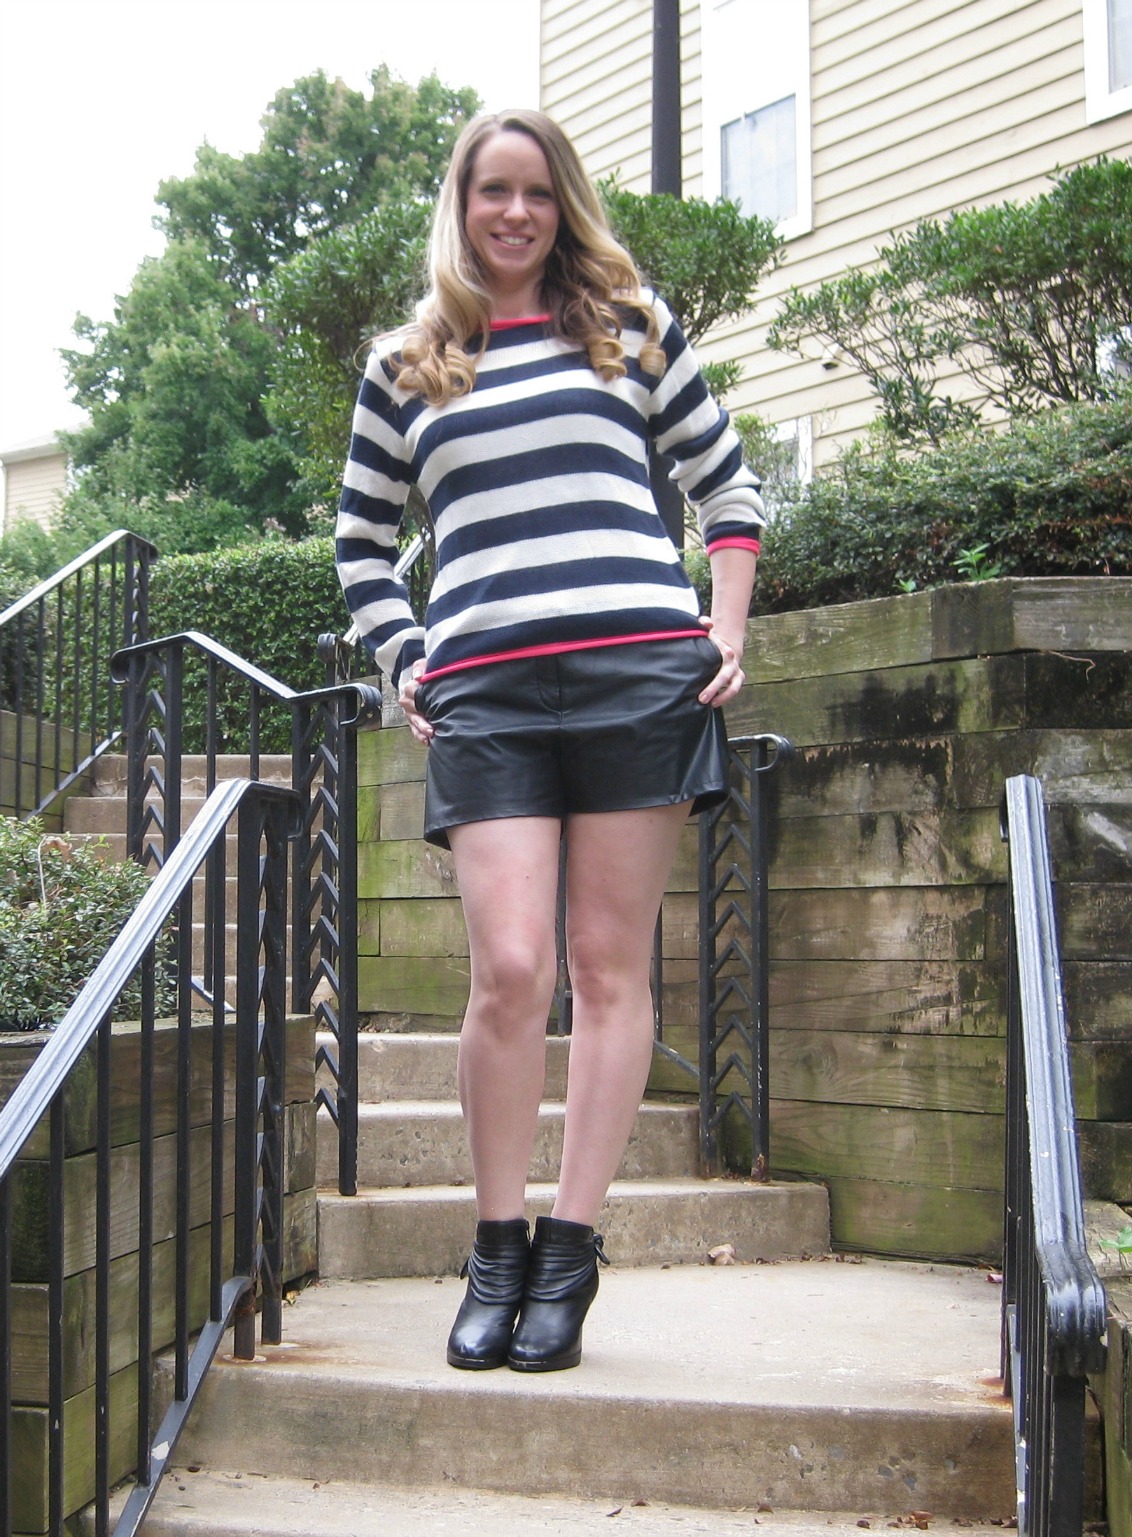
weather was better I would have tried to reenact New Years Eve 2001.”-Lauren
*****
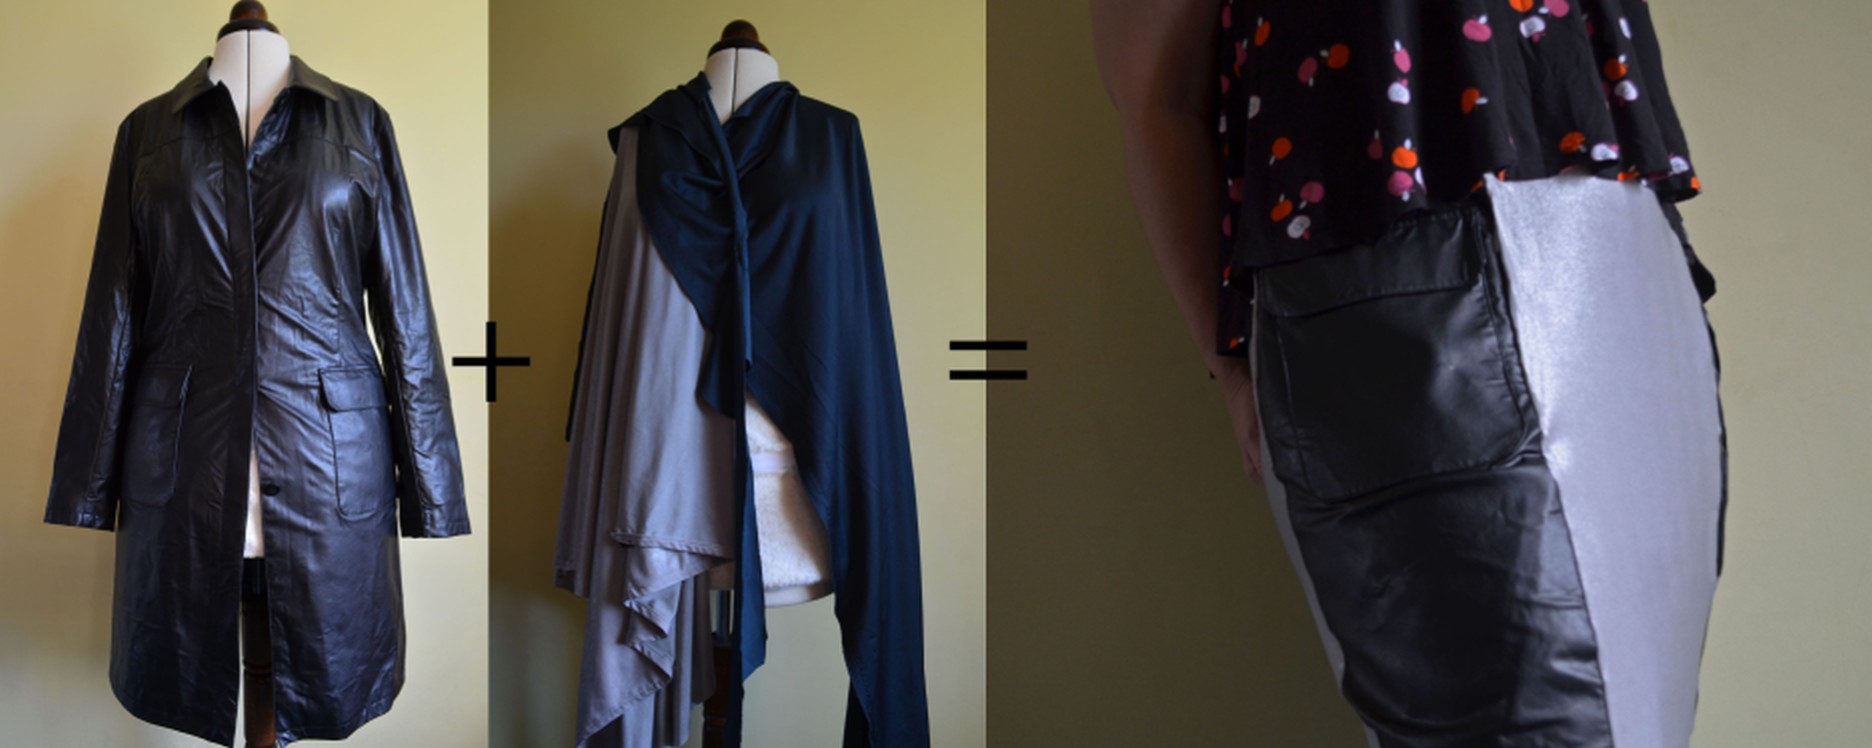
Let’s see what Desarae from Gladness of Heart has rescued this week:
“I have come to the conclusion that cows are stubborn, no matter what form they come
in. And try as you might, you can’t always get them to do what you want. At least,
that was my experience with this week’s leather challenge.
But, just like working with cows, you’ve gotta lay down who the boss is and not let
’em whoop ya! And that is just how I decided to approach this knee-knocking
challenge!
To start things off, I found a hideous fake fur and leather coat at Goodwill. I say
hideous because fake fur gives me the heeby-jeebies, especially the stained and
discolored variety this coat was sporting.
So I did the only humane thing that could be done…I put the furry fiend out of its
misery. With seam ripper in hand, I completely took apart this coat, discarding the
fake fur, setting aside the lining, and salvaging all of the pure leather jacket and
pieces.
Having never sewn leather before, this was a huge learning curve for me! I didn’t
want to get too ambitious, so I decided to make a vest. After taking the arms off
the leather jacket, I made some fitting adjustments by taking up the shoulders,
re-cutting and taking in the bulk at the back collar, and tapering in the sides a
little more under the arms to reduce gaping. Next I removed the pockets and sewed up
the holes. After that was done, I hemmed up all the edges and armholes. Taking the
leather piece that was originally the collar, I cut a matching lining piece from
some fabric and sewed it on the underside of the leather collar. This created a fun
pop of hidden color. All that was left was to attach this to the vest.
Five broken needles later, I have a fun, leather vest!”-Desarae
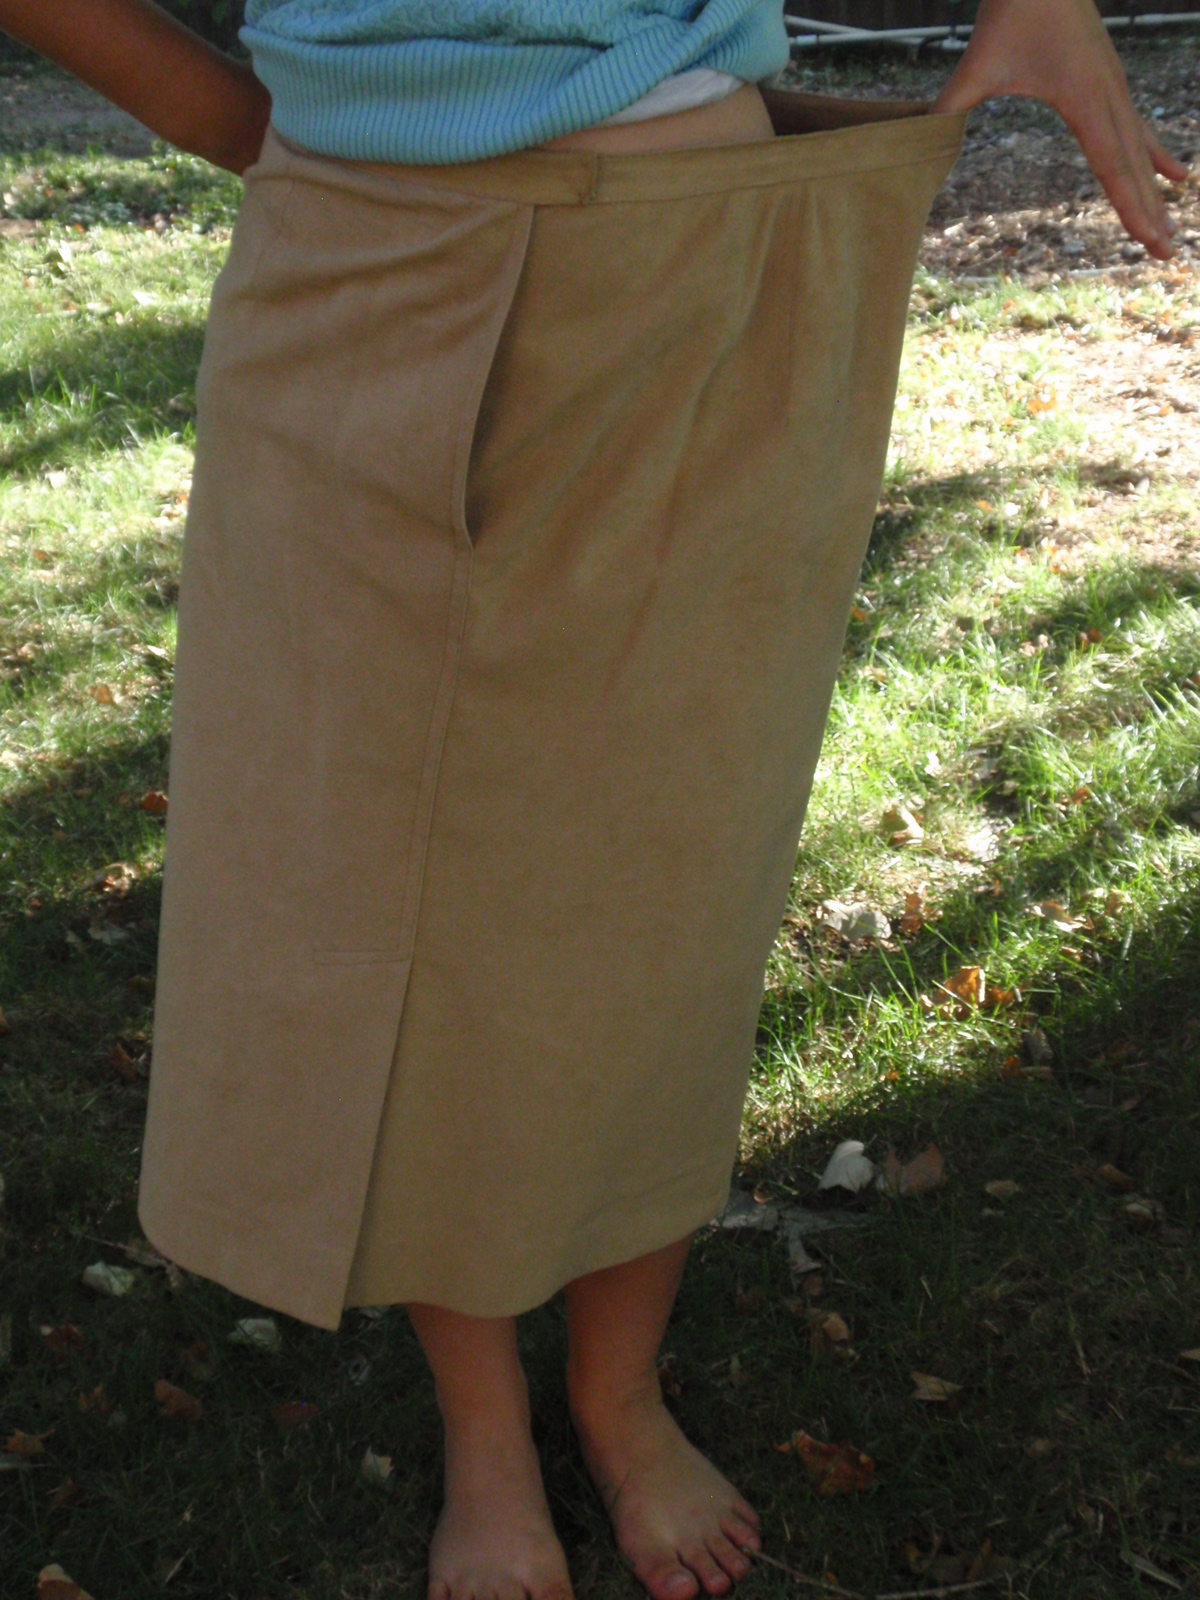
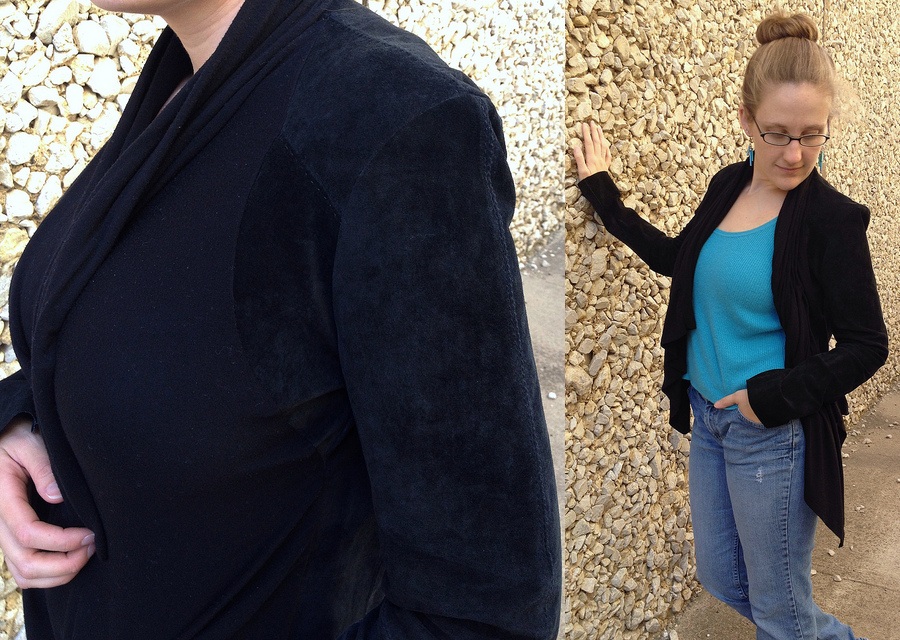
“This week’s challenge of working with leather was fun, tedious, sometimes frustrating, but overall rewarding! I started with a men’s grey suede shirt, my son’s pullover argyle sweater that was banished to the “donate” pile when he left for his two year church mission in Arizona, a thrifted piece of wool fabric with a cute tag claiming it was “Made in France,” some big vintage buttons, and a little bit of ribbing.
I loved the grey and yellow combination and was hoping I could do something with it.
I cut the sweater up the middle and around the neck. I then gave it a “high/low” chop to remove the extra length. I also cut the sleeves at 3/4 length and then reattached the original ribbed cuffs. I stitched new ribbing around the front and neck. I then overlapped the fronts just a little, stitched new ribbing around the bottom and added some buttons salvaged from the suede shirt. Now my sweater feels a bit more feminine.
I made the pleated skirt from scratch. I have to admit, it gave me a bit of a challenge. In fact, I wasn’t sure if I wanted to continue, or set it aside and figure out a whole new game plan. In the end, I stuck it out and am happy with the results.
The leather “over skirt” is removable and can be worn with other skirts for a whole different look.
I didn’t have any shoes that I thought would work with this outfit, so I figured a pair of spats were in order. Now, I have never worn spats, nor made them, but that’s all part of the challenge!
Its kind of fun turning high heels into faux ankle boots. They look pretty good with skinny jeans, too. I just may have to make more of these!
If you would like to see the whole process, you can visit my blog where I’ll post a tutorial in a couple of days when I get back in town. Thanks!”-Susan
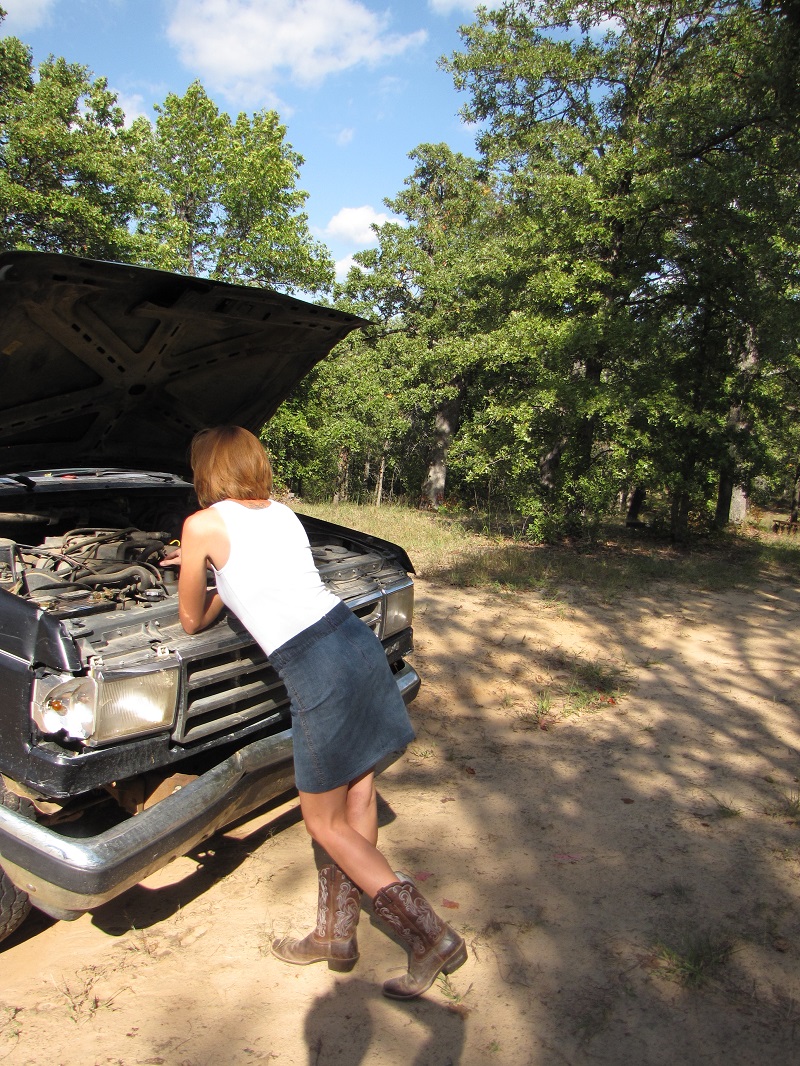
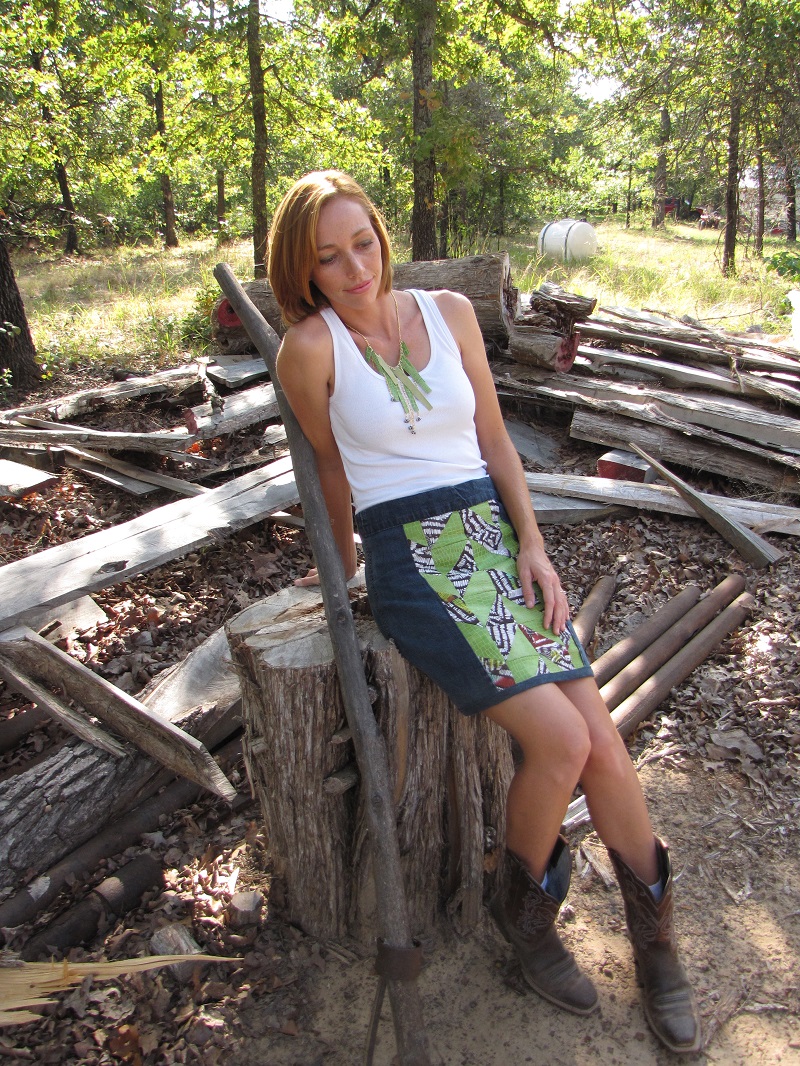
“This week I’m in my beautiful home state of Oklahoma, which works out great
for this week’s leather refashion. I had to leave my dress form at home,
but I’m lucky that my gorgeous sister, Amber, volunteered to let me make a
refashion for her. She even modeled for me.
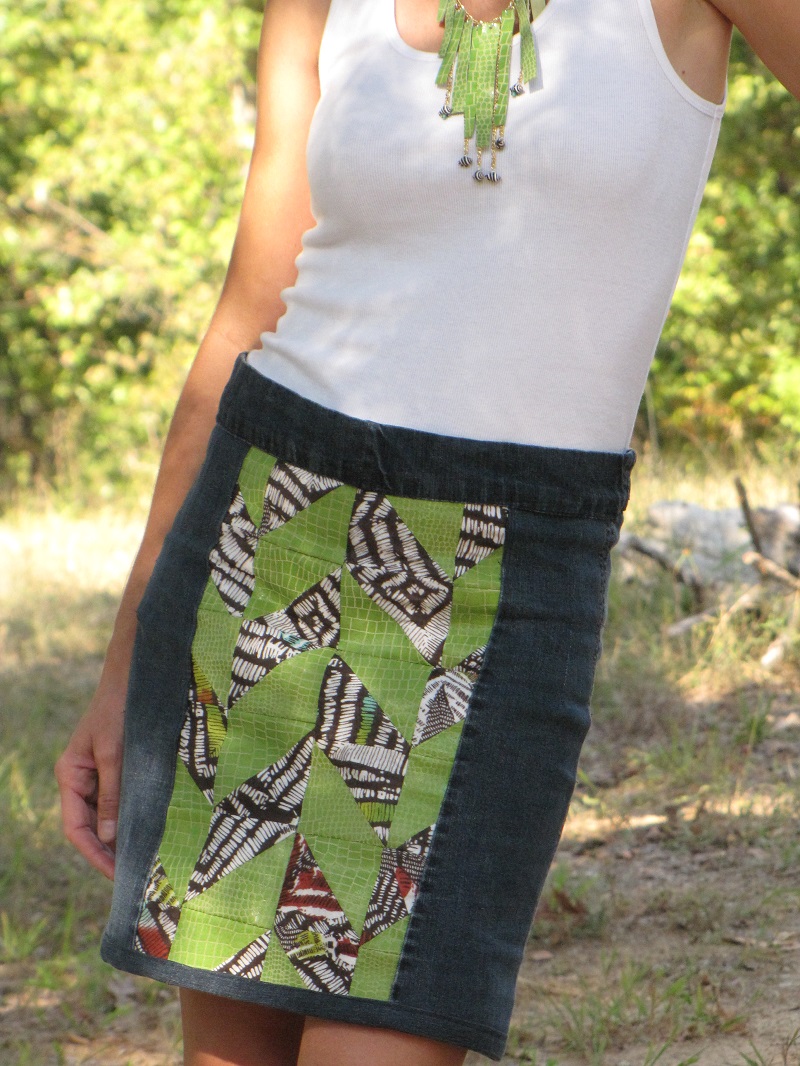
I found this neon green leather skirt at Goodwill for $10 (leather is not
cheap in Hawaii). The zipper was broken, and I began to wonder if there
was any way I could save it. Just when I was about to give up hope, I
remembered that I had tried to make a dress out of a tribal print skirt,
which didn’t quite work out, and I had a pair of jeans that were too big.
So, I got to work constructing a herring bone pattern out of the leather
and tribal print. In order for the tribal print to stand up to the
leather, I ironed on a backing.
Once the herring bone was completed, I tore the jeans apart to make a jean
skirt. The leather and tribal print herring bone was inserted into the
center. I added a zipper in the back. In order to add a little something
to the skirt, I created a leather necklace by cutting strips of leather and
attaching it to chain. I added some striped beads because they matched so
well. This leather refashion is perfect for an Oklahoma country girl!
More details can be found at my blog, Feeling Kinda Thrifty.”-Trish
*****
Let’s see what last week’s winner, Carissa, from Carissa Knits has been up to this past week:
“I’ve been itching to try a leather project for a while now, so this
challenge was just the kick in the pants I needed. I was a little
apprehensive though about avoiding the dominatrix and/or cowgirl aspects of
this material, but I feel like I struck a balance with this one.
I picked up a simple, A-line, black suede skirt for $5.99 at the thrift
shop. I wanted to make myself a black leather jacket, since I already have
a brown one, but unfortunately this skirt wouldn’t have provided enough
fabric. So I supplemented it with an extra large tee that’s been
languishing in my closet since my heavier days.
I cut two long sleeves from the back of my skirt, and the front became the
back of my jacket, utilizing the existing seams and flare to create a
flattering hourglass shape. From the scraps, I pieced together the
shoulders and sides of the front. Once I had completed my long-sleeved,
front-less, bolero-like thing, it was time to bring in the reinforcements –
my black t-shirt. Two rectangles, cut from the front and back of the shirt,
were turned sideways and attached as drapey front panels. And the tee’s
sleeves were joined end-to-end and became my new collar.
I love how it turned out and can’t wait for cooler weather so I can wear
this non-stop!
As always, more details and photos will be posted on CarissaKnits.com!”-Carissa
*****
Now it’s your turn to vote for your favorite leather refashion using the poll below:
If you sewed along with us this week, send your before and after pictures of your leather creation to bhunting@eoni.com. We’d love to see what you made!!
Before I announce the winner, I would just like to say that all of the seamstresses were very brave this week, they all stepped out of the box, tried something new and created some beautiful peplums for us.
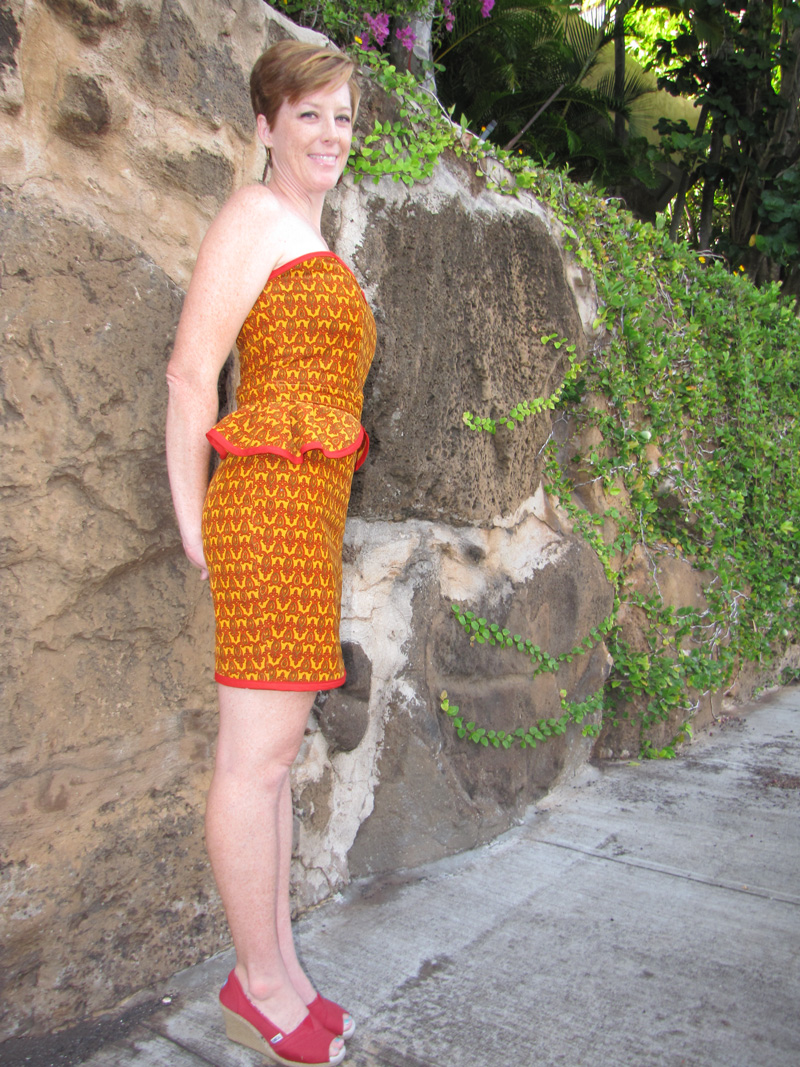
Congratulations to Carissa from Carissa Knits. Her beautiful, self drafted peplum dress came in first place this week in both the on line voting and the competitors scores.
She started with this:
And transformed it into this:
Wow, great job, Carissa!
*****
But now we have to move onto the hardest part of the competition- Saying good-bye to one of our new friends. Excuse me while I grab my box of tissues…..
It’s not really good-bye, it’s more “see you later” Magda, from House of Estrela. I hope you all have visited Magda’s awesome blog and will continue to be inspired with all of her sewing projects for both adults and children.
Before she goes, let’s take a look at her amazing leather creation:
“Contrary to last week, I was excited for the leather challenge. Working with this material wasn’t new to me. I have actually done a few things in the past, with leather and vinyl… I knew exactly what I wanted to do from the start. I am mad about corsets. I wanted a new one for such a long time. So I did one.
I drafted a pattern. This video helped me to draw the corset pieces. I didn’t make
mine exactly like the one from the tutorial, but it was very helpful with the
measurements, and I was able to adjust them to the design I had in my mind. Since
the jacket was big, I had plenty of fabric to work with, I used basicly from the
bottom and am hoping to use the rest for something in the future.
Instead of adding a zipper to the back I wanted it to look as a waist cincher, so I
marked my eyelets holes and inserted them. Instead of lining I have add some bias to
finish the piece. It wasn’t really bias tape you know, it was a scrap left over from
a shirt. I cut two stripes from it (on the before picture above), sewn them together
and attach it to corset as being bias tape. It worked.
I am happy. We’re done. And
that’s it! My leather challenge. See and read more in my blog. Thanks!”-Magda
Molly’s Emerald Refashion was so popular last week, I’m happy she came back to sew along with us again this week.
“I found this knit dress
which had the cute ruffle already along the collar and also along the sleeves (can’t
see this in photos). Dress was too short, and the sleeves wouldn’t stay up.
Thought it would look cute with a peplum.
So, I also grabbed a grey sweatshirt and
got to work.
I cut off the dress, added the grey section at the waistline, then put
two rows of the stripe back on below the grey (the shorter one was gathered to
create the ruffle). Then, in order to keep the 3/4 sleeves up, I took the cuffs off
the sweatshirt and attached them to the bottom of the striped sleeves. Lastly, I
exchanged the buttons at the collar from white to red for a fun accent. Then, for
the photos, I paired the top with a red belt and either red shoes or red boots.
Even my 16 year old son thought it looked good when I added the red accents!” -Molly
*****
Eira, from Hoffi Coffi, decided to try a peplum this week, too.
You can see the entire process she used over at Hoffi Coffi.
*****
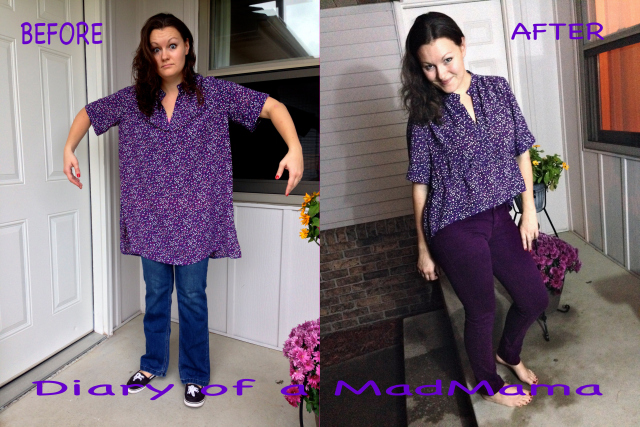
Once again, Jen, from Diary of a Mad Mama, has come up with her own unique version of the challenge.
The moment I saw the announcement, my heart began to race!
What an honor it would be to receive The Craftsy Blogger Award! To me, it would be like winning an Oscar, an Emmy, or a Grammy.
“This October, Craftsy wants to celebrate creative bloggers who have truly inspired us through their original content, vivid imagery and exceptional online personas. That’s why we are presenting the first ever Craftsy Blogger Awards, to honor those individuals who spend so many hours behind the scenes crafting the blogs you love to read! Nominate your favorite blogger, and you’ll be entered for a chance to win a free online Craftsy class!”
Creating an on-line class for Craftsy is actually on my list of things to do. I’ve shared many of my tutorials on their site, but to actually be one of their instructors would be a dream come true for me.
The nominations will be open until October 14th so if you have a little spare time, here’s your chance to nominate your favorite blogger.
And be sure to vote for your favorite Peplum Refashion, too:
Thanks for being so supportive, I really think I must have the best subscribers on the planet!!!
As I was perched upon MY personal peplum pulpit, preaching the praises of this perky pattern, who knew many of the others were petrified of this popular trend.
(Say that five times real fast) 🙂
But come to find out, there are many out there afraid of this flattering silhouette.
WHO KNEW???!!??
But true to Refashion Runway style, these lovely ladies, overcame their fear of peplums and once again created some outstanding transformations for you!
“I have to admit when I saw that one of the challenges was “peplum,” I was a little apprehensive. I don’t think I have anything with a peplum, and didn’t know if I really wanted something with a peplum. But a challenge is a challenge, so I jumped in.
I started with two shirts—a denim blouse that fit me okay, and a men’s plaid
shirt. I also perused through my stash of lace and found some extra wide vintage
eyelet lace that I had salvaged quite a while ago from the bottom of a petticoat.
After choosing a piece of flat lace that was given to me recently, along with a
scrap of ruffled eyelet lace, and I was ready to start.
I cut the denim shirt at the waist, and also cut away the button placket and
collar. I stitched darts in the front and back bodice to make it fitted. The
original cuffs were cut away and I added a bit larger, non-buttoned cuffs with
some lace trim.
To make the collar lay flat around the neckline, I made several small darts in the
lace at the back of the neck. The vintage lace was added to the bottom, creating
the peplum.
I added some vintage buttons that reminded me of lace, along with buttonholes to
the front for decoration. I chose to leave them nonfunctional since the jacket is
meant to be left open. i also flanked the buttons and buttonholes with top
stitching to give the illusion of a placket. I accessorized with a necklace I had
previously made from old watches and broken jewelry pieces.
I lined the jacket (front and back bodice, and cuffs) with the plaid shirt,
retaining the original shirt pocket which is now a “secret” pocket on the inside!
I added a hook and eye to the waist to keep that jacket closed when wearing it
with a belt. It can also be worn open for a more casual look.
So my feelings about a peplum now? I love it! I can’t wait to pair the jacket
with a skirt or shift dress. If you would like to see a picture tutorial of how
the jacket was made, please visit my blog, Second Chances by Susan. Thanks!”-Susan
***
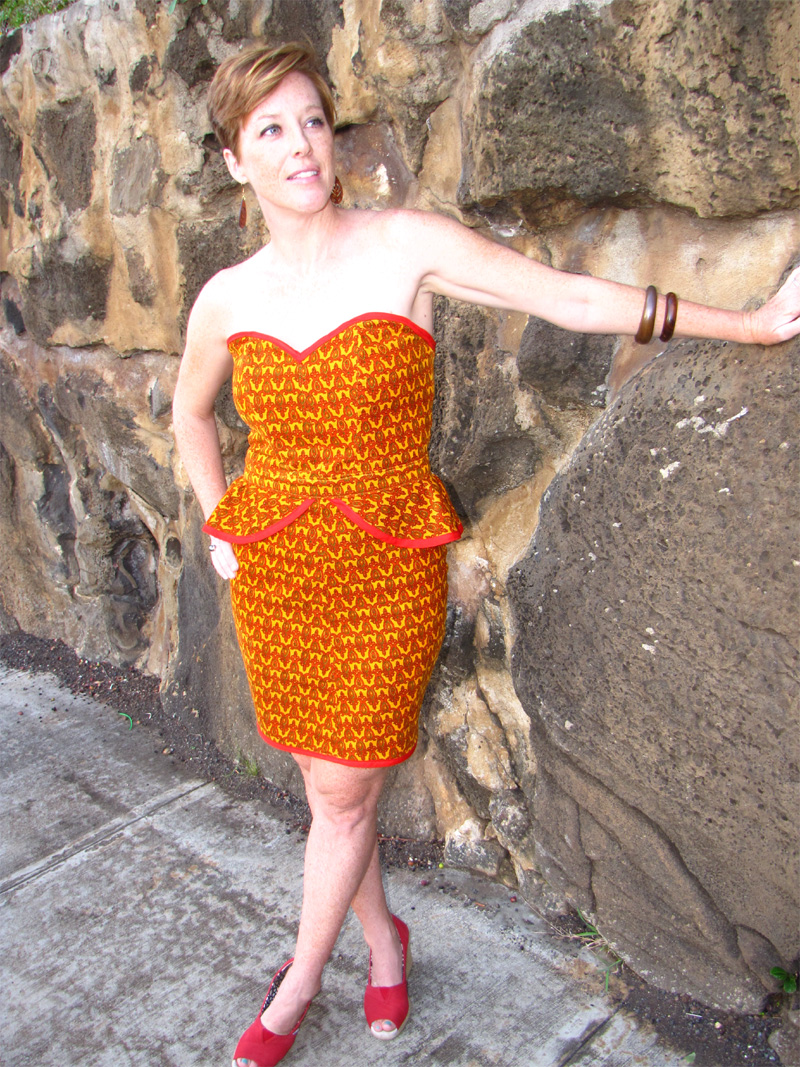
Now, let’s see what Carissa from Carissa Knits has created.
“This dress, lovingly handmade by someone’s mother years ago, came into my
possession by way of our local Freecycle group. The gifter told me of her
mother’s love of sewing and her own hopes of finding someone who would
appreciate the work that went into this dress (and several others she gave
me) and who could give it new life again. This week’s challenge seemed the
perfect time to do just that!
Since there was clearly no part of the dress that fit me or was still in
style, I knew I would have to start from scratch. And because this denim
was a nice even tone throughout, it was ideal for a pieced-together
refashion. Loosely based on a photo I found on Pinterest – but modified for
modesty – I drafted a pattern to my measurements. Then I cut my pieces from
the original dress and began the reassembly process.
I used darts to shape the skirt, bust, and back. I included a slit in the
skirt for walking room. And of course, the peplum – angled flaps in the
front and straight across the back. Finally, I installed a zipper I
purchased for $2.49 – the only cost for this project – and I was finished!
The result is sleek enough for a night on the town, but modest enough to be
paired with a blazer or cardigan for work.
(Apparently “muumuu” is the correct spelling. I’ve been spelling it “mumu”. Learn something new everyday. My apologies for the past misspellings of this marvelous word.)
“While shopping at a Goodwill fundraiser a few weekends ago, a friend of mine pulled this gem off the rack, and we both burst out laughing. Yet, I found myself mesmerized by the super funky print. It had potential, and it was definitely unique. It’s not every day that one finds a *corduroy*muumuu made in Hawaii!
Initially, I had plans to make this piece into a tame pencil skirt. I thought that perhaps it needed to be paired with a solid color in order to bring it down a few notches. However, when the peplum challenge came around, I knew right away that my funky corduroy muumuu would be perfect!
The sleeves were transformed into the bodice. I used the rounded shoulders to make the sweetheart neckline and added a princess line down the front. The top needed some shape, so I added boning in the seams. There was plenty of fabric for the skirt, so I used my dress form to size a large rectangular piece. I then attached the two sections.
Before adding the band around the middle, I created the peplum. I wanted to play around with the shape of it, so I first used a piece of scrap fabric. I cut out an arch and pinned to one half of the dress. I ended up adding some pleats on the sides and cutting away a slope at the middle and back. This scrap piece became my pattern for the corduroy peplum. Once the peplum was sewn around the middle, I added the band. To make the dress pop (as if it needed any help), I added a deep red bias tape around the peplum, top and bottom.
I am in love with my new corduroy peplum. It’s absolutely perfect for the Holidays!”-Trish
“Out of the entire gauntlet of Refashion Runway challenges, when I saw ‘Peplum’ was on the list, I knew exactly what I wanted to make! It was with that clear vision that I selected this huge, coral blazer!
Funny story. As the Goodwill clerk was ringing up and folding this coral creature, he gave me this look and said, “Now ma’am, do you see this tag…? Just leave this on, and if anything doesn’t fit, you can bring it back.” Obviously he was concerned. I just smiled and thanked him for the advice…little did he know that I had most specifically selected the biggest blazer I could find.
To get started, I ripped out the football jersey-worthy shoulder pads, removed the sleeves, and the pockets (which were sewn into the side seam). After measuring, I chopped off the bottom half of the blazer. I had great plans for that precious piece, so I laid it aside for later.
To get started, I ripped out the football jersey-worthy shoulder pads, removed the sleeves, and the pockets (which were sewn into the side seam). After measuring, I chopped off the bottom half of the blazer. I had great plans for that precious piece, so I laid it aside for later.
After doing some research, I was able to draft a circular pattern for my peplum- which I altered to be fuller and allow for pleats, as well a creating a graduating slant so the peplum was longer in the back. After some experimenting, I further altered and drafted a different pattern for the two panels in the front. All of these I pinned and sewed together into one long ruffle. Before attaching this to the blazer, I added some metalic and burgandy thread embelishment all the way along the bottom hem of the peplum. This pattern was repeated on the cuffs of the sleeves, to which I also added a button for appearance. After attaching the peplum, I covered up the resulting ugly seam with a Hong Kong inspired bias tape finish. To round off the look, I added two buttons to the lapel points.
This blazer was such a beautiful challenge and gave the opportunity to try lots of new things! I am so pleased with how it turned out! You can find more details and pictures of this process over at my blog!”-Desarae
***
Now from across the Atlantic, Magda from House of Estrela brings us her version of the peplum.
“I can say it has been my personal little hell week. I knew this wouldn’t be an easy one, but I wasn’t counting with a sick kid, and being sick myself too, while trying to come up with a design that would please me. The hardest part? I’m not very fond of peplums. I knew I wasn’t ready to just give up though. I’d make something for my daughter. The argument that refashioning grown up’s clothes to kids clothes is just resizing them doesn’t seem right to me, because that’s the same thing you do when turning men’s clothes to women’s clothes, right?!And I did the shorts peplum out of a dress my mom gave me a while ago!
And it looks so very cute on my little miss. Not to mention how much she loved it! I used a stripe from the bottom of the dress to make the peplum, and used existing shorts to trace the new ones. The cuffs were made out of the original tights from the dress, and the waist from another stripe, I just cut, sized to the right side and attached (detailed photos on my blog).
I also refashioned a top to go with the shorts. The top was pretty easy, I didn’t focus in doing something too elaborated. First, because I was short on time, and then because I just wanted to match my shorts. So, to see more pictures of the process, and how wrong things went this week, step by my blog.”-Magda
“I will completely admit I am not a fan of peplum. I don’t really own a lot of peplum. I think it has to be just right for my figure as I am a bit boxy in my midsection and then have sticks for legs. But I thought if I could get it to hit at the right area, have the right length, and not be full I <think> I could pull it off.
I found this lovely black satin dress which after some research, I learned the company was a small couture house based in New York city!! This dress is quite epic, OH! Those sleeves!!! And it did not zip up.
Now I thought the way it was designed, I thought this would be an “easy” fix. I need to stop saying that b/c every time I say that, it is NEVER “easy”. I learned that the built in peplum was actually one massively gathered skirt. My original design plan went out the door.
For the bodice, I removed the poof sleeves and luckily the bodice had the perfect shape. I removed the skirt entirely from the too long drop waist. The drop waist was almost cut in half. The leftover fabric was then used to fill in the back so I could zip it up.
For the skirt and peplum, I created the main part of the skirt by cutting off at the gathering stitches. It was the perfect length for me. This was still way too huge so I cut that in half- one half for the peplum and the other for the skirt. I did a very mild gather on the peplum. Then connected all the parts together, made it fit, and gave it a hem! Done!
Here is my new little black PEPLUM dress! Which I can finally zip up! Now I am no longer afraid of peplum, I am actually more afraid of leather….”-Lauren
***
So there you have it.
The Peplum Challenge.
Perhaps you have been persuaded by the power of the peplum and will now have a preference for this playful profile. And perhaps, you too will become an appreciative and prolific producer of this positive appearance. Whatever your preference, you now have an opportunity to pitch your personal propensity toward a participant using the popular poll below: 🙂
The winner will be announced next Saturday, October 12.
Next week’s Refashion Runway Challenge: Leather
If you sew along with us, send your before and after photos to