

Welcome to the Halloween Challenge on Refashion Runway.
I promise you will be seriously blown away by the amazing costumes this week.
I know I am!!!
*****
Susan from Second Chances by Susan, really enjoyed this challenge:
“I really looked forward to this theme. I love costumes! So, any excuse to make
one, I’m all over it! It probably dates back to my childhood when the our old
steamer trunk would burst open in anticipation of Halloween. We would comb through
all the thrifted costumes that our grandmother picked up and and excitedly decided
what we would be for the evening. Over the past 34 years, having raised eight
children, I have to say that I have made my fair share of costumes. Costume
“season” always began with a trip to the thrift store for the perfect start to the
costumes. Well, right now I have a self-imposed break from the thrift stores so I
combed through my stash waiting for an idea to spark. As I found all of these
wonderful black and white, green, and purple goodies, I knew that I just had to make
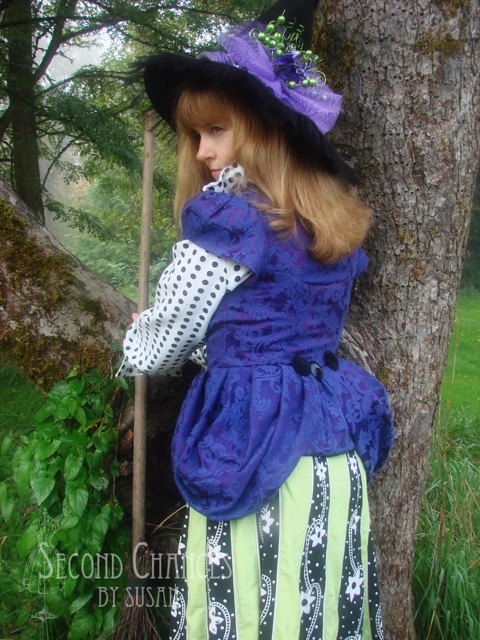
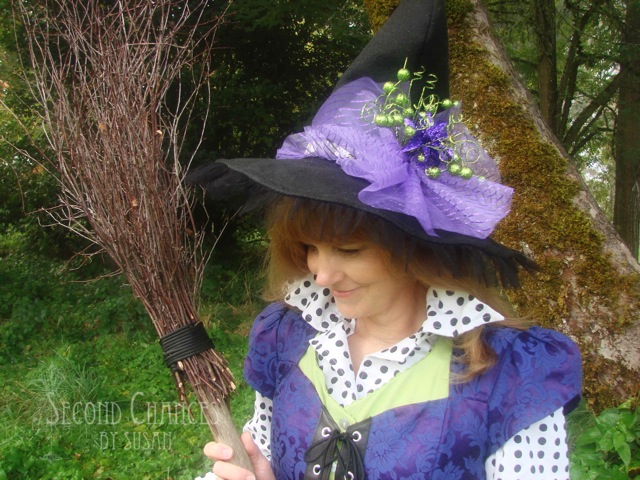
a witch costume. But not your ordinary witch, a whimsical witch. I began with
these six pieces. A blouse that someone handmade with an extra big collar and
cuffs, a cotton skirt, a black and white dress with sequins in the front, a green
sleeveless jumper, a purple brocade dress with an open back, and and black and white
sweater. (Can I just say right now that I have quite a large stash…hence, the
self-imposed break from thrift stores!)

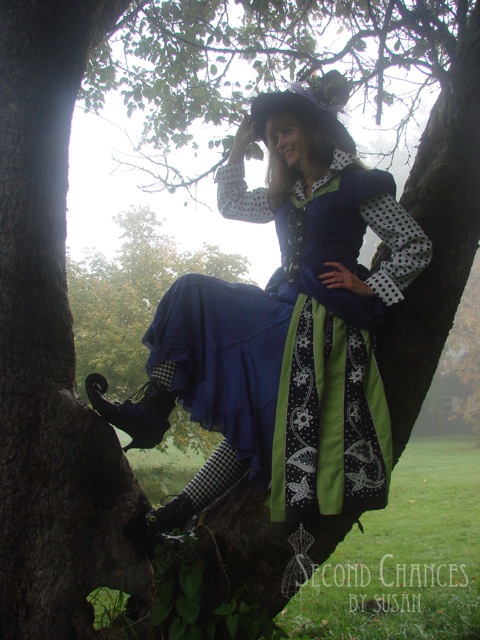
I cut the jumper at the waist, then cut the lower half into triangular strips. The
black and white dress was also cut up into triangular strips. Lucky for me, the
design was made that way! These strips were then sewn together and then reattached
to the upper part.

The purple brocade dress was disassembled at the waist, then cut up the front. This
was one refashion where the big shoulder pads were left intact! Leather and eyelets
were added to the front. I used the bottom of the dress to create pleated peplums
at each side (hey, peplum…leather, sound vaguely familiar?) Large vintage buttons
adorn the back. I also filled in the back with some of the left over fabric.

I cut the sleeves shorter, then used the excess pieces as a perfect start to a pair
of spats. Yes, I made another pair of spats! But these are not your ordinary
spats, these have curled toes! I have to admit these were a head scratcher, but a
proper whimsical witch must be dressed from head to toe!

Speaking of the head, the hat was made from some felt and trims that I already had.
In fact, the purple netting that was used came from a recently purchased bouquet of
flowers. The broom was a byproduct of doing fall clean-up in the yard. The fallen
branches were perfect. I put wire inside the edge of the blouse’s collar so that it
would stand up.
The underskirt was dyed a darker purple. The sweater sleeves made the perfect
leggings.

It was definitely witch weather this morning…foggy enough to make my toes curl!
And the moon tonight…WOW!”-Susan

*****
Carissa from Carissa Knits, is ready for the Royal Ball in her challenge entry this week:
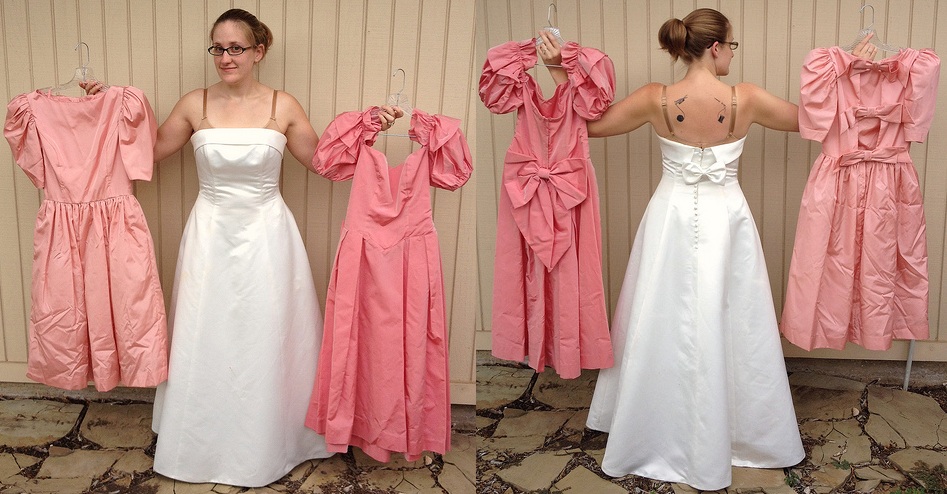
“Though I didn’t realize it at the time, I scored the *perfect *materials
for this challenge a few months back on Freecycle: a slightly-too-big
wedding gown and two slightly-too-small 80’s bridesmaid dresses. I had
absolutely no idea what I would do with them… until I was challenged to
make a smashing Halloween costume!
What better make-believe persona to assume than quite possibly the original
refashionista herself – Cinderella? If you recall, before the blue ball
gown her Fairy Godmother magicked up for her, there was the pink and white
dress of her mother’s, transformed into a gorgeous gown with the help of
her mouse and bird friends, and then relentlessly torn to shreds by her
evil step-sisters. I tackled my recreation all on my own though; no
cheating with tiny animal helpers.
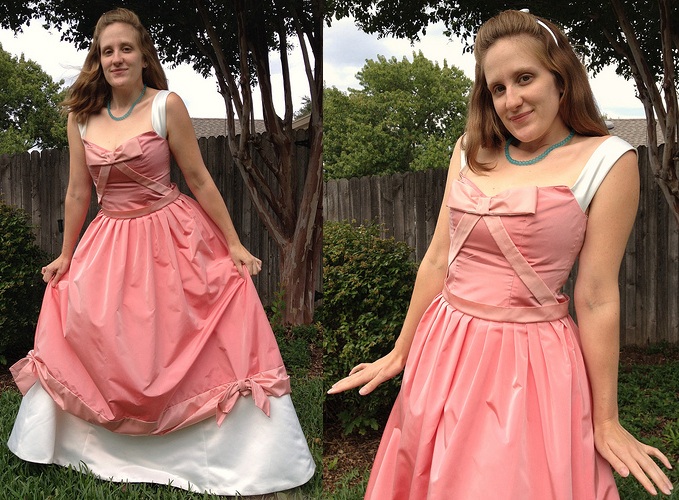
I created a two-tone pink skirt – complete with bows – from the skirts of
the bridesmaid dresses. Then I removed the skirt from the wedding gown and
attached the two. I enlarged the dark pink bodice a smidge with side panels
and added pale pink sashes and a bow, as well as white straps made from the
flappy thing on top of the wedding gown’s bodice.

I used scraps of the white fabric to make a tiny bow and attached it to a
craft-store headband ($1). Blue glass beads ($3) became a simple yet
stunning necklace, and scraps of the pale pink dress were turned into a
cute pleated clutch to match my dress. A pair of thrifted pepto-pink kitten
heels ($4) bring the grand total for this ensemble to a whopping $8!
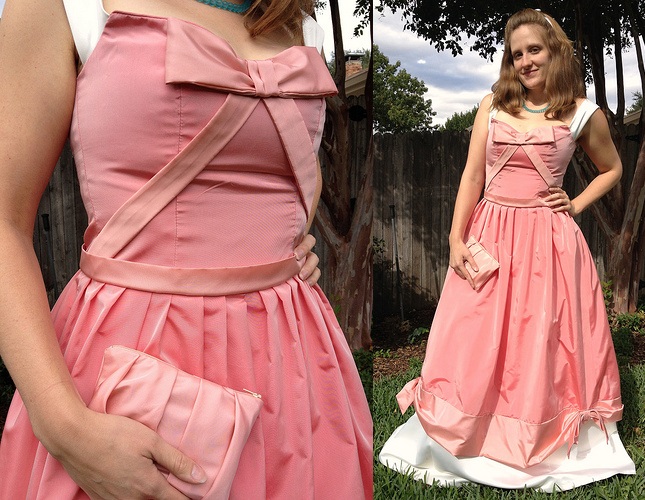
The entire (lengthy) transformation will be posted at CarissaKnits.com!“-Carissa
*****
Desarae from Gladness of Heart, stepped out of her costume box for us this week:
“I have a confession to make. No, I lied. I have two. Confession number 1- I don’t
celebrate Halloween. I know, I know, that may seem a little strange, but only as
strange as celebrating death and fear seems to me. This means that I’ve never had a
Halloween costume before. Which leads to Confession number 2- I love Disney.
Seriously, I do. Now, how this love was able to co-exist without the usual
expression of the yearly Halloween dress up, is a feet to be marveled at. So it
should come as no surprise that my Halloween project for Refashion Runway was
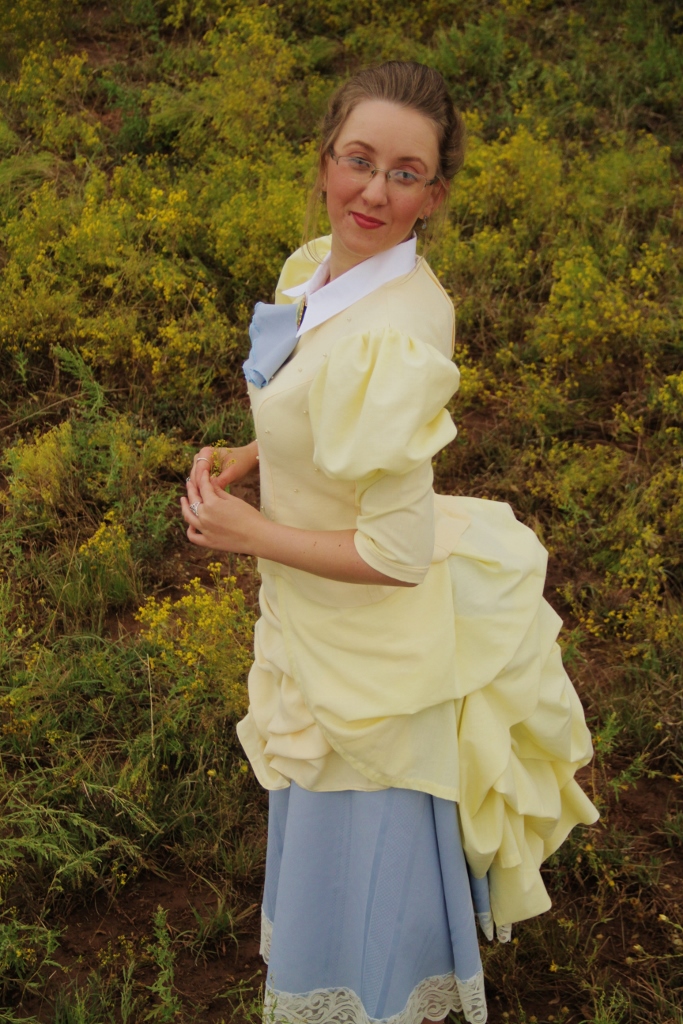
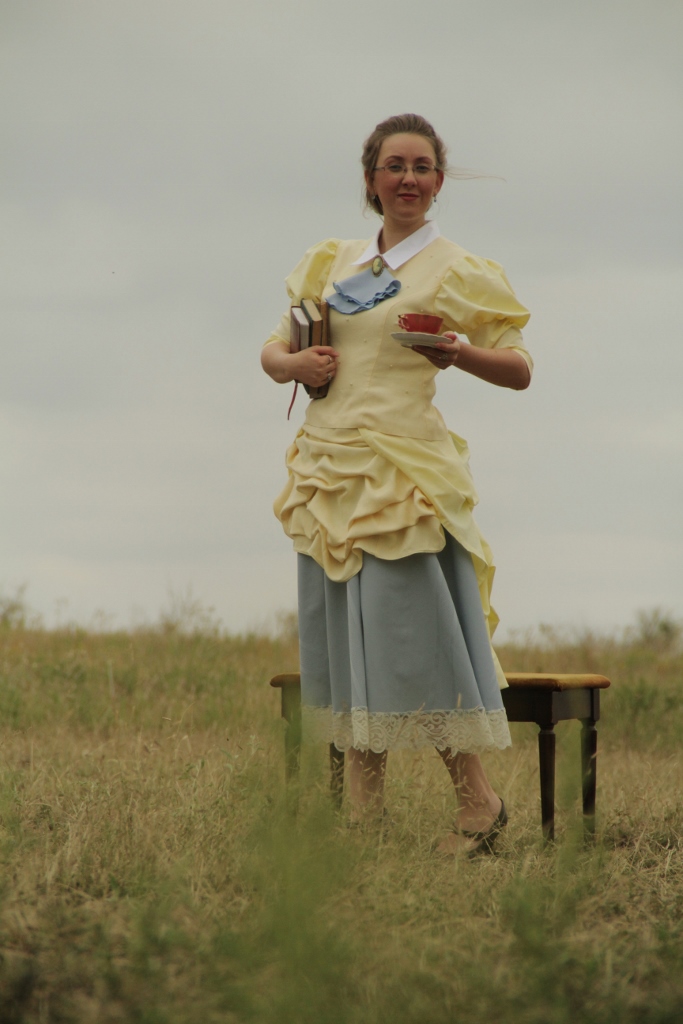
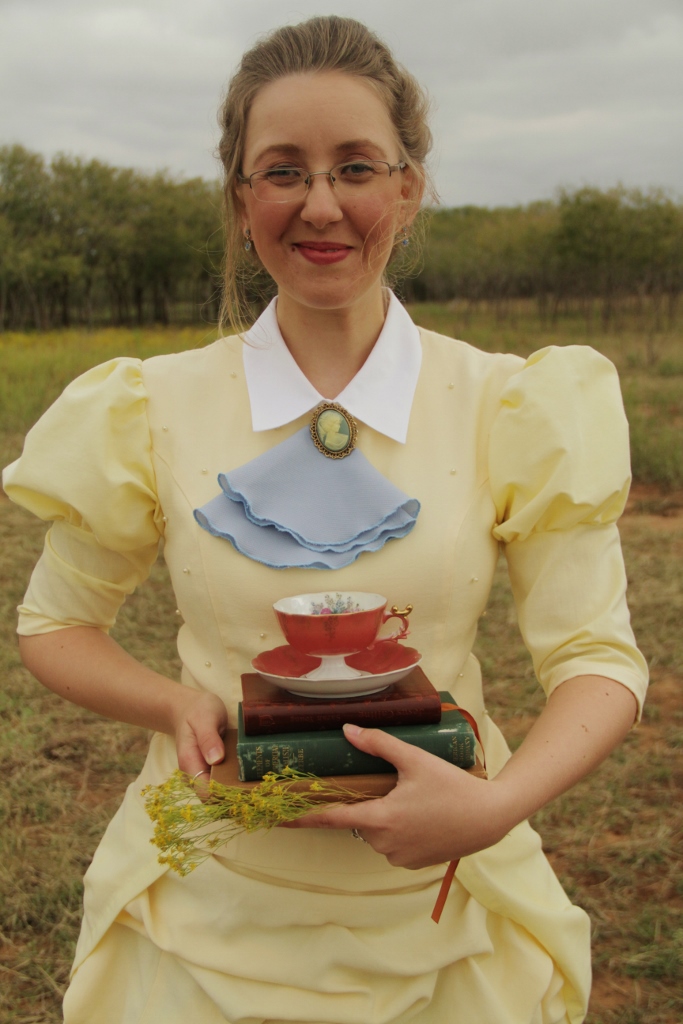
inspired by Jane’s dress in Disney’s ‘Tarzan’.
I started out with a fake layered two piece yellow dress suit, a white button up
shirt, and an old yellow sheet and lace trimmed circular blue tablecloth. In the
‘before’ picture, you will also notice a yellow button up shirt- I actually didn’t
end up using this, as I had plenty to work with otherwise.

To start things off, I separated the top from the skirt of my dress suite- removing
the shoulder pads, lace and sleeves. Using a self drafted pattern, I made and
attached Juliet sleeves (as I learned they are called) which were cut from the
yellow sheet. I hand sewed a couple of little dart tucks in the back, and shortened
the original zipper which used to run down into the skirt. Next, I filleted the
skirt portion and hemmed up all the edges. This piece would become the front
swooping panel on my new skirt.

To create the swoops and gathers, I pinched and
pulled sections of the fabric then pinned it to strips of gross grain ribbon running
down the inside of the material. These puckers were sewn to the ribbon by hand. The
same process was used to create the back bustle, which was made from a long
rectangular length cut from the sheet.
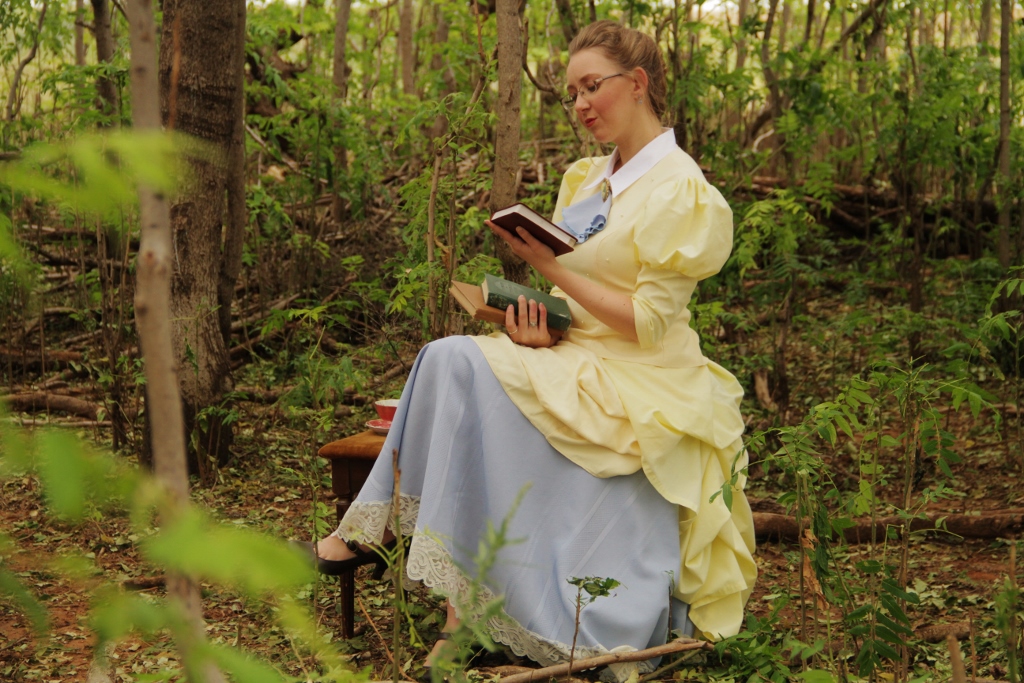
To create the blue skirt, I cut out a circle
from the center of the blue circular tablecloth- this created the waist opening. I
added a zipper to the back, then basted the front yellow swoop to the waist and
added a waistband, which I made from the sheet. I also added a waist band to my
yellow back bustle. To attach the bustle to the skirt, I created button holes on the
skirt waist band, then added buttons to the inside of the bustle waist band- this
way the buttons would be hidden inside.
Next, I made a dickey out of my white button
up shirt, which tucked nicely under my yellow shirt to create the perfect collar.
Earlier, when I had cut out the waist opening in my tablecloth, I was left with a
perfect circle. After satin stitching around the edges and folding it into fourths,
it became my neckerchief, which I pinned on with a cameo broach of my mother’s.
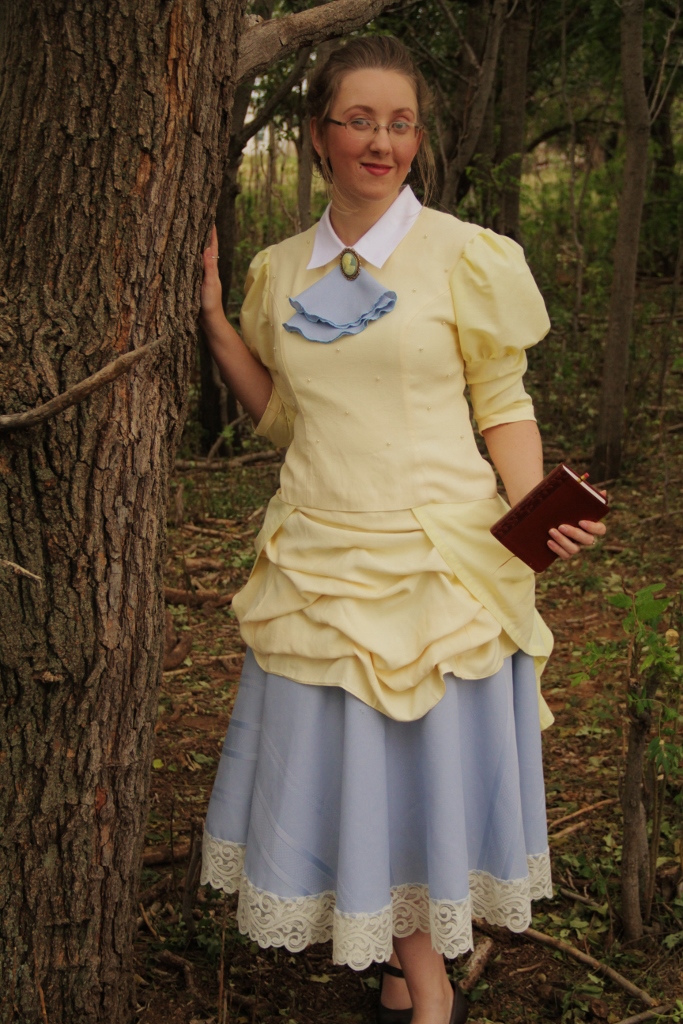
And,
in keeping with Victorian Era fashion, I even made… for lack of a better term, a
butt pillow! Seriously, it is a pillow that rests on your rump with ribbon ties
attached at either side so you can tie it around your waist under your skirt. This
gives the back of the skirt that dramatic pouf!
And oh my goodness! Did I ever have fun wearing this outfit and taking pictures!!
You can see *lots* more photos and read more details at my blog!”-Desarae
*****
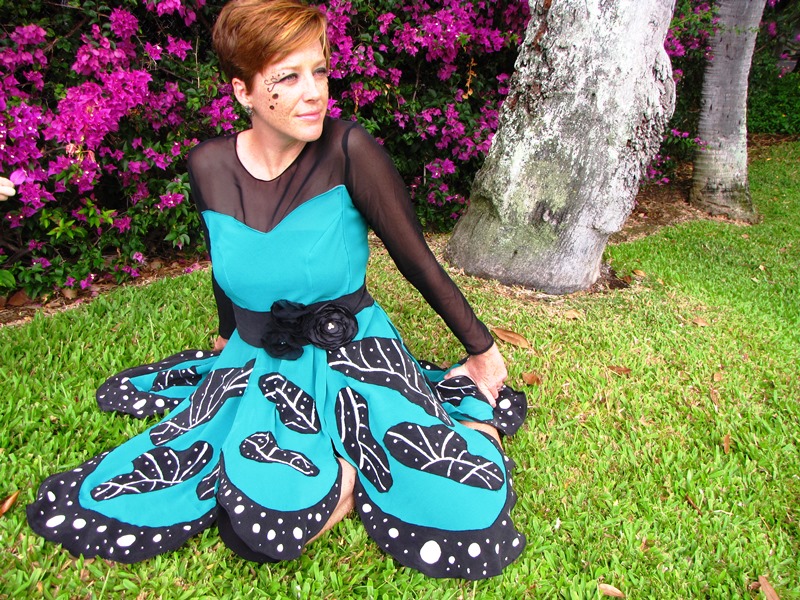
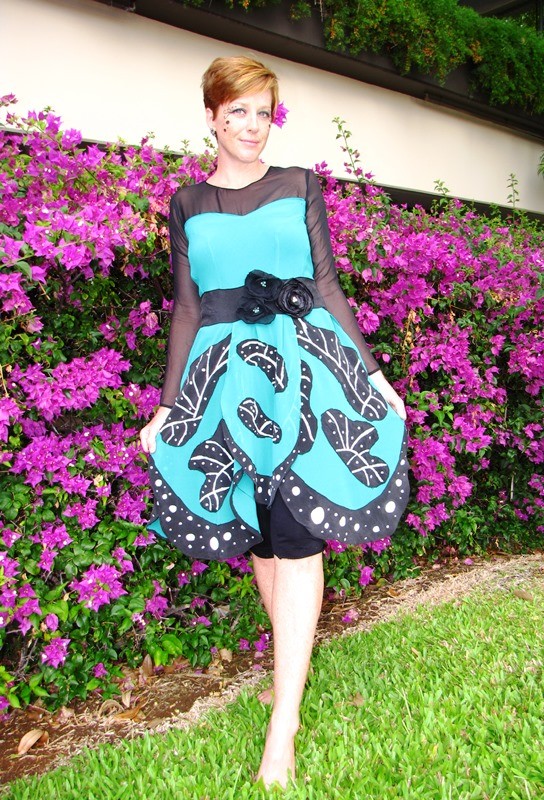
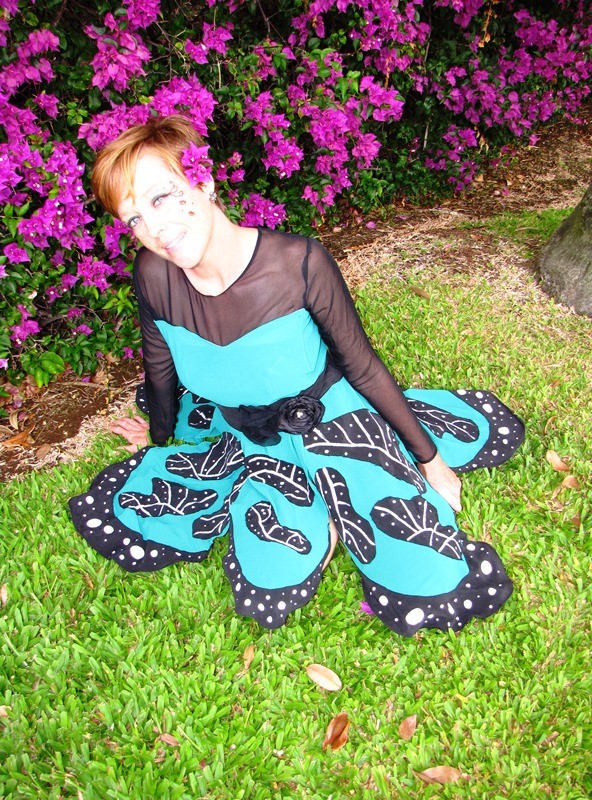
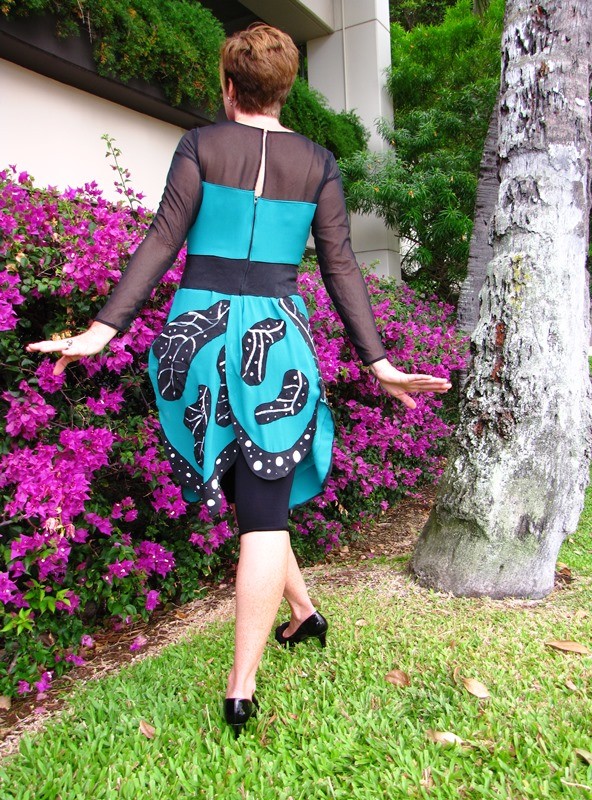
Trisha, from Feeling Kinda Thrifty, turned her Halloween Nightmare into a Dream Come True:
“For me, this week’s refashion was perfect for Halloween … a nightmare. Without
going into too much detail, I ended up scrapping my first refashion midweek
because I thought it looked a bit cliché and cheesy. At the last minute, I
made a bold decision to create a butterfly dress, using polyester crepe and
silk chiffon. My vision for this dress far outweighed my sewing ability,
and as I burned the midnight oil trying to complete it, I stumbled across
challenge after challenge. Throughout this process, there was a little
voice in the back of my head telling me to just let it go – throw in the
towel. Yet, I couldn’t. I had imagined this dress fitted with long silk
chiffon sleeves and a butterfly wing skirt, and I wasn’t going to stop
until it resembled the picture in my head. With a minimal amount of sleep
and an incredibly supportive and kind husband, I was able to complete a
Halloween refashion that I am proud of.

Here’s a brief breakdown of the transformation.
Top – I used a silk chiffon scarf that I found at Goodwill for $2 and part of a green crepe dress that I purchased at an estate sale for $0.25. To create a pattern for the chiffon top, I used a close-fitting t-shirt and traced it onto newspaper. I then cut this pattern across the top to create a sweetheart neckline for the crepe. I used the t-shirt again to trace a pattern for the sleeves, adding a curved edge at the top.
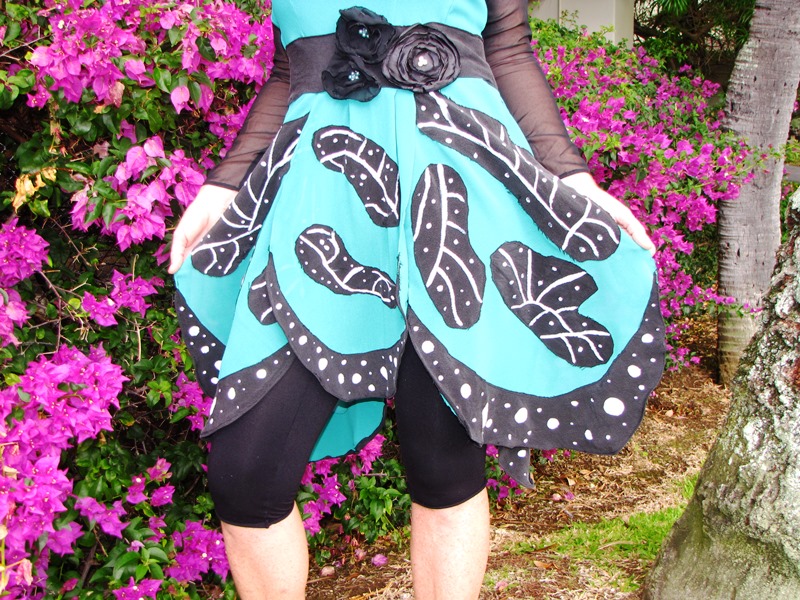
Wing Skirt – The base of the wings were cut from the green crepe dress. I
created a pattern on newspaper for the black appliqué, which came from a
black silk dress that I found at the same estate sale for $0.25. Using my
sewing machine, I stitched the appliqué onto each wing and hemmed up the
sides. I thought that the wings needed more detail, so I used Americana
multi-surface satin paint to add dots and veins.
Flowers – A tutorial will be posted on my blog in the near future, but
basically, I cut rough circles of different sizes and burned the edges
using a candle, creating petals. I then stacked the petals to create a
flower.
Now that my costume is out of the way, I can’t wait to start on one for my
little boy.
More details of my refashion can be found Sunday on my blog, Feeling Kinda
Thrifty.” -Trish
*****
See what I meant when I said you would be blown away. Incredible!!!!
Use the poll below to vote for your favorite.
The voting will be open until Friday at midnight.
If you sewed along with us this week, send your before and after photos to bhunting@eoni.com. I love to see your version of the challenges.
Wow, next week will be the final challenge already: Winter White.
*****
Thank you to all of you who have already voted for The Renegade Seamstress over at the Craftsy site, but just in case you haven’t had a chance to vote for me yet, here is the information:
The Renegade Seamstress has been nominated for the “Best Tutorials in Sewing” award over at Craftsy. My lil’ ol’ blog is up against some pretty big blogs so the competition is fierce. The voting is open until October 29th and I really need your vote. If you haven’t had a chance to vote yet, here is the link:
http://www.craftsy.com/blog/2013/10/vote-for-your-favorite-blogs/
Scroll down to The Best Tutorials in Sewing. Click on the vote button under The Renegade Seamstress. Scroll down in that box to enter your email address and click on the submit button.

If you have already voted, I’d love it if you would get your friends to vote.
If you are new to The Renegade Seamstress, you can see my tutorials here:

Thank you so much!
Beth


These costumes are Fantastic! What excellent work by all of these ladies. This blog is such a kick to read. I know it’s a lot of work for everyone but I get so excited to see what creative things everyone comes up with.
I’m so glad you are enjoying it, too! I’m so amazed at what everyone creates each week.
Wow, they all did a great job – I’m so inspired now!
Yay! We were hoping this would inspire you!!
What a fun theme!
Nothing like a good Halloween challenge to bring out the costume designer in everyone! Thanks for voting!
Whoa . . . that was hard to decide! BRAVO to ALL the contestants . . . I wish you could all come to one big party in your amazing costumes!
Oh, wouldn’t that be fun to have a big party and all of us get together!!! Maybe someday……
Wow! All of these costumes are incredible!!
Each of you did a fabulous job and made the voting so hard!!!!
I agree, such a difficult choice this week!
Wow, this is Hard. I will really have to think on this one.
Sandy in the UK
Thanks for voting, Sandy!
Pingback: Refashion Runway: The Halloween Challenge | Skipping Stars Productions LLC
definitely a hard choice…all are winners for sure!…but, the added accessories had me going toward the witch…
Yes, they are all winners in my book, too!
I am blown away by the creativity and skill of the contestants! And I don’t say that lightly. Whichever way my vote goes, I am recognizing all 4 as equally skilled and talented. Again, wow.
Thanks for voting and being so encouraging to these talented ladies!
These are incredible. It’s so hard to vote this week!
Thanks for voting, Sharon!! These ladies have worked so hard and given us amazing inspiration each week!
It has been so much fun to see how all of your contestants sewing skills have improved and elevated. I am amazed how beautiful and creative all of the designs are knowing that they are not allowed to use any commercial patterns. WOW!!!!!!!
You are so right! Each week just gets better and better!!
That was hard to decide b/c they were all amazing. I love Cinderella’s dress! But the detail in the witch costume blew me away. She refashioned a shirt into stockings! Loved it
This week’s challenge was one of my favorites of all the Refashion Runway challenges. These creative seamstresses continue to amaze and inspire me!
Beautiful job sewing these costumes!
I was truly amazed this week by these talented ladies, too!
I have to vote for Trish. My favorite, and not just because we share names.
🙂 Thanks for voting, Trisha!
I wish I could vote for them all!! Amazing, amazing work.
Me, too!
Hardest week to vote for so far!
I totally agree!
these are all so beautiful and amazing! great job everyone!
🙂 Thanks, as always, for your sweet comments!
What a fun challenge! The contestants did a great job and it was interesting to see how they combined multiple garments. I love Susan’s photos, especially the one of the shoes and stockings with the fall leaves.
I enjoyed her photos, too. Looks like she had fun!
Definitely blown away!! As another commenter said, no matter who I vote for, all four ladies have exceptional talent and my hat is off to them in a big way.
I was so torn this week on which way to vote, too. I think there might be a surprise this week………
All are great. I wish they could all move forward this week. Any way to save them all? Last minute renegade seamstress reprieve?
Hmmmmmmmmm……….
So awesome! This week was the hardest to vote because they were all so great!!
They just get better and better each week!
How can one vote for one when every one of them is fantastic!!
So true, Cathy!!!
Amazing! I had no idea what to do, to sew along this week. These are pretty inspirational!
We missed your sew along this week, Joelle!
Pingback: Quick and Easy DIY Sheriff Costume for Halloween | The Renegade Seamstress
This was the hardest one to choose who to vote for- all of them are fabulous. You have a business here ladies!
They continue to amaze me each week, too!
It is getting harder to choose every time we vote. The design ability of these ladies is astounding.
I love each of these costumes!! Great work, Ladies!
On a side note, I now have more details about my butterfly dress on my blog, feelingkindathrifty.blogspot.com
You all were amazing this week!!! I’m so excited to see what you come up with next!!
Pingback: Refashion Runway Sewalong Week Five: Halloween | Wedding Dress Blue
I also love your challenge! I am by no means ready to take on any of these challenges, believe it or not, I messed up sewing/cutting a halter top from a tshirt! Still don’t know what went wrong…
But you can paint like nobody’s business!!!!
I think this was the hardest vote yet!!
Me, too! Thanks for voting!!!
WOW! I’m in awe of the skill and creativity of all of you ladies! 🙂
This was a fun week!
Wow. It keeps getting harder and harder each week to choose just one! Amazing job, all of you ladies! 🙂 Lisa
I totally agree! These ladies are so talented!
Pingback: 49-Cent Friday: Refashion Runway Sew Along: Week Five – Halloween! | Diary of a MadMama
Pingback: Refashion Runway: Halloween Sewalongs | The Renegade Seamstress
Pingback: Refashion Runway: Winter White Winner and Overall Winner Announced Today | The Renegade Seamstress
Pingback: Little Things: Sixth Edition | EccentricOwl
Pingback: 9 Halloween Costume Tutorials (Even if You Don’t Sew) | The Renegade Seamstress
Wow, this is not just refashion this is art! So beautiful! Every theatre would like to get you for their customs. I love it! Kind regards Undine
Pingback: What is Refashion Runway Anyway? A Look Back Through the Seasons | The Renegade Seamstress