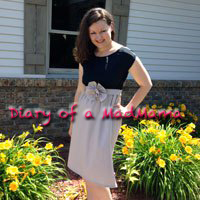
Ah, the maxi dress.
So comfy!
So cute!
Here’s a maxi dress you can make in less than fifteen minutes.
I had previously used the bottom of this thrift store shirt for some ruffles.
Now I can use the top.
The fabric was a lightweight knit from Joann Fabrics.
After refitting the bodice and the sleeves, sew sleeves back in sleeve casing, being sure to sew right sides together.
I measured from under my bust to the floor and added an inch to get the length I wanted for the skirt.
I’m 5’4″ and I measured 44 inches. This is a perfect length if I’m wearing flats.
My fabric was a lightweight knit and 60 inches wide so I just used it all and sewed the seam down the selvage edge.
Since this fabric had a pattern, I was also careful to match the pattern.
I put the seam down the back of the dress.
Stretch and cut a piece of quarter inch elastic under your bust to a comfortable length. Don’t make it too tight, just enough to gather in your dress nicely.
And now you have a fun, inexpensive summer maxi dress in less than fifteen minutes.
My “fashion photographer” (aka youngest son, Cooper) was experimenting with this photo. I kind of like it…..
You might also like:


Such and easy way to make a new dress for a nice change in wardrobe. Great job. Thank you. Oh, and Cooper’s photographic skills are admirable.
~Louise
Thank you, Louise! Coop is such a good sport to take pictures of his mom. I love him!!! Enjoy your day!
Beth
That’s brilliant – I only ever wear maxi dresses and they usuall cost me between £40-£65! This is good as well because I could find a top I liked the sleeves on and ‘extend’ it to make a dress….ahh the possibilities!
Thanks, and I think I paid around $8.00 for the fabric and next to nothing for the shirt. If the shirt fit already, it would be an even easier project!
Beth
Beautiful!!! 🙂
Thank you for always being so nice!!!
Beth
This is so great too… I have lots of tops that could be re~vamped like this. I so need to get to sewing. I have nominated you for the Very inspiring and One lovely blog award and thought you may want to check it out. Have a great day!
Wow, thanks for the nominations!
A Beautiful Creation – thanks for sharing:) Have a Great Day!
Thank you!
Very nice! I love your fabric choice. You have a real talent for altering and fitting garments, as well as making some really attractive restyles. Your garments always fit you well and are flattering. Your work looks very professional, and this sets your blog apart from many other sites.
Oh my, thank you so much for all this encouragement! Necessity truly is the mother of invention. Finding clothing that fit was always such a source of frustration for me. So last December, I set out on a mission to learn how to sew clothing for my body. In addition, I’ve learned how to use my “new to me” camera, Photoshop, and how to blog. Huge learning curve happening here, but I guess it keeps the ol’ brain cells fit. Thanks again for all of your nice comments. It really means so much to me!
Enjoy your week!
Beth
Oh wow- what a great idea! Thanks for the post; I love this.
You are so welcome and thanks for thinking it was good enough to be reblogged! I hope you get a chance to make something like this. FUN FUN FUN!
Beth
Reblogged this on Kirinjirafa's Blog and commented:
I’m wrapped in a family visit and thus not taking to post, but when I saw this I just had to reblog it. Love, love love! I need to blogroll chic envelopments. She comes up with such cool, easy project ideas!
This is awesome. I follow you blog heaps as I am into reusing, upcycling etc for clothes as well as home. Great tutorials.Karen – http://www.madewithmytwohands.blogspot.com
Thanks, Karen! I’ll check out your blog, too!
Beth
Love maxi dresses. This one looks fabulous!
Thanks, Bella!
Amazing, your inventiveness is awesome!
Thanks so much!!!
Hi Beth! Please check my post on “Time for me to give”. I have shared 2 awards with you. All the best
Thank you , Nova! Have a great day!
Beth
You are so talented!! 😉
Thank you so much! I would do this all day, everyday if I could. It’s so much fun!
Happy Fourth of July!!!
Beth
Hi Beth, can you email me your home address for the swap/ Thanks rachel.
houseofpinheiro(at)hotmail(dot)com
Done!
I love your posts and refashions! It seems we have very similar tastes in style, so I’m always eager to see what new creation you’ve made because they always appeal to me, too. (Plus, it seems we have same body shape, so I can kind of “cheat” to see how a style looks on you first, ha ha!) I am just getting into refashioning so I learn alot from your tutorials, too. I do have one question, though? When you do a refashion involving the sleeves, you always say you “cut off the sleeves.” Do you actually cut them off, or just unpick the existing seams and then cut material off from the sleeve itself? May sound like a dumb question, but I’m thinking it could make a difference in the end result! And I also have to say, I’m envious of you having such a great place to thrift shop. Thrift stores around me aren’t that great, it’s hit or miss at best….mostly miss! Still looking for that great thrift store like you obviously have! 🙂 Thanks for taking time to respond to your comments and posting all your tutorials!
Hi Tish,
I’m so happy that you are finding these posts helpful. I love having this community of people who are interested in doing the same things. It makes it even more fun to do!
As far as the sleeves go, yes, I just cut them off leaving a little room for a seam allowance if need be. I’m usually working with clothes that are too big so this works fine for that since you have to get rid of some of the excess fabric anyway. If the garment fit you and you were just trying to change the style of the sleeve, then you might want to unpick the seam.
I keep hearing how lucky I am to have a thrift store like mine. I do so appreciate them and I don’t know what I’d do if they ever closed their business. The other thrift stores in town are WAY too expensive.
Have a great day and I’d love to see some of your refashion projects some time!
Beth
Man I wish dresses would look as good on me than it does on you… Great refashion!
Thank you! I usually can’t wear Ready to Wear dresses because I am a different size on top than on the bottom. So this refashioning thing allows me to make it to fit my body as is!!
Perfect solution for a hard to fit body!!!
Beth
Loving this dress, great tutorial!!
Also wanted to let you know that I featured your awesomeness on my blog!
Feel free to come check it out 🙂
http://www.artsyfartsymama.com/2012/07/pinteresting-features-n-shtuff-39.html
Thank you so much, Lindsay!!
Such a cute tutorial! I am a new follower! Love your blog – can’t wait to finish scrolling through for more fun things! Feel free to visit me at http://LoveItSewMuch.blogspot.com
I LOVE this dress! So practical and chic. I think I must have a few of these to wear this fall. Thanks for the tutorial.
Thank you so much! I hope you make some and I’d love to see pictures of them. I’d love to post them on my “Your Projects” page, too!
Beth
I admire your bravery with knits, I don’t know why they have always intimidated me! You have great ideas…
You also look great in all your creations!
Thank you for sharing,
Chrissi
Hey Chrissy,
Thanks for your kind words of encouragement!
I think knits are the best to work with. I love they way they hang and they never fray. Perfect for refashioning. Using cheap thrift store clothes makes it so much easier to just dive right in, take risks and just cutting.
Enjoy your day!
Beth
Pingback: One Thrift Store Dress+One Refashion=Three New Looks | The Renegade Seamstress
congratulations!!! your blog is full of good ideas!!
Thank you!
This looks so easy and comfortable, I have to try it out. Probably more than once. I am loving your blog!
Thank you, Crystal! It is super easy to do and the color and fabric combinations are endless. Have fun with this one!!!
Beth
I recently pinned the cutest maxi dress from t-shirt tutorial to make for my 3 girls (6, 4, 20 mths), then I got to thinking…I wonder if I could make me one too? Thanks so much for sharing! I haven’t done much sewing in the past few years, but I’m going to give this a try. :0)
Hi Lana!
I hope you get a chance to try this. Super easy and fun!
Thanks for visiting!
Beth
Pingback: 5 Maxi Skirt Tutorials for Beginning Sewers | You Put It On
Pingback: Up-Cycled Fashion | A Homeschool Mom
Reblogged this on Your Favorite Mistake Life & Photography and commented:
This is so my next project!
being near 6 ft can have em to lenght ~~~~ thanks a bunch!
You’re so welcome!!!
Nice!
Thanks!
Can this be done in fabric other than knit ? I have 2 yards of very soft cotton ( probably a mix but feels very soft and has a good fall). The fabric width is 56″, my waist measures 34″. How much fabric do I use for the skirt? I am a novice. Your refashions are so classy. Love them all. Keep inspiring us. Thank u 🙂
I am not the original poster. I have been making some of these with woven cotton for the skirt. Measure your hips and use 1+1/2 times that measurement for the starting fabric width for the skirt. If your tank top is very loose fitting at the hips like a swing top, you can gather the skirt of woven fabric to match the width of the top, and just sew it together. If the tank or tee fits snugly where the skirt will attach, you must gather that same fabric for the skirt to a larger width than the bottom of the tank or tee, and use elastic in attaching the skirt. I’m still working out the details of the exact steps, Googling tutorials here and there (especially on Pinterest). The reason that you must use the elastic is that the woven cotton (non-knit) does not stretch and will be uncomfortable tight when wearing, (unless, again, the whole dress is a wide a-line). I had a knit tank I loved that had a nasty hole above the waist. It was very stretched out side to side. I cut it off the somewhere between bust and waist, picked a woven coordinated print in rayon challis, put them together and now have a gorgeous lightweight flowing summer dress. I am also a size bigger in the hips than bust, so that loose style hides a multitude of sins. I made another one without elastic and a tighter tank and the seam is tight and scratchy, so learn from my mistake.
Hi! I need a new button from your site. Can you pass along the code? I am also using Theme Twenty Ten like you, but can’t seem to get any more of my buttons on the side bar. There’s also an optional side bar. I can’t get that to work either. Any tips? Babara
How much yardage was your knit?
I am not the original poster. The rule of thumb – a starting point – making anything gathered is to use 1+1/2 times the measurement. Take your hip measurement and the skirt width should be 1+1/2 times that before gathering. The fabric should run up and down, selvedges on the sides. You can economize on a few things by running woven (not knit) fabric around sideways, but many fabrics do not hang as nicely when used side-to-side rather than up-and-down. That’s why there are always grain line instructions on patterns – the long line with arrows that say to align the pattern to the long up and down threads that run up and down the long length of fabric yardage. Most knits that stretch have side-to-side stretch, and using it sideways will to lead to very unsatisfactory results. Buy yardage based on how long you want the skirt, not how wide you will make the skirt. You will need to buy enough yardage for the front, then the same amount for the back.
The original poster said her skirt was 44″ long. So, that’s 44″ long from the waist to hem in front, 44″ long in back = 88″. That’s 2 yards plus 16 inches. If you are using 44″ wide fabric, like woven cotton, you would need to buy that 2 yards and 16″ for that length of dress. If you are not a larger plus size, you can get a skirt from 58″ to 60″ wide knit fabric and would only need the 44″ long piece of fabric.
I hope that makes sense. It’s the width of fabric that is going around the dress sideways. The length of dress is determined by how much yardage you buy.
Love it, thanks. Just walked my 14 yo how to make a maxi shirt. This will b our next project. Thanks.
Yes! I have the same question as Anonymous – how many yards did you use for the knit fabric?
I am not the original poster. The rule of thumb – a starting point – making anything gathered is to use 1+1/2 times the measurement. Take your hip measurement and the skirt width should be 1+1/2 times that before gathering. The fabric should run up and down, selvedges on the sides. You can economize on a few things by running woven (not knit) fabric around sideways, but many fabrics do not hang as nicely when used side-to-side rather than up-and-down. That’s why there are always grain line instructions on patterns – the long line with arrows that say to align the pattern to the long up and down threads that run up and down the long length of fabric yardage. Most knits that stretch have side-to-side stretch, and using it sideways will to lead to very unsatisfactory results. Buy yardage based on how long you want the skirt, not how wide you will make the skirt. You will need to buy enough yardage for the front, then the same amount for the back.
The original poster said her skirt was 44″ long. So, that’s 44″ long from the waist to hem in front, 44″ long in back = 88″. That’s 2 yards plus 16 inches. If you are using 44″ wide fabric, like woven cotton, you would need to buy that 2 yards and 16″ for that length of dress. If you are not a larger plus size, you can get a skirt from 58″ to 60″ wide knit fabric and would only need the 44″ long piece of fabric.
I hope that makes sense. It’s the width of fabric that is going around the dress sideways. The length of dress is determined by how much yardage you buy.
How did you attach the top? After the elastic? Thanks
I attached the top before the elastic.
I just love this dress. I will definitely try this one.
I made the maxi dress last weekend. I love it! I’m so pleased with the results that I want to make more. I didn’t get to grips with the gathering stitch very quickly and it took me a couple of attempts to pin the top and skirt together correctly (my brain got confused!) so all in all it took me about 2 hours rather than 15 minutes, but I enjoyed it! I’m not very accomplished at using my sewing machine yet, so I need more practice. I’ve looked through some of the other tutorials and love how they are set out with easy to follow instructions – making me feel like I can make them all! Thank you.
Hi Josephina! Welcome to the fun world of refashioning and sewing! Please let me know if you have any questions on any of the tutorials. I’d be happy to help.
I have a husband and son who have heaps of t-shirts. Loved this idea. My question is at what step do you re-attach the sleeves? Muchísimas gracias.