Another great week of voting! Thank you to everyone who took the time to vote for your favorite designers in the 1970’s challenge!
Between your voting and the judges scores, here’s how it all came out.
The fourth place winner this week is Beki Biesterfelt
The third place winner this week is KT
The second place winner is Julie Kong
And we have a tie for first place…
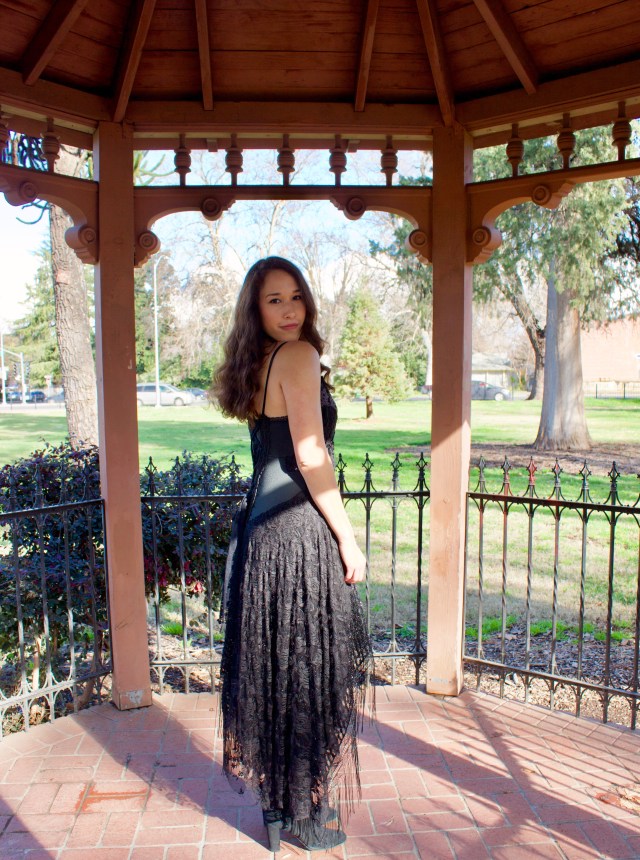
Peggy Latta and
Deana Budgell
Congratulations to all of the designers who placed this week!
And now for the hard part, we have to say good-bye to Diane Scarponi. She was having a hard time finding any faux fur to refashion so she had to respectfully drop out of the competition. We will miss her but she is really looking forward to seeing what everyone else created.
The Faux Fur Challenge will be up today sometime. The governor declared our county in a State of Emergency due to severe flooding and the high speed internet that I usually use to download the photos is down right now. I’m using a slower version but it is taking FOREVER! I apologize, but I’ll post it ASAP.
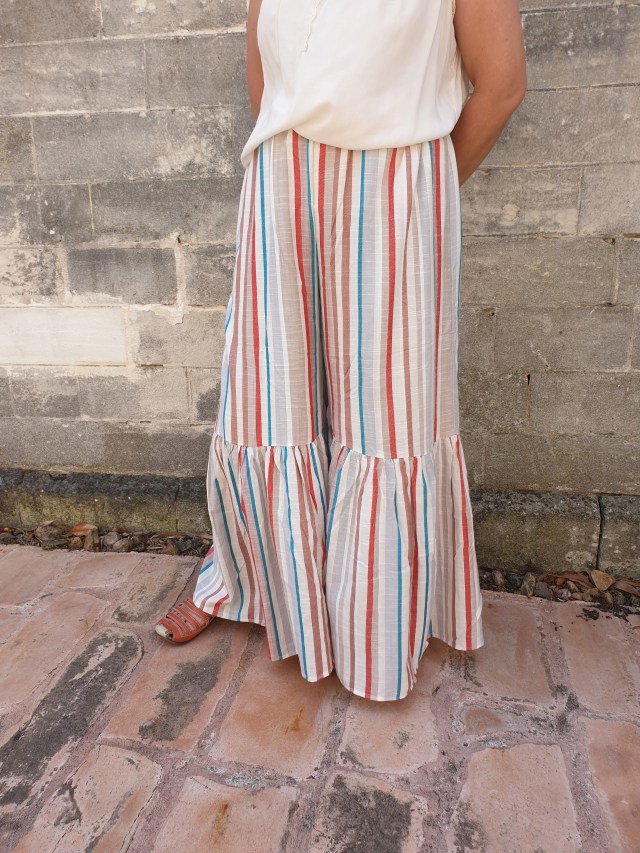
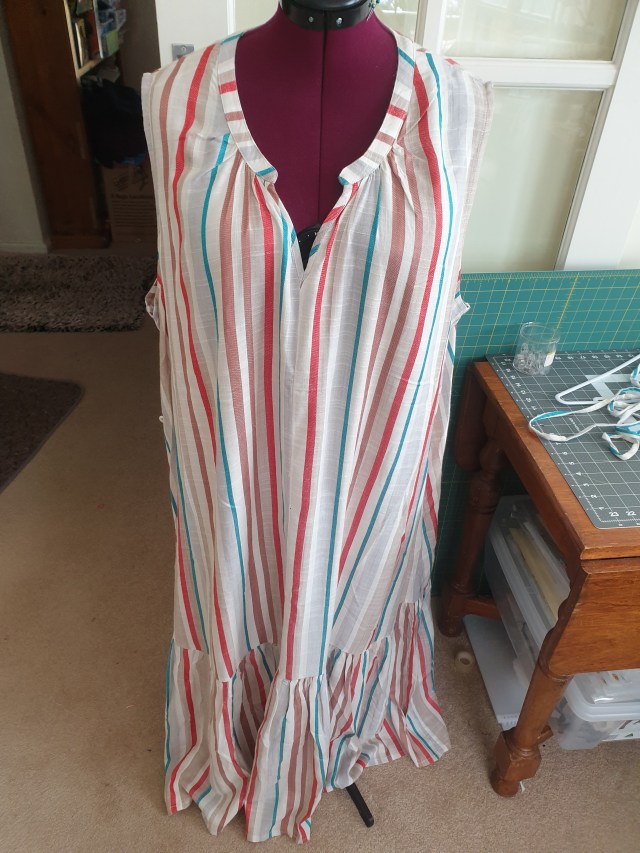
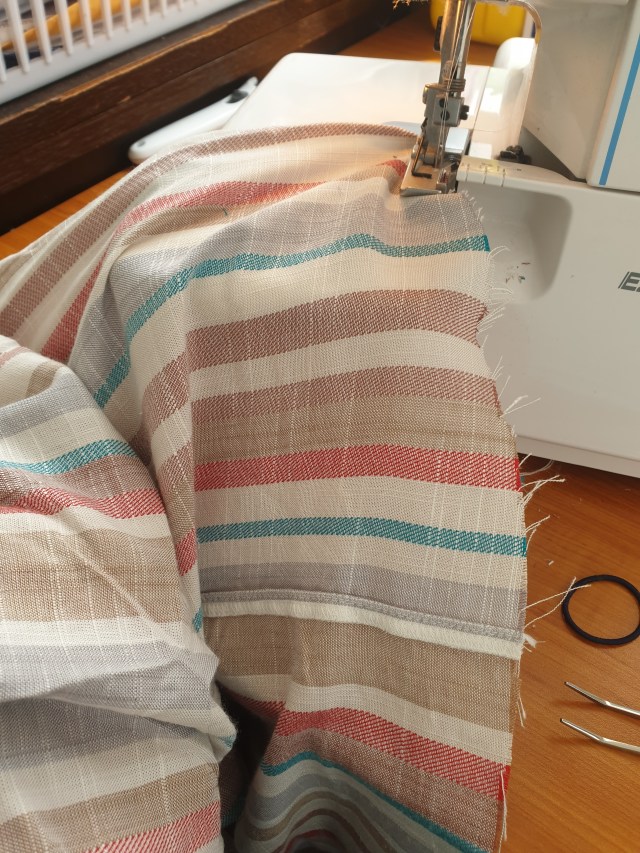
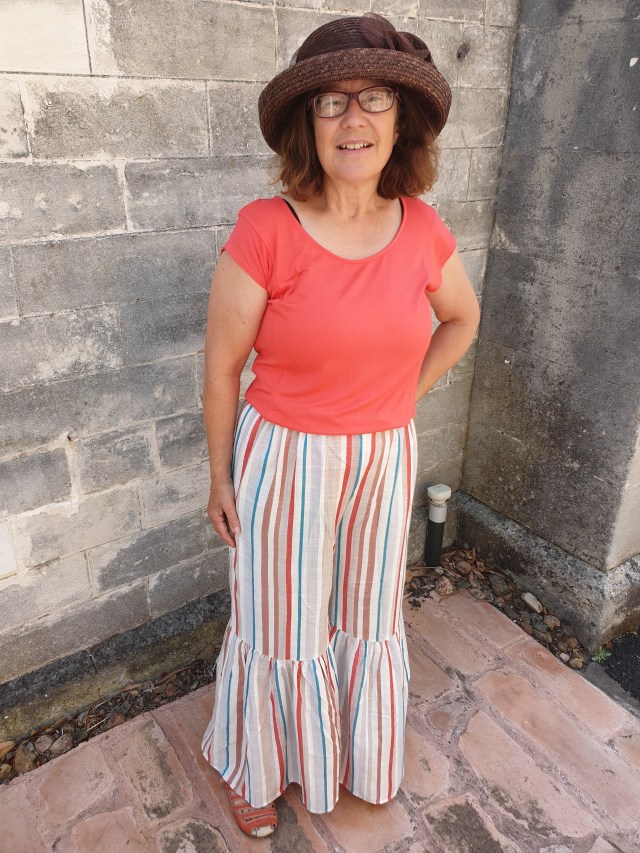
Amy Smith sewed along with us this week and she turned a rather shapeless dress into some funky trousers. Now these are some serious bell bottoms! Be sure to send in your before and after pictures to bhunting@eoni.com if you’ve been sewing along this season. We’d love to see what you’ve created, too.
Friday is the last day to vote for your favorite Refashion Runway Designer in the 1970’s challenge. You can vote once every 24 hours. Click here to see what the designer’s created this week and to vote.
If you’d like to see more of what Amy creates you can visit her Facebook page, Luvluv made.
Bell bottoms, disco, The Bee Gees, & platform shoes just to name a few things that had their moments in the 70s.
But, wait til you see what these talented designers have created for you this week. From tie-dye to refashioned couches, pretty sure you’re gonna love it!
Scroll down to the bottom of the post to vote for your favorite designer. Be sure to click on the button above their name then click the vote button at the bottom of the poll so your vote will be counted. (The voting is over for this challenge) Click here to vote for your favorite in the Faux Fur Challenge.
If you have more than one favorite, or you’d like to vote for your favorite more than once, you can come back every 24 hours and vote again.
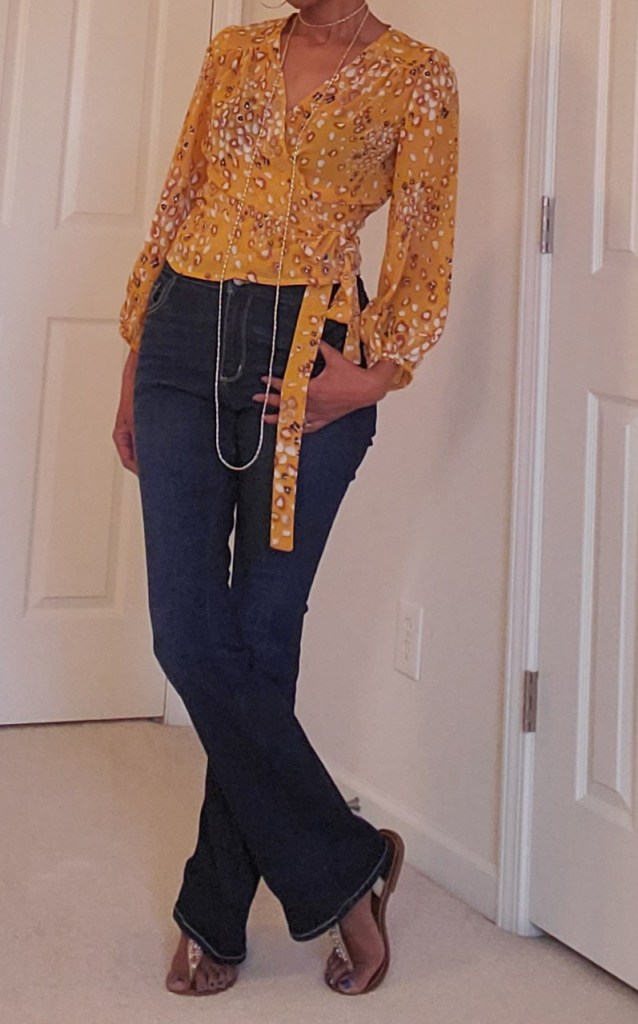
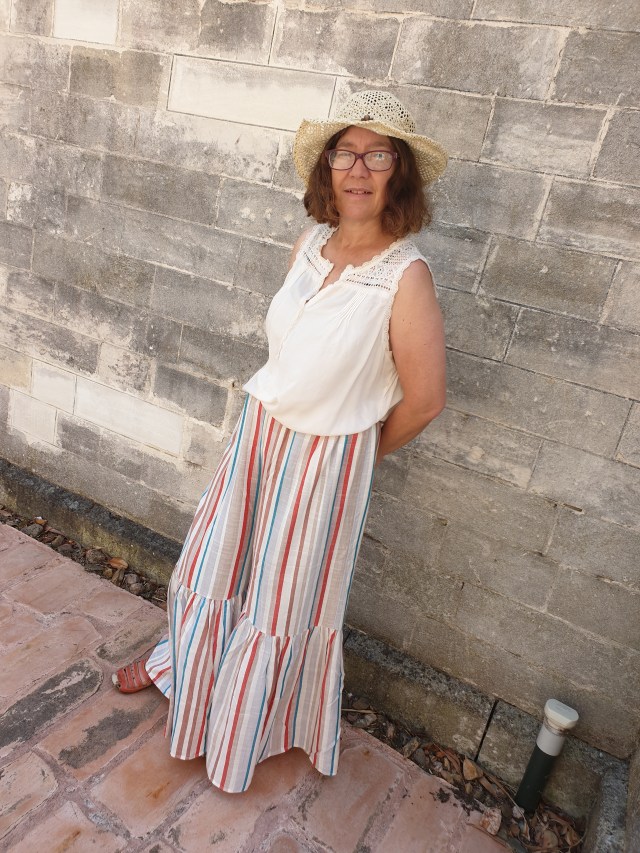
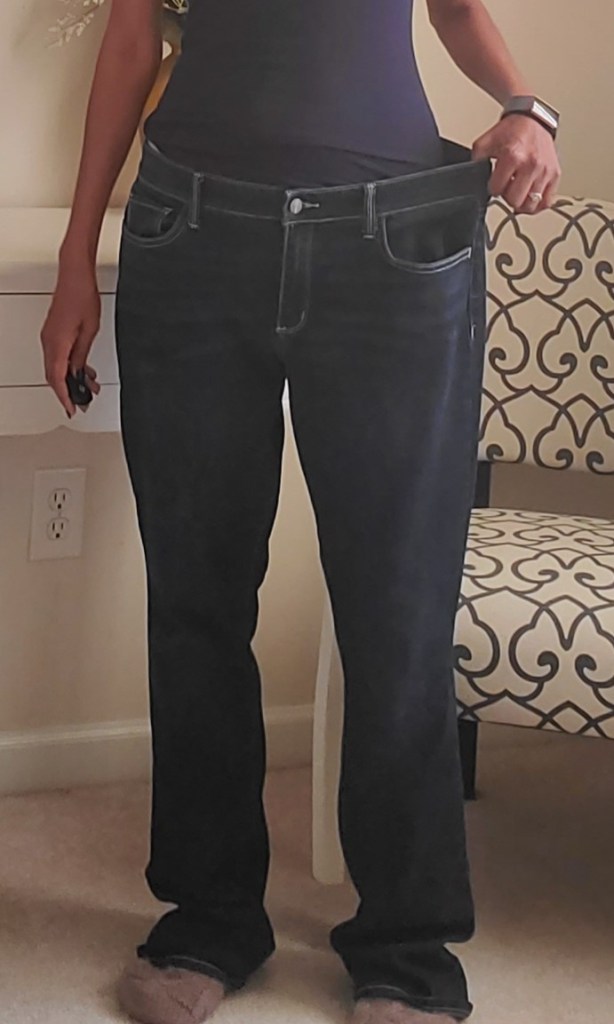
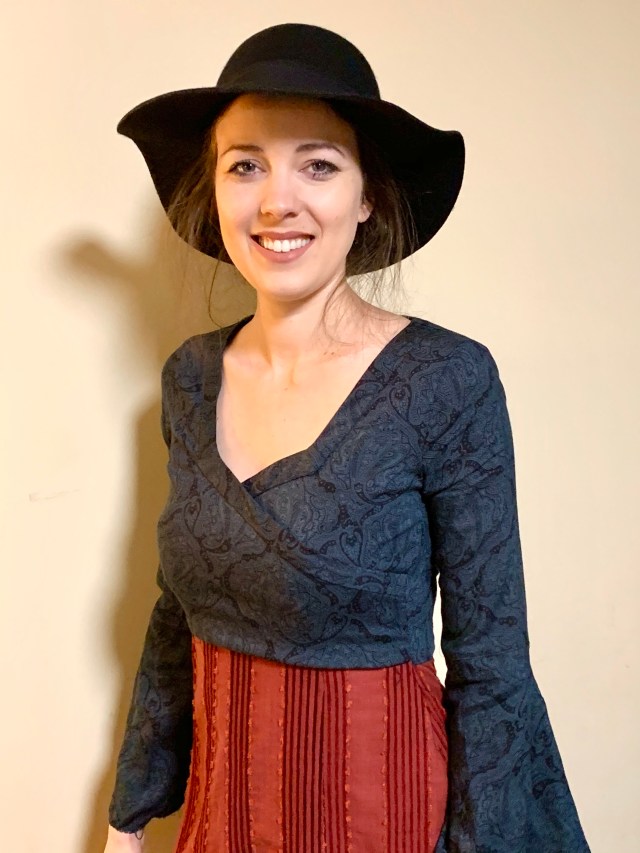
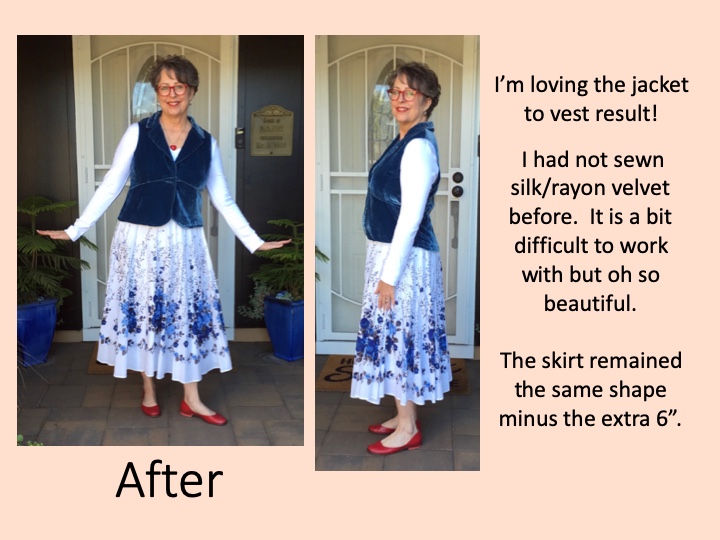
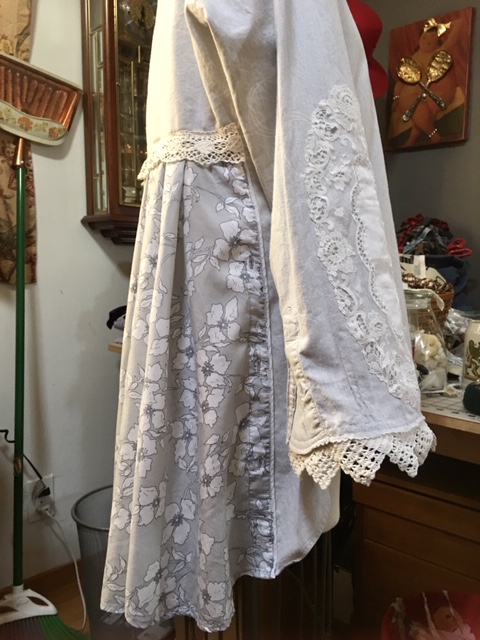
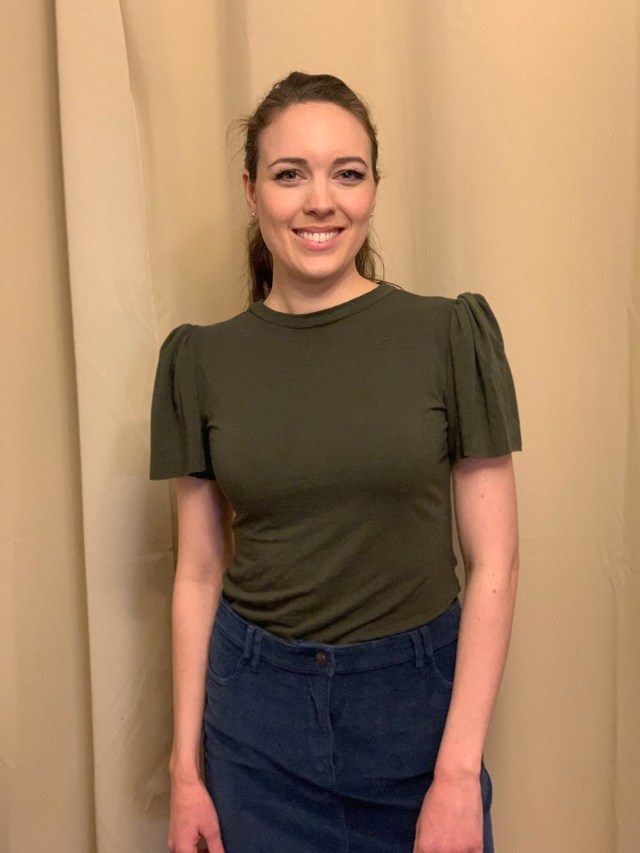
I was inspired by the bell-bottom pants and fitted tops from the 70s. Jeans: I found these really soft, stretch jeans to resize. I made them high- rise by adjusting the crotch and taking in the waist. I also flared the bottom by taking in the thighs. Blouse: I loved the chiffon fabric and color of the blouse. I took off the sleeves, collar, buttons, and recut the bodice to fit me. created a more fitted wrap style. I made the waist ribbon and sleeve binding from the excess fabric.
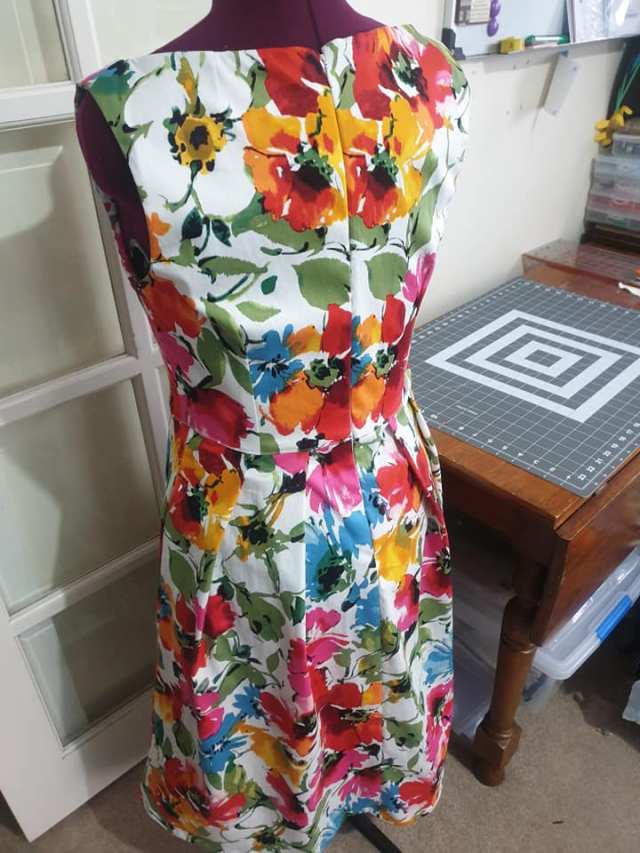
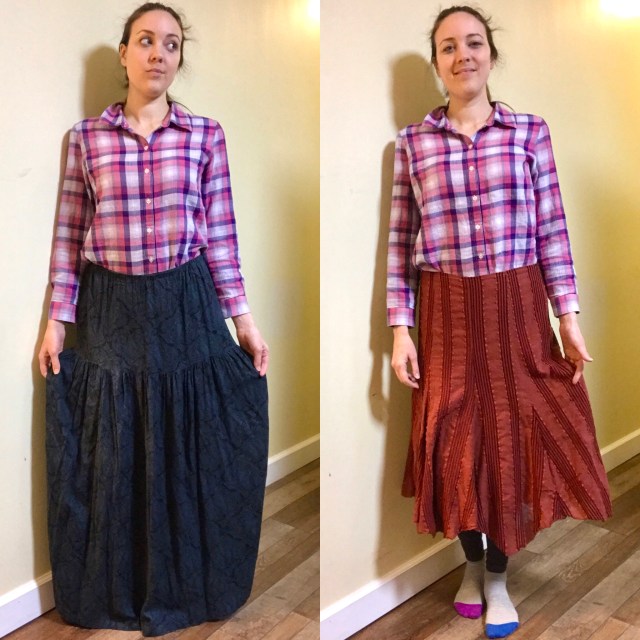
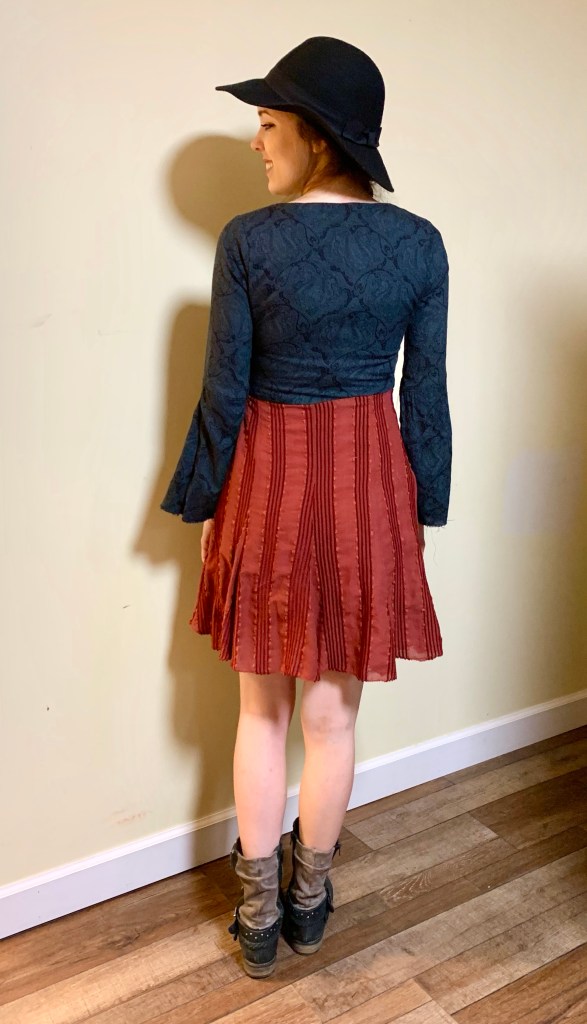
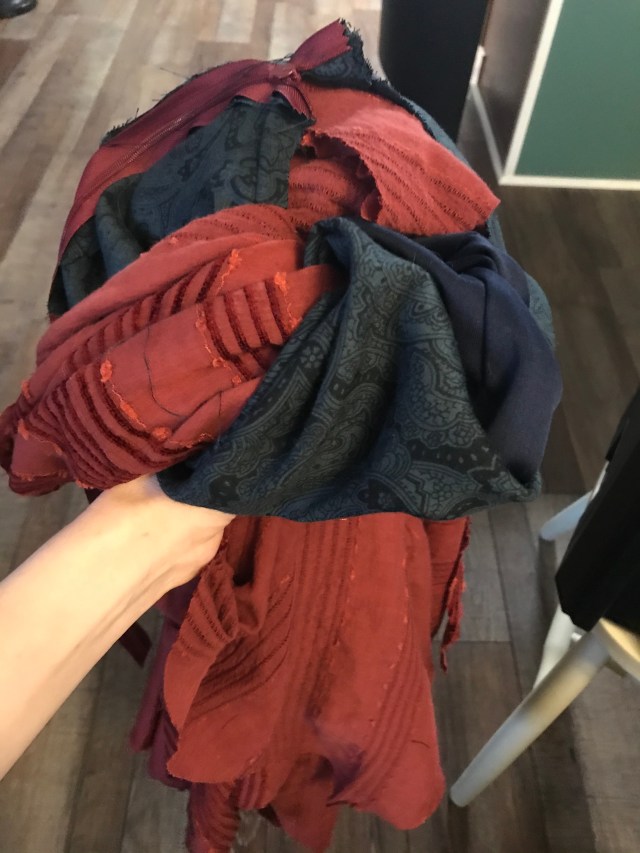
It all began with a dress that I used as a pattern for this one. I traced the shape of the dress but then changed it so that it was a wrap bodice. I cut out a lining from leftover fabric from a previous upcycled project and the top from a thrifted skirt that my mom had given me and used a thrifted Goodwill skirt for the bottom. I cut out the pieces and the battle began. Just kidding! Things went pretty well at first. I sewed darts and the wrap part at the top. Things started to get complicated when I was trying to figure out the wrap around bodice and the zipper and the lining. At one point I held up this big ball of twisted fabric because I had no idea how to untangle it (I took a picture for y’all!). I took a break and when I came back We made peace I was able to untangle it and continued moving forward. I added the zipper, sleeves, and finally finished things up with a zig zag stitch around the bottom of the sleeves and hem of the dress. I always learn from my sewing projects and I learned a lot from this one! I had a lot of fun too, despite The big ball of tangled fabric I had for a while! It turned out well in the end!
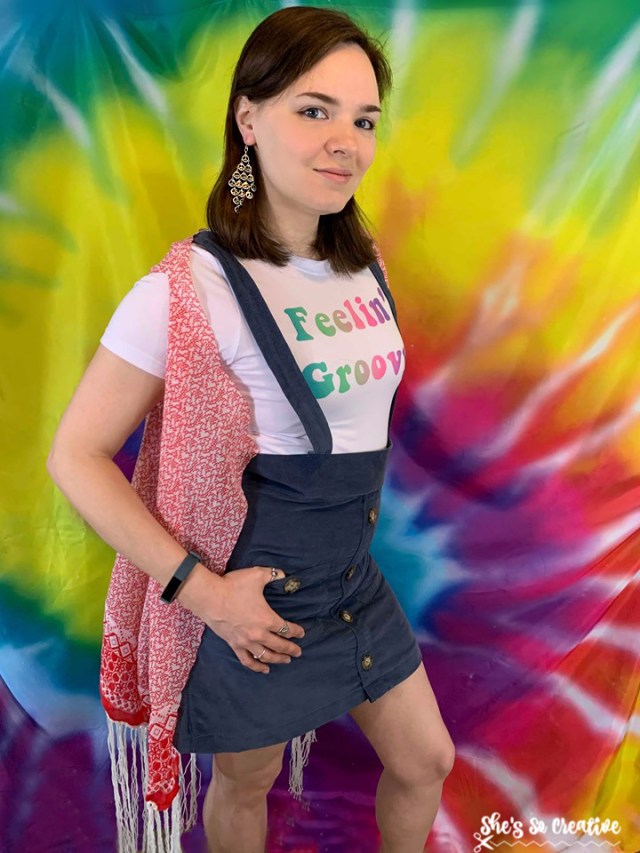
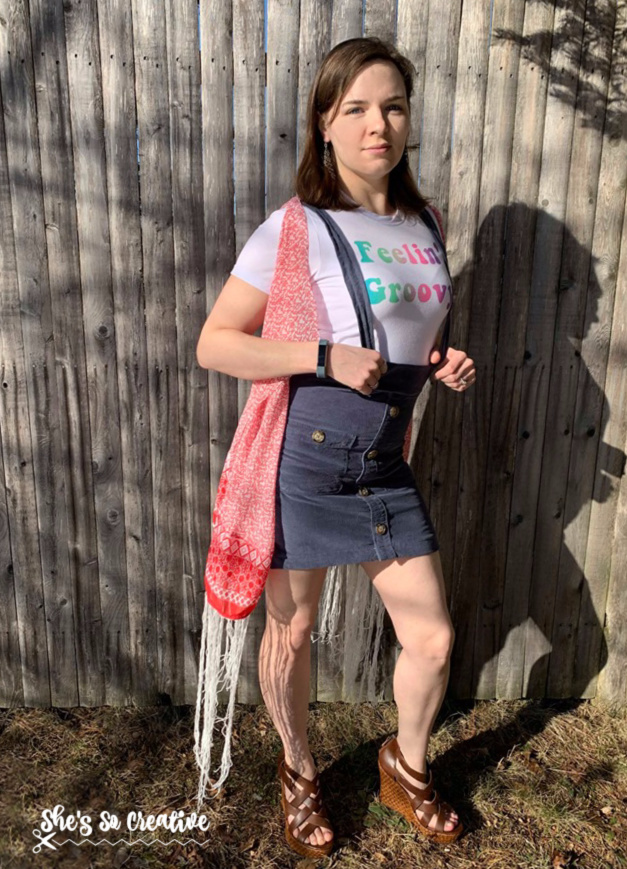
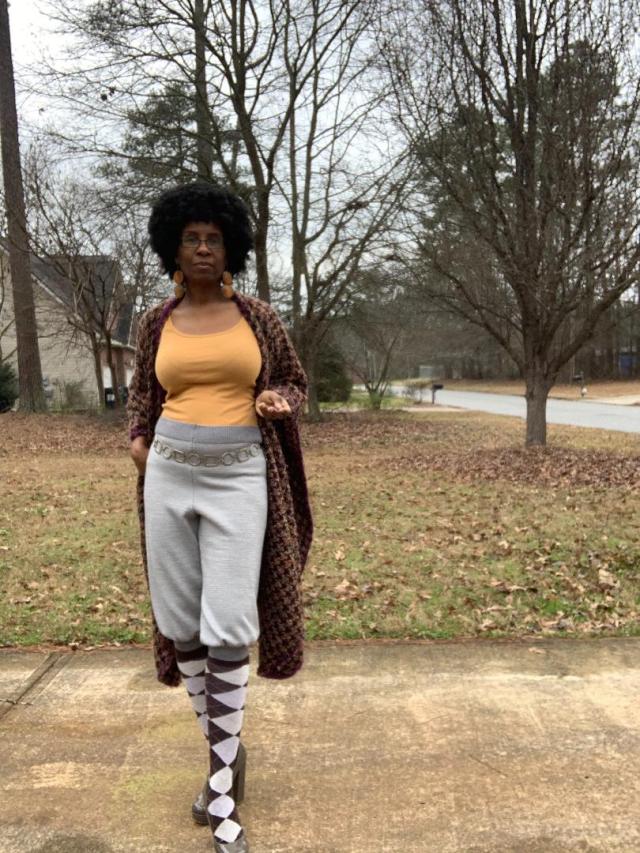
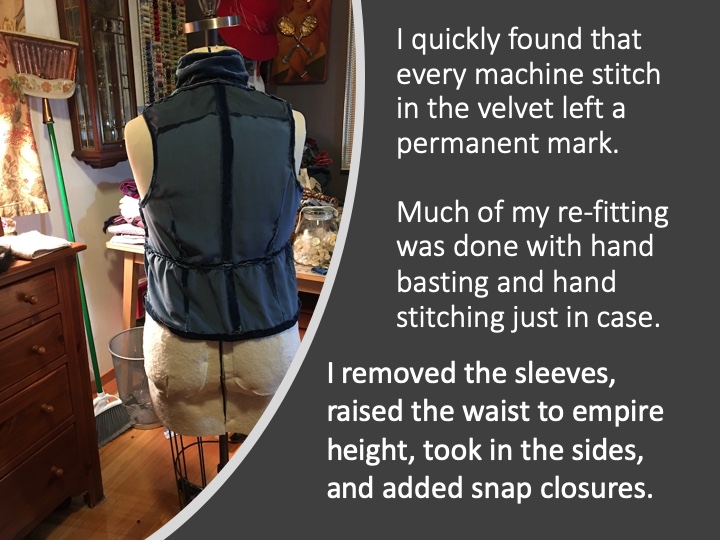
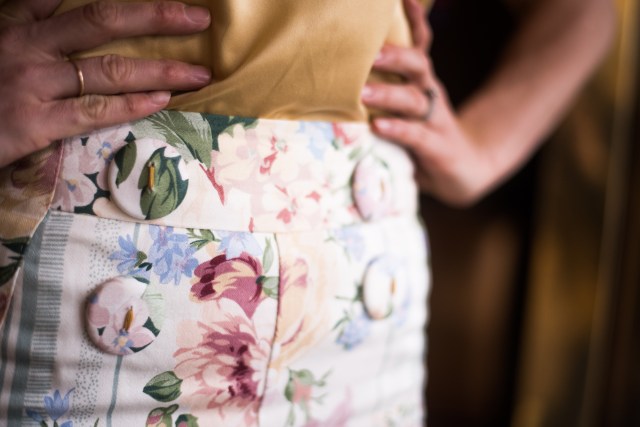
“For this round I chose to go with a high waisted corduroy skirt and a flowy waterfall vest with fringe. I took a men’s corduroy button up that I had purchased when a local store closed a few years ago (score!) and I cut off the sleeves, the top of the shirt and the bottom of the shirt. I then adjusted the remaining portion to fit my model Waist-hip creating an A-line skirt. I took the bottom portion of the skirt and made a waistband and used the sleeves to make suspenders. I also changed out the buttons for larger tan buttons that were more true to the 70s style. For the waterfall vest, I removed the bottom portion of the dress, cut the skirt in half and added armholes. Then I crocheted a small trim and added fringe to it, then sewed it along the bottom. I got the white t-shirt a year or so ago for $1 and finally had a purpose for it a 70s saying! I used my Cricut and their new Infusible Ink and added Feelin Groovy to the front in a tie-dye-esque sublimation. I used the ink instead of vinyl because this was also more true to the 70s fashion. I kept the t-shirt understated, so the focus was mainly on the pieces I had truly refashioned.”
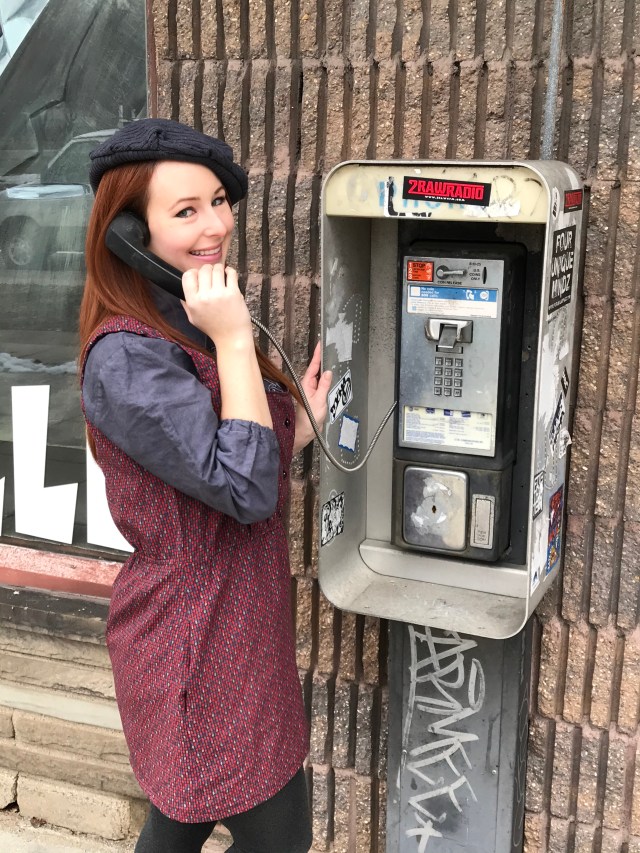
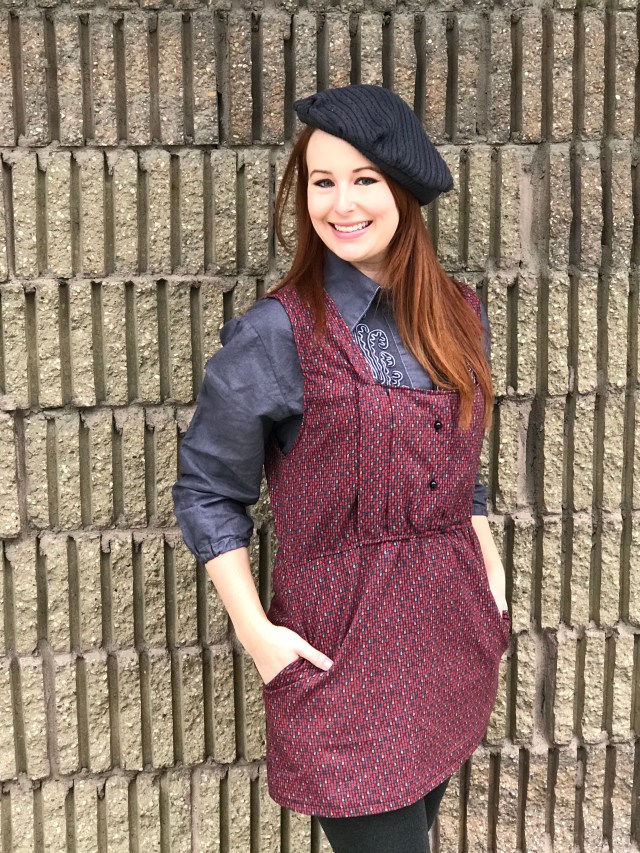
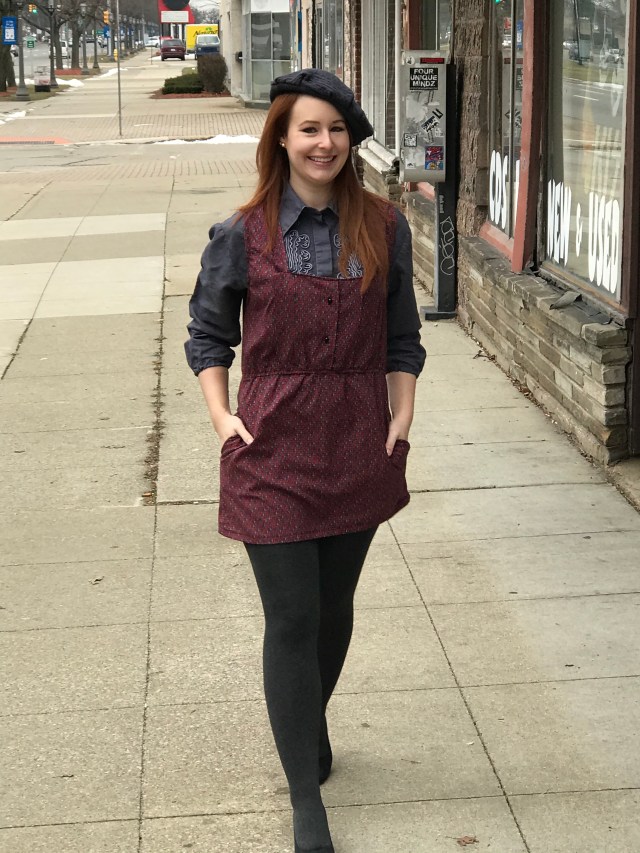
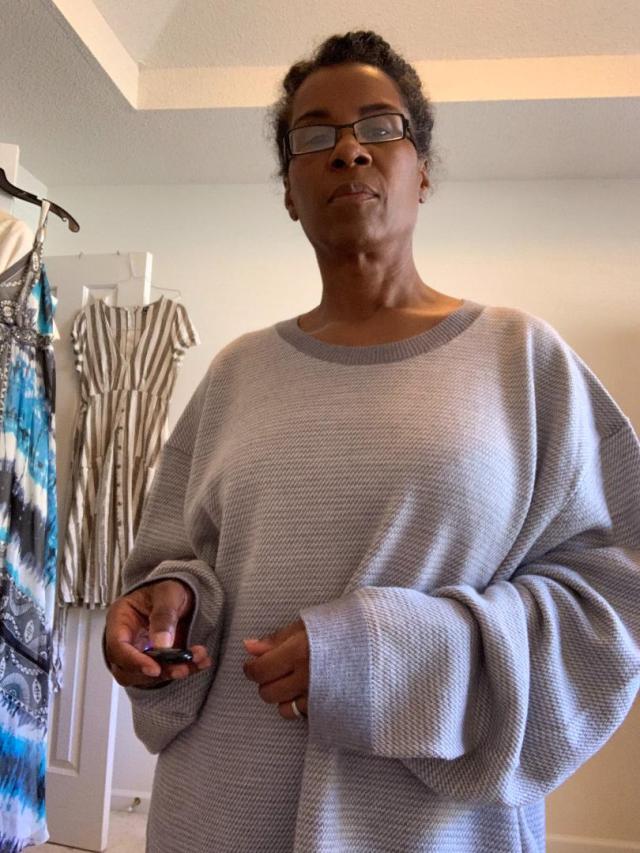
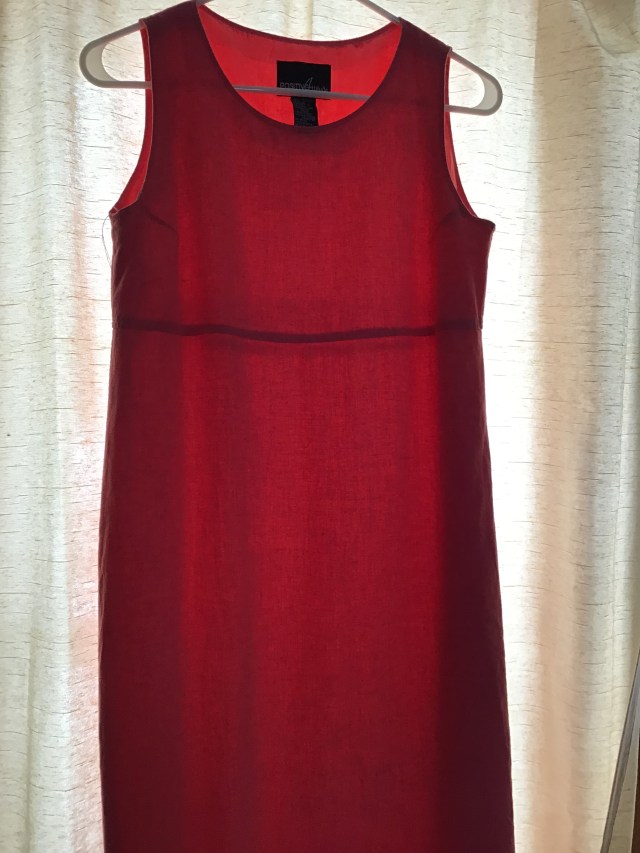
For my 1970s challenge I wanted to make something very casual for everyday life in the 70s. I wanted to portray something that a girl would purchase from her local department store such as Sears. I began with 2 pieces from the 80s- a white button down shirt and a working girl dress. I wanted to make the dress into a jumper. I removed the sleeves and collar, then fashioned a new neckline. Nothing says 70s more than short skirts and dresses so I said goodbye to most of the length and made a new hem. I took the shirt in on each side to make it fit, the threw it into a dye bath with black dye. Once the shirt was dyed I cut off the existing cuffs and made a space where I could thread in some elastic to make the sleeves gather at the bottom. For my final touch I made a beret out of a grey sweater that I had thrifted!
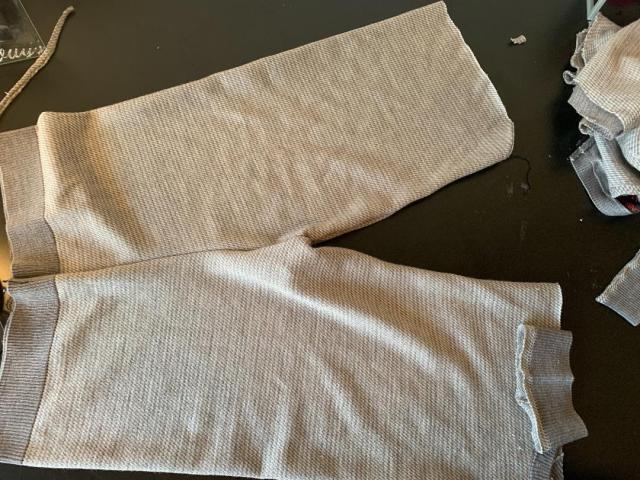
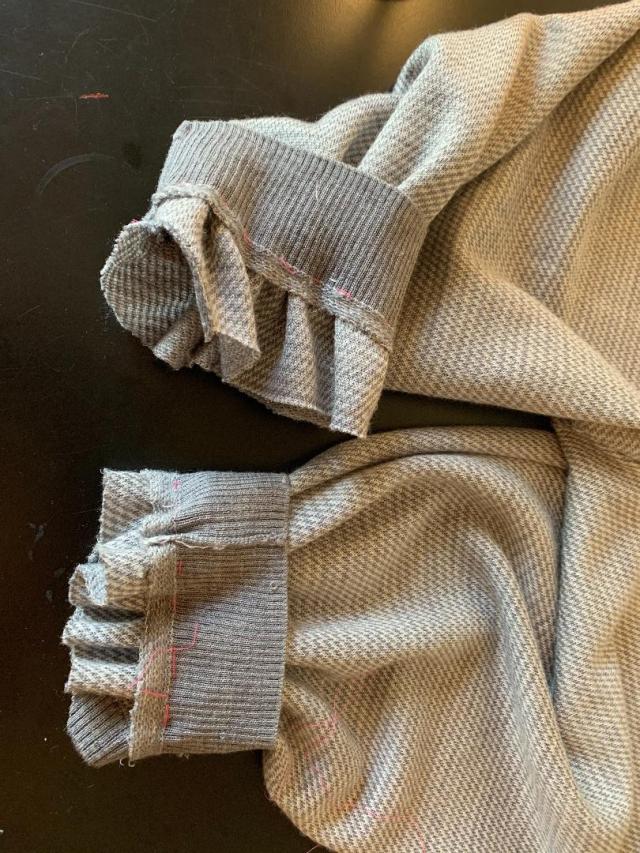
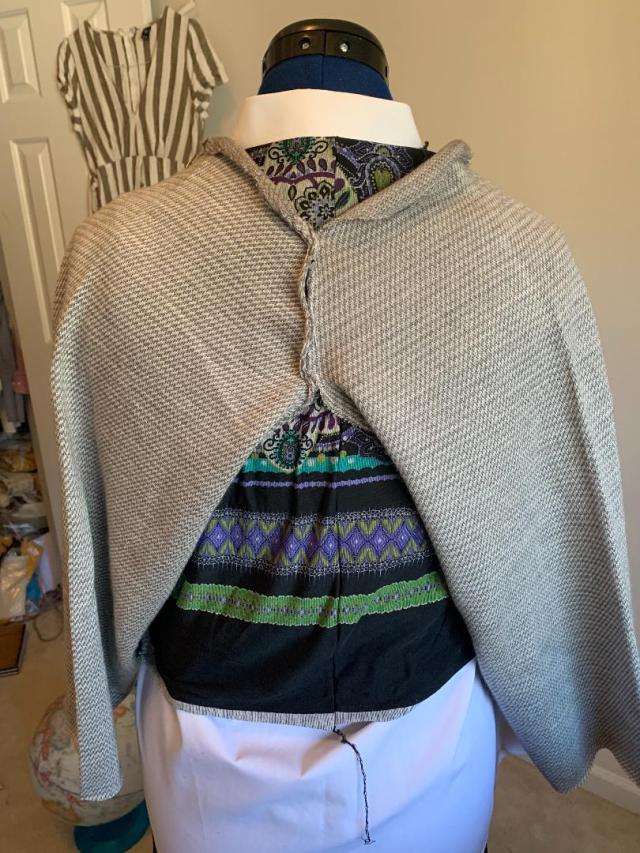
When I was in high school in the late 70s I had a wonderful pair of knickers. I wore lots of comfy sweaters. This old sweater was used to recreate both. I used the original bottom of the sweater and cuffs from the sleeves to bring the look together. I also cut front and back together to avoid side seams. Once the knickers were done the remaining sleeves were used to make a bolero style vest. Selvages from the original sleeve bands were sewn together to cuff the sleeves. The whole look was made easy with the aid of my serger.
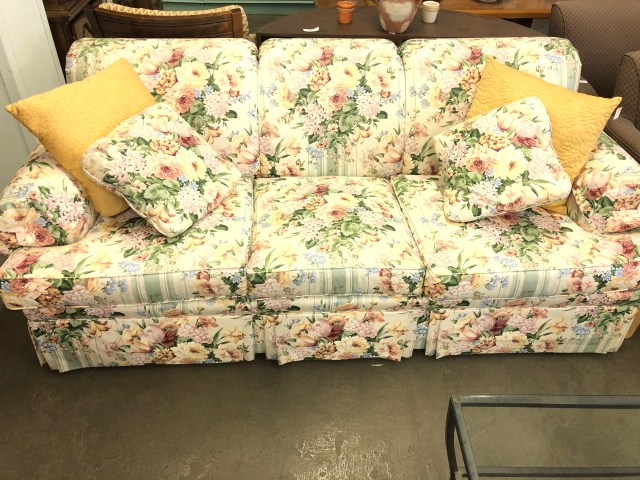
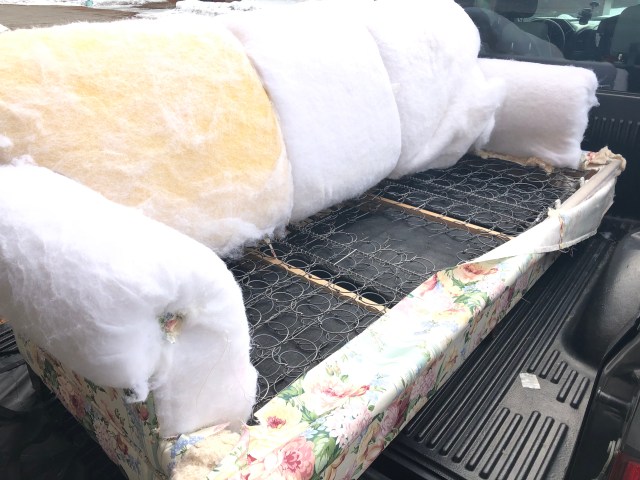
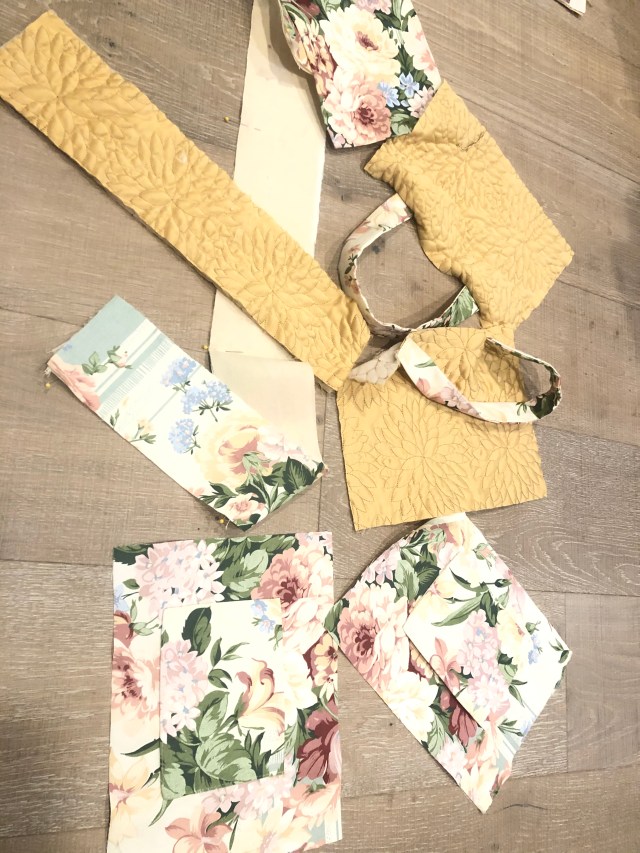
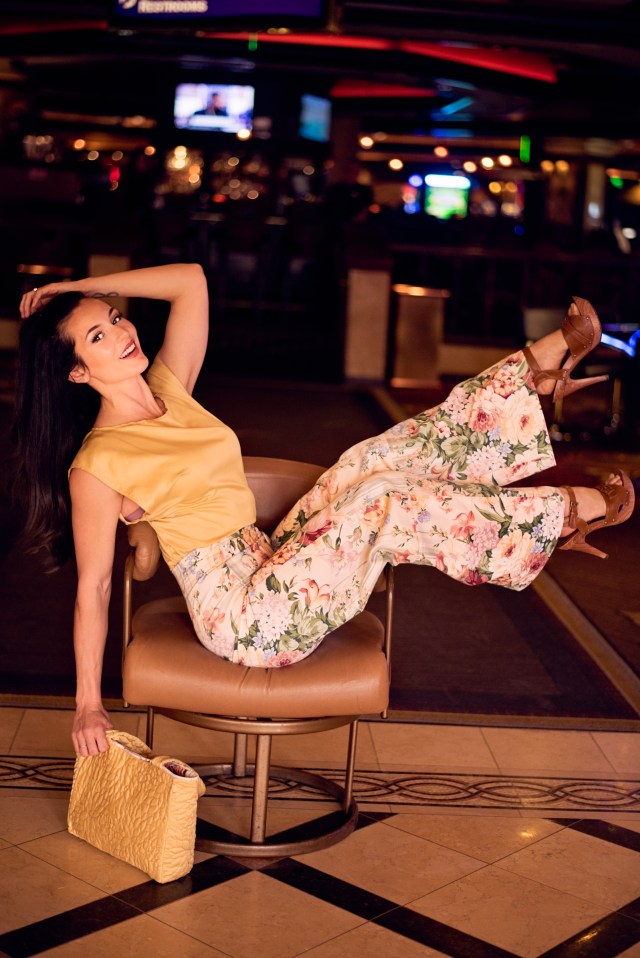
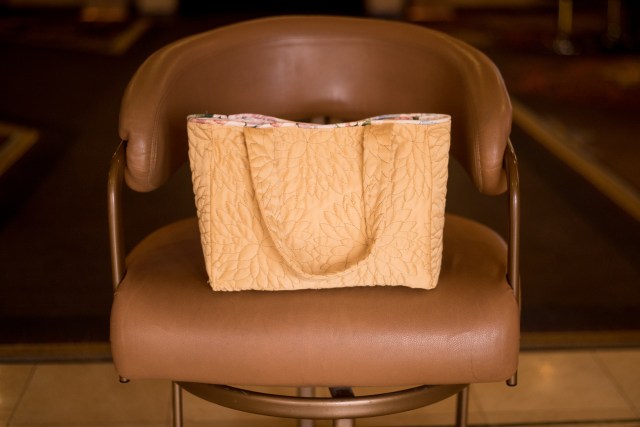
A lot of people think of bell bottoms and disco balls when they think of the 1970’s, but what’s more 70’s than a floral print couch? When I first saw it I knew that I had to recreate it as something 1970’s glam.
When I see this outfit, I want to put my platforms on.
Hope you like it.
“Jacket and pants made from the floral fabric taken from couch, zipper for pants is from the cushion. Buttons on pants came from the arms of the couch, I removed the nails and drilled two holes in them to form buttons.
The seventies is a decade that’s near and dear to my heart. I fondly remember mood rings, earth shoes, bell-bottoms and halter tops. It was fun designing this blast from the past.
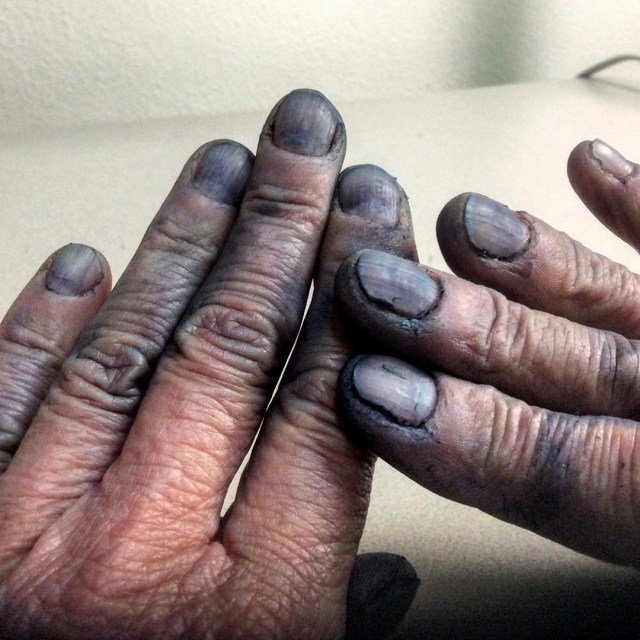
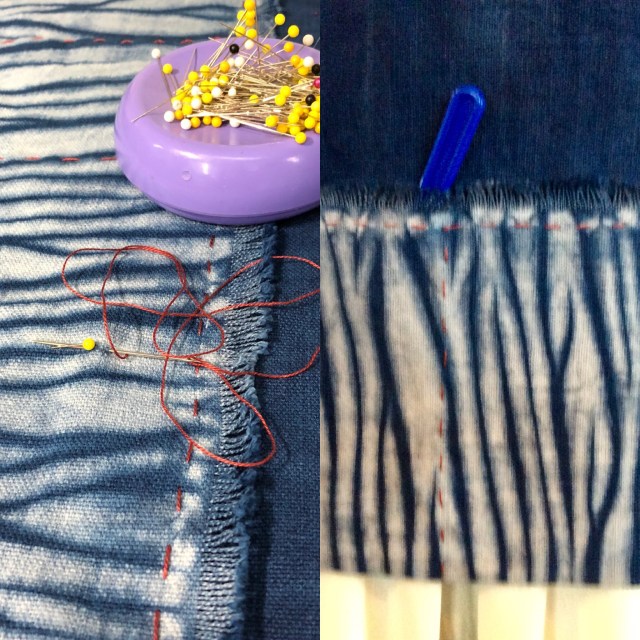
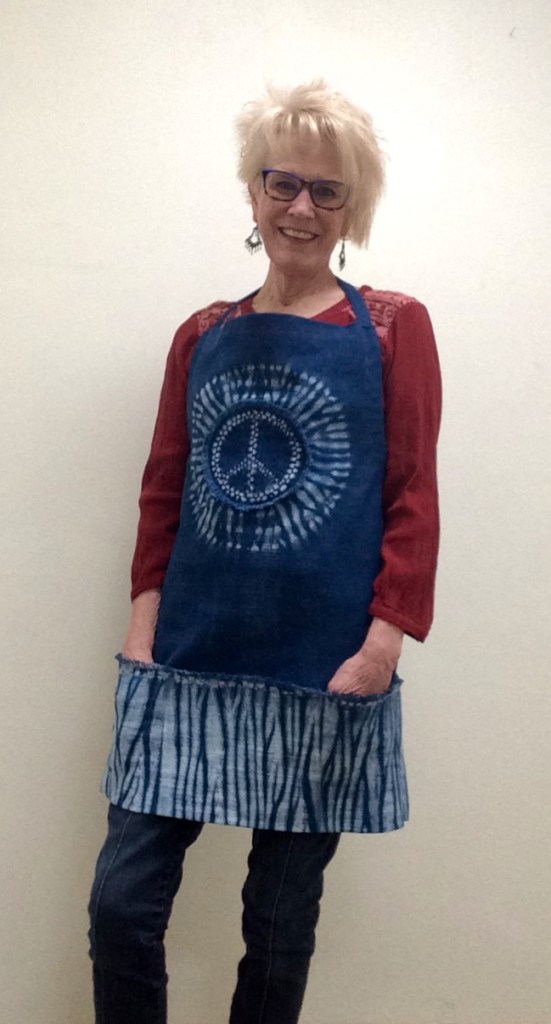
To be honest, I spun my wheels at first. I test-drove a couple of looks (the close second including cuts from my extensive denim stash and some indigo on white cotton tie dye), but once I found my muse, the rest just fell into place.
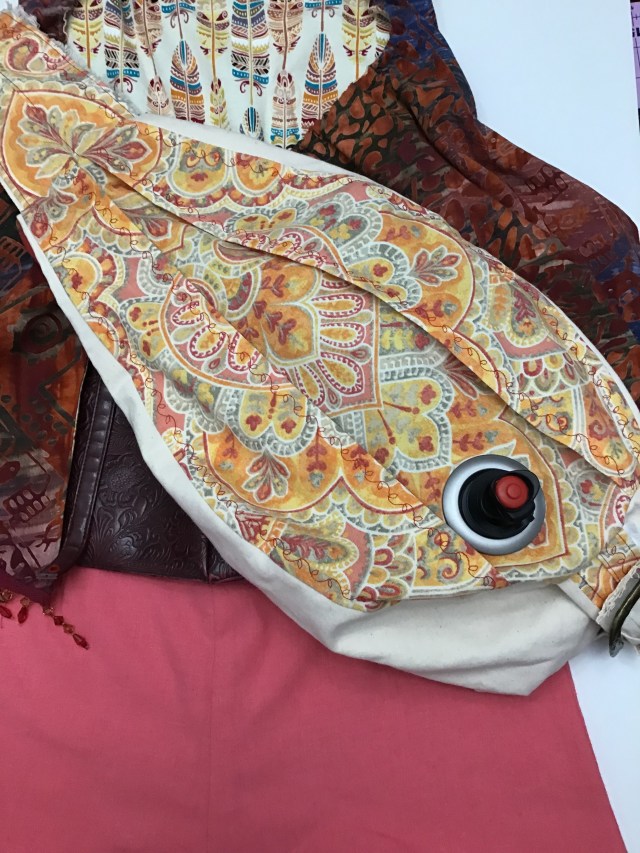
I designed and made this prototype of a WINE SLING, using remnants of muslin and upholstery fabrics. It can accommodate the big box of wine, but is photographed with the remains of my holiday box of wine (lesson one: share! That wine isn’t gonna drink itself!). The spigot uses a standard shower curtain grommet, and fits the box’s spout perfectly!
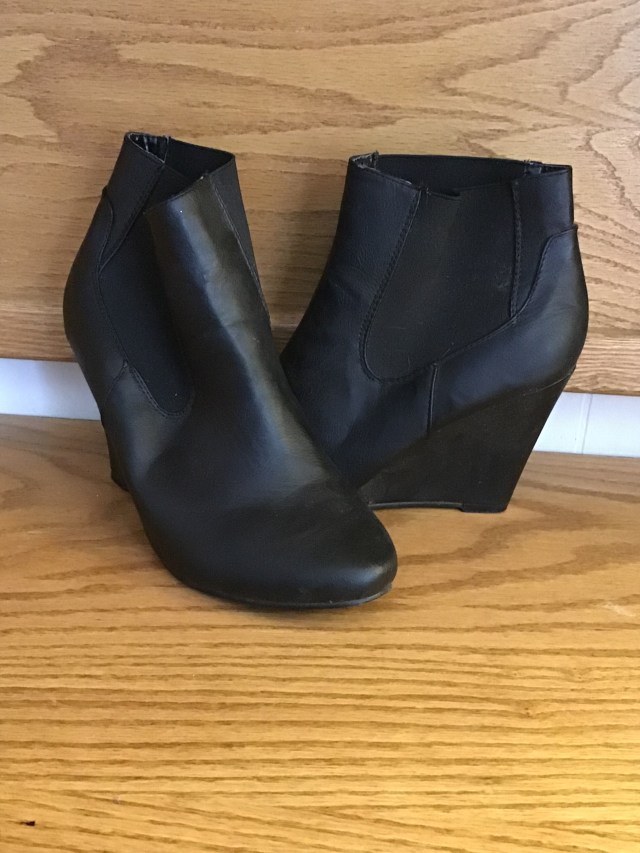
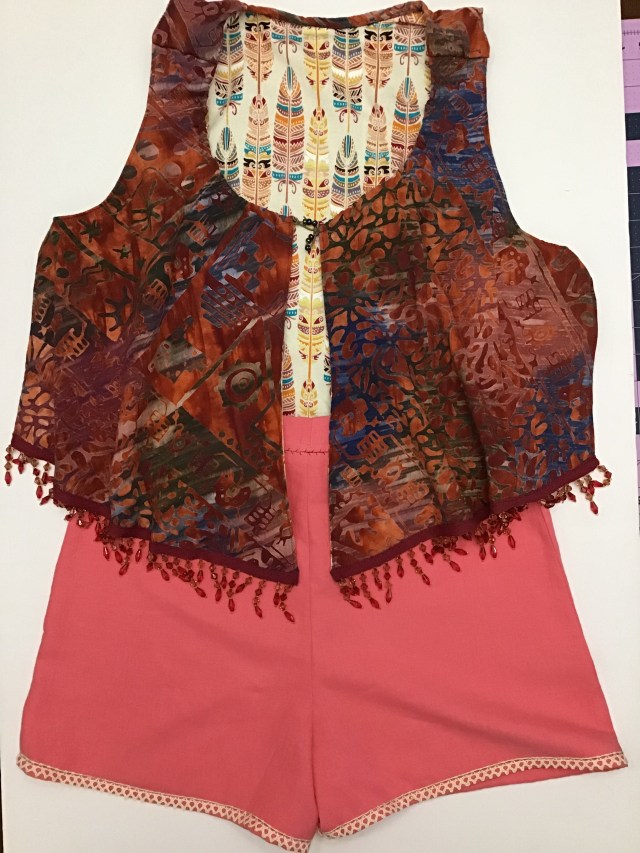
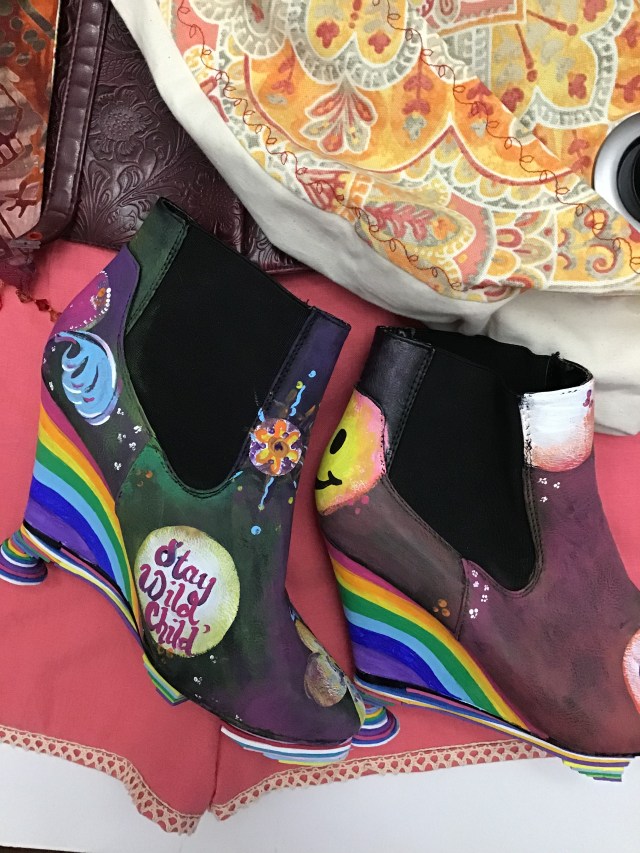
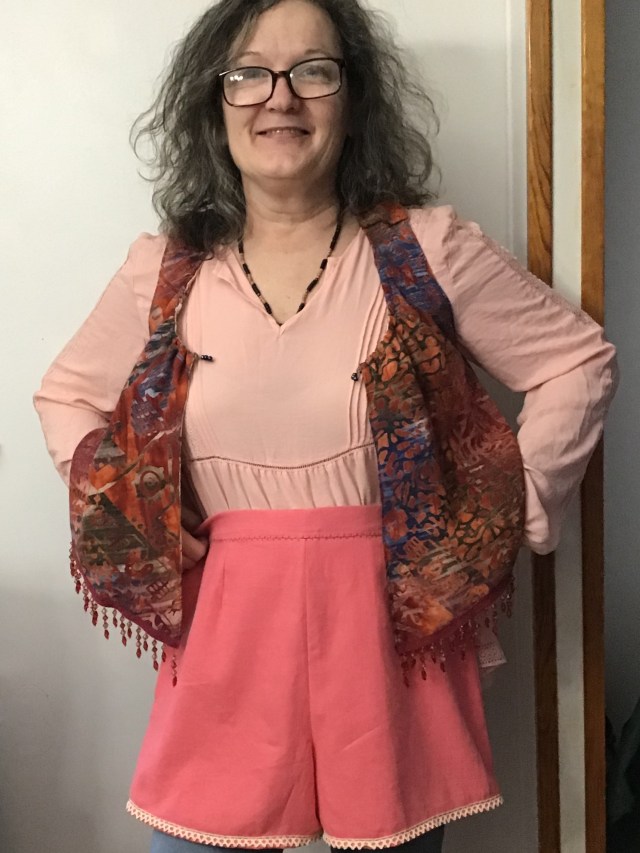
A few moo moo dresses trimmed with beads and lace are transformed into this boho batik vest and a cute pair of short shorts. (Who wears short shorts? hee hee) I thought I’d spare the entire internet the view of my winter white granny gams, but I did step into the modern platform booties. Basic black got a hand-painted graffiti makeover. FYI: these boots are NOT made for walking! My vision for stacked and glued magazine and construction paper died on the desk. I’d dremel sanded and shellacked them, only to find that all the pretty colors from my Seusical imagination were reduced to mud brown! Ugh!
With a few charms and a trim I made an embossed vinyl purse into a bustier, and a few beads later…voila! My bohemian soul is happy with the results, and I hope that you enjoy! Thanks for the visit!
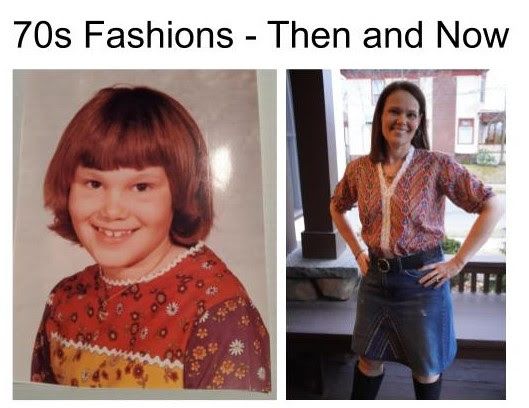
I took inspiration from my 1976 first-grade class picture to create a modern look with a 1970s twist, using all refashioned and upcycled materials.
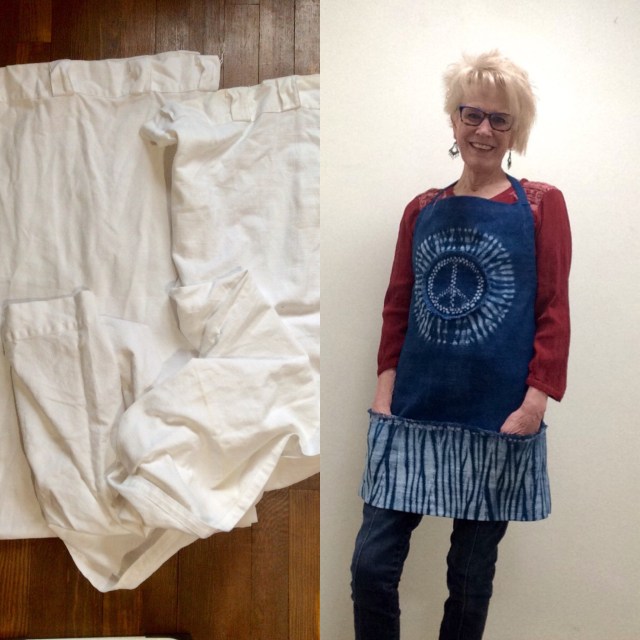
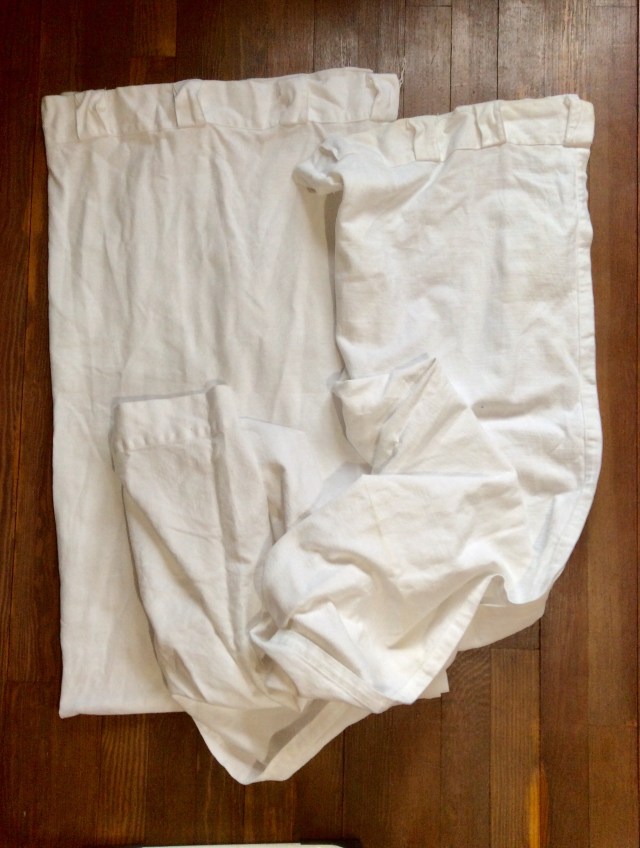
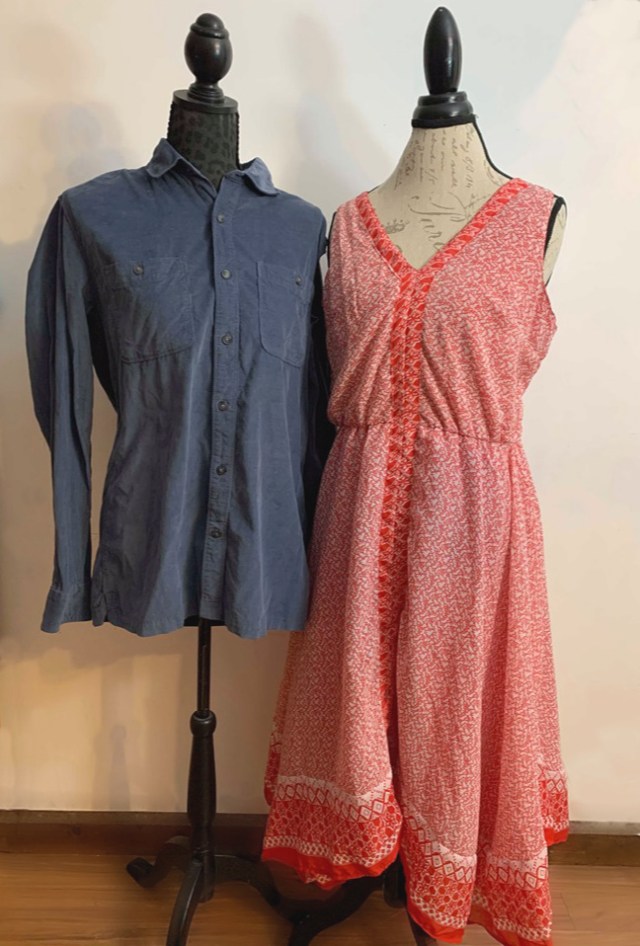
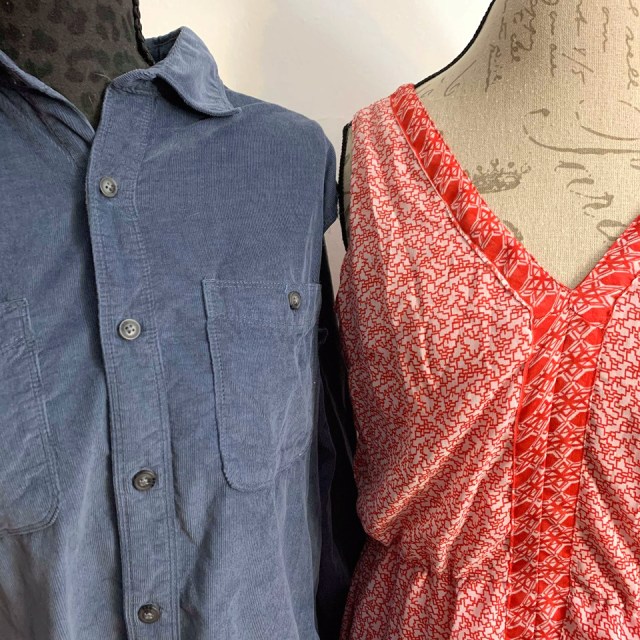
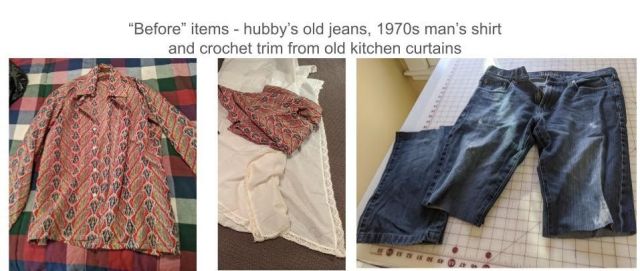
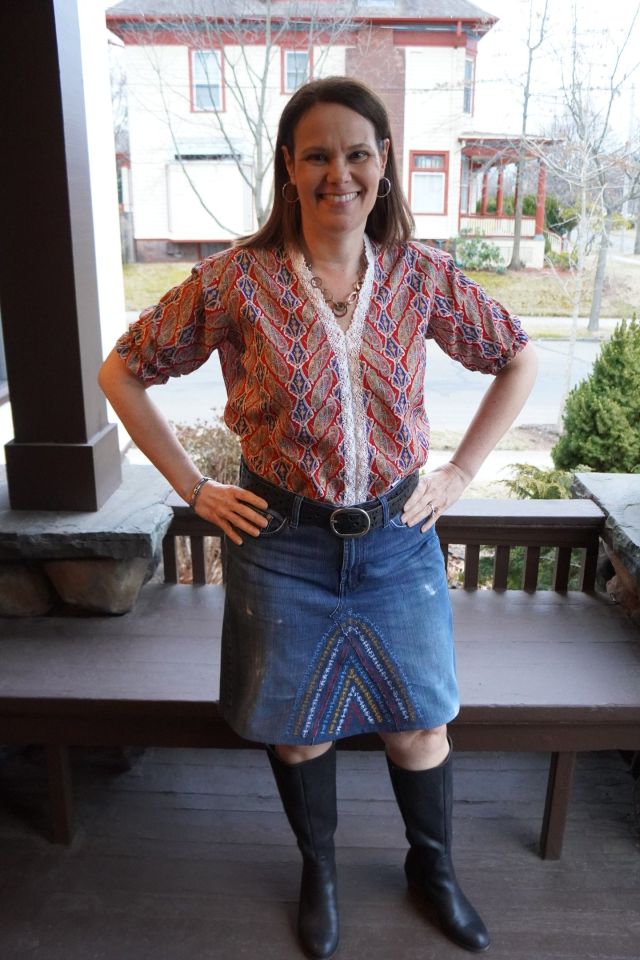
The 1970s were not a pretty decade style-wise – in fact, a true 1970s look should come off a bit sleazy and unappealing. So I tried to make something true to the era yet wearable for today. I started with these raw materials: old jeans from my husband, a vintage men’s shirt and old kitchen curtains with crochet edging.
Let’s start with the top! The colors exactly match the dress in my 1976 class picture, so I had to go for it. Also, paisleys were such a huge motif from that era in fashion. If you find any ugly wide neckties from the mid-1970s, I bet you $1 in 1970s money (about $6.60 in today’s money) that paisleys swirl around someplace on it.
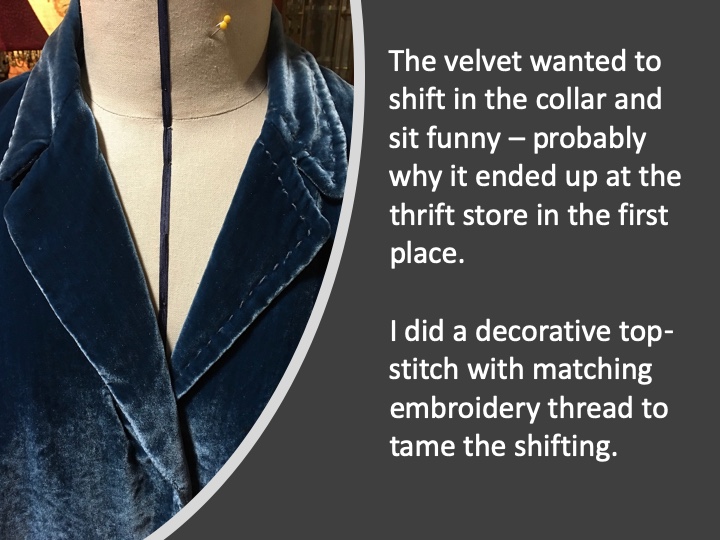
This shirt is very well made, with flat-felled seams, darts and nice wide facings at the center front. But… it’s made of that notorious spun polyester fabric that disintegrates into fluff instead of unravels at the raw edges.
To make this man’s shirt more feminine, I started by cutting off the button and buttonhole plackets and unpicking the collar, then cutting down the center front on an angle using New Look 6498’s bodice pattern piece.
I harvested the crochet edge from the old kitchen curtains and sewed them to the raw center fronts, then sewed up the middle to join the design into something new. The lacy detail is a bit see-through – just enough for an adult look without being too much. The crochet makes a little collar at the back neckline – cute! Elasticized sleeves with a cuff complete the look.
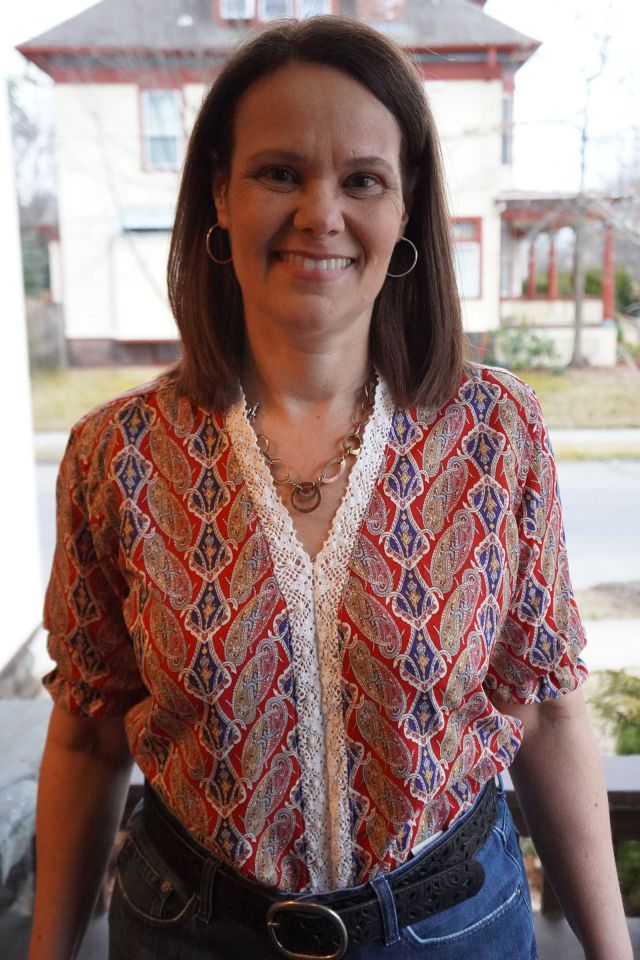
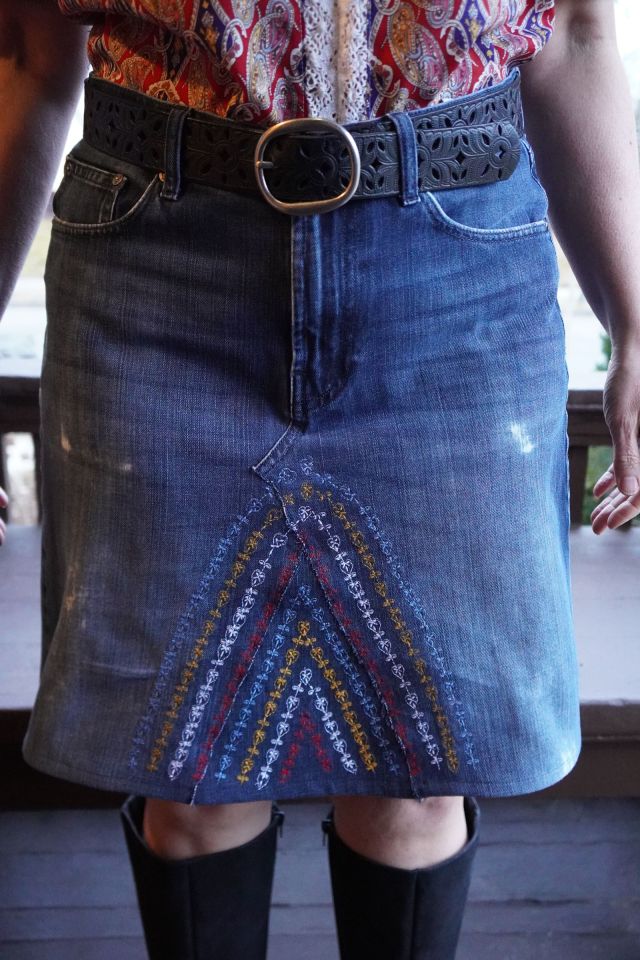
The skirt is a throwback to my youth as well. Skirts made from old jeans were all the rage back then. If you don’t believe me, visit any vintage store or trawl eBay and you’ll see tons of these skirts.
To be authentic, I needed to start with men’s jeans. That was the style back in the day – you’d make a skirt from your boyfriend’s old jeans. In this case, my husband supplied these jeans that had seen better days. In brief, you cut off the inseams and unpick a bit then fold the curved pieces flat and layer on top of wedge panels cut from the legs. (For more on how to make a skirt like this, please see my blog, Distaff.)
To make this skirt go with the top and to add more design elements, I decided to embroider the wedge in a 1970s style motif using colors from the top. I started by running a line of embroidery alongside the seam where the wedges meet the front and back.I added lines above and below that line – eight lines of embroidery in all. Make sure you have enough thread to spare before you tackle this!
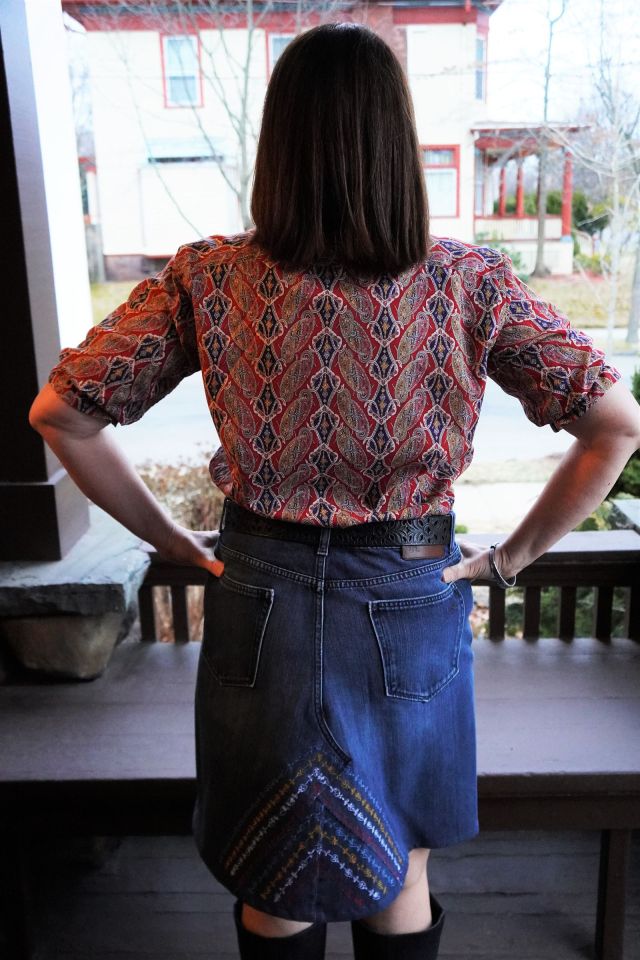
Here’s a back view:
Key to the look are 70s elements like big belt buckles, boots and hoop earrings.
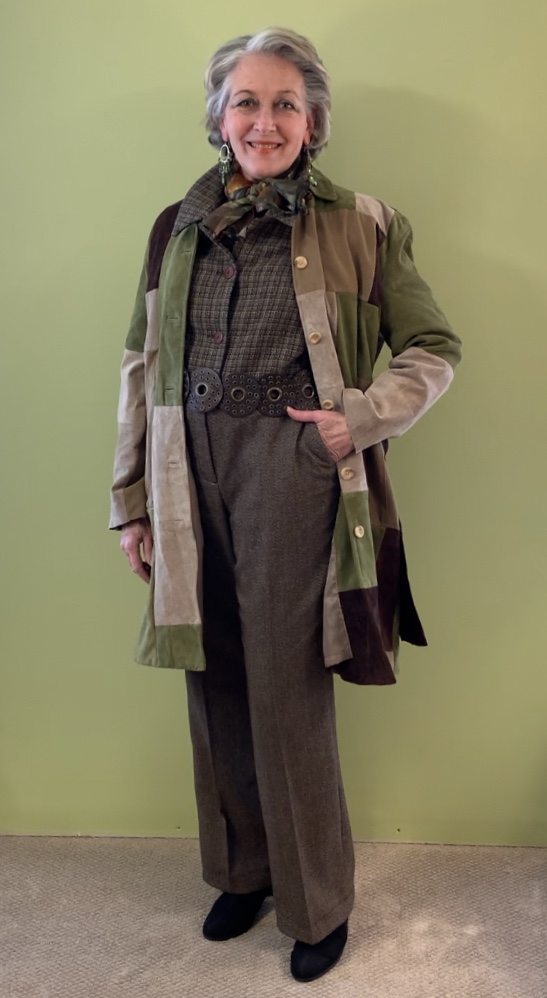
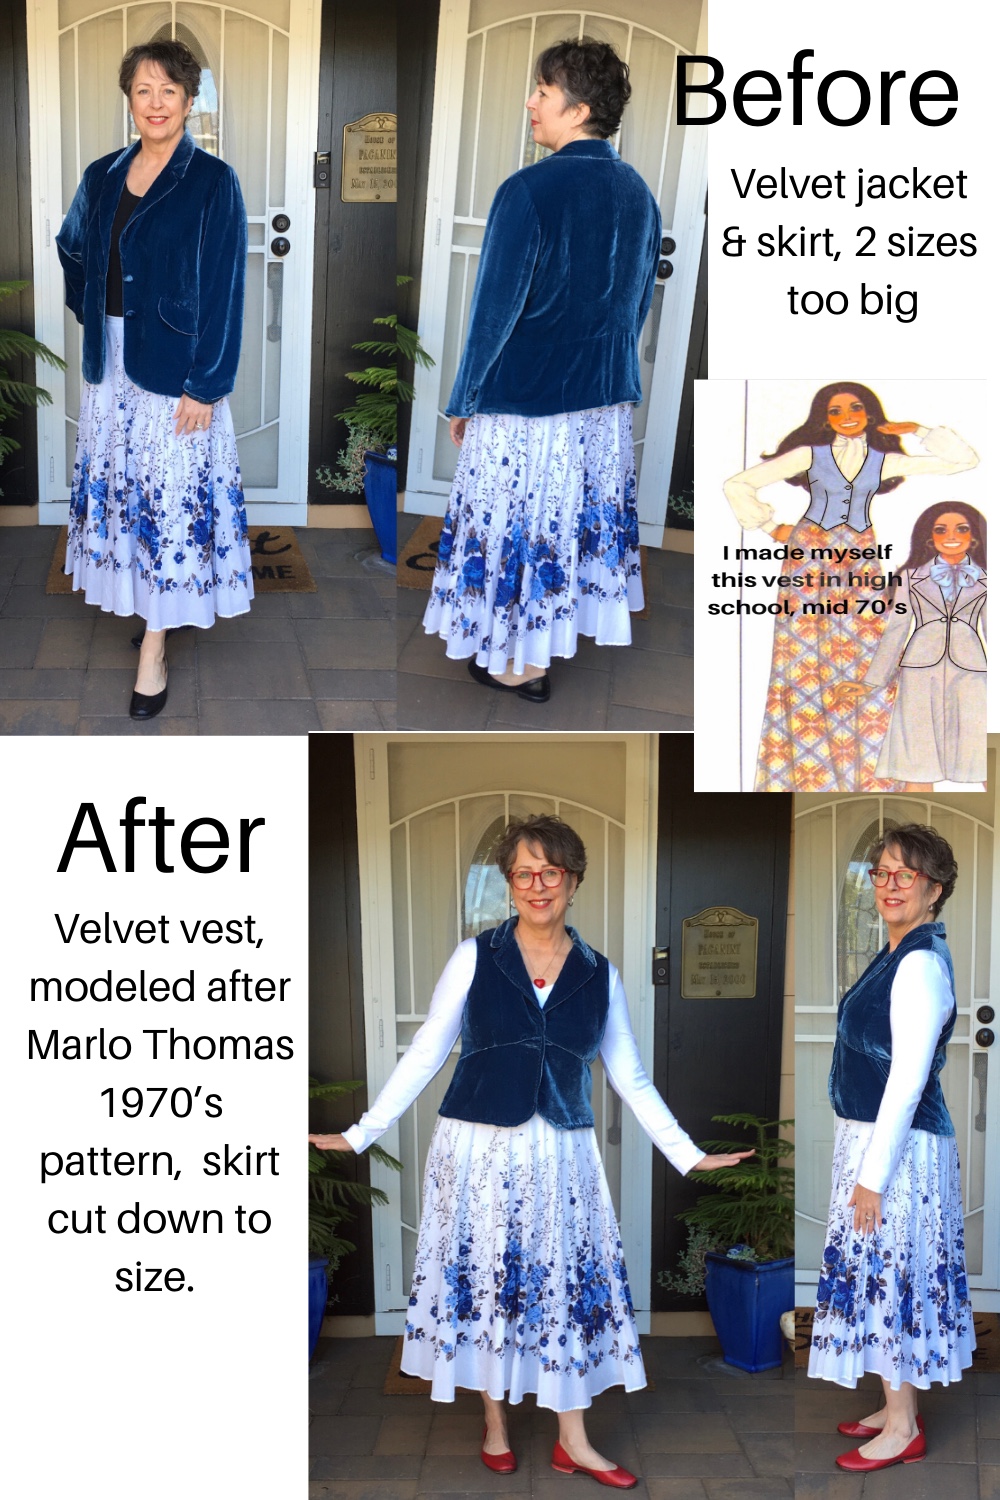
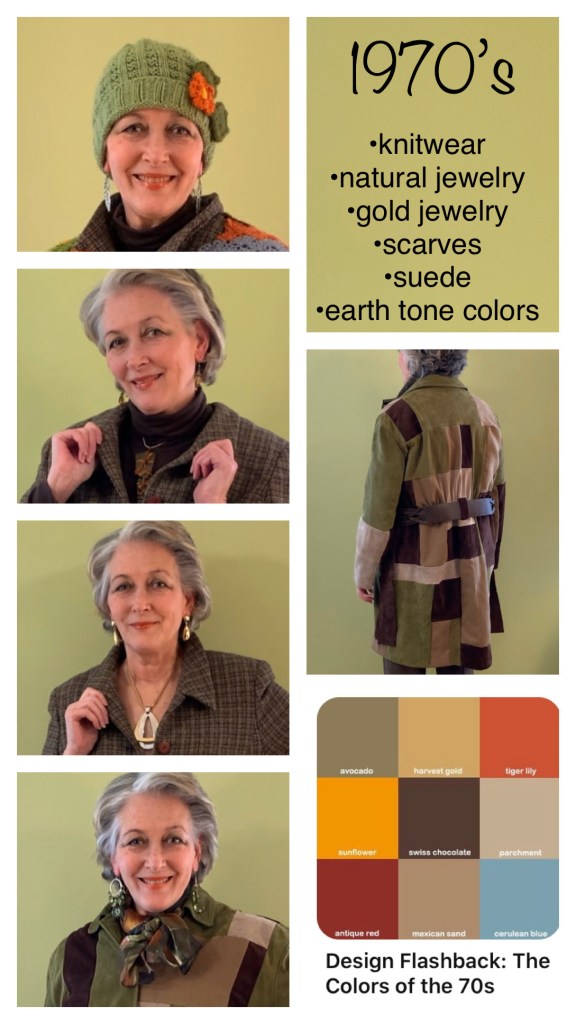
My Seventies Inspired Separates Seventies fashion: I wore it, I sewed it, I modeled it, I sold it and I survived it! In 1975, I was graduating from high school so this challenge was a long stroll down memory lane. I was already sewing most of my wardrobe, studied Fashion Merchandising in college, worked at The Limited and even did a bit of local modeling. As I reflected on the variety of 70’s styles (some good; some not so much), I kept returning to my favorite thin jumpsuits, coats, separates, and a cozy earth tone palette.
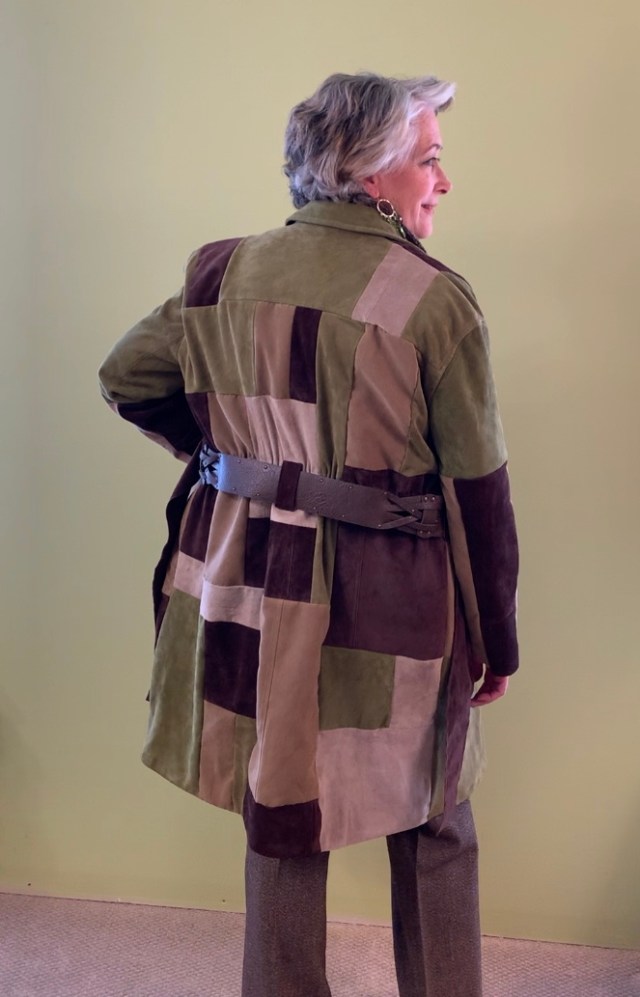
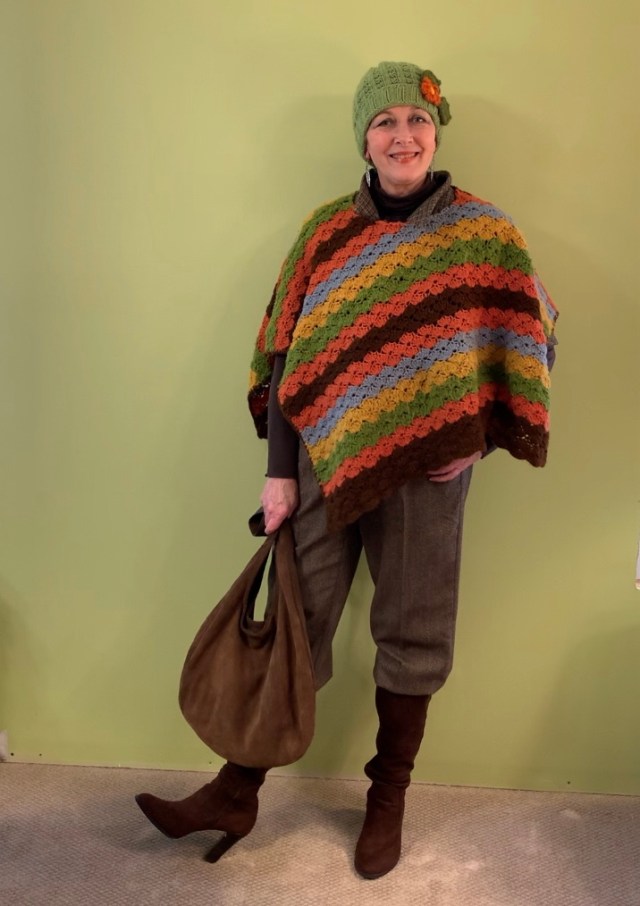
I started my new separates wardrobe with a too small green suede jacket that I just haven’t been able to let go of and paired it with thrift store finds: two neutral suede jackets and a chocolate brown suede skirt; a brown and tan small scale plaid jacket and a pair of tweed trousers; and a last minute crochet afghan!
I began chalk marking the green jacket. To make construction easier, I maintained the collar, sleeve heads and button holes piecing around them. And then, fearless that I am with scissors, I started cutting and randomly piecing the other suedes to enlarge and lengthen the original green jacket into a groovy knee length patchwork coat. .I wanted a chocolate suede belt for the coat, but sadly didn’t have enough for a full belt…but wait…a beautiful thrifted belt with woven detail (cut shorter) made the perfect “back” portion and I added suede ties to the front.
To recreate a trendy jumpsuit the plaid jacket and tweed trousers were overlapped and joined at the waist, cutting off the excess bulk of the jacket from the inside. Sleeves were shortened to give the 70’s feel.
And remember that last minute afghan find? A quick neck opening secured with zigzag stitches and a knit remnant turned it into the coolest 70’s poncho you could ever imagine!
I tried to stay true to the decade with my accessory choices…many from my personal collection …suede boots, suede bag, knit hat with flower, leather belts, gold jewelry, hand-crafted natural jewelry.
As I’m typing this, I see my garments hanging in the studio. I couldn’t be happier with the results. If you lived the seventies, I hope my separates brought back some memories; if you’re too young to really remember…it was a great time to grow up. Trust me
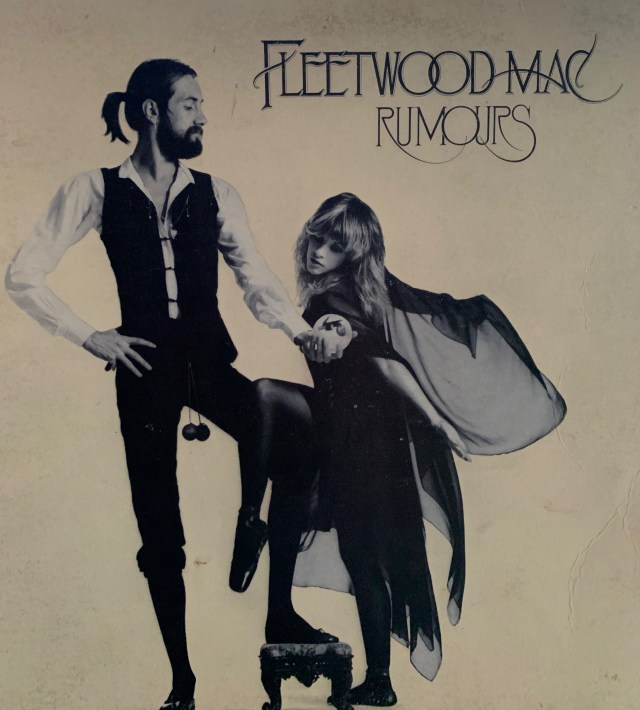
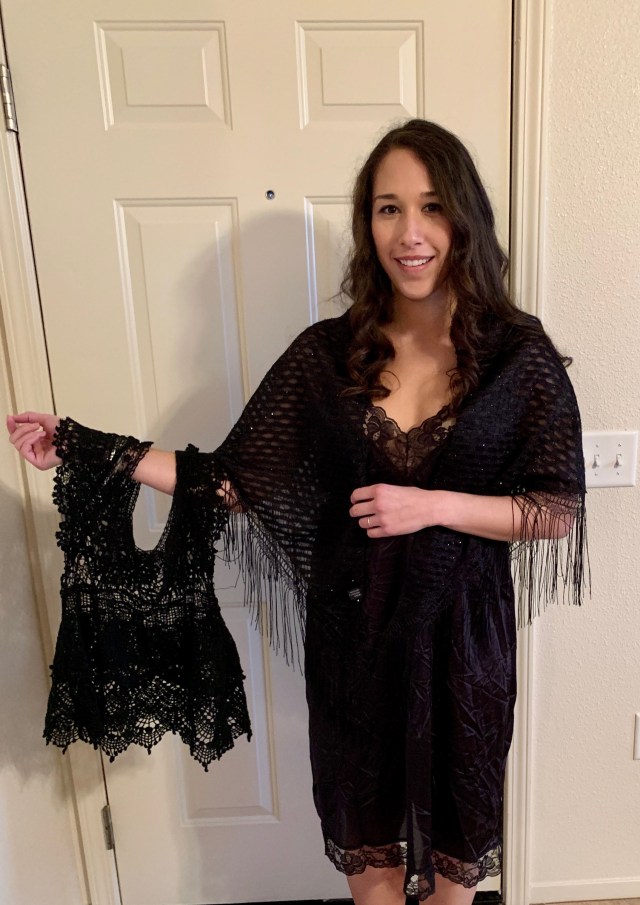
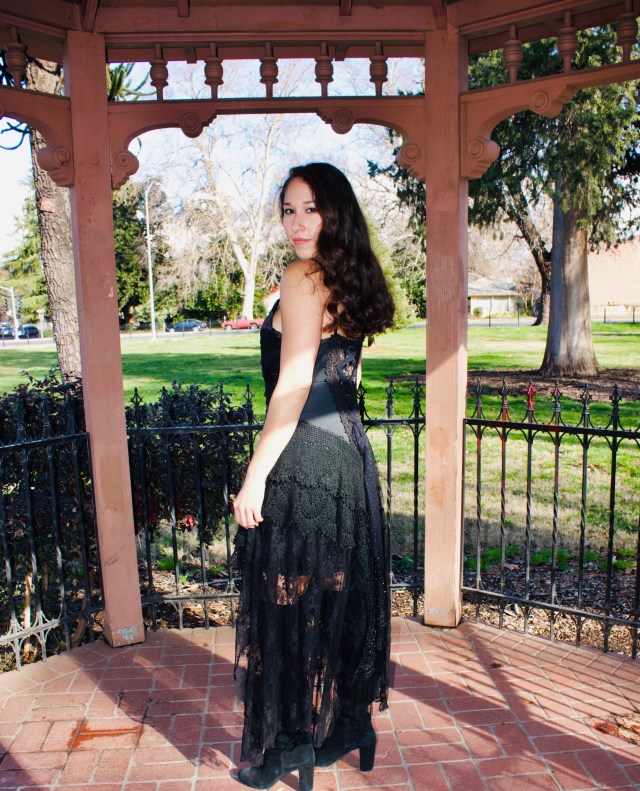
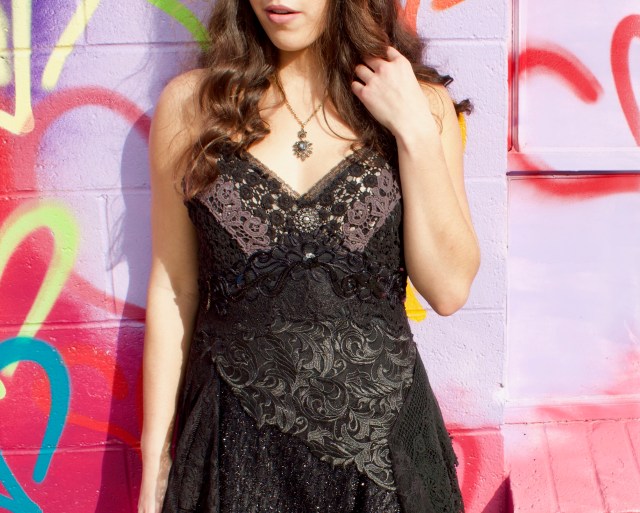
This 70’s challenge brought back many memories for me. It was such a great time especially for music and fashion. I can remember listening to Fleetwood Mac’s album, Rumors, over and over. I knew every song by heart. Thus, my inspiration for the 70’s is Stevie Nicks. Stevie truly embraced the Bohemian look. Her style was unique and innovative. I remember Stevie was always wearing either all white or black. Her dresses consisted of layers of flowing fabrics. Oh, and she always had a shawl! On to my creation. My dress started as a black slip from Goodwill. I then found a black sparkly shawl and crocheted vest at the Cancer Society Shop. I was very excited about that! I used the shawl as one of the layers in the dress since it was a big part of Stevie’s look. Not to many people wear shawls anymore so I figured I’d add it to the dress. The shawl blended well and added texture to the flowing layers of fabric. Additional lace and trims were applied in layers on the dress. I have a huge box of lace and trims I’ve saved from other garments and thrifting expeditions. So, when I start to create I have an amazing selection from which to pick. Now, On the right side, you can see where I used the Crocheted vest. I cut the bottom portion of the vest off and draped it over the side. The top I’ve saved, in that box, for another project. I hope I’ve inspired you and given you some good ideas for your own upcycling. Thanks! Julie
Thank you to everyone who took the time to vote for your favorite designer’s Statement Sleeves.
There were almost 4,000 votes this week and several very close races. So after combining the votes and the judges scores, here’s how it all shook down.
Tied for fourth place is Beki Biesterfelt and
Marisa Glied
and Sonya Blackstone
Tied for third place is KT and
Michelle Paganini
Tied for second place is Peggy Latta and
Julie Kong
And the first place winner is…… drumroll please……
Deana Budgell.
Thank you to all of these talented designers and thank you to all of you who voted and to our judges for taking the time to score everyone.
JP Choquette and Amy Minster. Thank you so much for joining us this season, I hope you had fun.
They will both receive a Gift Card from Joann Fabrics and Crafts.
Before we say good bye, though, let’s see what they did for their 70’s challenge this week.
JP Choquette
When I think, “1970s fashion” my mind goes straight to mini skirts and discowear–not my favorite things to wear! I appreciated this challenge because it helped me learn more about the decade’s style (I’d forgotten all about romantic looks like the long, flowing dresses and bohemian layers that are really very lovely).
I started with a three-quarter length jean jacket that I wore infrequently because of the large number of sequins and “fake looking” embroidery on the back. I liked the overall shape of the garment though and thought that with some special tweaks, it could look very 70s.
I started with a blouse I’d thrifted years ago, replacing the jacket’s sleeves with the shirt’s puffed ones. Next, I added vintage doilies along the shoulders–I like how that gave it a little more structure and drew attention to that area. I also added a third, larger doily to the back to cover most of the embroidery and sparkly sequins.
Lastly, I created a torn ribbon and fabric strip fringe along the back. This adds a little romance to the piece and is also in line with the decade…what’s a good 70s jacket without fringe?
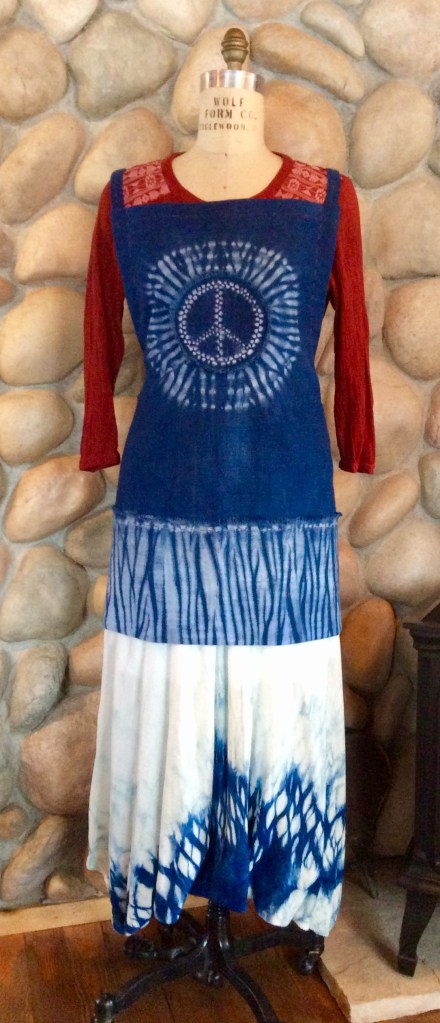
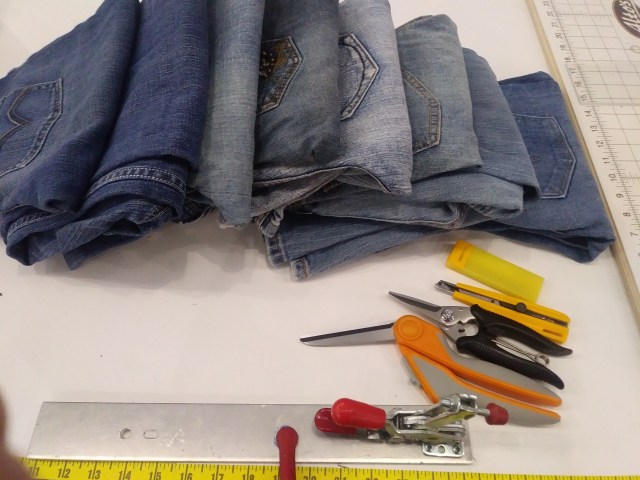
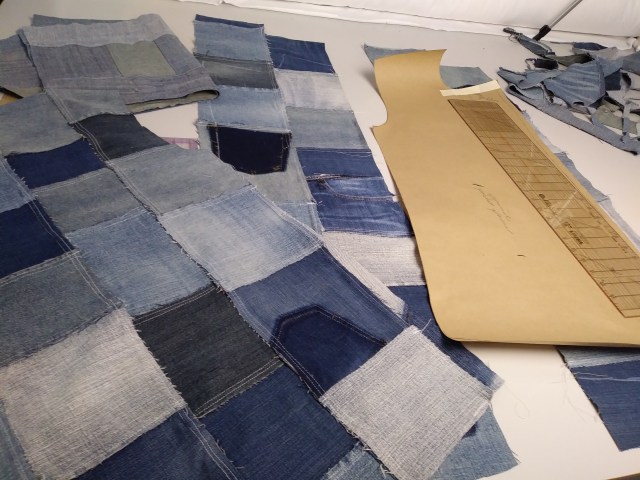
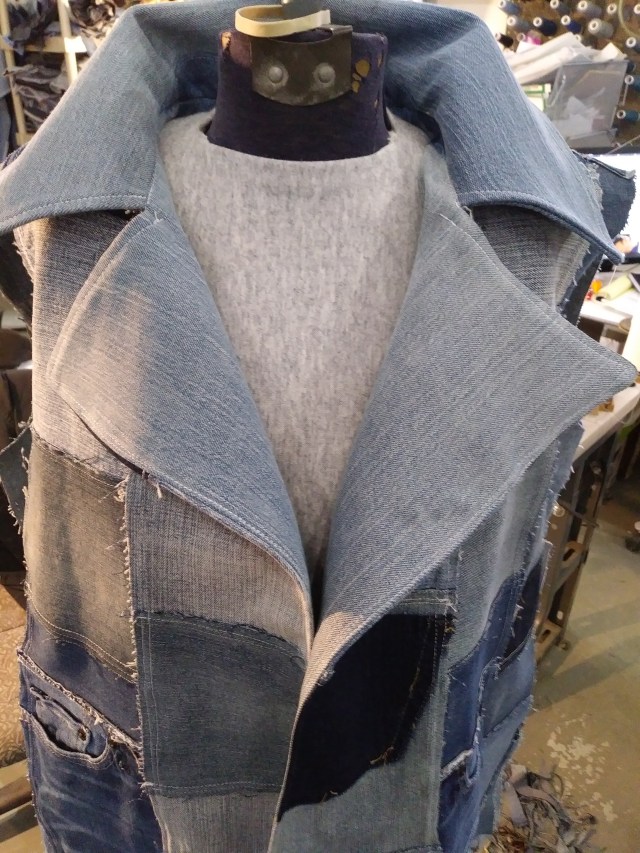
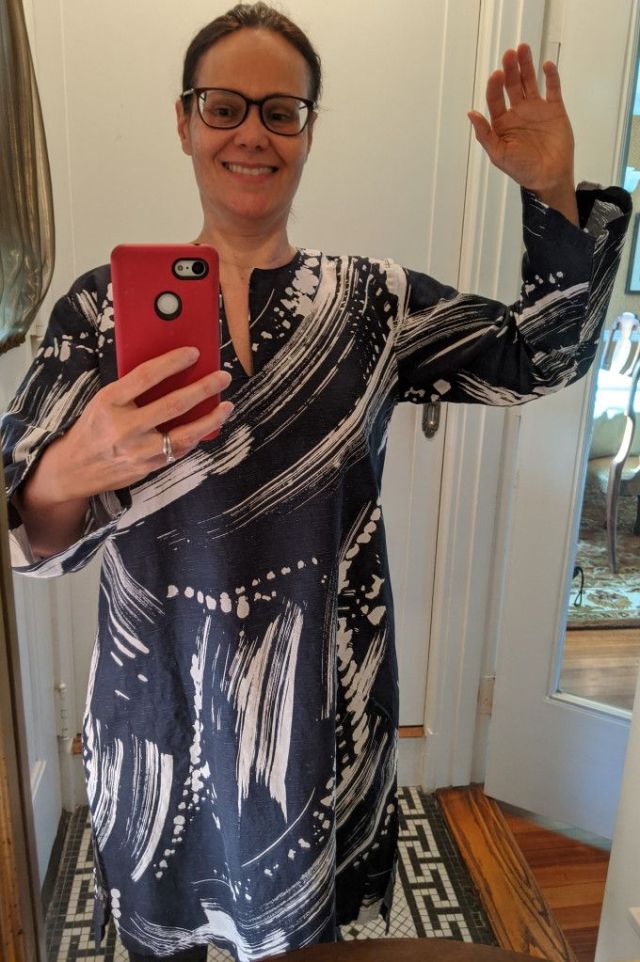
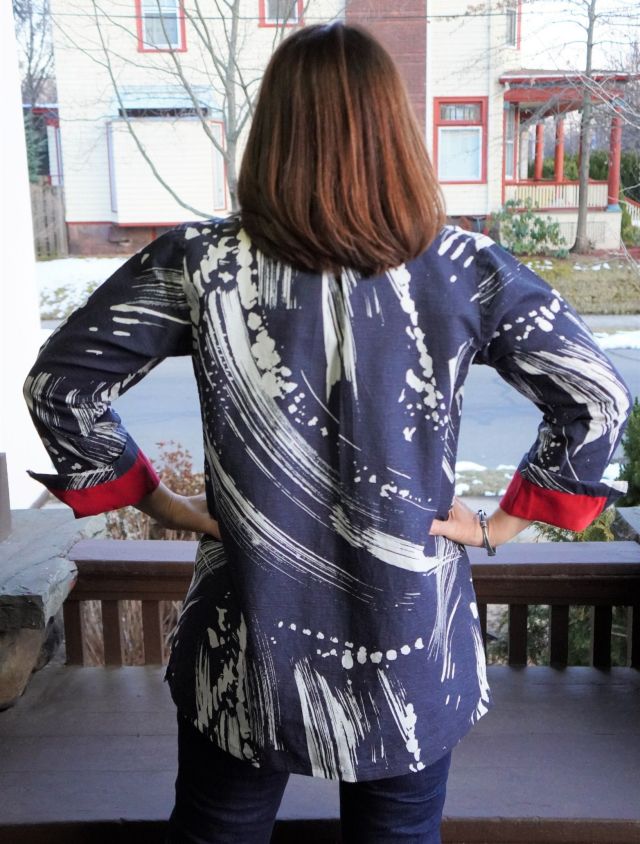
When I looked over the submissions from last week with my daughter, she said I had better step up my game this week, and she was not wrong! Hopefully, you all think I’ve done that. When I do a refashion, I try to preserve some of the details of the original, but for this week, I wanted to try something I’ve never done – patchwork. I looked through my piles of potential refashion items and noticed I had a lot of blues and turquoises in the mix. A few things were items I had refashioned in the past that I didn’t end up wearing as much as I thought I would, and another was a summer dress that had a ton of fabric on the bottom but not nearly enough on the top! The dress fabric also had a great ’70s sort of pattern on it, so I decided to make that the main fabric of a patchwork kimono.
I spent a lot of time this week cutting, stitching, trying on, altering, and serging. I used almost all of the fabric from the dress, including the lining, and most of the top and the two skirts. I bought some coordinating ribbon for the front edges and some fringe for the bottom. I used the original printed hem of the dress for the cuffs of my sleeves. It was a lot of work, but I think it turned out well. It makes me think I might be ready to try a quilt next!
Thank you again JP and Amy. We’ll miss you. (Unless of course, you’d like to sew along with us. 🙂 )
And once again, congratulations to Deana Budgell for winning the Statement Sleeve Challenge with this amazing transformation from a man’s suit.
To vote for your favorite designer in the 1970’s challenge, click here.
Most of you will recognize Susan from Refashion Runway Season Two and Refashion Runway All-Stars. She is one of the most creative and inventive women I know. I’m always amazed at her beautiful refashions and her sewing ability is definitely her Super Power. I hope you’ll get a chance to check out her site, I know you’ll be inspired.
You’ll probably recognize Gema from Refashion Runway Season Three and Refashion Runway All Stars. She and her sunny personality join us from all the way across the pond in England. In addition to her website, Gema has a fun You Tube sewing and crafting channel that I hope you’ll get a chance to check out. She’s a powerhouse when it comes to breathing new life into old things.
She doesn’t have a blog or a YouTube channel but she really should. Her fashion creations never cease to amaze me. She’s so creative and inspiring when it comes to putting colors, textures and patterns together. We used to work together and I always looked forward to seeing her OOTD.
She joins us from Refashion Runway Season One and Refashion Runway All Stars. Not only is she an excellent seamstress and can see the potential in an old garment, but she’s a third grade teacher, too. Super Star!!
Well, there you have it. These judges definitely have their work cut out for them.
In addition to on-line public voting, they will be scoring the contestants as well. The on-line votes will count for half of the score and the judges scores will count for the other half. A winner will be determined by combining the two scores.
The judges will give each of the competitors a score of 1-10 (1 being the lowest and 10 the highest score) on the following areas:
Following the challenge
Originality
Craftsmanship
Design
Presentation
For a perfect score of 50 points.
If you haven’t had a chance to vote for your favorite Statement Sleeve refashion yet, click here.
Welcome to our very first creative Sew Along for Season Five:
Leslee Brandt
“Have followed all seasons and took the plunge to follow along this go round!
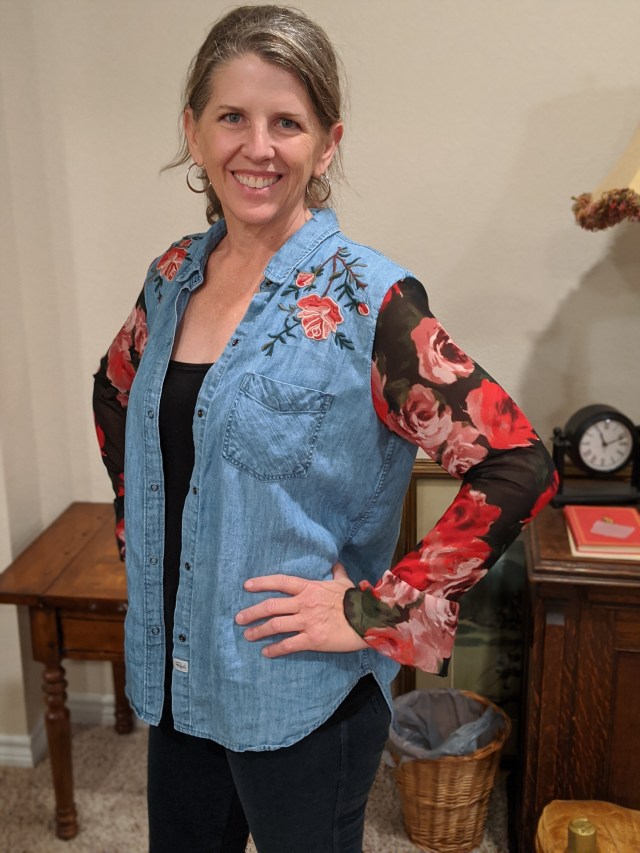
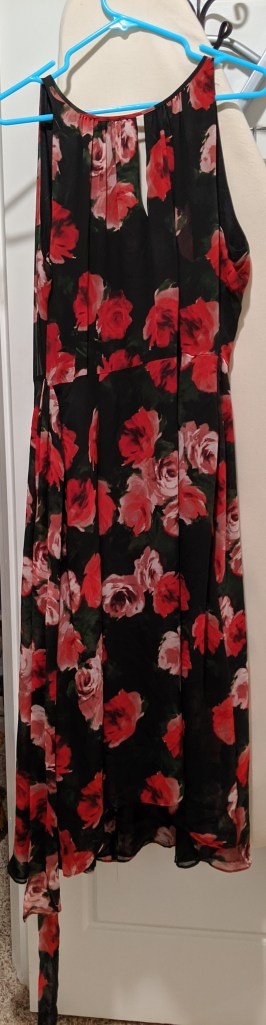
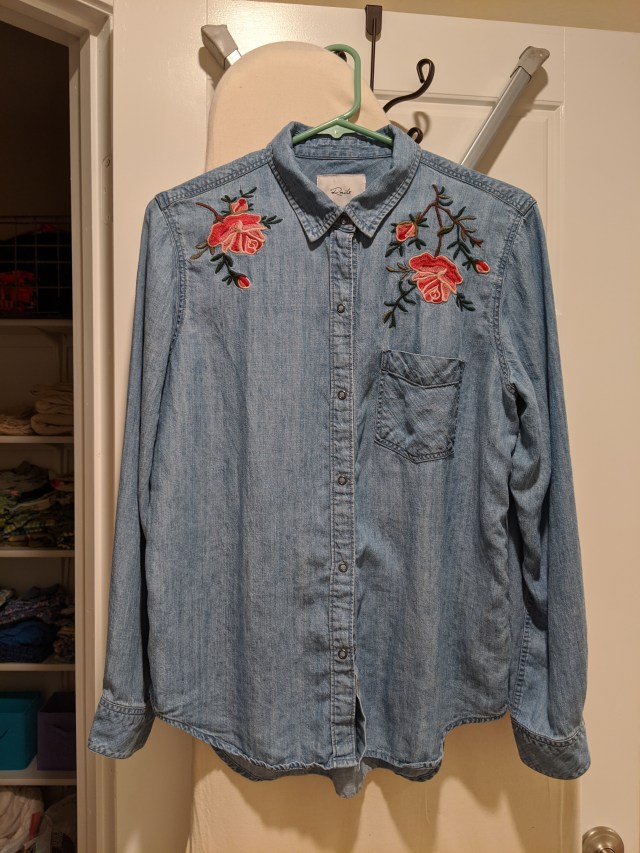
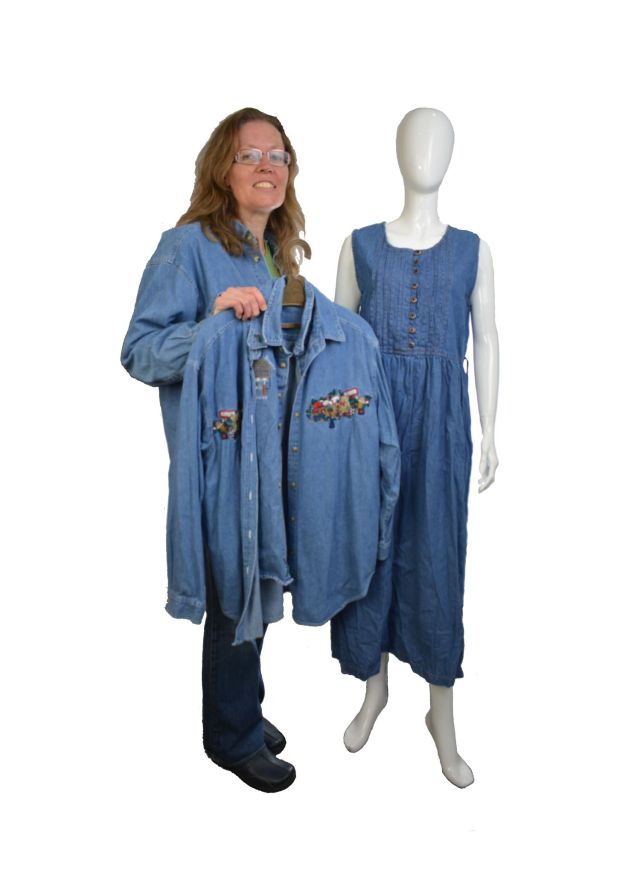
The denim shirt was one my daughter put in the donate pile. The dress was mine from a few years back. I have lost 60 pounds and the dress did not fit. Was so excited to see how well the flowers from the dress went with the flowers on the shirt.
Having fun sewing along!
Leslee”
Thank you Leslee for taking the time to share your beautiful Statement Sleeve with us!
If you are interested in sewing along with any of the challenges, feel free to send your before and after pictures to beth@therenegadeseamstress.com
We’d love to see what you are creating, too.
And….
If you haven’t had a chance to vote for your favorite Statement Sleeve, click here.
This season, if you have more than one favorite, or you’d like to vote for your favorite more than once, you can come back and vote again after 24 hours. YAY!
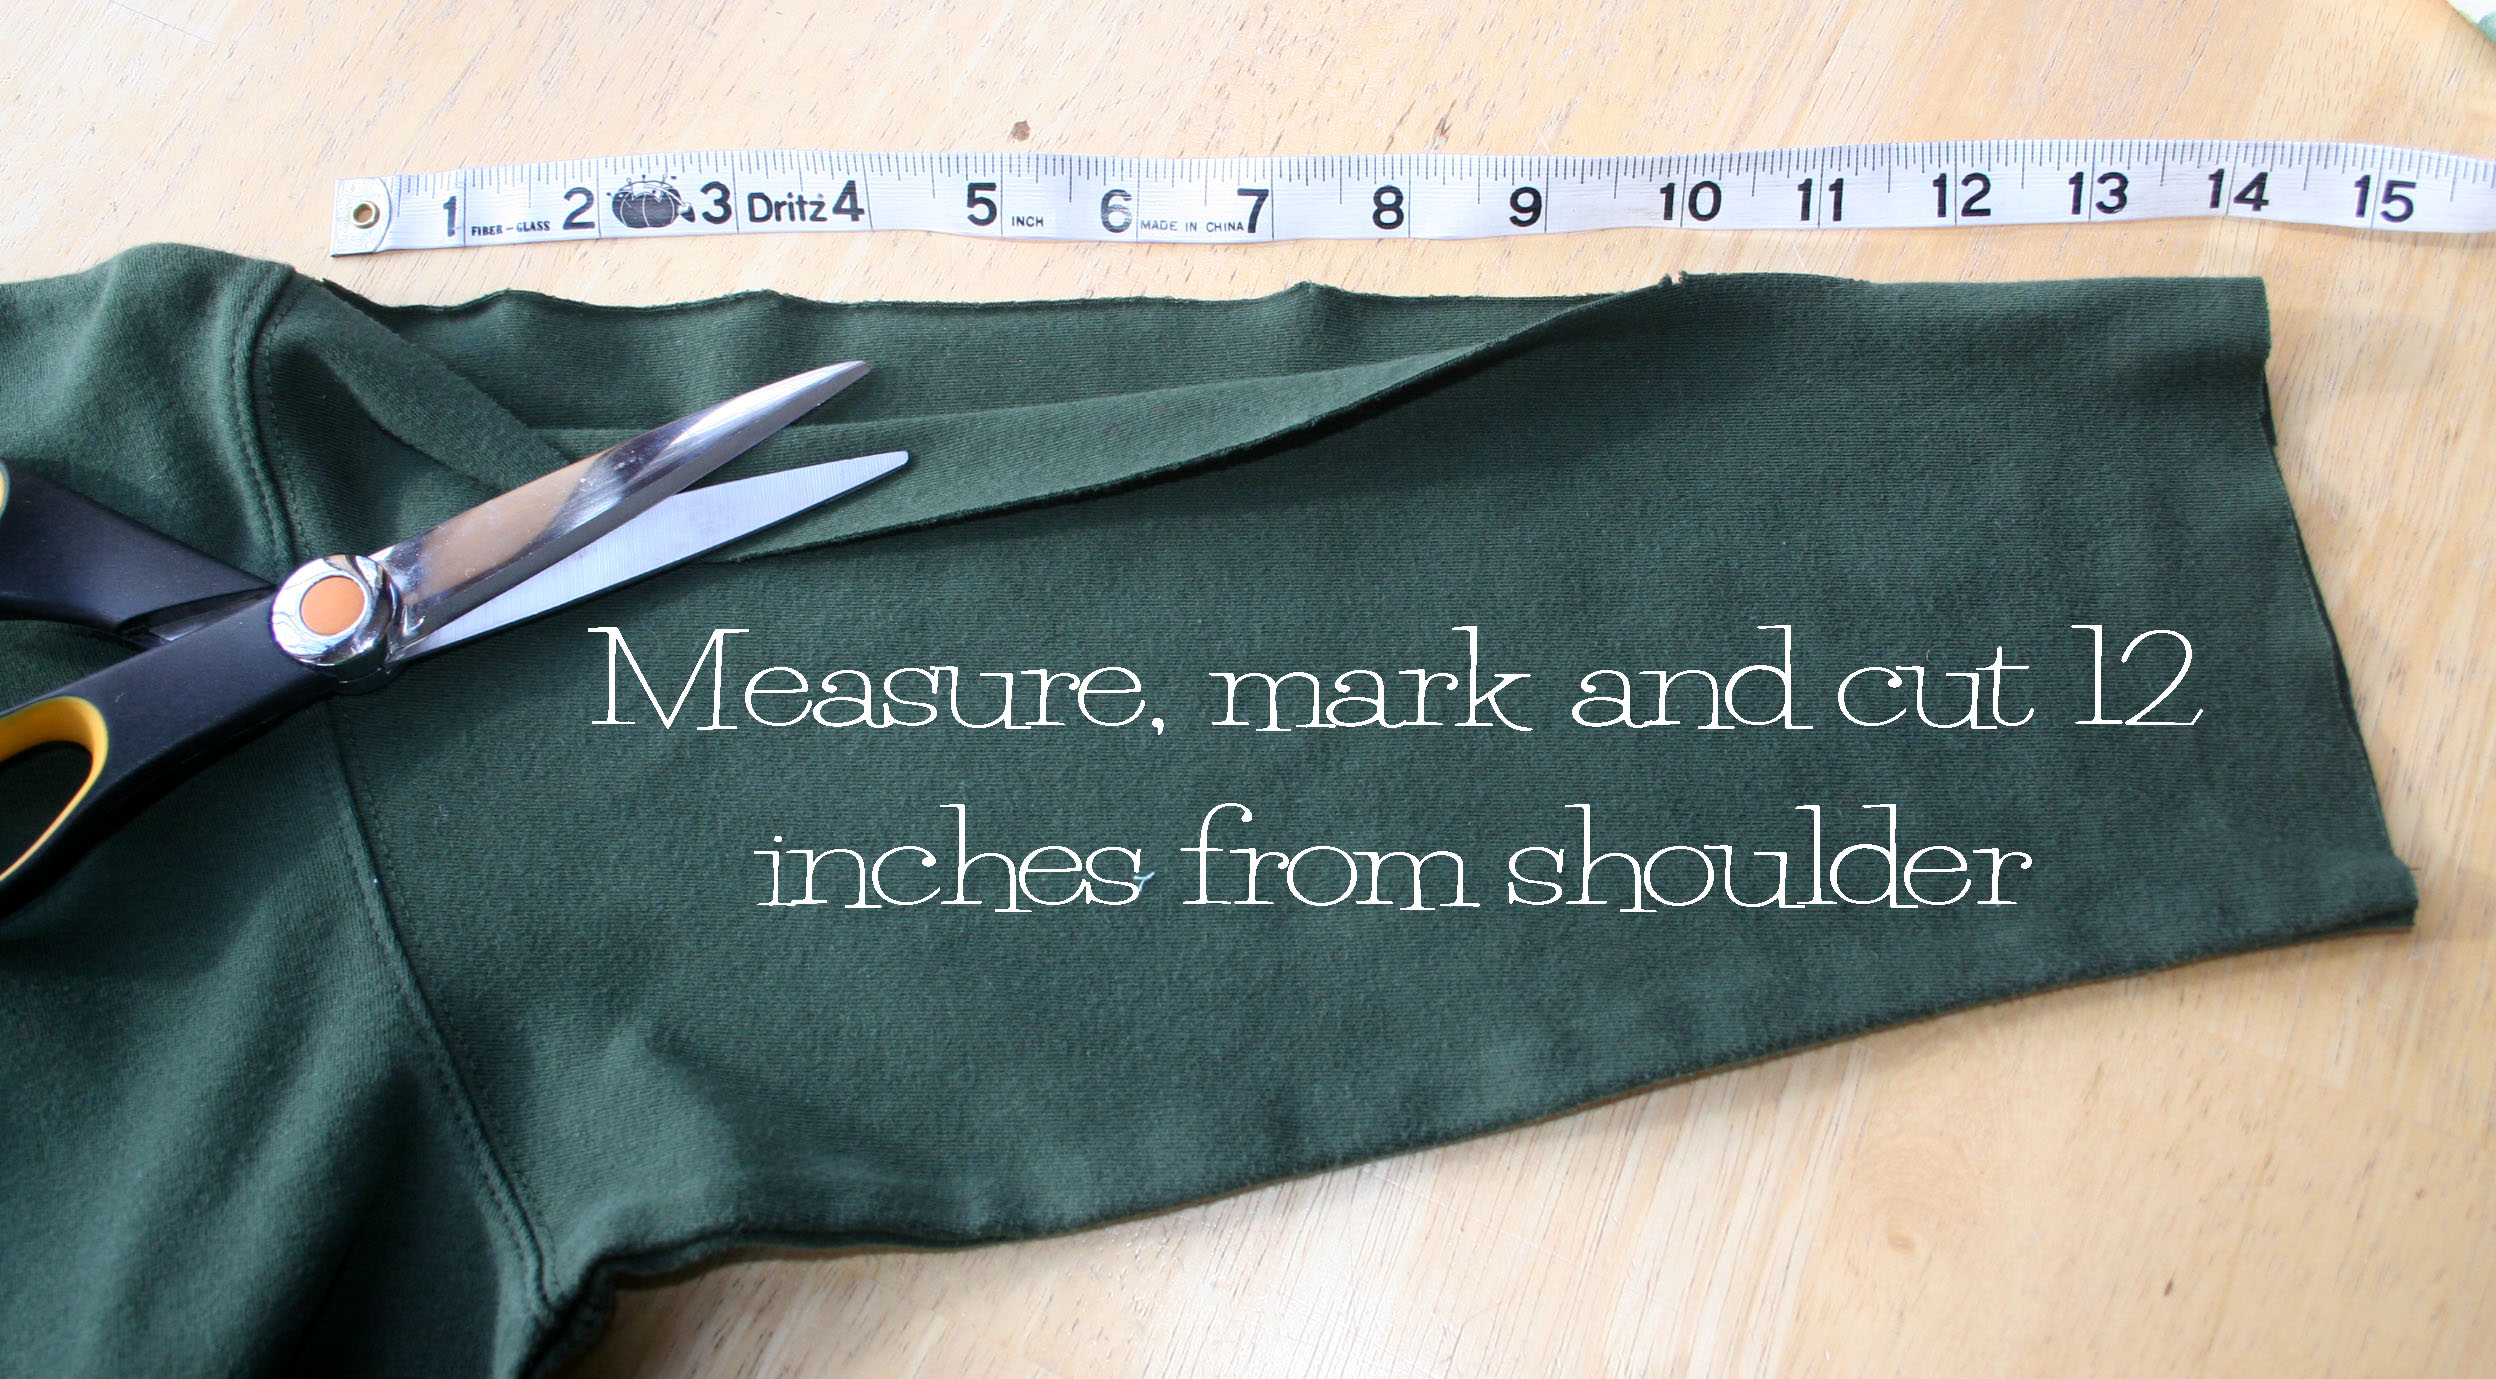
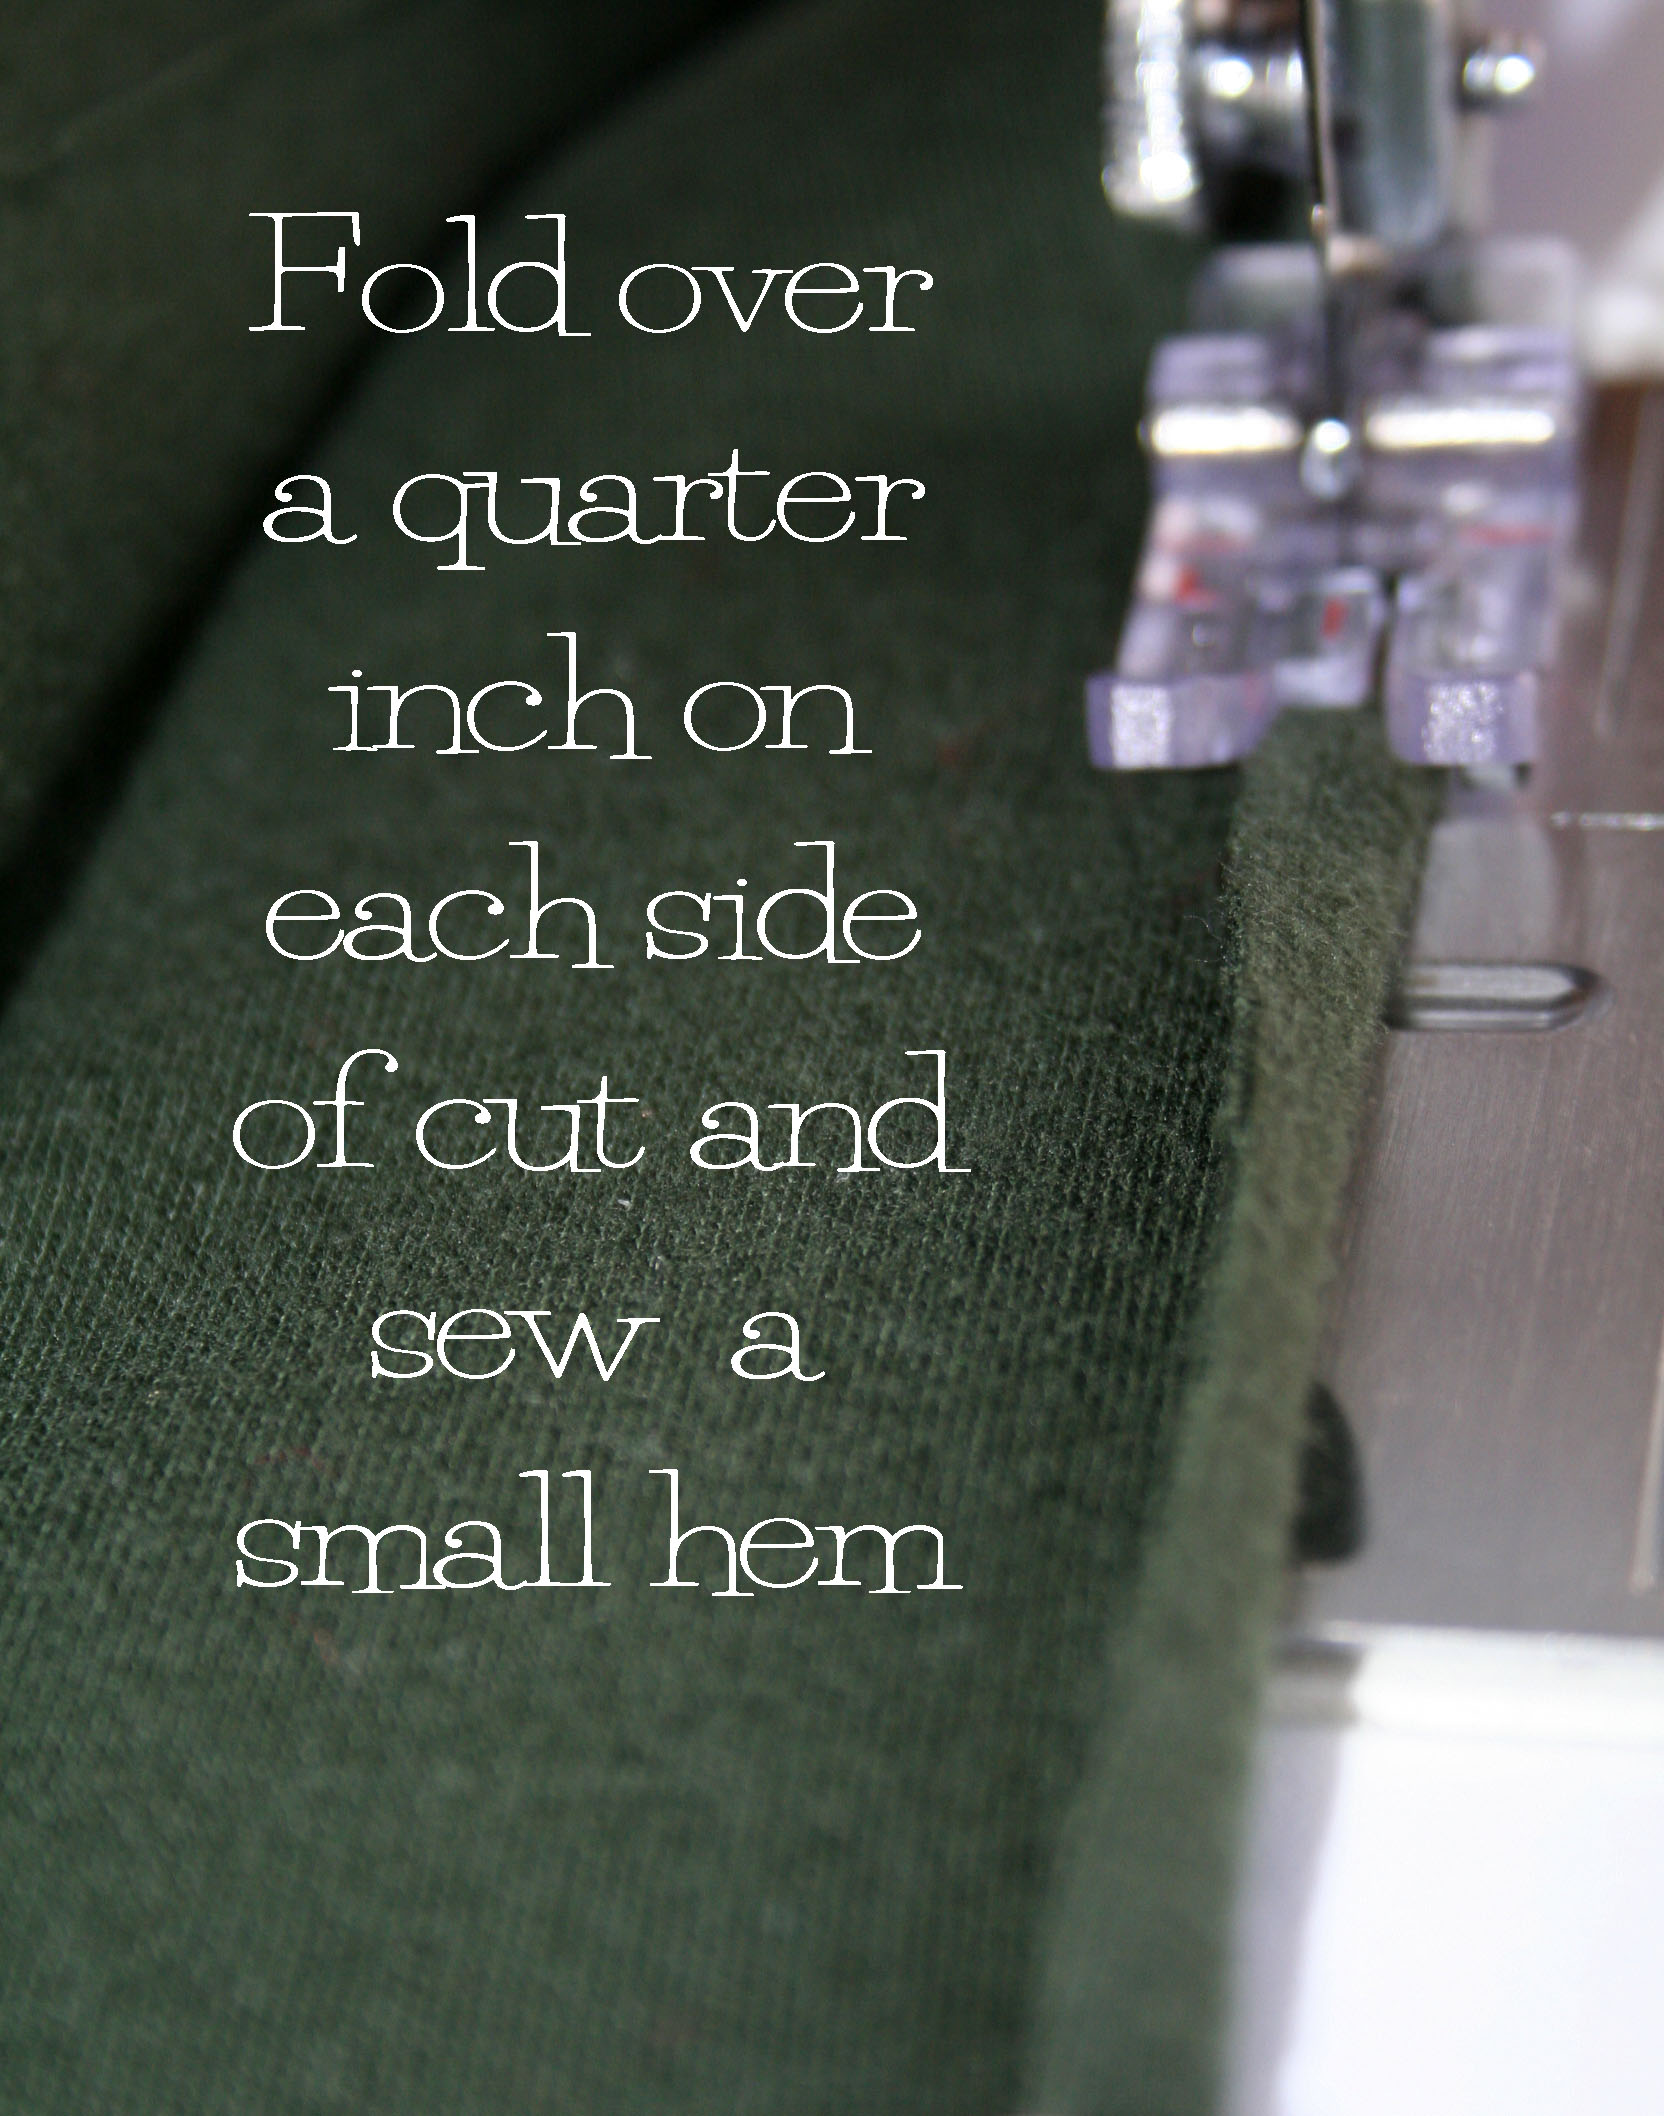
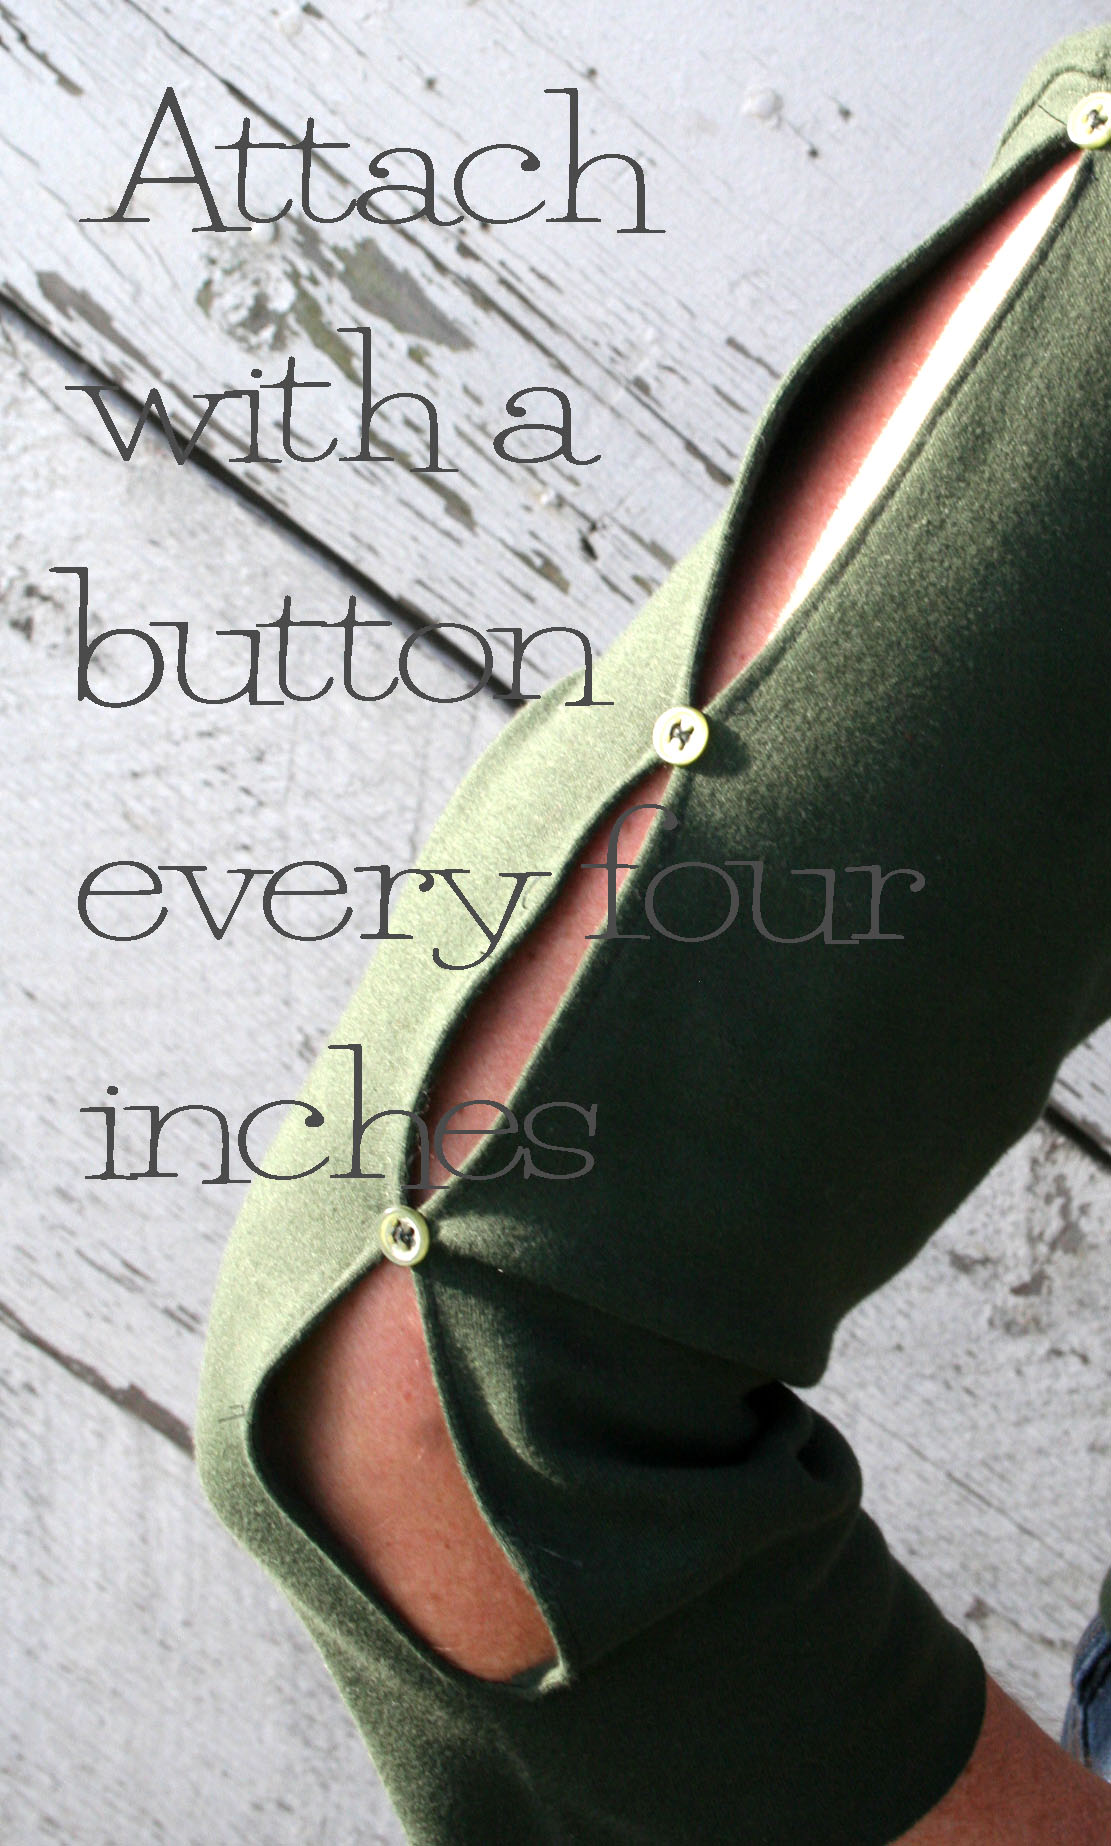
This isn’t exactly a “Statement Sleeve” but since that’s the challenge for this week in Refashion Runway, I thought I’d share a post from a few years ago of an easy sleeve refashion of my own:
Inspiration can be found in the strangest places. Who would’ve thought that a TV series about a funeral home would inspire this next refashion.
I’ve been unexpectedly enjoying the HBO series Six Feet Under. Claire showed up in episode five wearing the perfect shade of eggplant to go with her beautiful complexion and red hair. Not only was it just the right color for her but it had these fun cut outs on the sleeve.
I needed to give it a try.
This was supposed to be my experiment shirt. Just to see if it would work.
Well, I think it worked and I can see so many possibilities for this kind of sleeve. I can’t wait to try this again for an entirely different look.
Click here to see the creative work of the Refashion Runway Season Five contestants and vote for your favorite “Statement Sleeve“. I promise, you won’t be disappointed! The winners will be announced next Saturday, February 1, 2020.
Click here for more sewing and refashioning tutorials and inspiration.
Wait ’til you see what these talented ladies have created for you this week.
From lace, to men’s suits, to even candy wrappers (yep, I said candy wrappers 🙂 ) I promise, you won’t be disappointed.
So scroll down to the bottom and vote for your favorite designer.
The voting is closed for this challenge. Click here to vote for your favorite designer in the Faux Fur Challenge.
And GOOD NEWS! You can vote once each DAY this season. So if you have more than one person you’d like to vote for, or you’d like to vote for the same person more than once, you can come back 24 hours after your first vote and vote again!!! YAY!
So with out further adieu, I present the first challenge of Refashion Runway Season Five:
I wanted to say a little bit about the process I use to create my garments, It’s a different approach to upcycling. I like to start with a basic garment. And I usually search through my closet first. The garment I pick becomes my canvas. The pieces of fabric, that I’ve saved from previous projects, upcycling, thrift stores and antique stores, become my paints. I then layer piece upon piece to achieve the desired look I want. It’s like I’m painting with fabric! I feel the most unique thing to use, when creating an upcycled garment, are doilies and crocheted tablecloths. A lot of love and work goes into their creation. They are totally a work of art. To see these amazing pieces discarded is heart breaking. As a result, I chose to use both pieces as my focal points. First, I used a beautiful doily to create the sleeves. I cut it in half, created folds and sewed it on. Next, I used an amazing crocheted tablecloth for the bottom half of the dress. I really wanted to highlight the scalloped edge of the tablecloth, so I made sure it showed in the front. I also made a shrug from the bottom half of the dress that I had cut off.
I hope I’ve inspired you with my ideas. I also hope I’m here again next week to share more with you. Thanks for looking!”
I love to embellish with fabric, beads and embroidery.
I am drawn to anything “Chanel-esque” …the tweed fabric, the trims, the pearls!!!
So, combine all of those things and you have the theme for my Statement Sleeve entry!
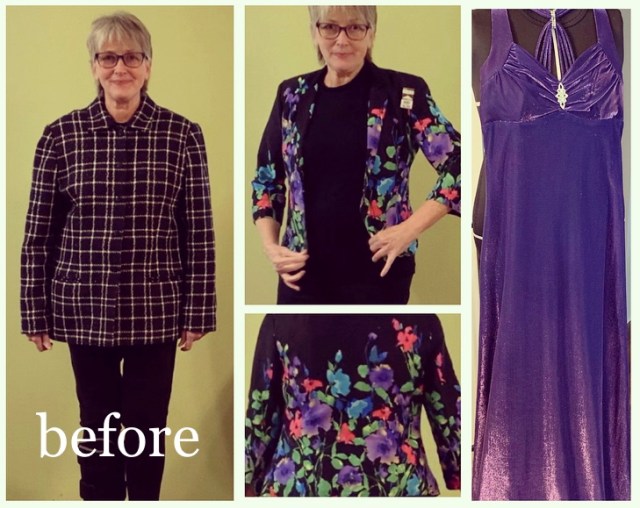
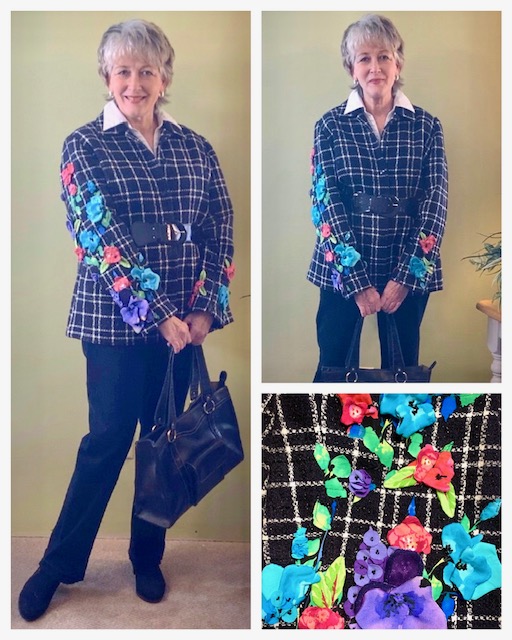
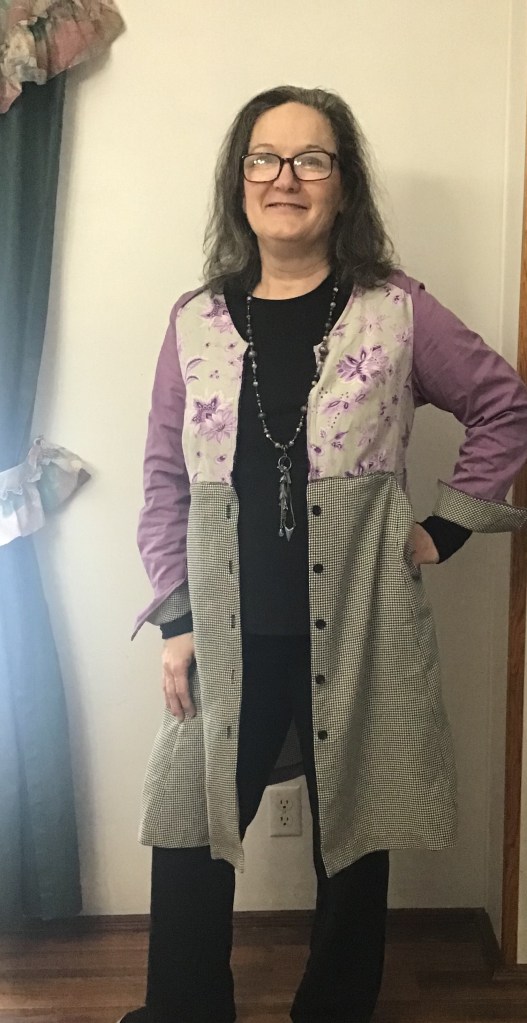
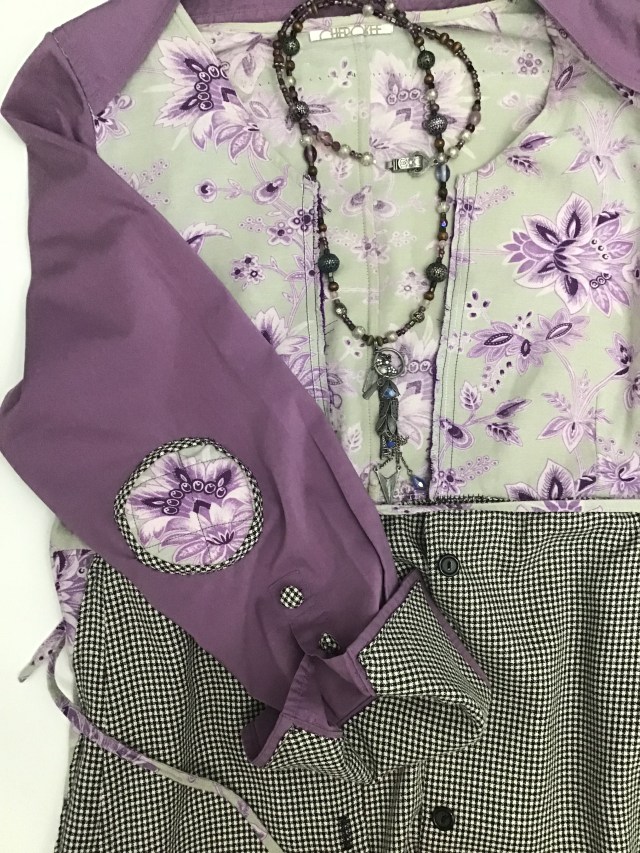
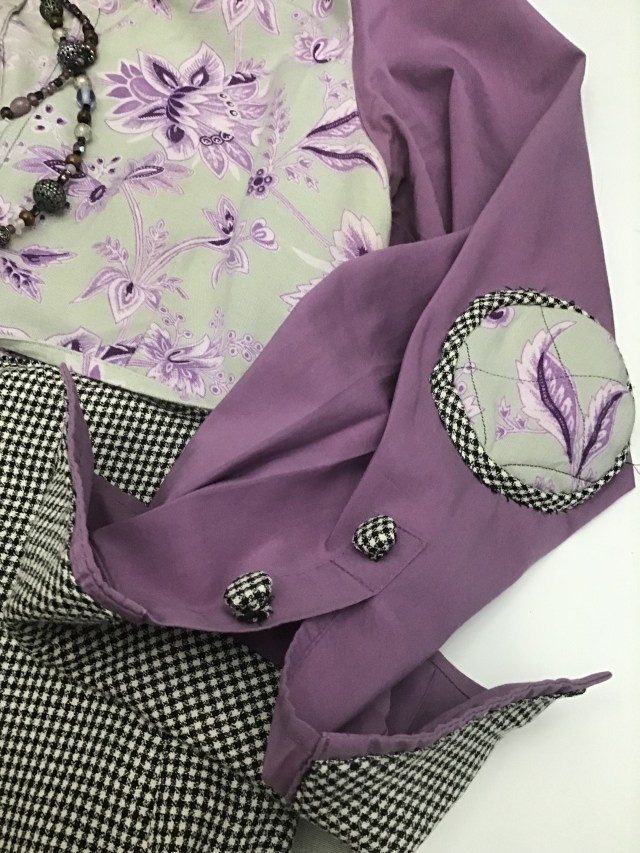
I began my challenge with a thrifted, black and white plaid (Chanel) jacket.The fabric is yummy and the black has a bit of shimmer woven into it. I dissected a second jacket (selected for the bright, watercolor floral print) and added the fabric from a glistening purple evening gown plus a harvested zipper (?) from a little girl’s puffer jacket!
After opening the front seam of each plaid jacket sleeve, some of the flowers from the second jacket were backed with fusible bond, trimmed and attached to the “trellis” plaid of the sleeves. More flowers and leaves were cut, stitched to contrast fabric and turned to make 3-dimensional petals.Then the fun began!I topped the fused design with the 3-D petals and leaves and began embellishing.
The open sleeve seams were finished by inserting zippers…one thrifted (puffer jacket) and one from my zipper drawer.And then, the final piece of my DOUBLE STATEMENT SLEEVES was added. The fabric from the glistening purple evening gown became the lining for the zippered sleeves. When unzipped, the beautiful contrast is revealed!
I styled the jacket sleeves two different ways:
sleeves closed for a daytime look with white blouse and black jeans, suitable for meetings, lunch or shopping.
sleeves unzipped, presenting a dramatic cape-like effect, with a little black sequin dress for a night on the town.
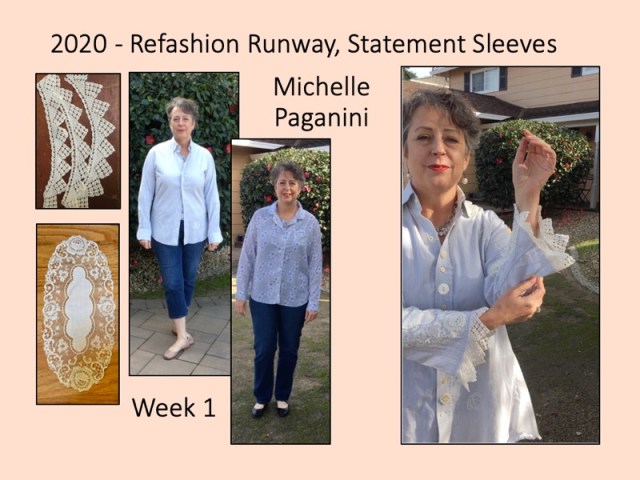
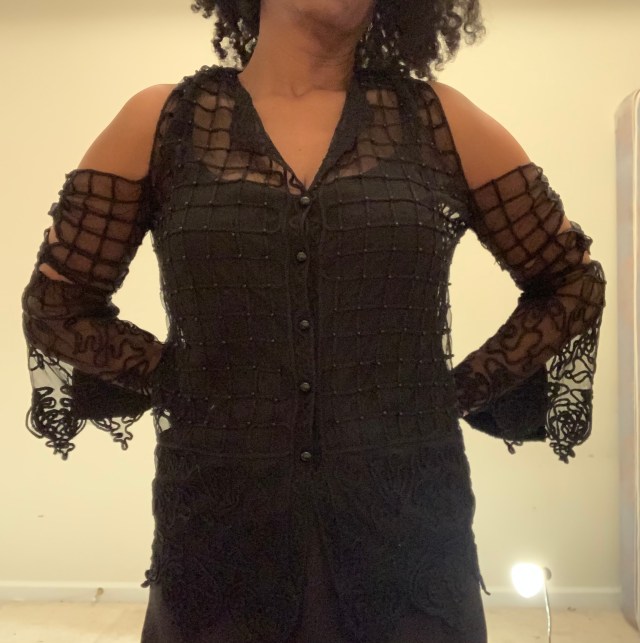
Hello, I am Michelle Paganini. You may already know me from Paganoonoo, or appearances on the syndicated PBS TV show It’s Sew Easy, or my upcycle sewing YouTube tips. One of the things I am really enjoying about participating in this challenge is that it has me focus on projects that I would not normally have selected.
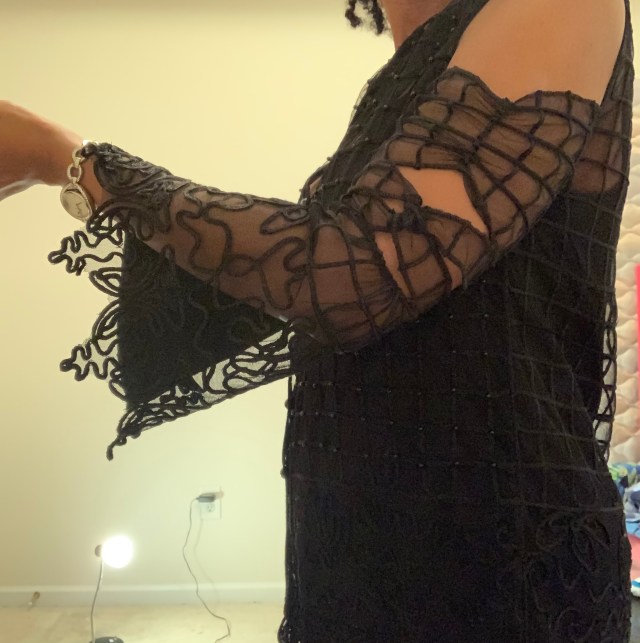
To me a statement sleeve can be structural or textured/embellished. I decided to use used some vintage lace and beautiful vintage linens pieces to embellish my sleeves. A classic men’s dress shirt is one of my favorite mediums to upcycle. I selected a thrifted solid-color light-gray shirt so the color play between the shirt and the embellishments would be subtle, and the lace/linens details noticeable without competition from a print. (Click here for my video tip on color and pattern selection.)
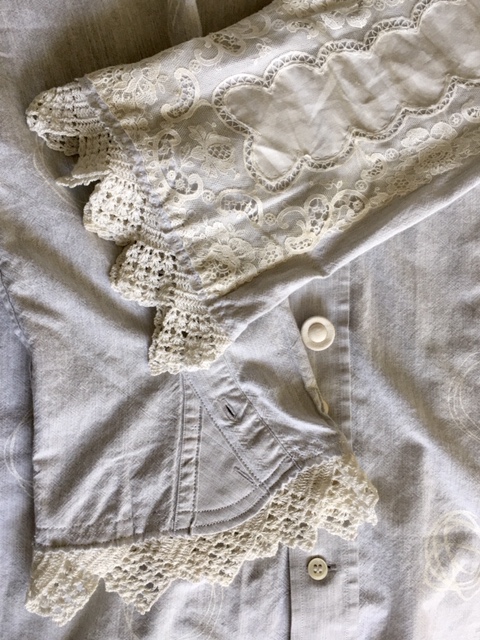
My experience with men’s shirts is that when I remove the cuff, the sleeve length is just shy of full length. Also because the pleat is released from the cuff, the sleeve bottom becomes a bit wider. After removing the cuff and looking at the result, I wanted even more flare to create a bell shape at the cuff. Solution? Add a godet in the sleeve placket using the cuff corner. Space for a second godet was created by making a pinked cut along the underarm seam and inserting the other cuff corner as seen in the picture below.
With the addition of the godets the ends of the sleeves now had a bell shape with a raw pinked edge. I underlined the cuff with vintage lace, making the length a perfect long sleeve. Using what was left of the lace, I edged the collar, creating balance with the sleeves. To finish the “statement” part of the embellishment, I selected two identically styled but different shaped doilies, a rectangle and an oval. They were too delicate to look nice with machine stitching (and difficult to access with a machine), so I hand stitched them in place.
The shirt fit my bust, but would not button across my hips/belly, a typical problem for my pear shaped figure. I now had a button down shirt with a feminine sleeves and collar but not a very feminine bodice. Solution? I turned to my favorite upcycle sewing design, the Paganoonoo Patti, and added a swing back to the garment. A thrifted pajama top of soft lightweight cotton provided the perfect fabric to create the back panel, with the bonus of an existing hem! The bottom of the shirt then flared out for a much more feminine silhouette.
The front of the shirt now had the right silhouette, but was out of balance with the embellished sleeves and collar, needing a more feminine touch. It had been silkscreened with a few white overlapping circles in a workshop I took with Holly Badgley at PenWAG (Peninsula Wearable Arts Guild, Campbell, CA), but that was not quite enough. I added a collection of mis-matched non-functional buttons on the placket. Perfection!
The Paganoonoo Pattidesign is my favorite, simple and elegant, with plenty of hip and belly room. I am in love with with this sweetly feminine “Statement Sleeve” version. I hope you love it too!
P.S. Speaking of sleeves – I have a free video tipon how to add a turned cuff to a dress shirt. Great for making ¾ sleeves!
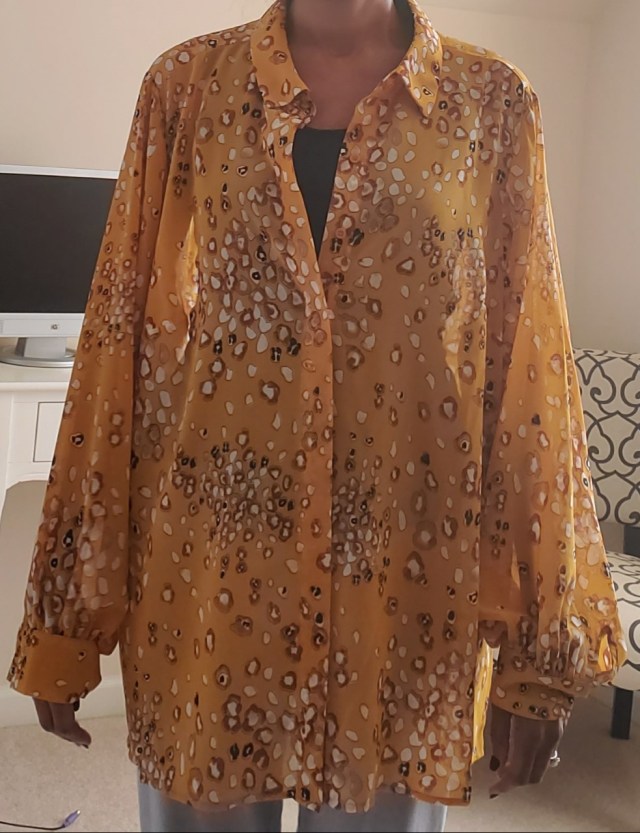
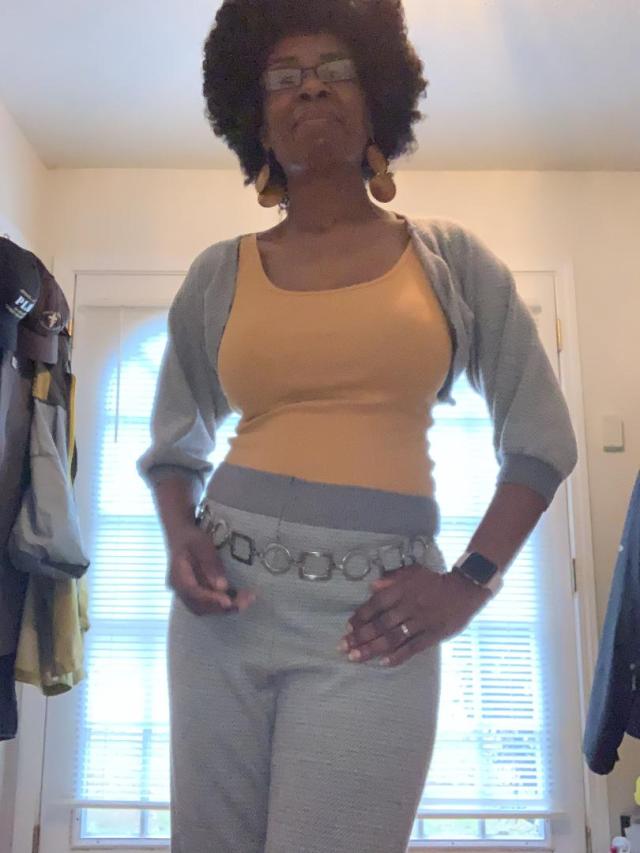
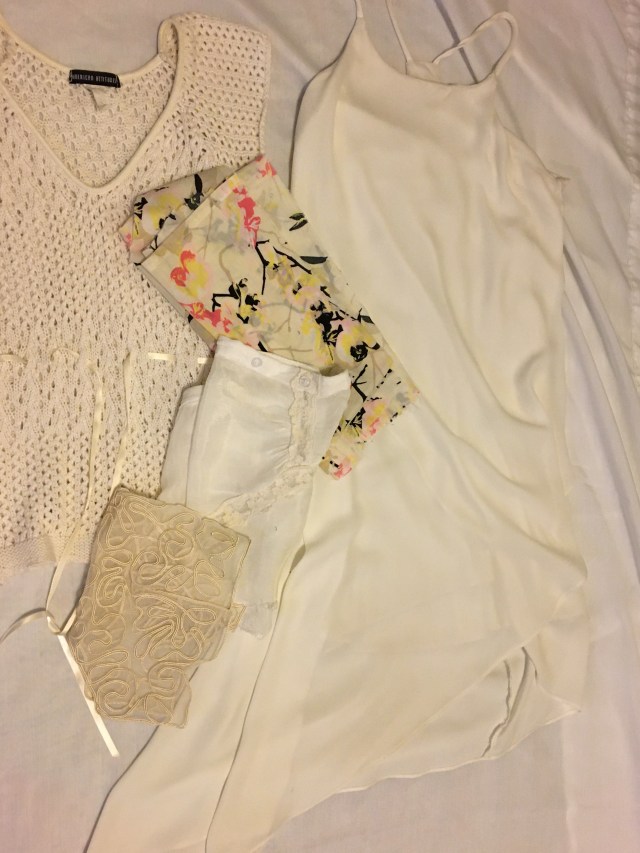
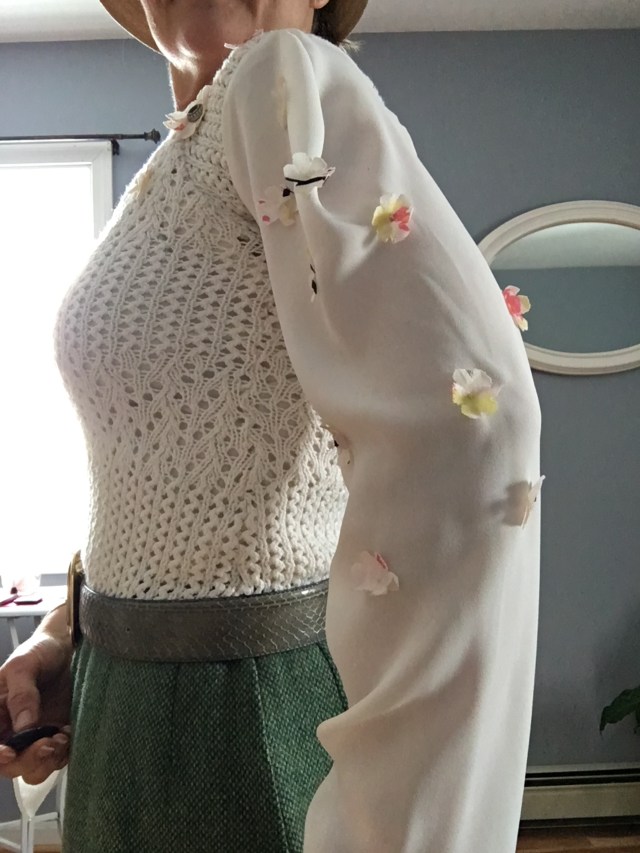
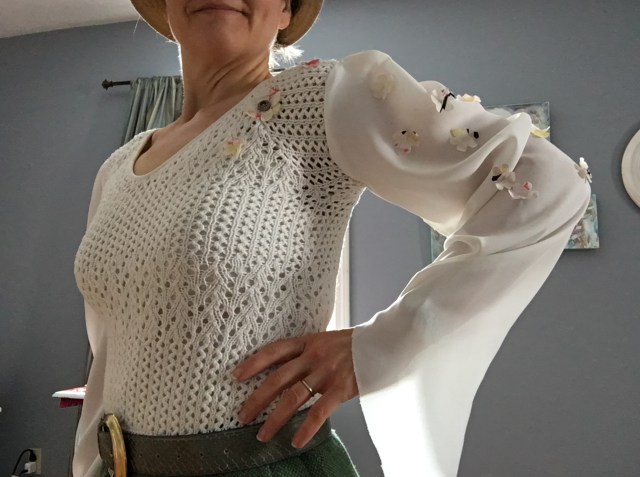
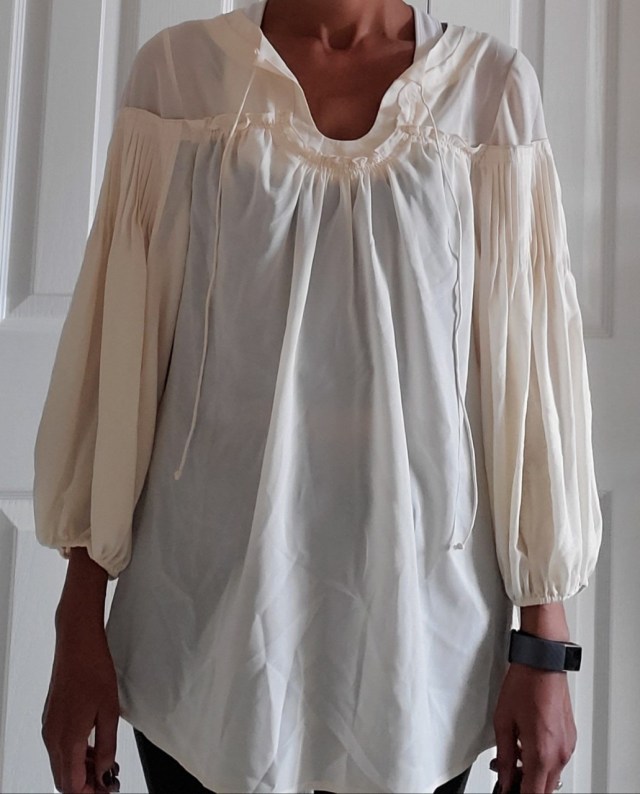
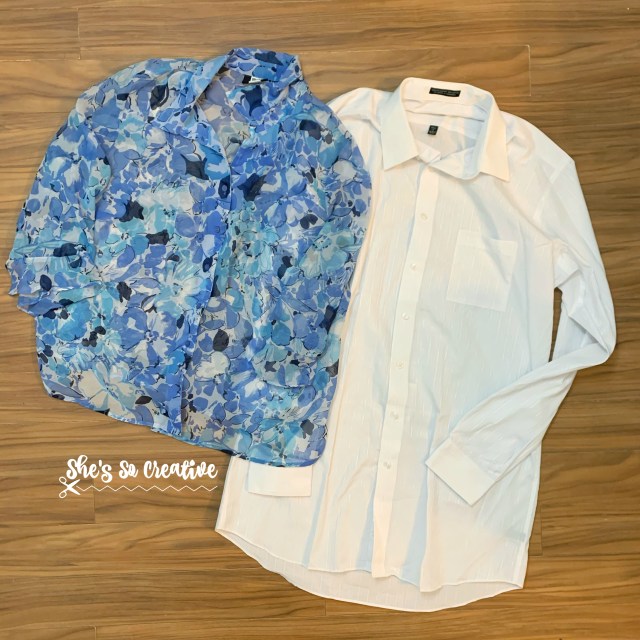
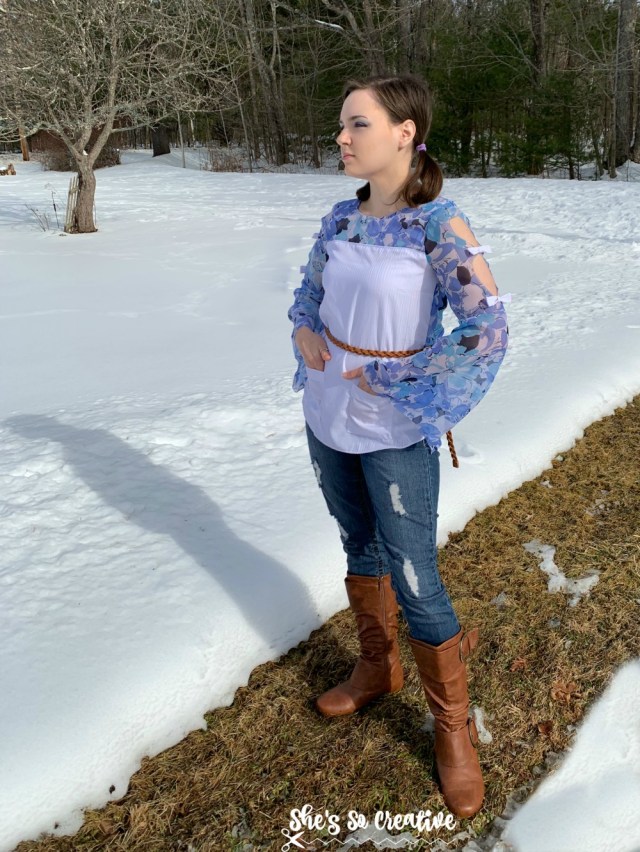
“For this challenge, I used a cocktail dress, a cotton sweater, and some scrap fabric. The feeling I was going for was “D.C., in the Spring” and the fabric scraps made perfect cherry blossom’esque additions to the refashioned blouse.
I created sleeves from the sheer overlay of the dress and carefully sewed these to the sweater’s barely-there cap sleeves. After three attempts, I was pleased with the result! Next, I removed the ribbon across the front of the sweater and then cut and hand-stitched the blossoms on the sleeves and across the left side of the bodice. It feels romantic and slightly vintage–which is what I was going for.”
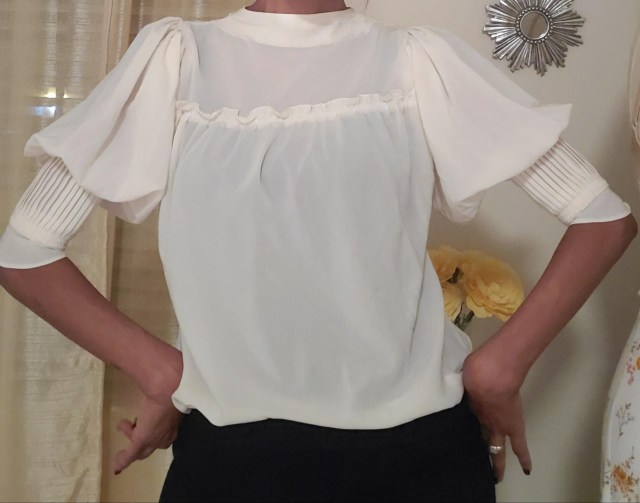
“I liked the material of this blouse and some of the details but the sleeves were awkward and it looked frumpy. I removed the old sleeves from the bodice and took out the elastic. I cut and reshaped the sleeves to make them look puffy. I love the pleated part so I kept it. I reshaped the neck to fit better and flipped the opening to the back. I added elastic at the bottom hemline to give it shape.”
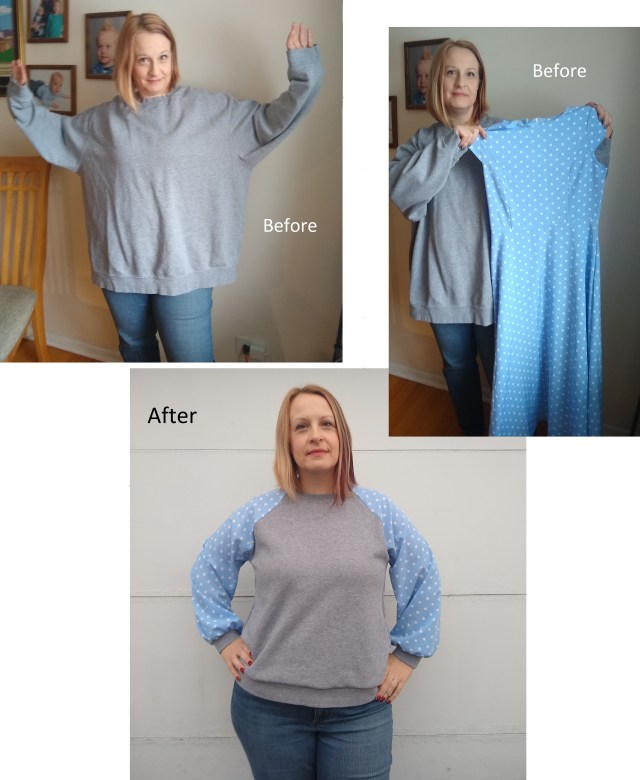
I am short, so I didn’t want to go with huge sleeves for my statement. I am a sucker for a gray sweatshirt, especially with sleeves of a different color or fabric. I found this men’s 2XL sweatshirt at the thrift store, then I saw this gorgeous blue polka dot dress. If the dress was the right size, I absolutely would have worn it as-is, but it was too small, making it the perfect candidate for my sleeve material.
I used a raglan shirt to make a pattern, cut the sleeves off the sweatshirt, and cut new sleeves from the dress fabric. Attaching them to the sweatshirt was a bit tricky, but I figured it out. The sweatshirt was too long, so I shortened it by raising the hem about 4 inches. I had planned to use the original cuffs, but then I realized that one was frayed. Thankfully, the material I cut out from shortening the torso was just enough to make my new cuffs. I love how it turned out – a winter sweatshirt with a preview of summer in the sleeves!
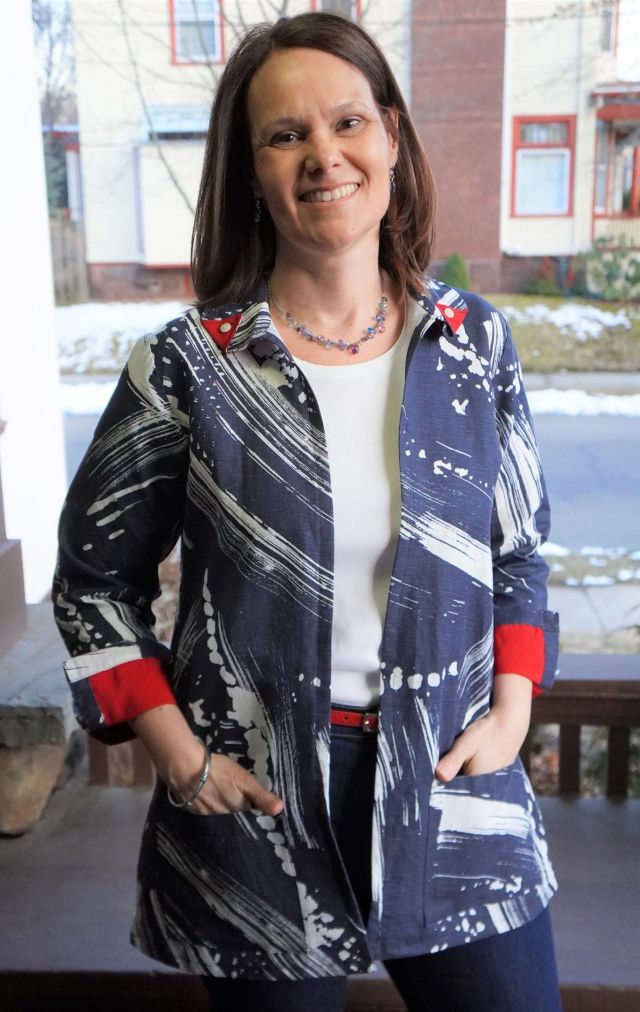
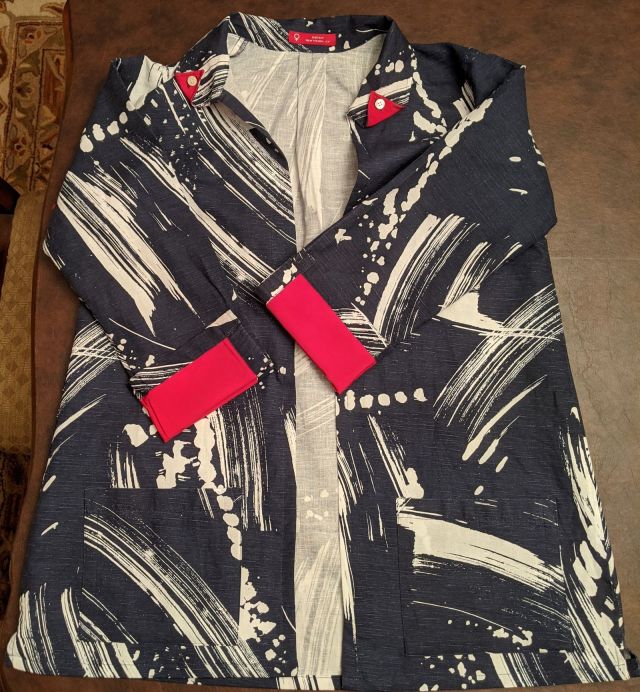
Refashion Runway Season 5 – Challenge 1: Statement Sleeves I just love a high-contrast look to jackets, so when the challenge was statement sleeves, I knew I had a great opportunity to create some drama!
My jacket started life as a dress that a friend gave me. She didn’t like it, but she thought the linen-cotton blend fabric was nice and the print was cool. She gave me a challenge to refashion it. Challenge accepted! Here’s the before look:
The fabric is too stiff and the style is too shapeless for me, but there’s plenty of opportunity for refashioning! I began by washing and drying the dress a few times to change the fabric’s hand – it’s softer now but still crisp enough for a jacket.
I started by cutting the dress straight up the front and unpicking the neck facing. The front was turned and topstitched to create a self-facing. Then I created a pleat at the center back to take up some of the fullness, so it would fit better. I trimmed about 8 inches off the bottom to create a more pleasing length, leaving side vents about an inch long just for style. I used the fabric from the bottom to create the collar and pockets – nice big pockets perfect for holding a phone and keys.
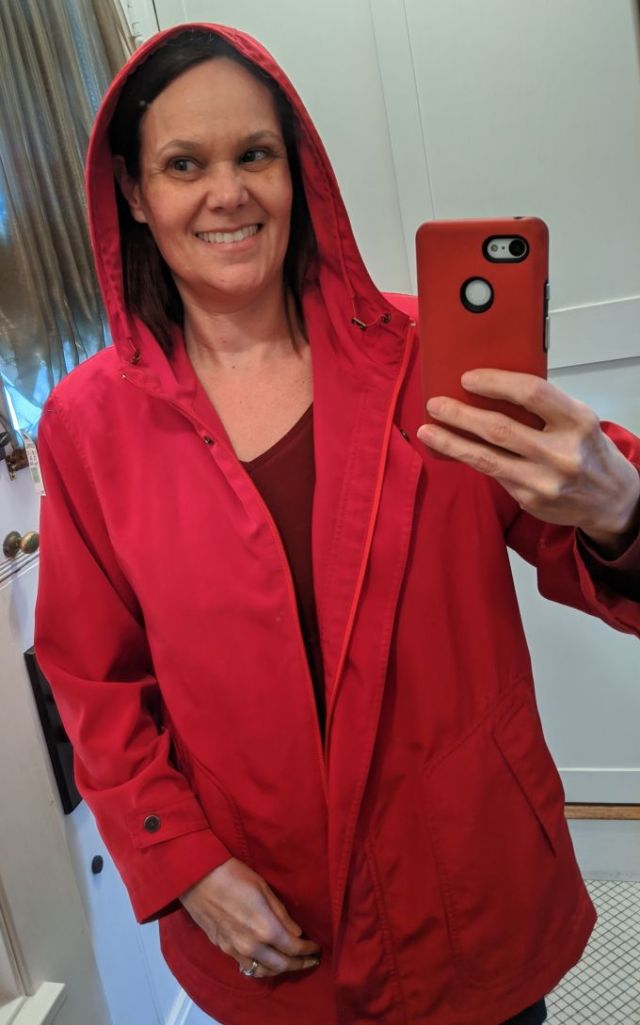
Now to create some drama – red is my favorite color and I love a red, white and blue combo (not just for July 4th!). I headed to my local Goodwill and scored this rain jacket with a broken zipper. I love the color and since it’s fully lined, I had a lot of material to play with.
I created cuffs and a collar facing out of the rain jacket and sewed them on. I put buttonholes in the finished collar so that I can turn over the points for a peek of contrast. Here’s a flat view of the jacket inside and out.
I like making garments convertible, so that I can wear things differently depending on my mood. I can unbutton the collar detail and roll down the sleeves if I don’t want as much of the red to show.
Here’s a back view with the pleat and cuffs:
I am delighted with how this turned out. Now if only winter could be over so that I could wear it!
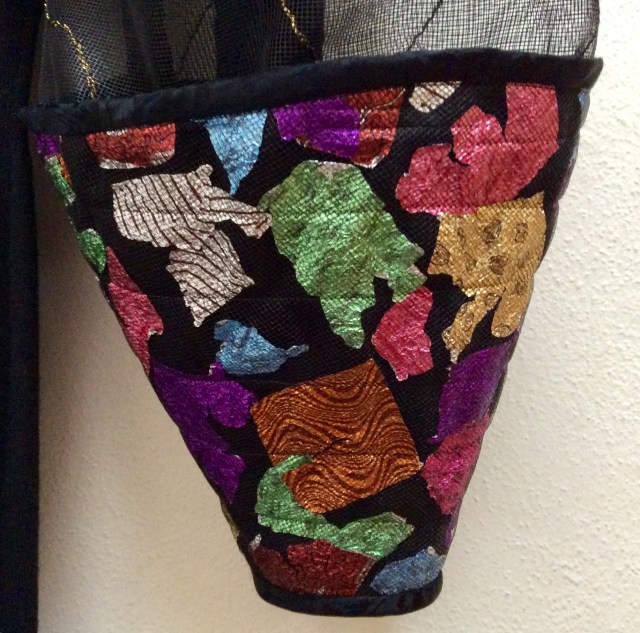
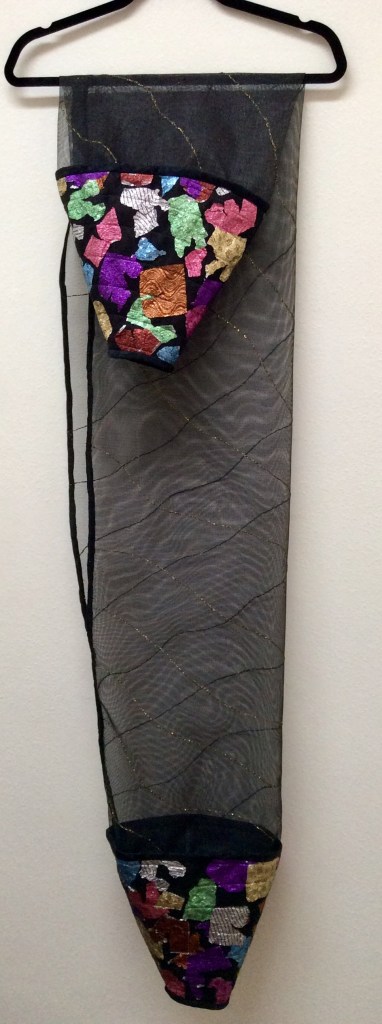
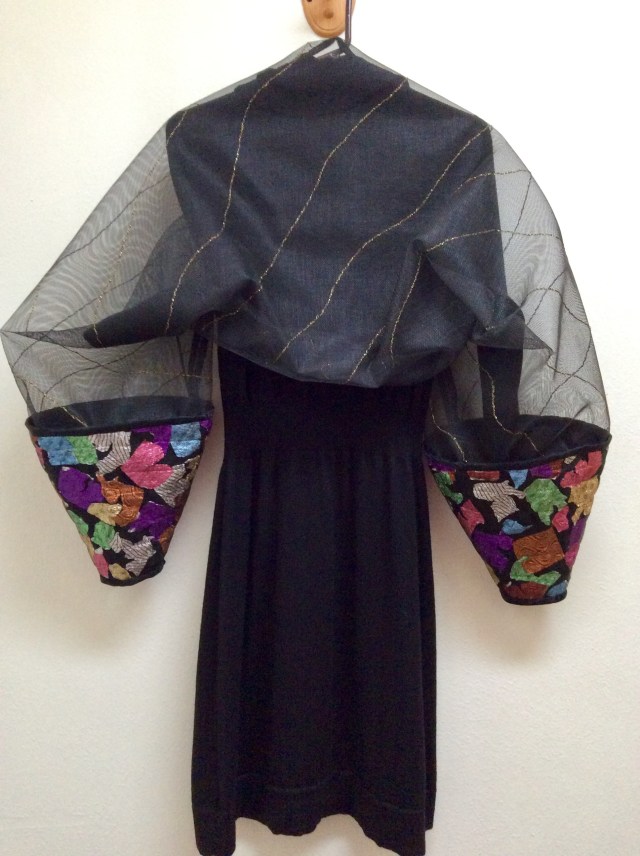
I made a cylindrical shaped shrug, basically a bog coat design without the body just the sleeves.
I repurposed/recycled/upcycled -window screen mesh leftover from screens we repaired -colorful foil wrappers from chocolate candies -a black silk skirt purchased at a thrift store
I couched metallic gold decorative thread to the screen mesh before seaming the tube together. All of the seams and edges were covered with bias strips cut from the thrift store black silk skirt.
The candy foils were sandwiched between layers of mesh and lightly machine quilted.
“I used solely the shirts for materials and didn’t add any other fabrics. I basically turned the blue shirt around, cut part of the back panel out and patched in the white panel (blue shirt went from a 3X to a small). I deconstructed the sleeves, added double peekaboo holes and took some left over white shirt and made bows. I took what was left of the blue back panel, cut it in half the width way and attached that to the bottom of the sleeves to make them long and flowy. The bottom of the sleeve goes from elbow to wrist. I also adjusted the collar to make a deep V in the back. I added the white pocket from the shirt to the bottom and then constructed another and added that as well. Statement sleeves. Form fitting peek-a-boo tops, loose and flowy from elbow to wrist, accent bows. “
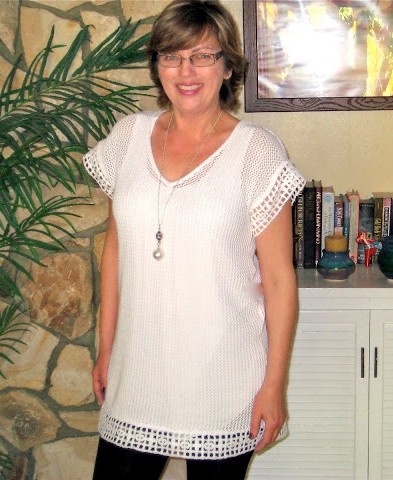
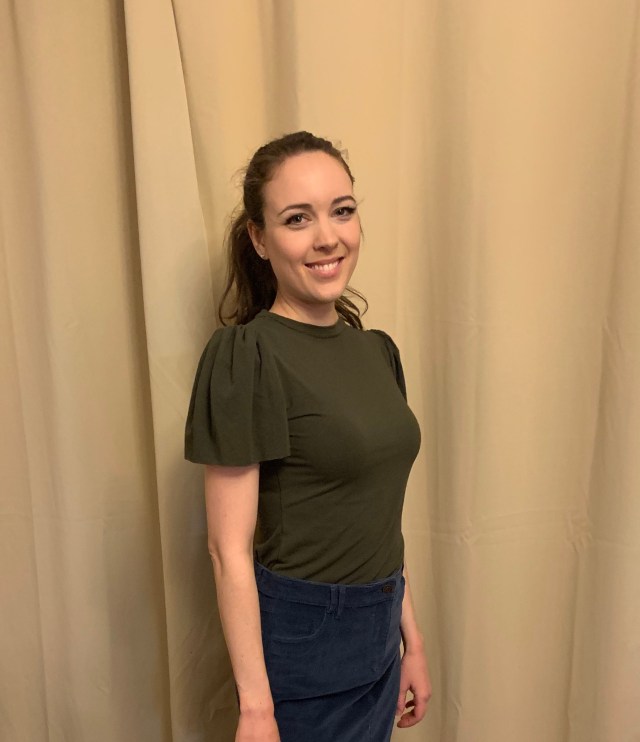
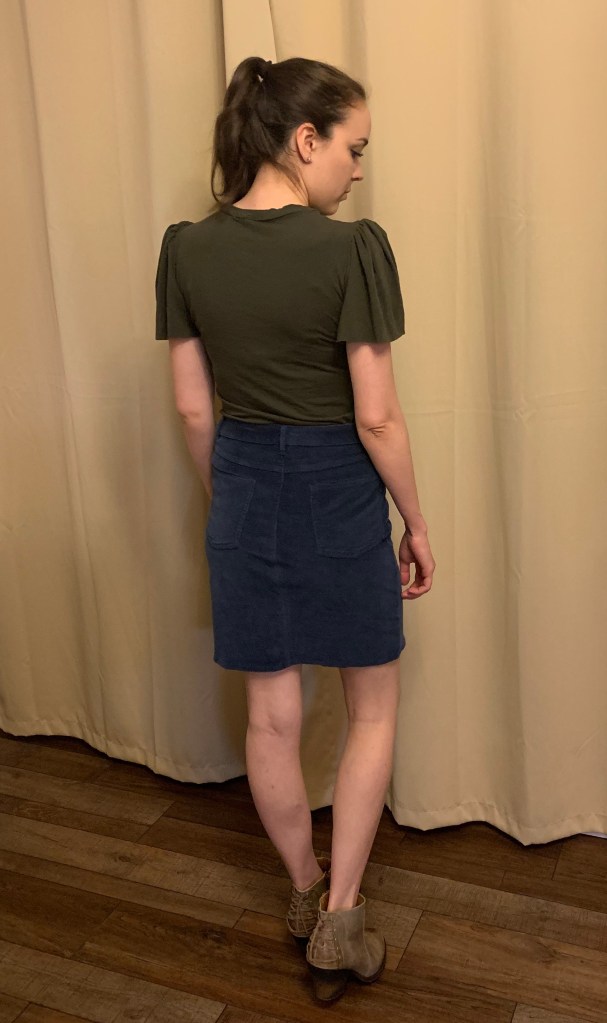
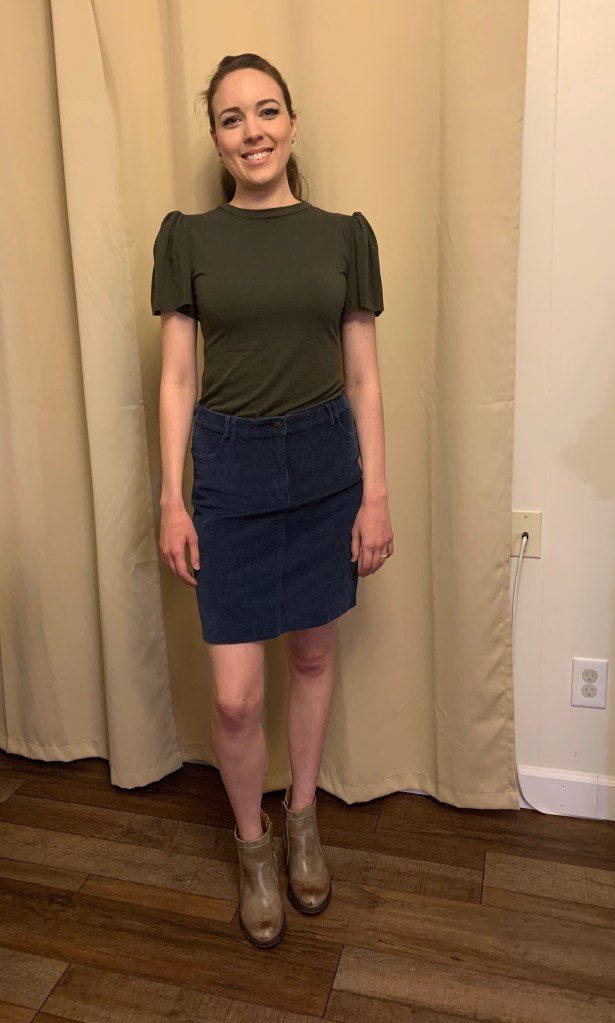
This had been sitting in my thrifted stash for a while. Was it a dress, a tunic, a nightgown? I wasn’t sure, but liked the color and soft knit material and decided to refashion it for this Statement sleeves challenge.
First I seam ripped the neckline binding and cut out the sleeves. Using my measurements I cut out a shirt. Cutting where I wanted the hem of my new shirt to be I used the remaining curved part of the old hem for the new sleeves. I seam ripped the old hem, gathered the material and then stitched them in place, reattached the neck binding to the now smaller neckline and Hemmed the bottom of the shirt.
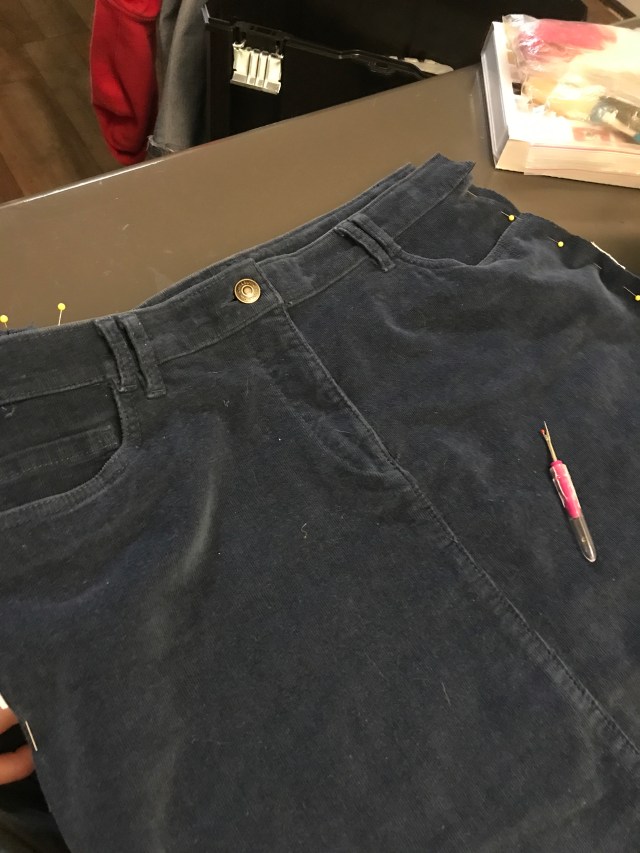
I also had this really beautiful blue corduroy skirt in my refashion stash for a while and thought the color would look nice with the new shirt, but it wasn’t my style and was a little big for me. So I cut a new hemline and pinched, pinned, and sewed the sides until the fit was right.
Even though I have sewn with it before I always feel a little out of my comfort zone when sewing with knit fabric. I thought about changing my project a couple times to a different material, but I’m glad I didn’t. In the end I am very happy with how it turned out! Even more so because I felt challenged by it!
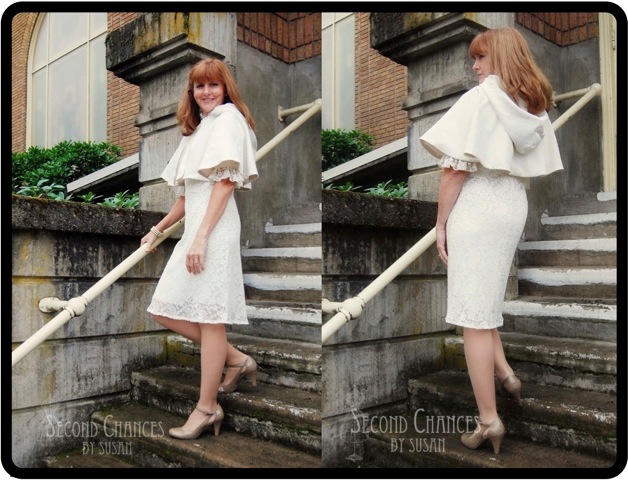
Before: This original heirloom style blouse began to decay. I loved the fabric and couldn’t bring myself to throw it away
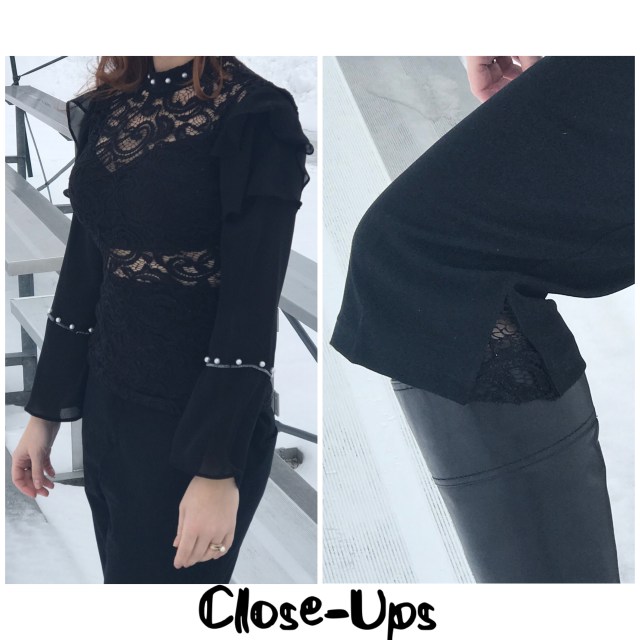
After: to update the look, I added flare to the sleeves with a satin triangle, then removed sections of the sleeves to create a cold shoulder. Because of the delicate fabric everything except the satin inset was hand sewn.
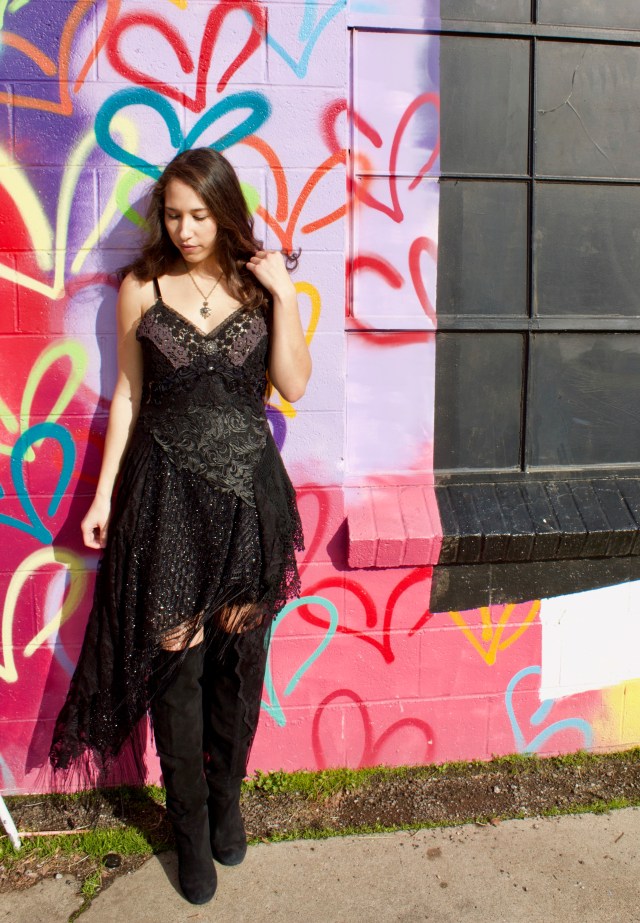
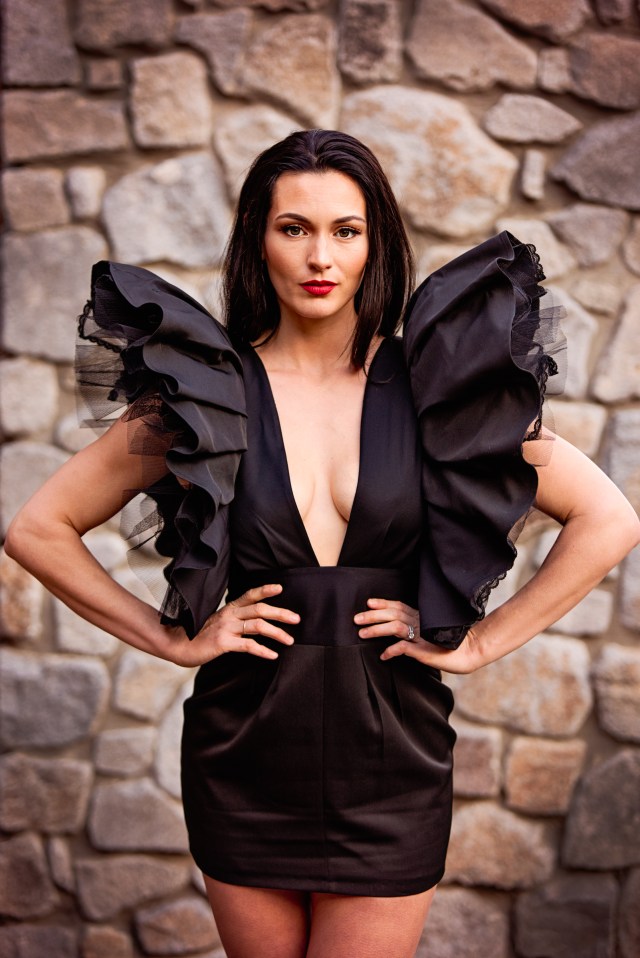
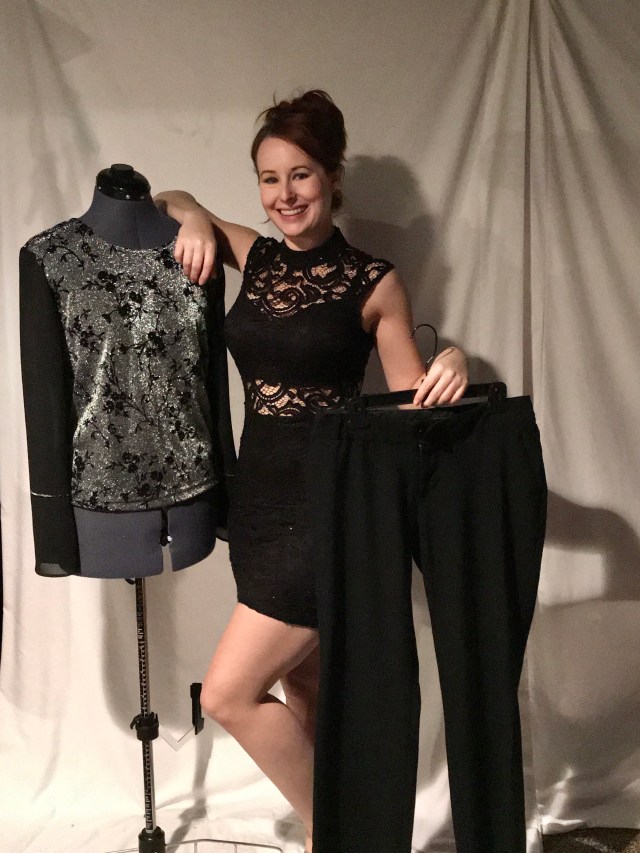
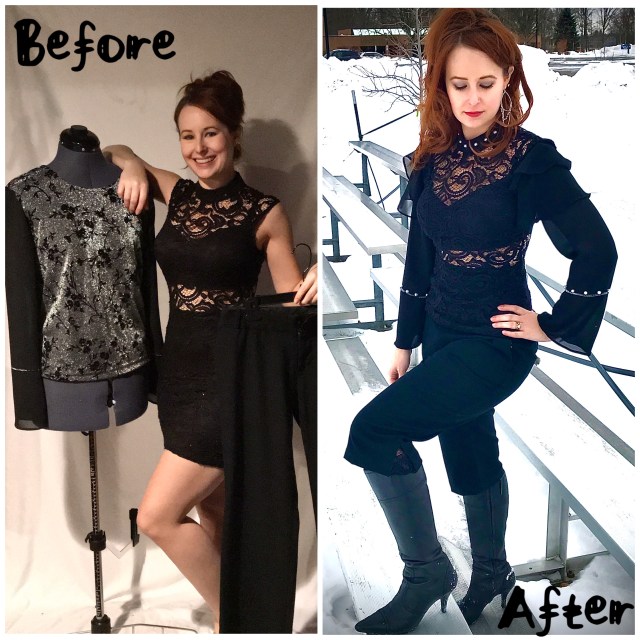
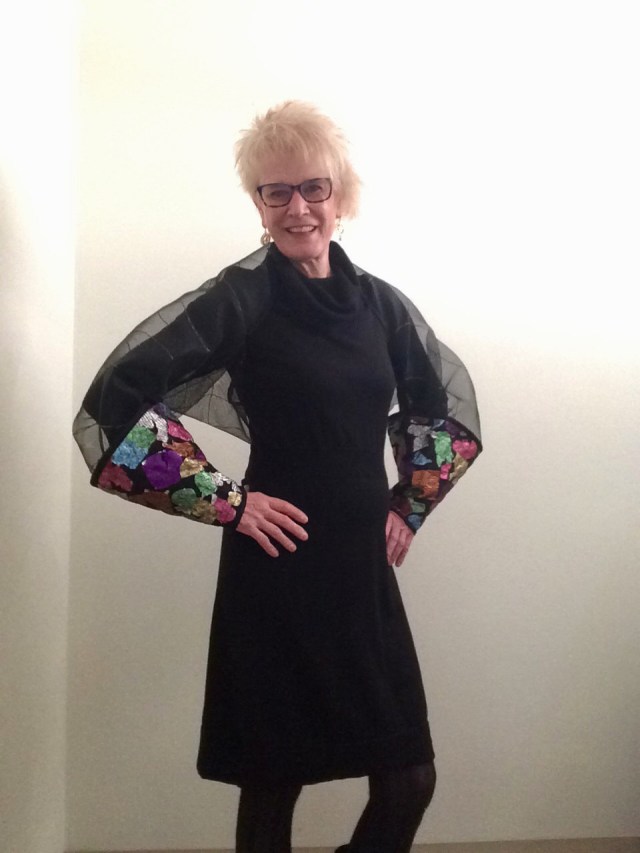
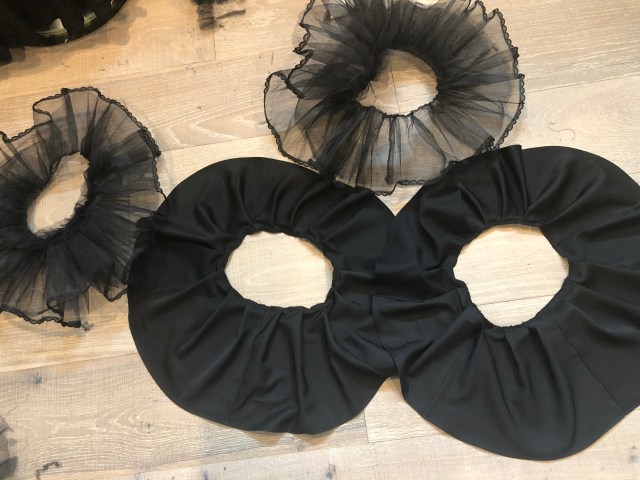
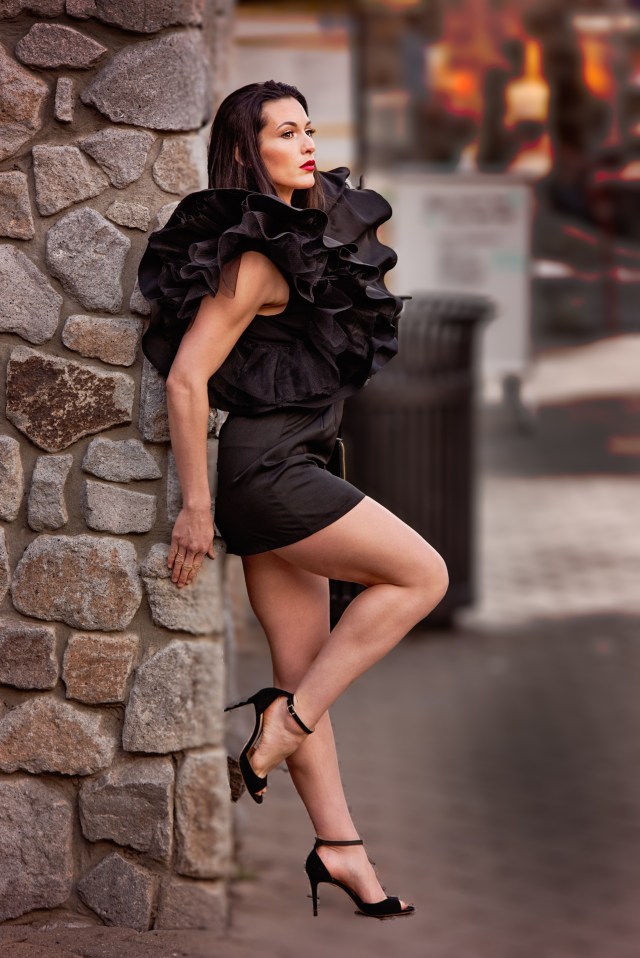
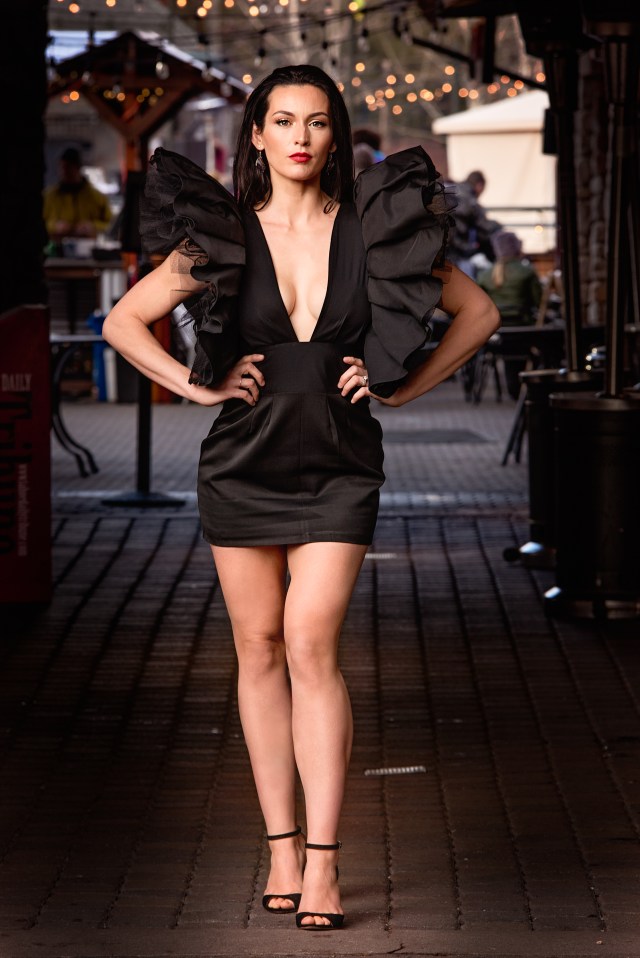
I knew the moment I saw this suit on a rack at the Attic, a second hand store in Lake Tahoe, that I had to resurrect it. In my mind’s eye I could see it refashioned as a sleek, formal dress with stunning sleeves that make it stand out. I’m super happy with the end result.
Vote for your favorite designer in the poll below and if you have more than one favorite, come back tomorrow and vote again. 🙂
The winner of this challenge will be announced next Saturday and the two people with the fewest votes and the lowest scores from our judges will be “sent home” (eliminated) 😦 The hardest part!
It’s time to vote!
After you click on your favorite, scroll to the bottom of the poll and click the vote button so your vote will be counted.
If you’ve been wanting to try your hand at quilting, a rag quilt is the perfect place to start. All you have to be able to do is cut squares and sew a straight line. No need to worry about fraying around the edges either because on this quilt, the more fray, the better. Since the seams are exposed and they are expected to fray, this quilt is very forgiving and a cinch to make.
What? What’s that you said? You love that wiener dog flannel?
Me, too!!! Isn’t it cute! 🙂
You can watch the video here:
Click here for the complete step-by-step photo instructions.
And stay tuned to see what the 15 creative contestants designed for the very first challenge of Refashion Runway this Saturday, January 25. After you see what they created, I hope you’ll take the time to vote for your favorite Statement Sleeve Refashion.
I can’t wait!!!
Beth
For more refashion and sewing tutorials, click here.