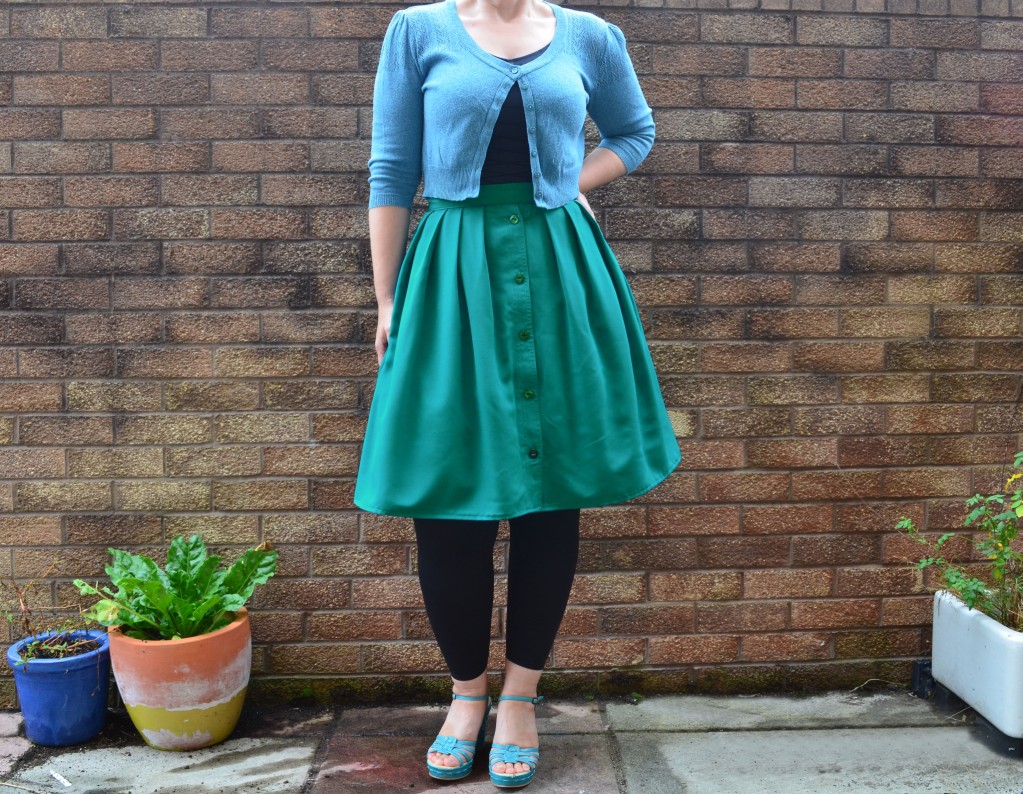
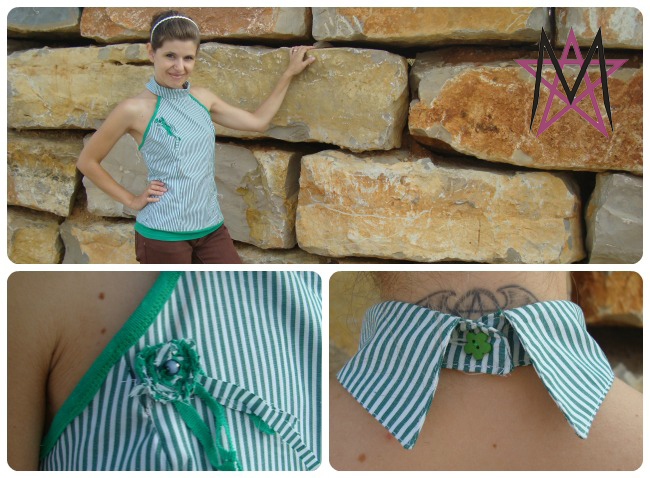
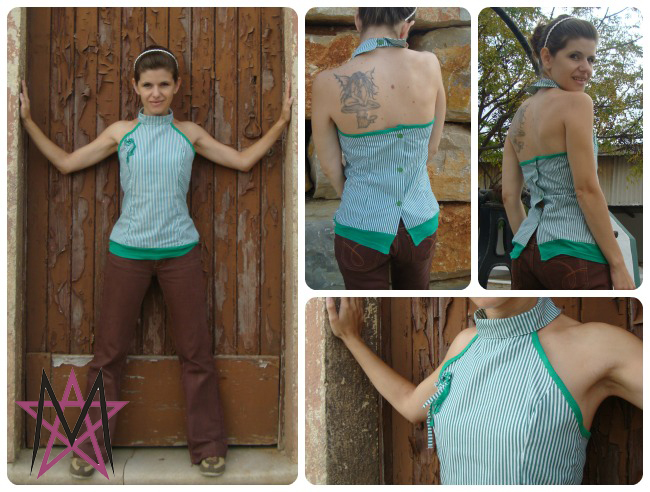
Molly, who has sewn costumes for years, just recently jumped out of her pattern box to join the refashion world. Her husband accuses her of being addicted to repurposing. Hmmmmmm…….(Looking up and whistling) I wouldn’t know anything about THAT…. 😉
Well, I’d just like to say, Welcome to Molly and I’ll let you know when the next Refashion Anonymous meeting is, because I’m pretty sure, the meeting will be at my house. The meetings will go something like this: (Serious face)”My name is Beth and I’m a refashion addict.” (Face lights up) But just look at this horrendous sweater that could be made into a gorgeous hat and a warm pair of mittens. And this colorful tablecloth that needs to be a dress. And this old skirt that is begging to be a dress.” It’ll be fun!
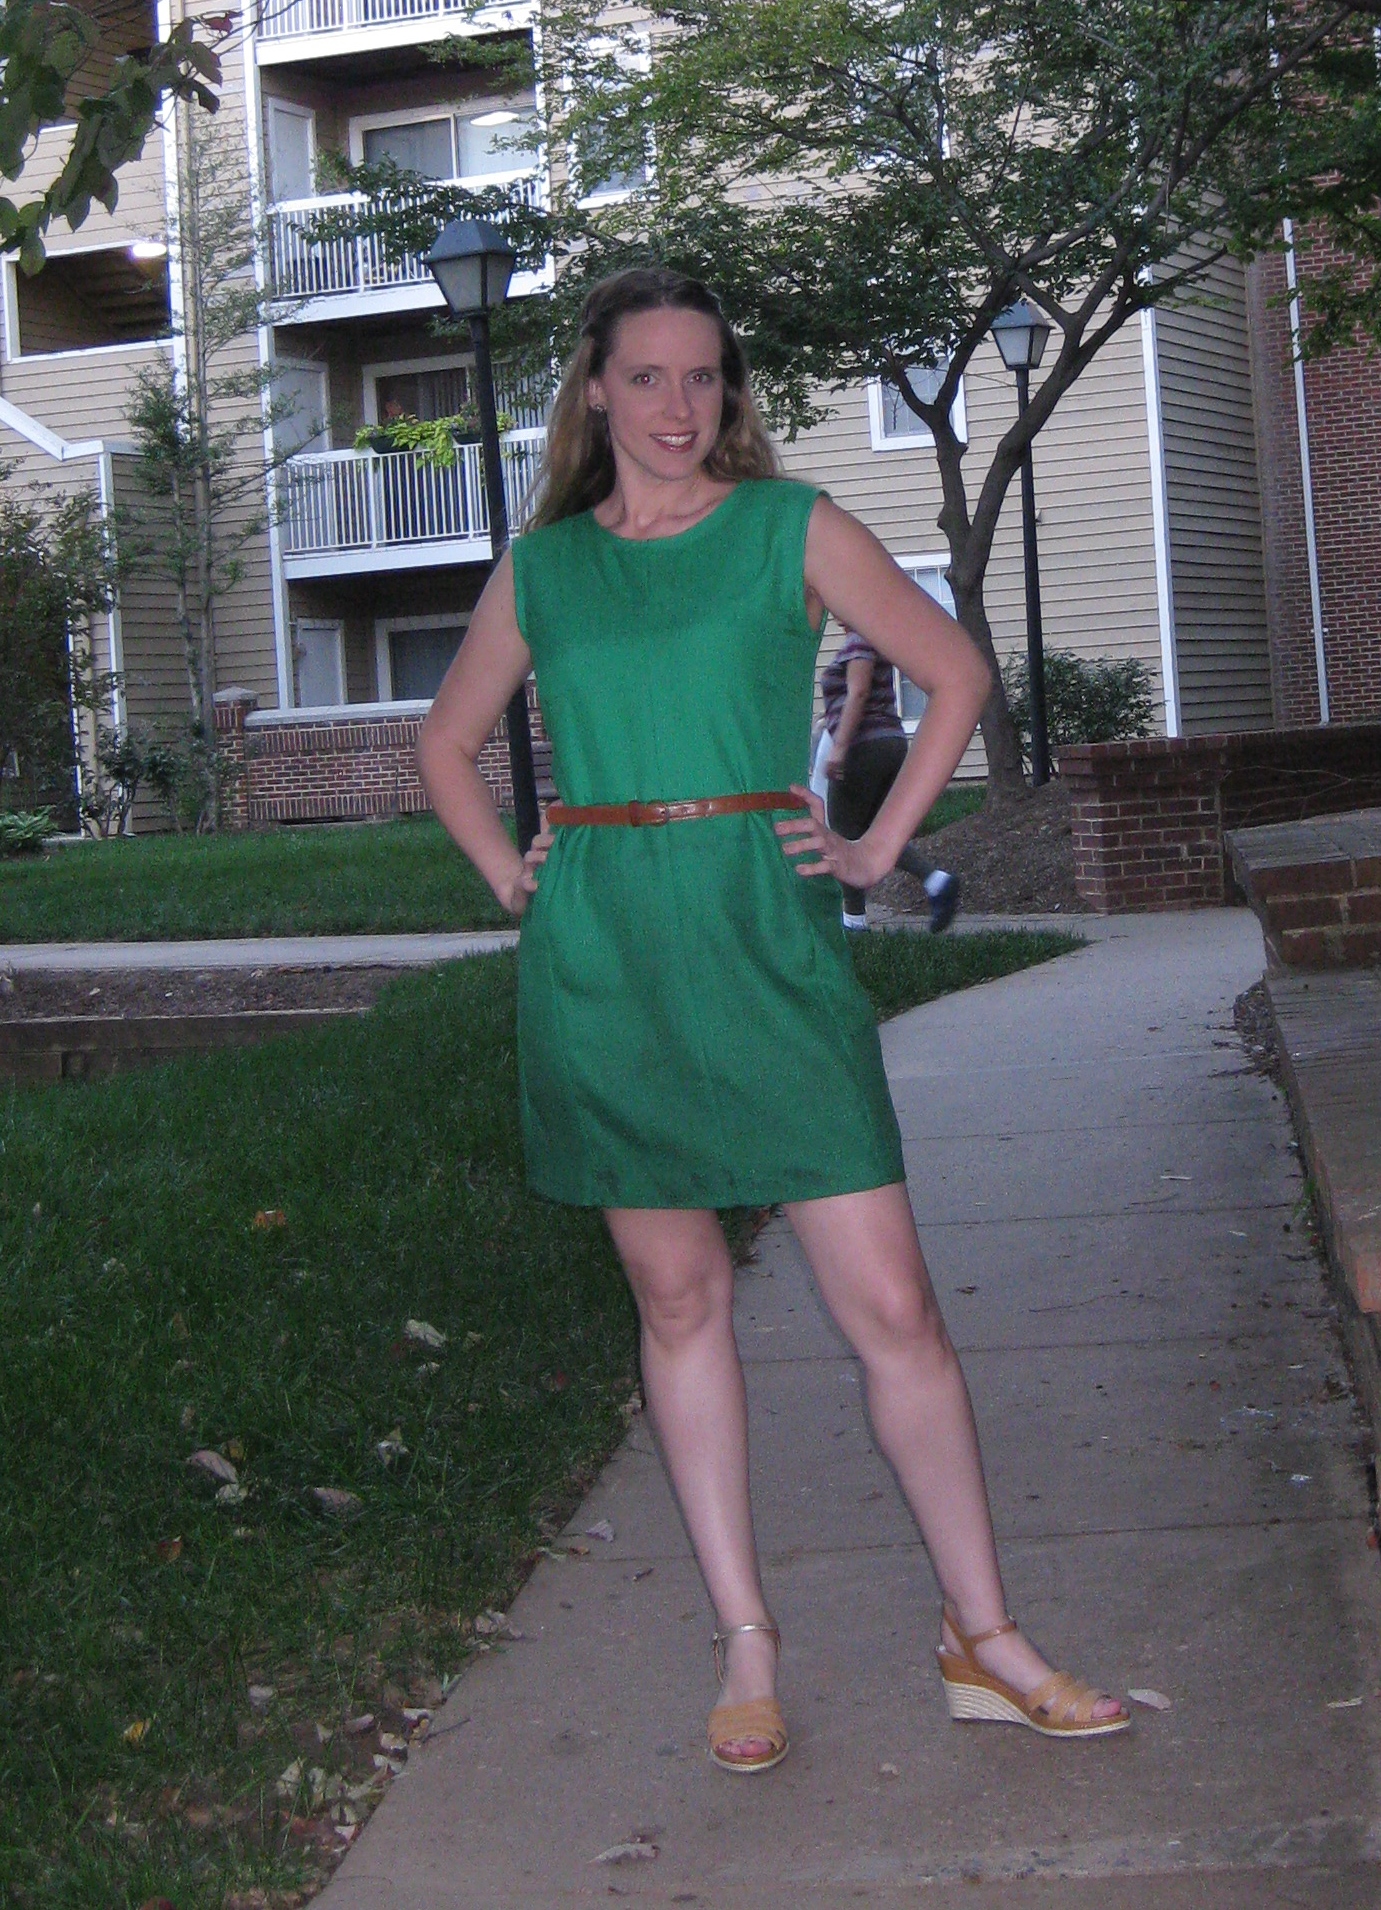
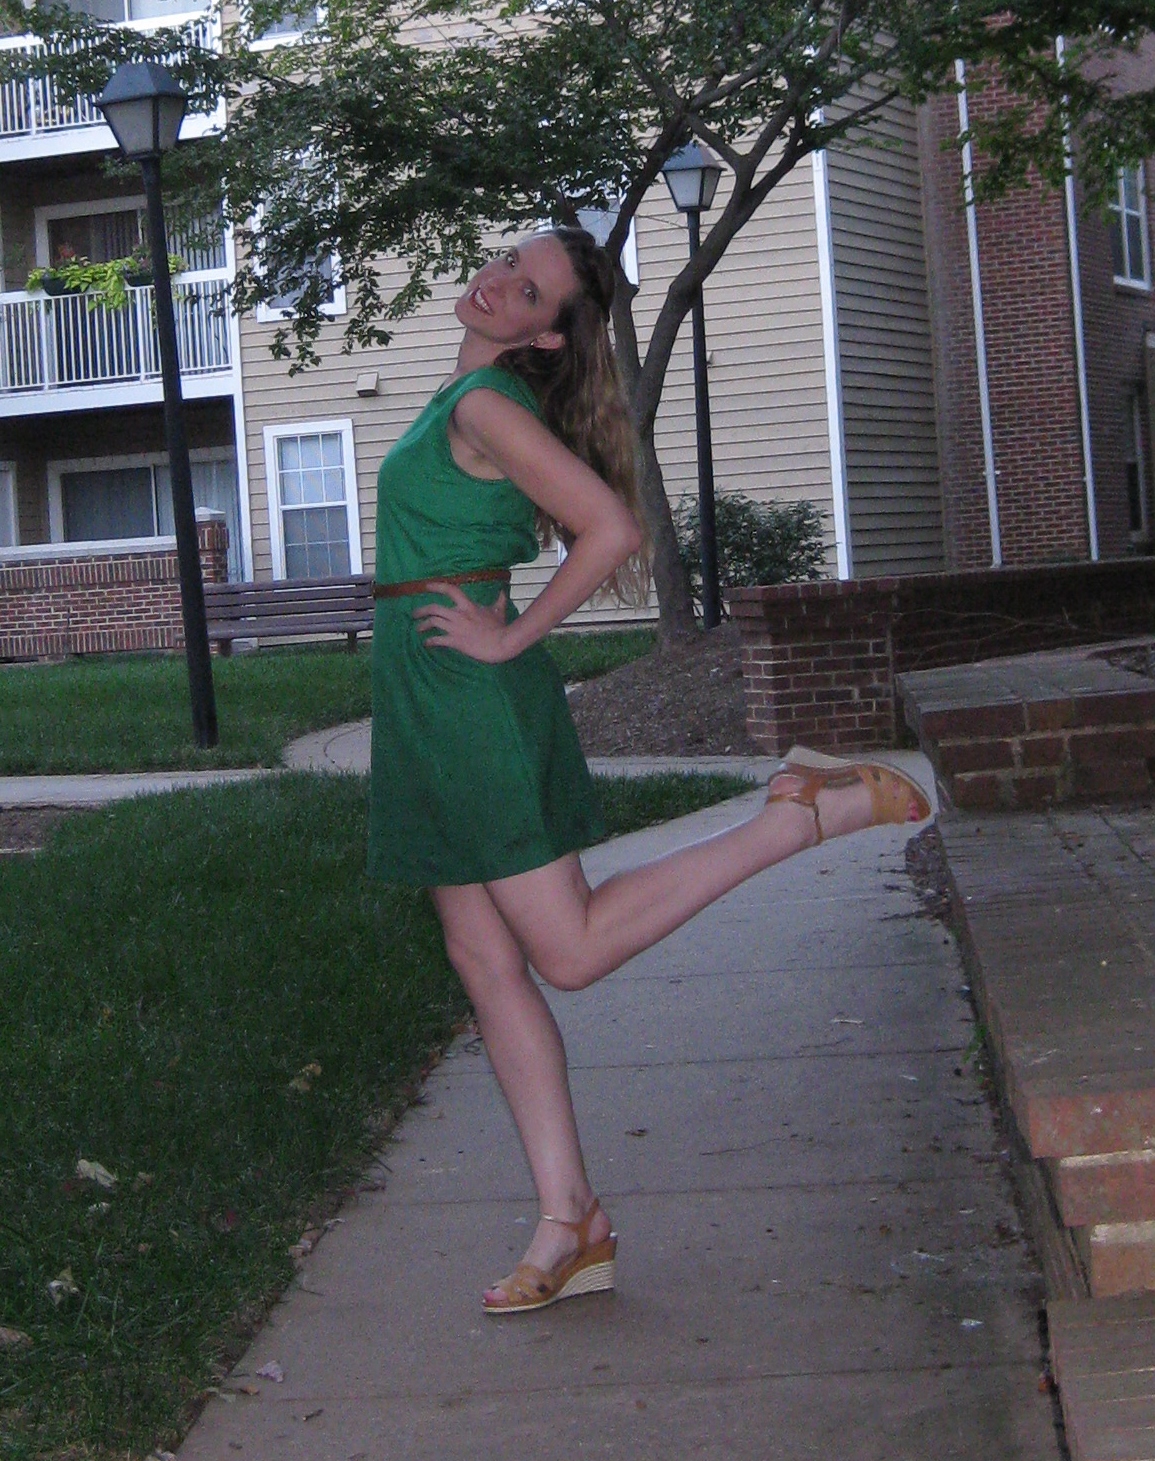
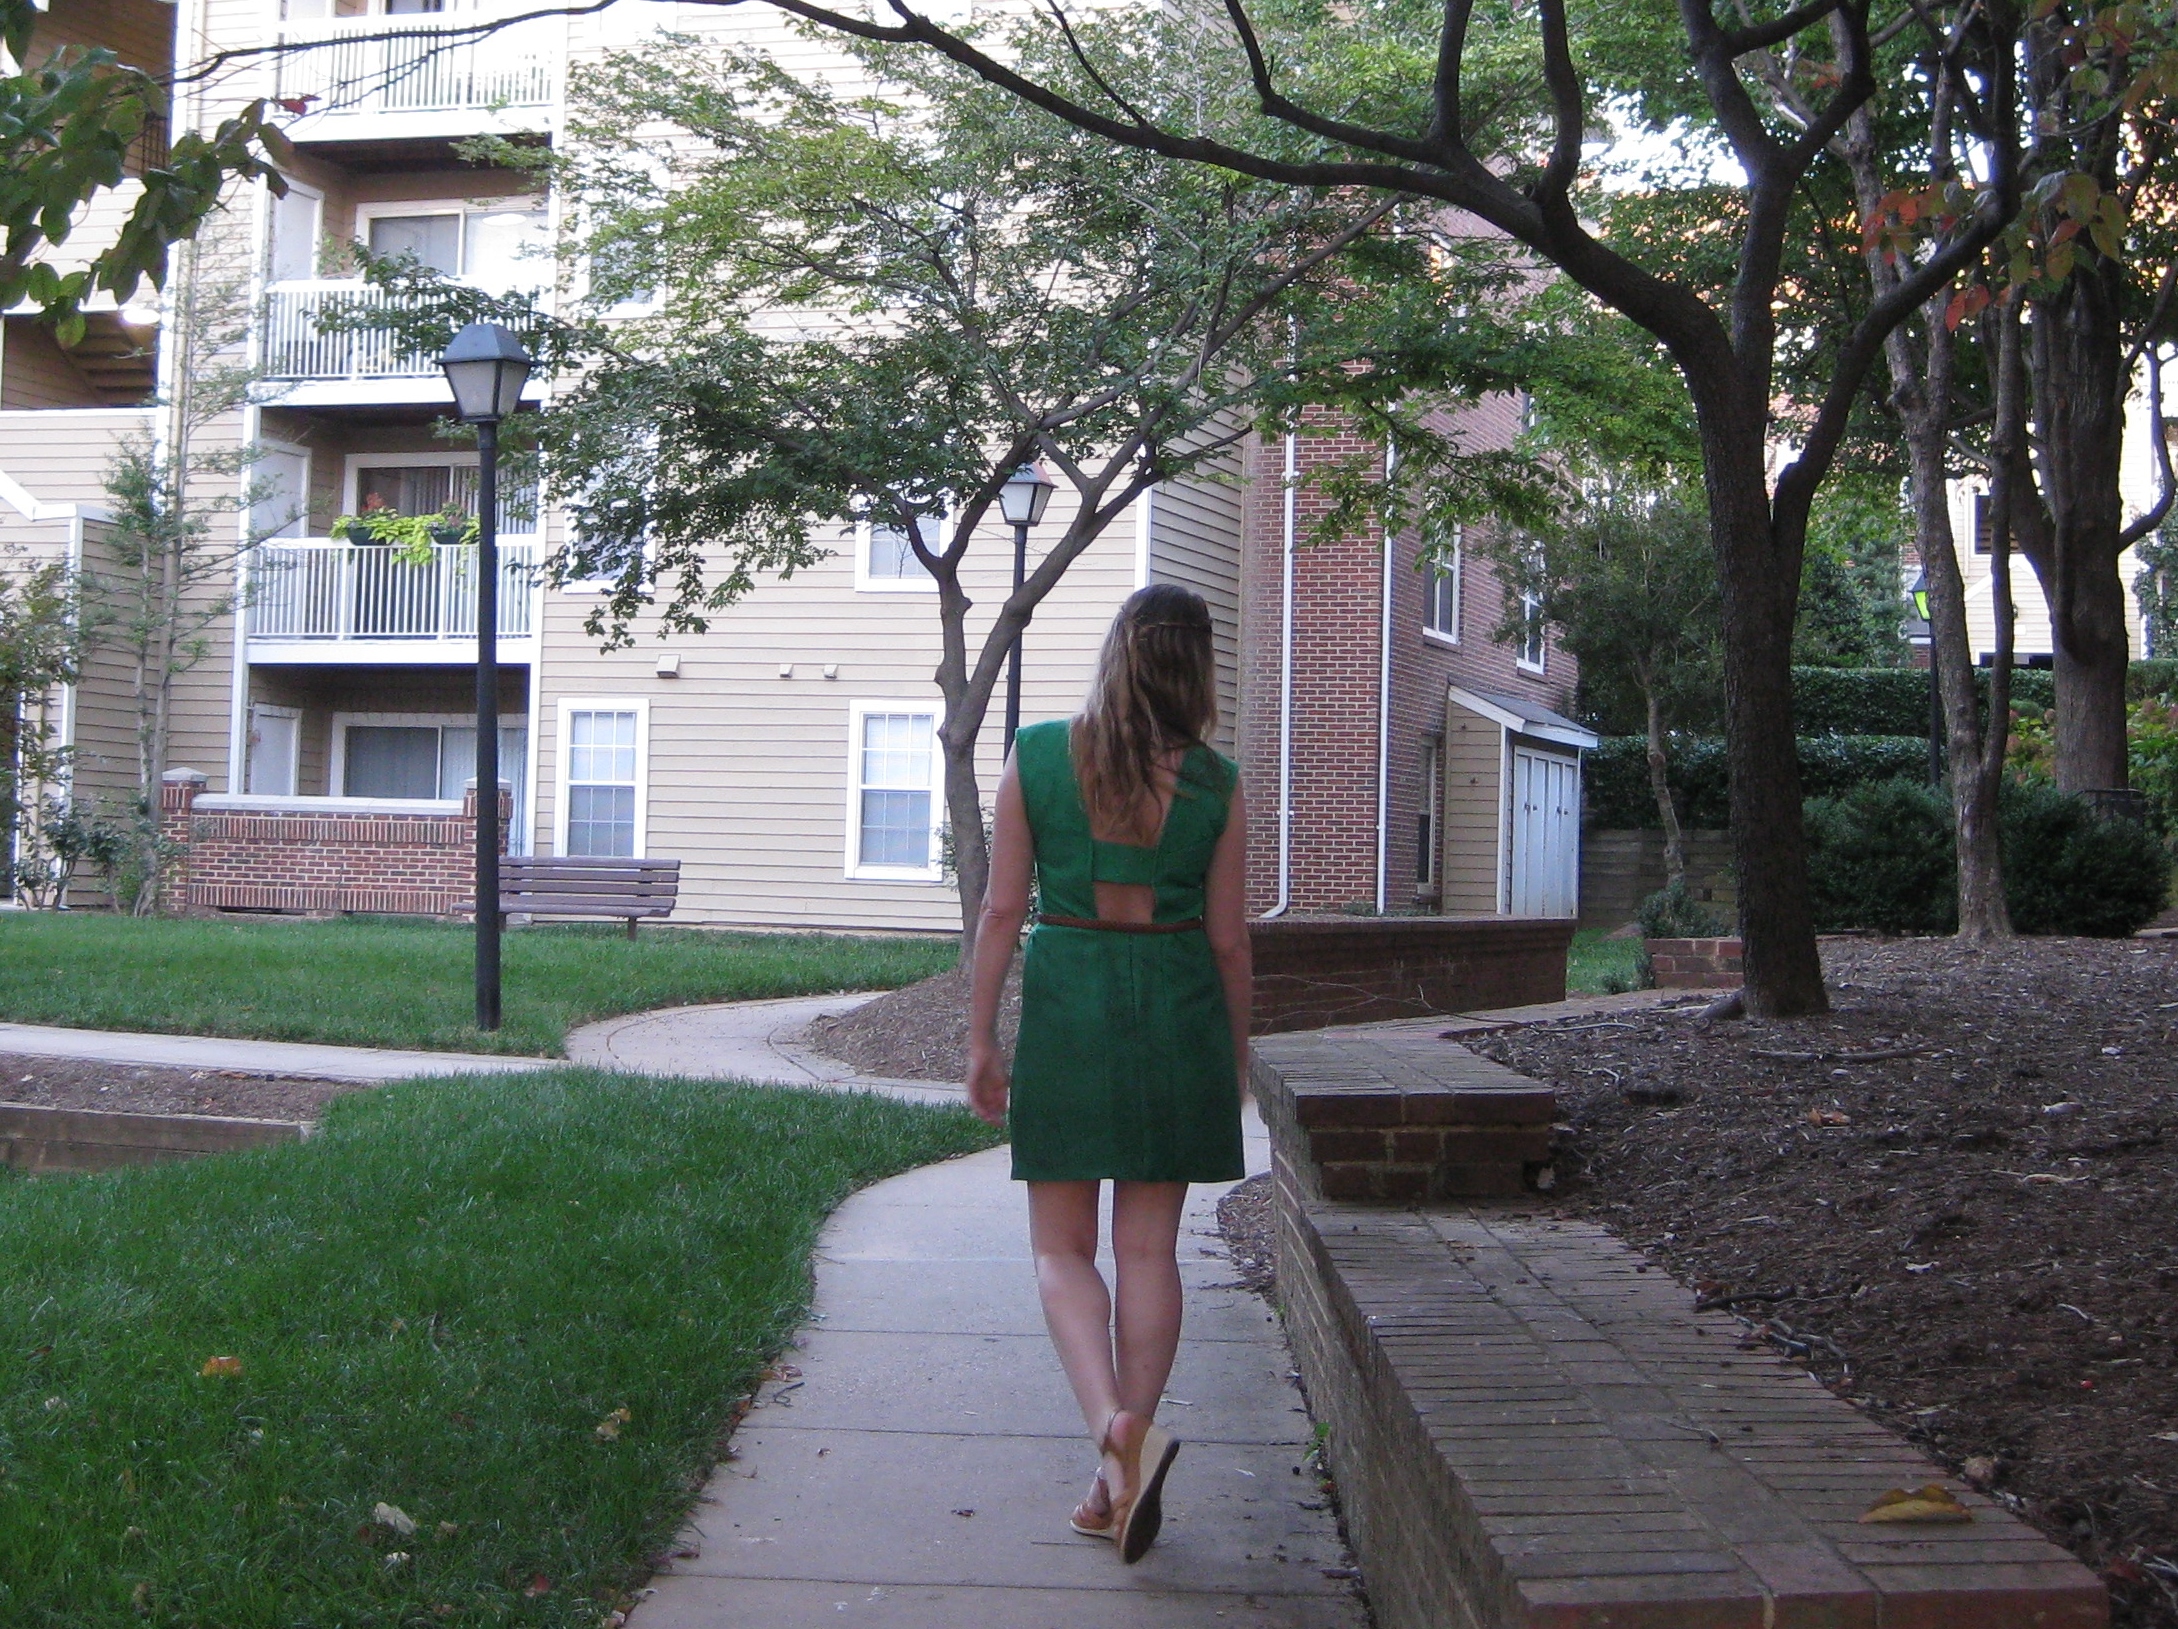
Here is Molly’s version of the Emerald Challenge and I’m sure we’ll be seeing more of her in the future.
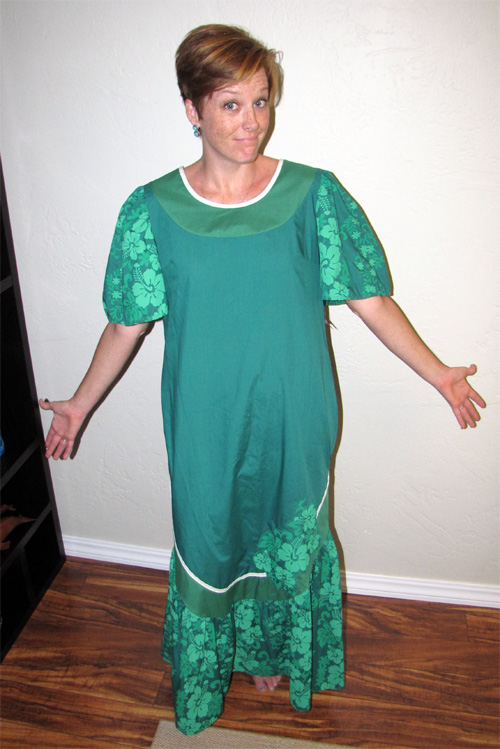
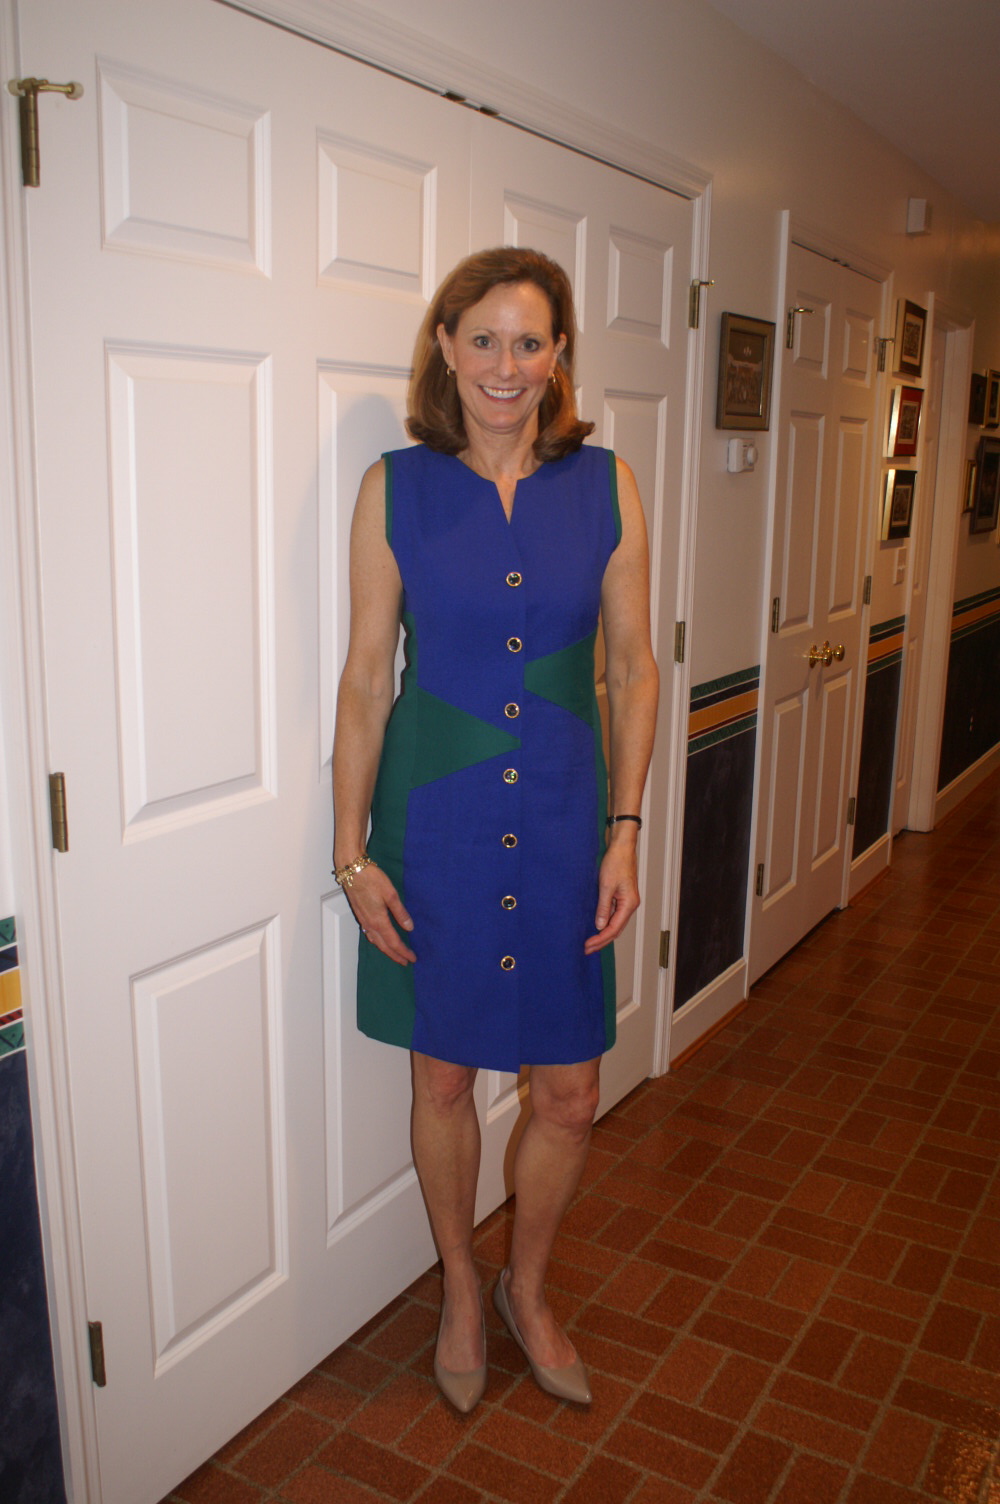
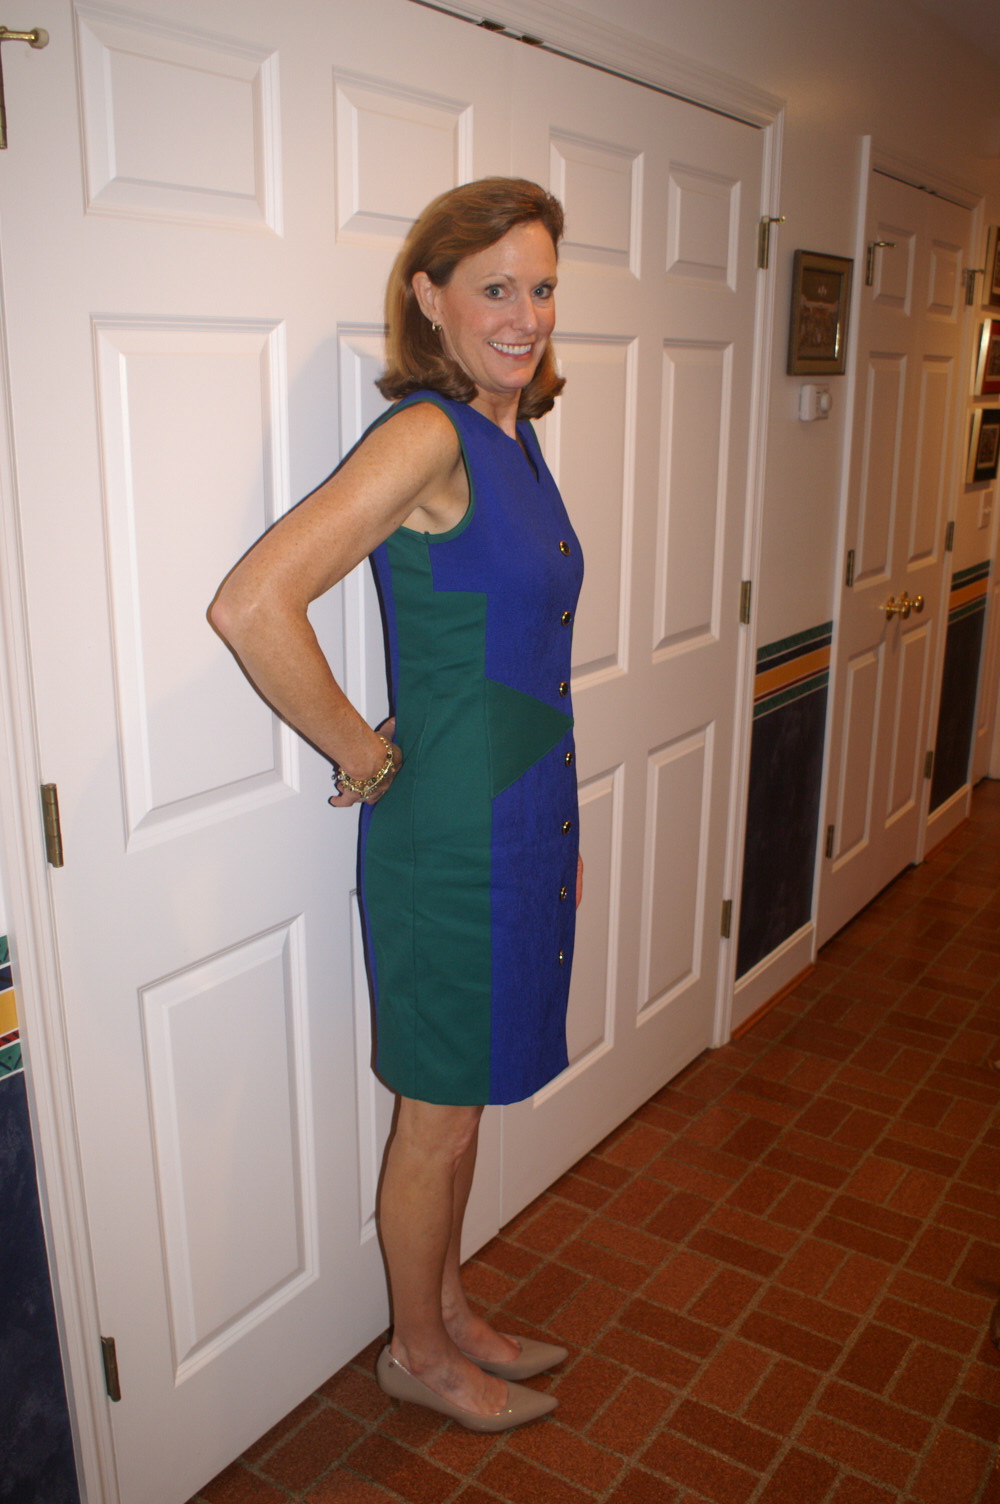
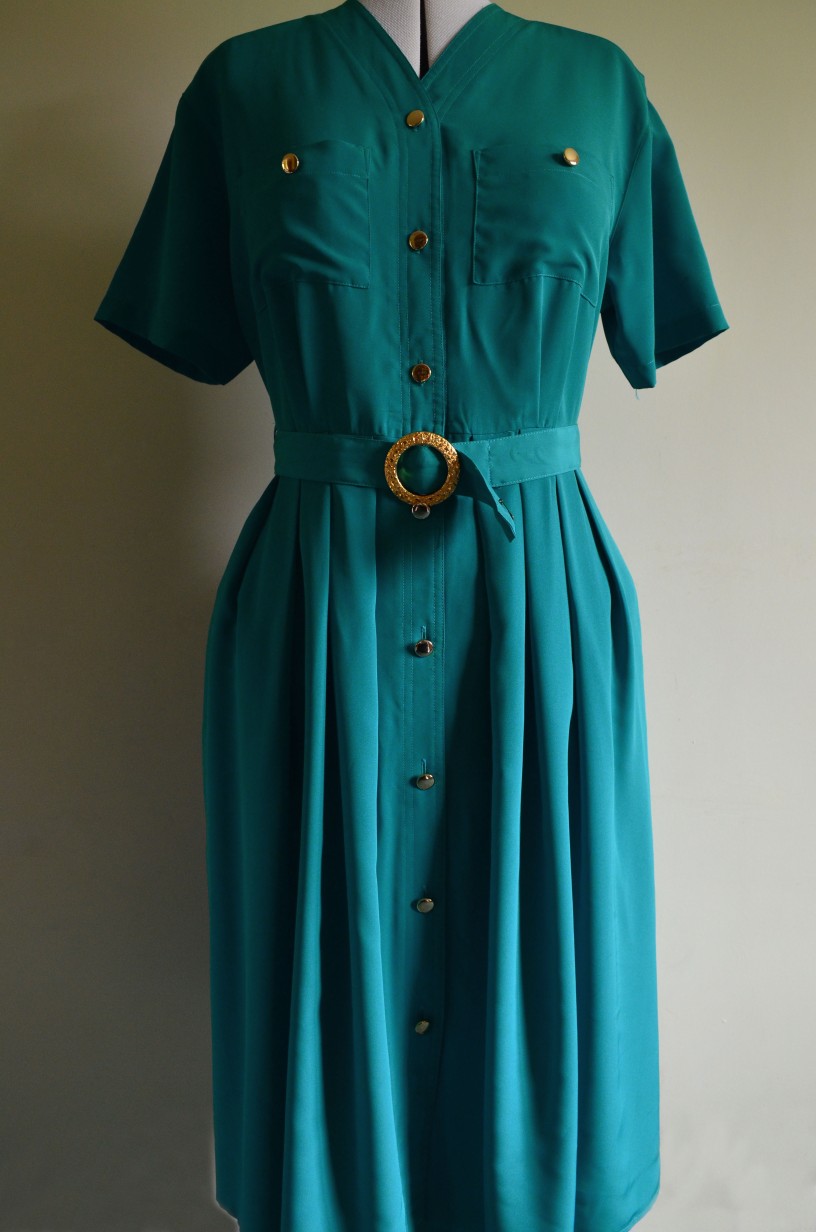
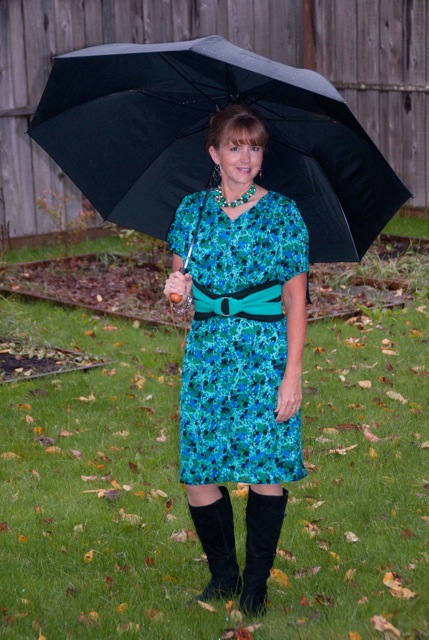
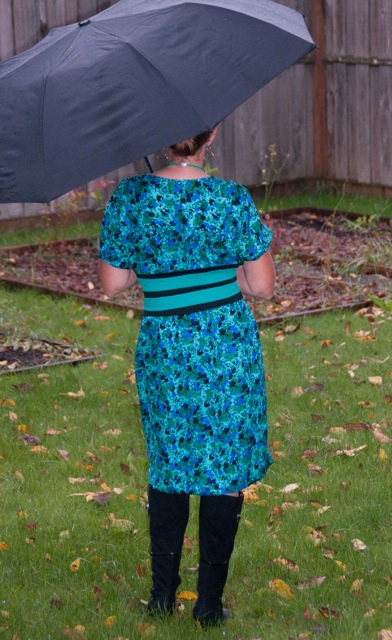
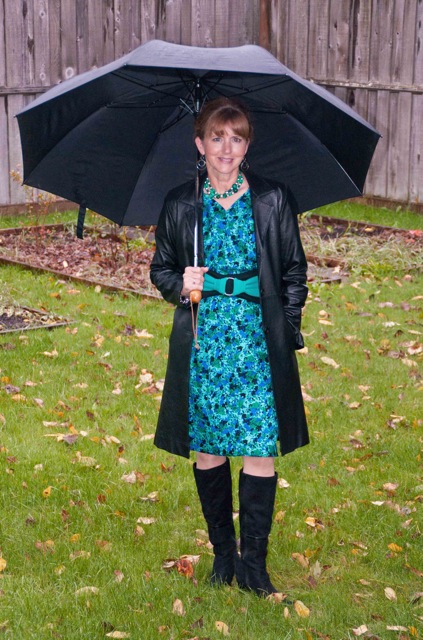
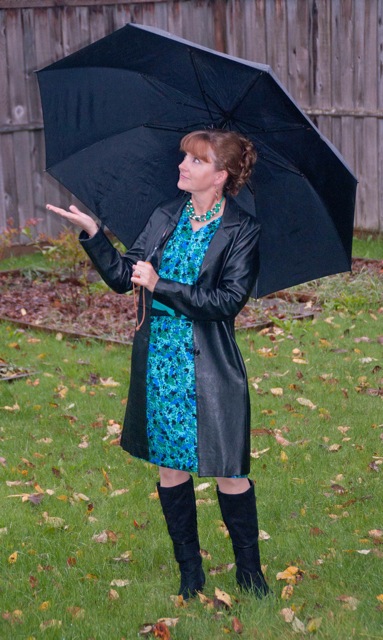
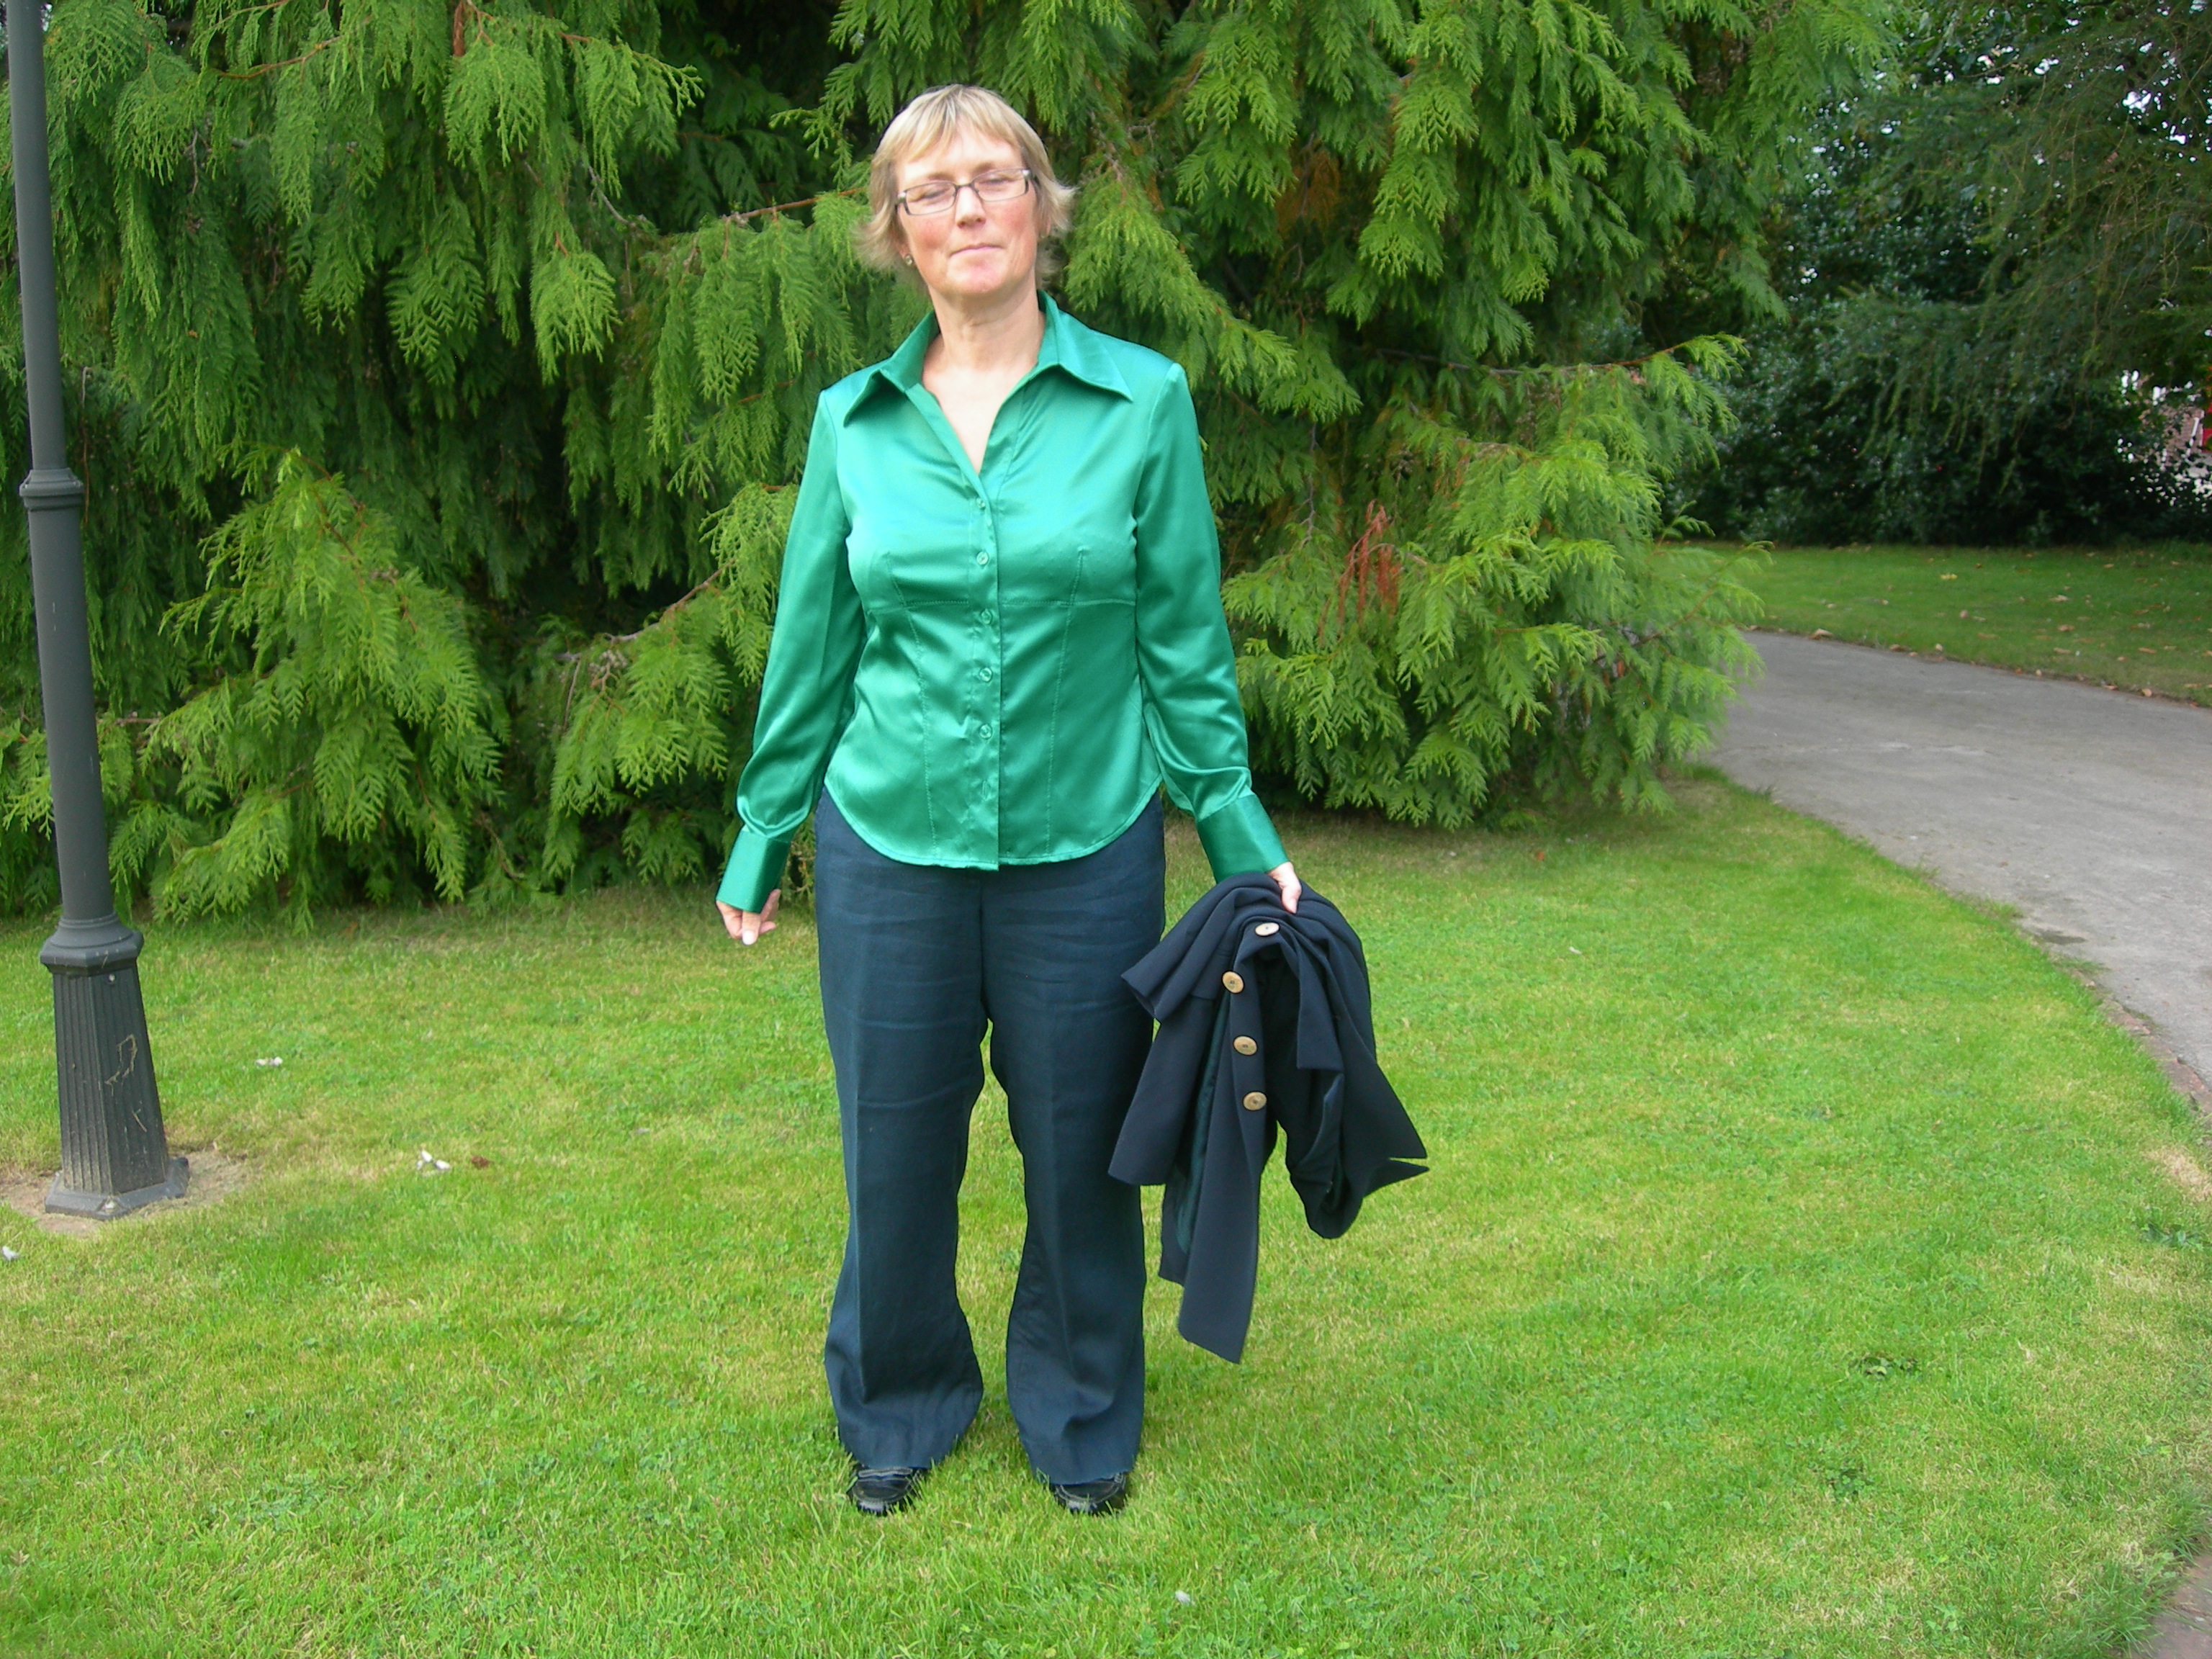
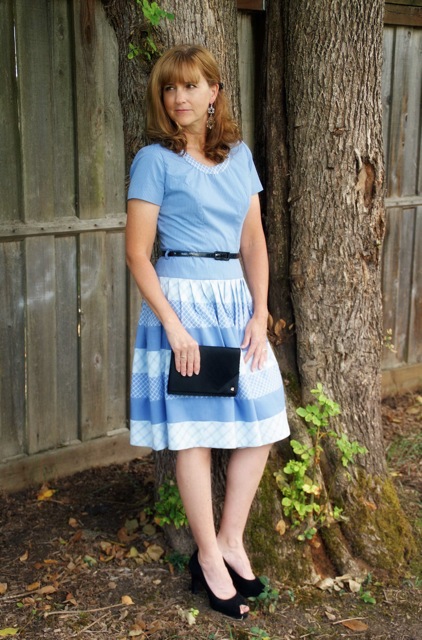
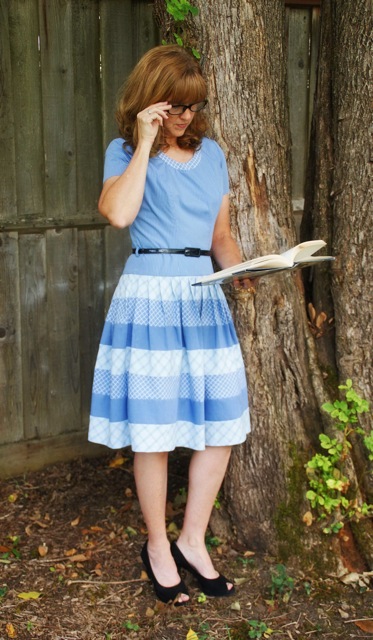
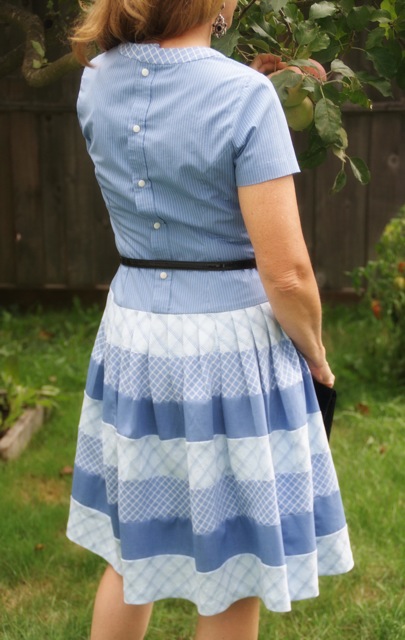
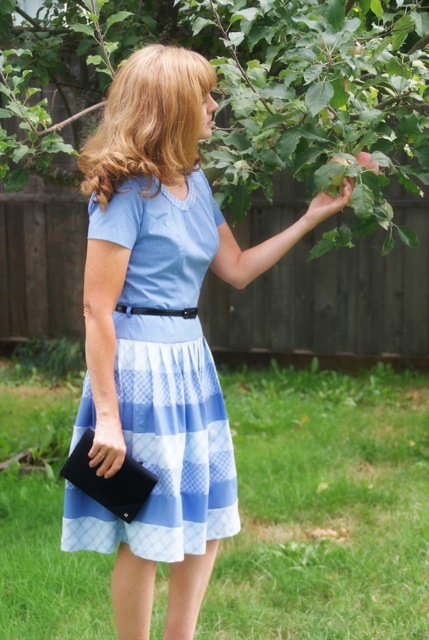
“Took a pair of green capris I found, as well as a royal blue dress, and made numerous changes. Swapped panels along the sides, removed original stand-up collar, removed sleeves, made bias binding to trim armholes, shortened dress and took in sides to fit, then added the triangular accents to front, and new buttons that have a blue and green shimmer to them. Enjoyed the project, and love the new dress!”- Molly
Your new addiction looks great on you, Molly!
***
Here are a couple more addicts…..er….I mean refashionistas sewing along with us this week……
Eira joined us again with her version of the Emerald Challenge. You can see her process on Hoffi Coffi.
Super cute transformation, Eira!!! Thanks for sewing along!
***
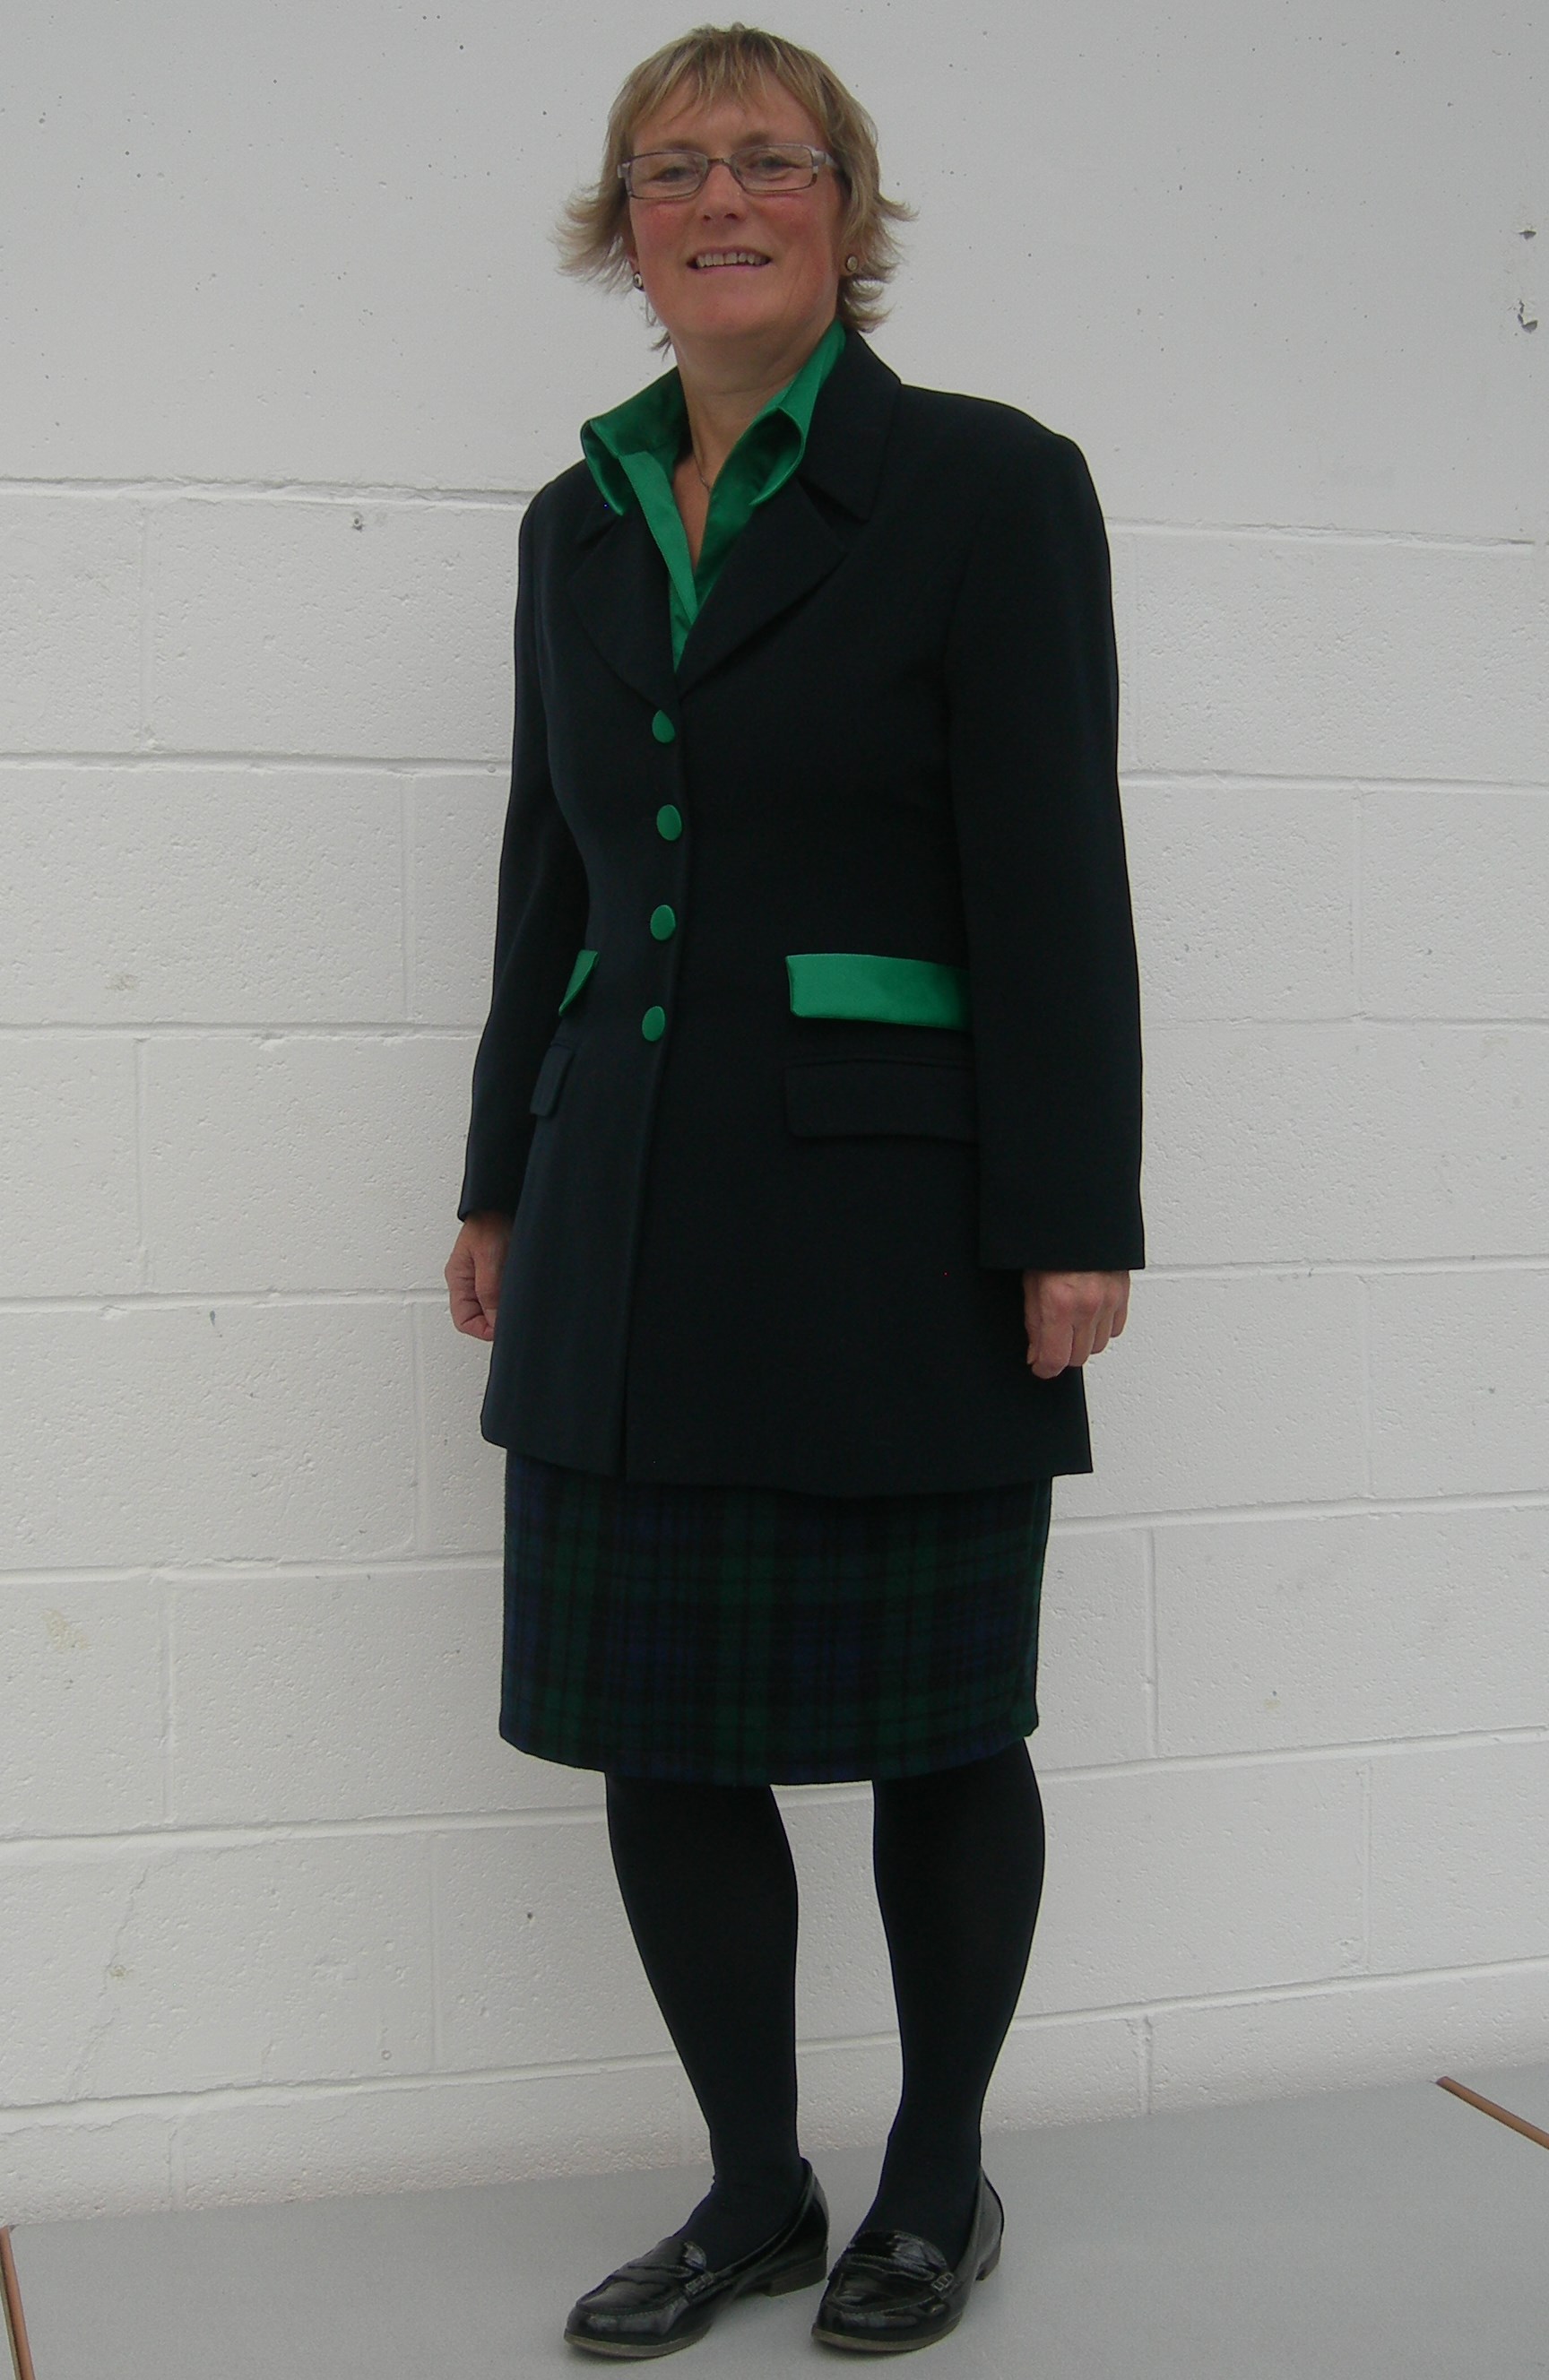
Here’s our friend, Jen from Diary of a Mad Mama with a “twofer”. Not only did she refashion an old emerald jacket, but it’s even a cute peplum. You can see her entire process here.
Thanks, Jen, you look great, as usual!!
***
If you haven’t had a chance to vote for your favorite Refashion Runway: Season Two Redesigner, there’s still time!! You have until midnight on Friday to vote. The winner will be announced on Saturday, October 5.
To be honest, this week’s challenge was totally self indulgent for me.
You see, I LOVE the color green.
It’s the color of balance, harmony and growth.
Emerald green, forest green, asparagus green, spring green, kelly green, moss green, really, any kind of green rolls my socks up and down. Most likely, my love affair started as a young teenager while hanging out with my friends on my yellow vinyl beanbag chair perched on top the lime green shag carpet in my bedroom. I really did think I had the coolest bedroom in the neighborhood.
I know not everyone has the same love affair with this clear, deep color as I do, so I appreciate how all the designers stepped up to the plate and truly hit home runs this week.
***
First, let’s check in on Susan from Second Chances by Susan who has been literally drenched in Western Oregon this week.
“I have to say I love the emerald green color this week…but, it presented a new
challenge for me. A few months back I decided I had enough refashion projects to do
so I made the decision to not buy anything from the thrift stores for awhile. Well
that’s all fine and dandy, unless you didn’t happen to buy much in the way of
emerald green (who knew I would need it, right?) Well, I had two options, the first
one involved using some dye. After picking, cutting, and sewing before the pieces
could go into the dye bath, I’m sorry to say that the dye experiment wasn’t too
successful. So on to option #2. Months ago I had picked up this 100% silk dress
for 50 cents. I loved the colors…blue, aqua, black, and emerald green! It was
also a size 20 so there was a lot of fabric. Although there was zero shape to it,
there was a little attempt at design—buttons down the front, a gathered yoke, fake
pocket flaps, and shoulder pads that Linda Evans would be proud of! I also found in
my stash a scrap of black lycra knit, 4” of ribbing, a silver ring previously cut
from an old purse, and a baggie full of silver and emerald beads from a broken
necklace.
I removed the buttons, flaps, and giant shoulder pads (seriously, those things
practically stand up and salute!) I replaced the buttons and buttonholes with a new
seam down the front. The shoulders were too wide and really drooped on me. Instead
of taking off the sleeves and recutting them smaller, I ran a gathering stitch along
both sides of the shoulder seams and along the front yoke seam. Once I cinched them
up, they fit my shoulders much better, plus it adds a little feminine touch to the
dress.
I cut the sleeves shorter and added a casing with elastic. I stitched some tucks
around the front and back waist so that when I applied the belt detail, the dress
would always be gathered evenly (they’re hidden under the belt detail.) I used the
scrap lycra and ribbing to create a faux belt and stitched it into the side seams.
I added an invisible zipper to one side seam.
I paired it with my thrifted $2 black leather coat and $4 black boots. Considering
the scraps were leftovers from other projects, and the broken necklace was free, the
total cost of the whole outfit was $6.50. Not too bad!
If you would like to see more close-ups and details of how it was accomplished,
please visit my blog, secondchancesbysusan.blogspot.com. Thanks!”-Susan
***
Now let’s see what Carissa from Carissa Knits has been sewing for us.
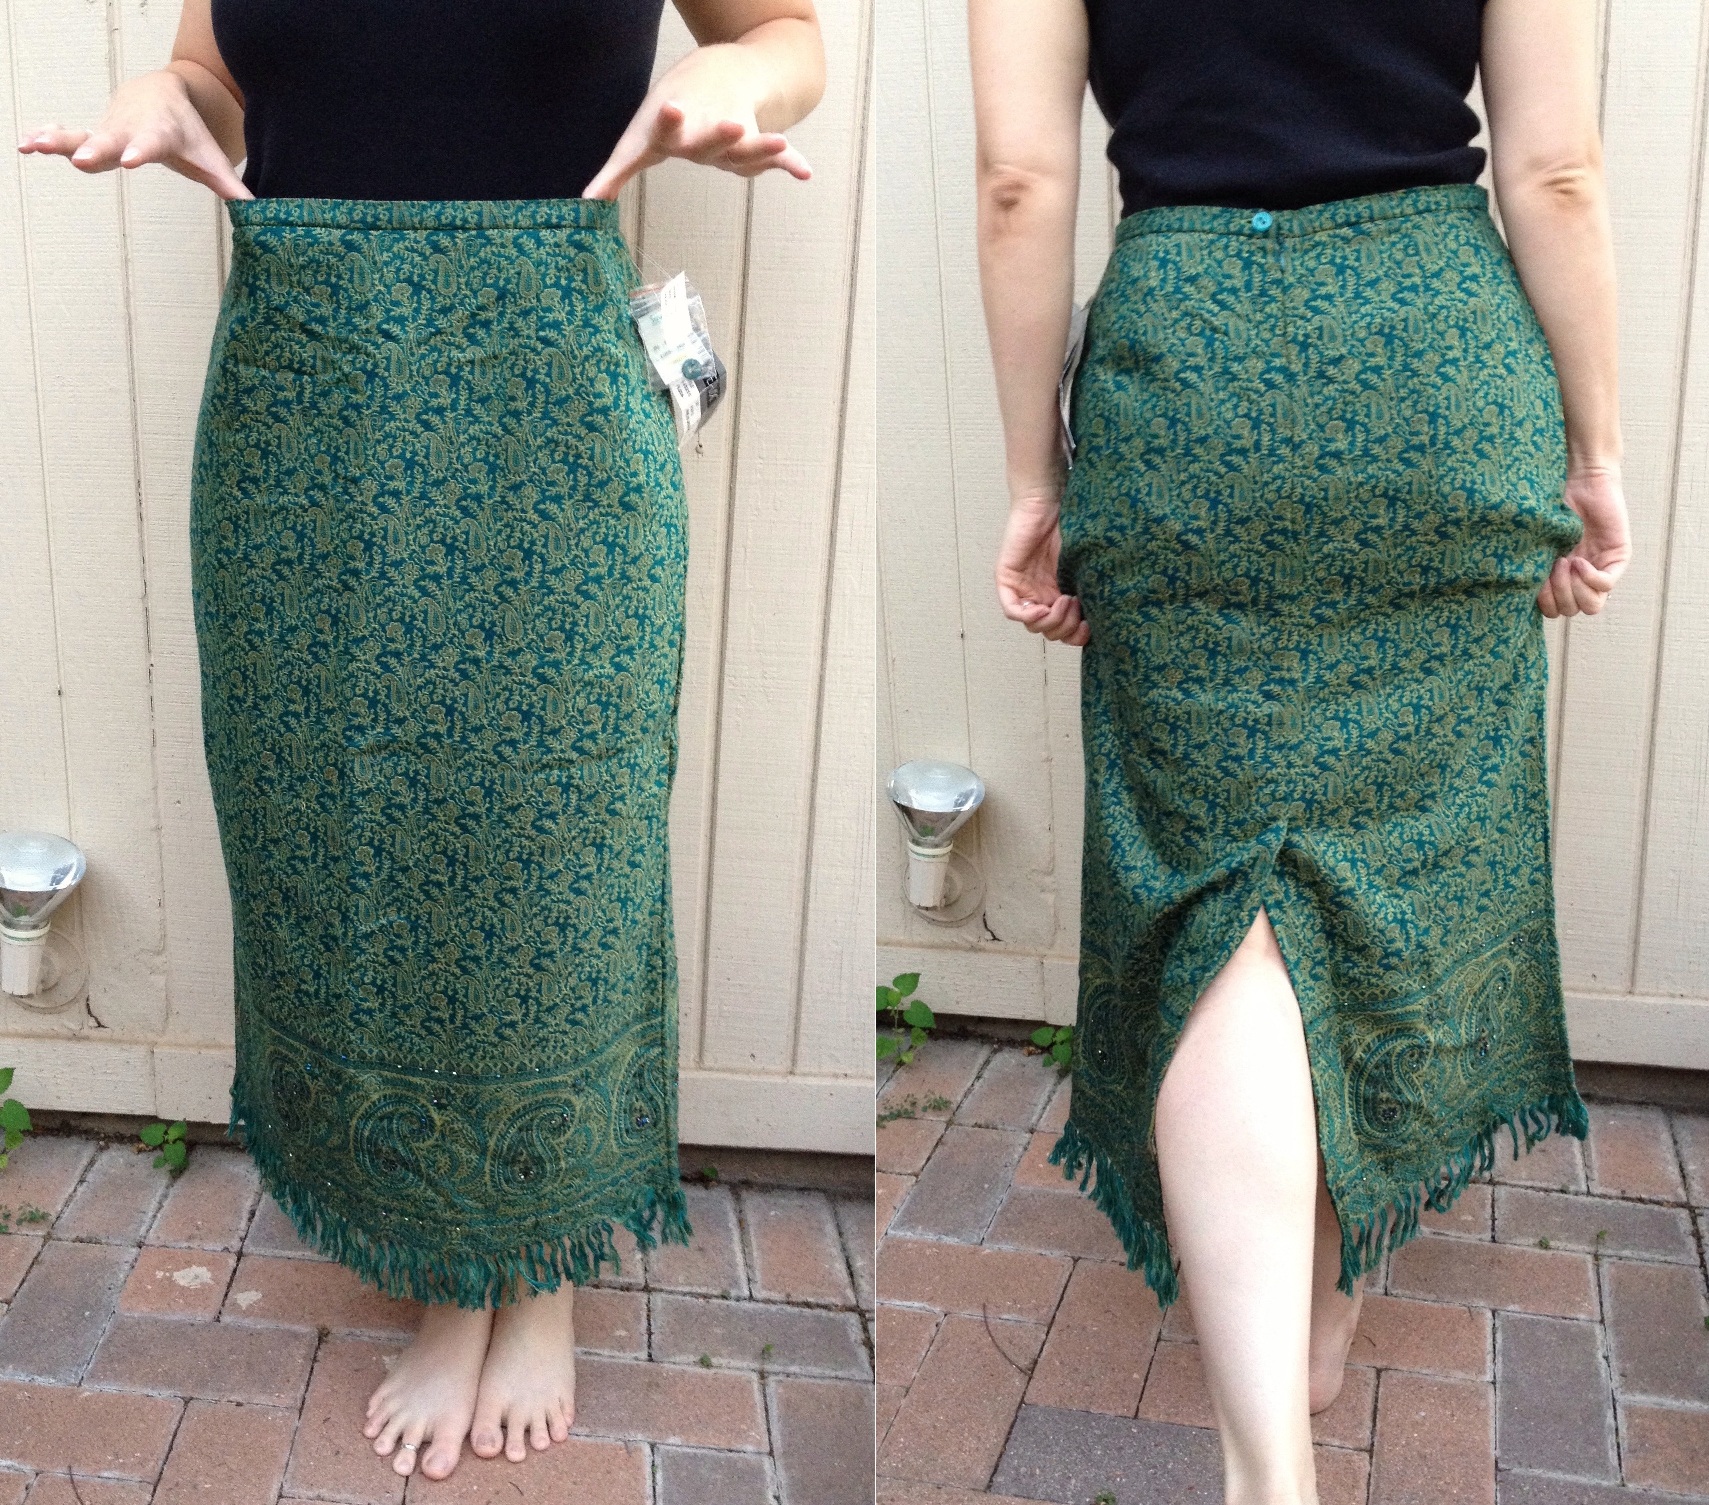
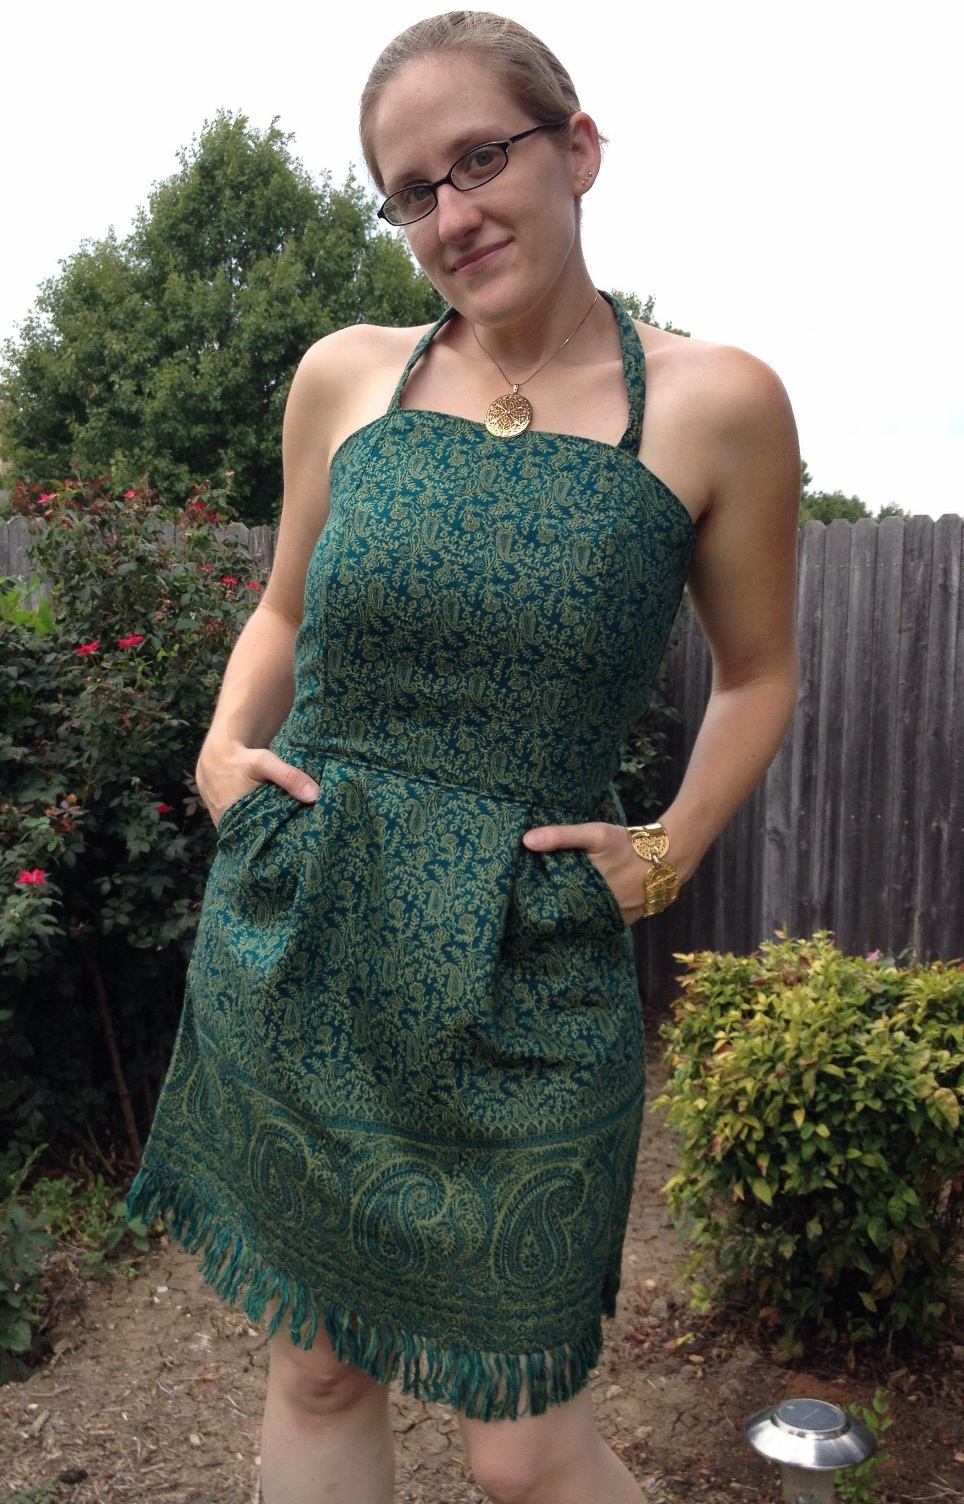
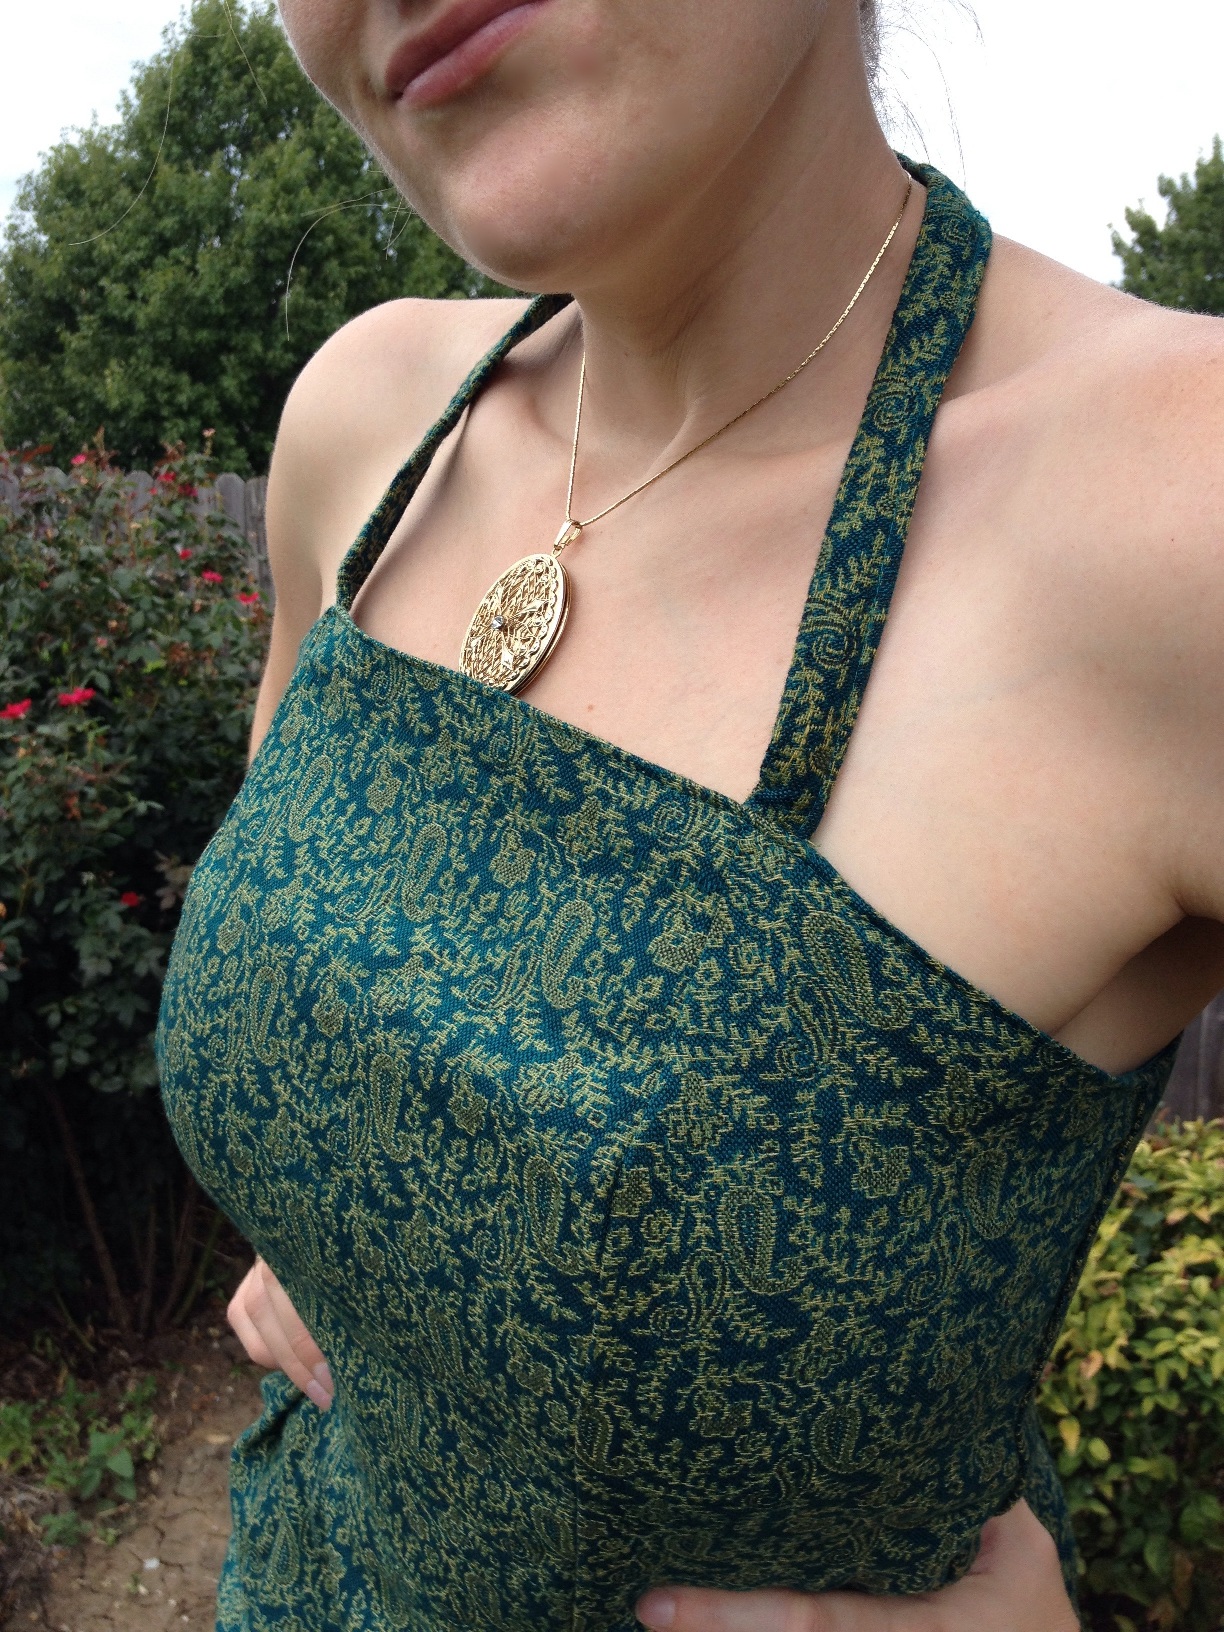
“At $12.49, this skirt cost more than I would normally pay at a thrift
store. But I loved the colors, the paisley brocade pattern, the fact that
it was *brand new with the tags still on it! *I have a wedding to go to
next weekend, and this skirt was the perfect jumping-off point for a cute
semi-formal ensemble.
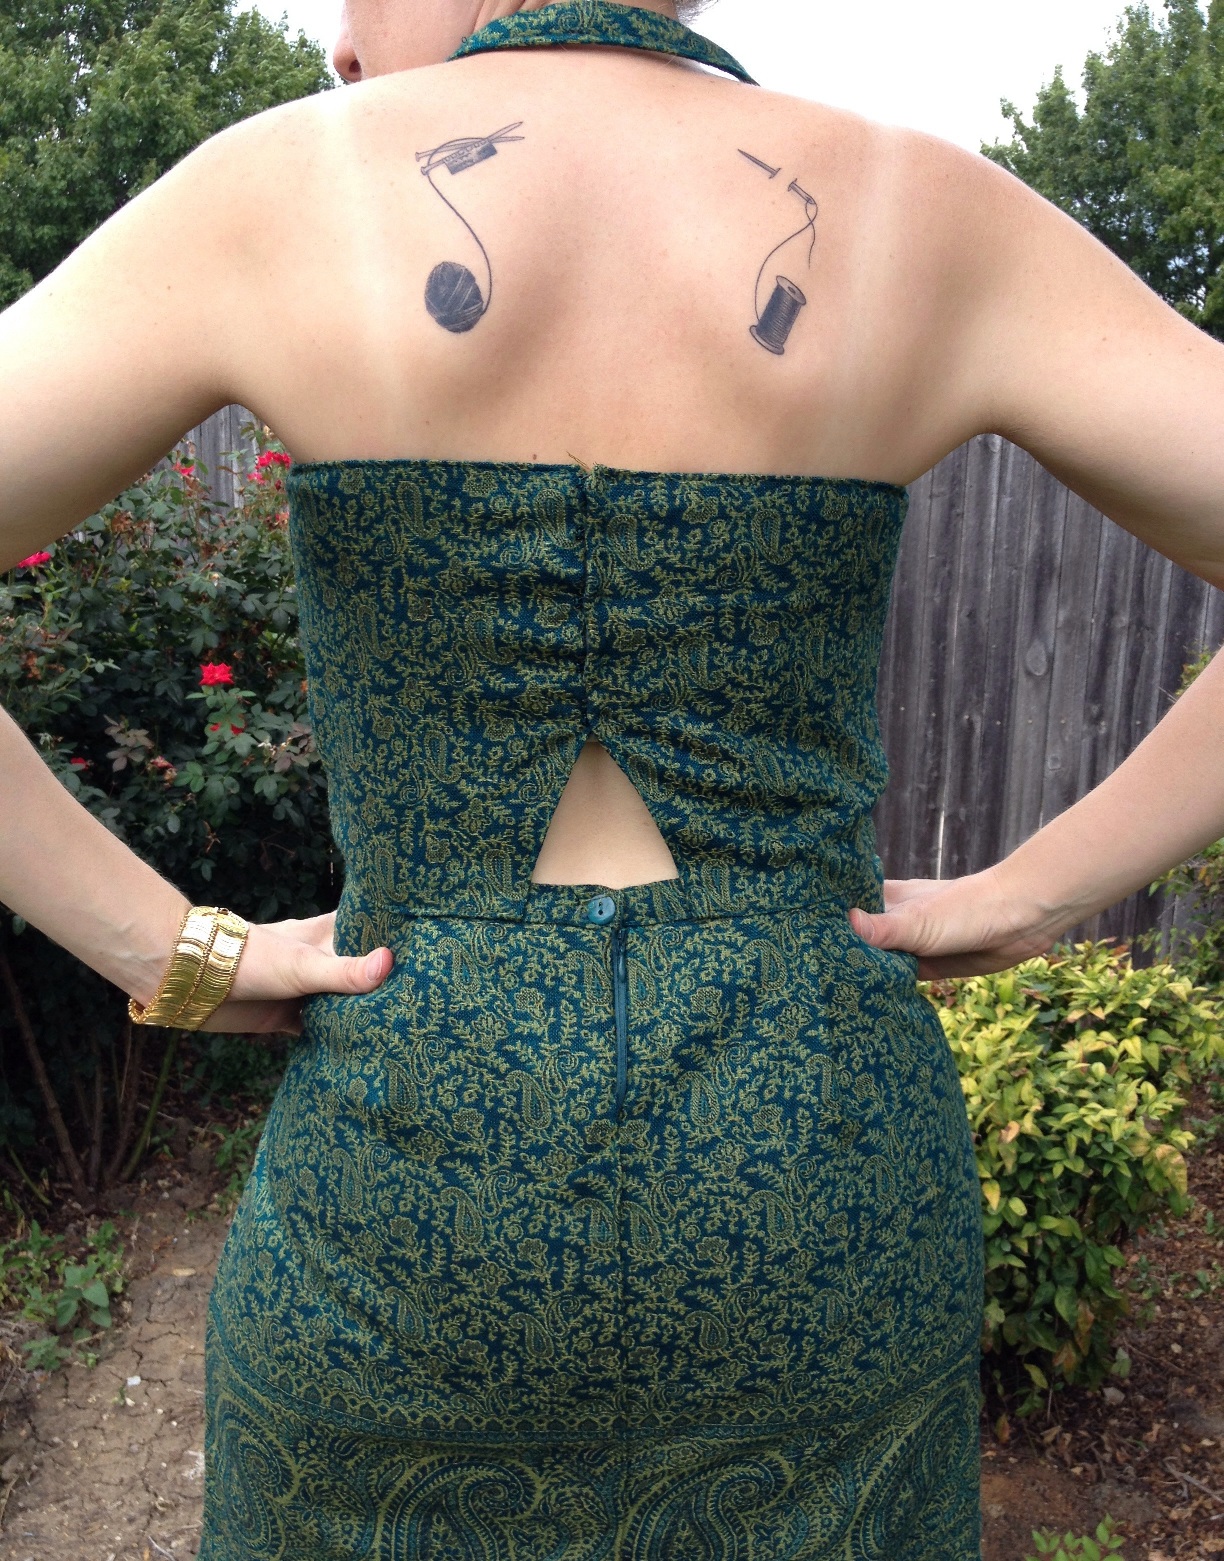
After literally hours of bead removal and careful deconstruction, I cut the
skirt in half and used the top portion to create a new bodice. I pinned, I
darted, I pressed, I top-stitched. I used the original lining from the
skirt to line my new bodice, and added some hook-n-eyes as a closure in the
back (since the original zipper wouldn’t be long enough to go all the way
up my back). I was inspired by another recent trend to create a little
cutout at the lower back to add some interest. And part of the original
waistband was recycled as a halter-style strap.
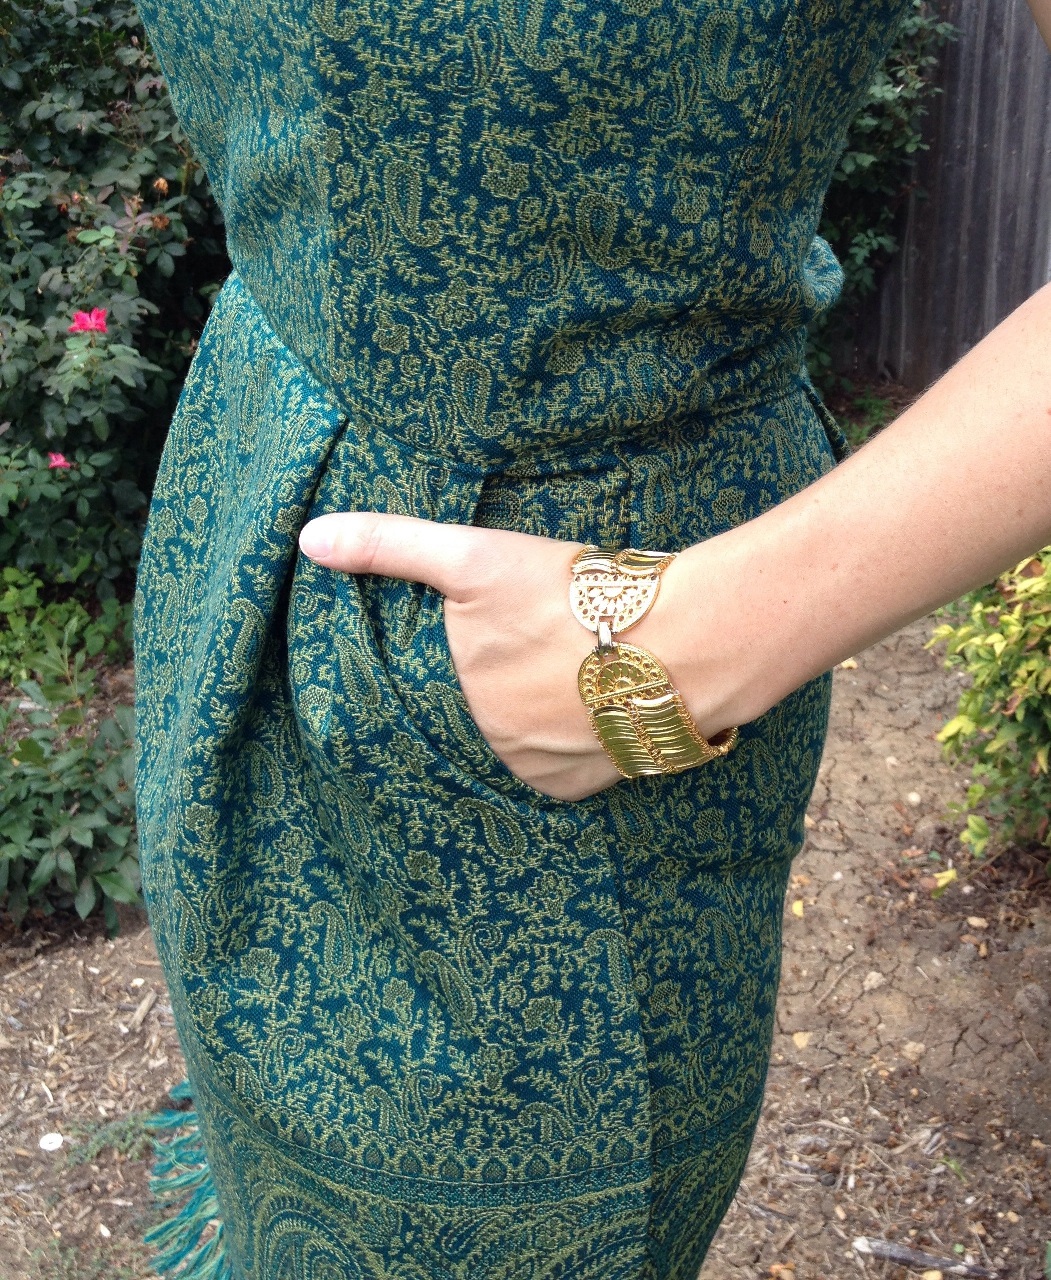
Once the bodice was complete, I turned my attention to the skirt. I added
loose pleats at the waist for fullness. The back slit was sewn up and the
salvaged zipper and button were re-installed. I even used some scraps of
both the main fabric and the lining to create pockets. I love a dress with
pockets!
I am *so* ready to do some bunny hopping at the shindig next Saturday!
More details and photos will be posted at CarissaKnits.com, so come check
’em out!”- Carissa
“Have you ever Googled a color?
Only twice in my life, have I ever.
Once for a bride’s maid dress, and the second to find out what in the world ‘Pantone
2013 Emerald Green’ was!
Green and I don’t get along well together, so I was very relieved to see that this
particular green was more of a teal-green, as compared to the St. Patrick’s Day
green I had in mind.
And to my further surprise, it wasn’t as hard to come by as I thought it might be.
Still, it amazed me how challenging this project was…probably on the count that
green doesn’t naturally conjure up my inspiration.
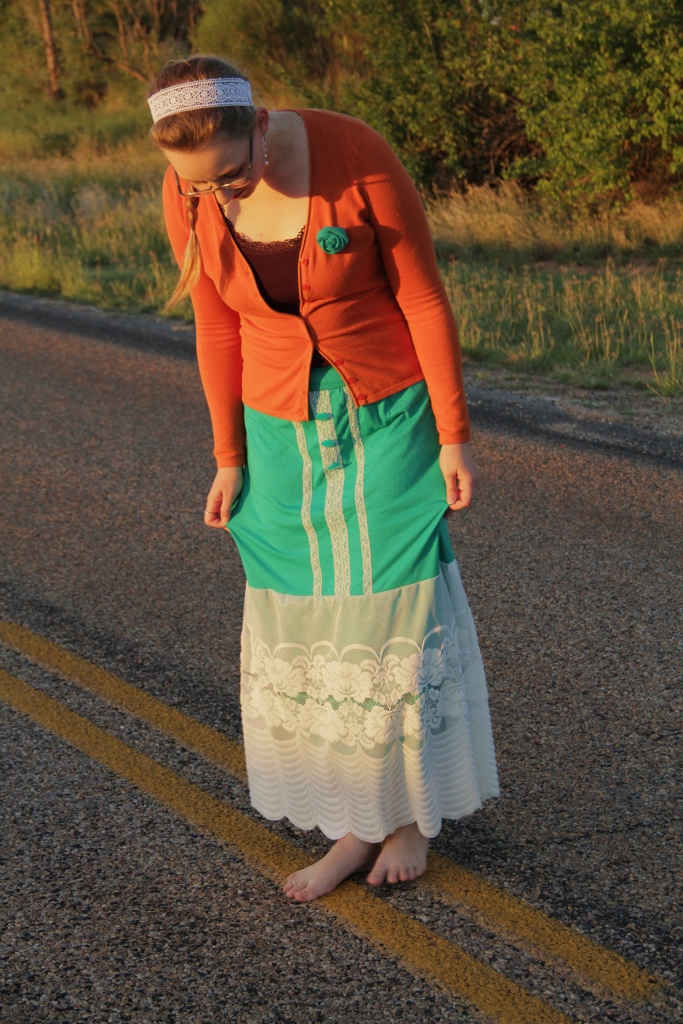
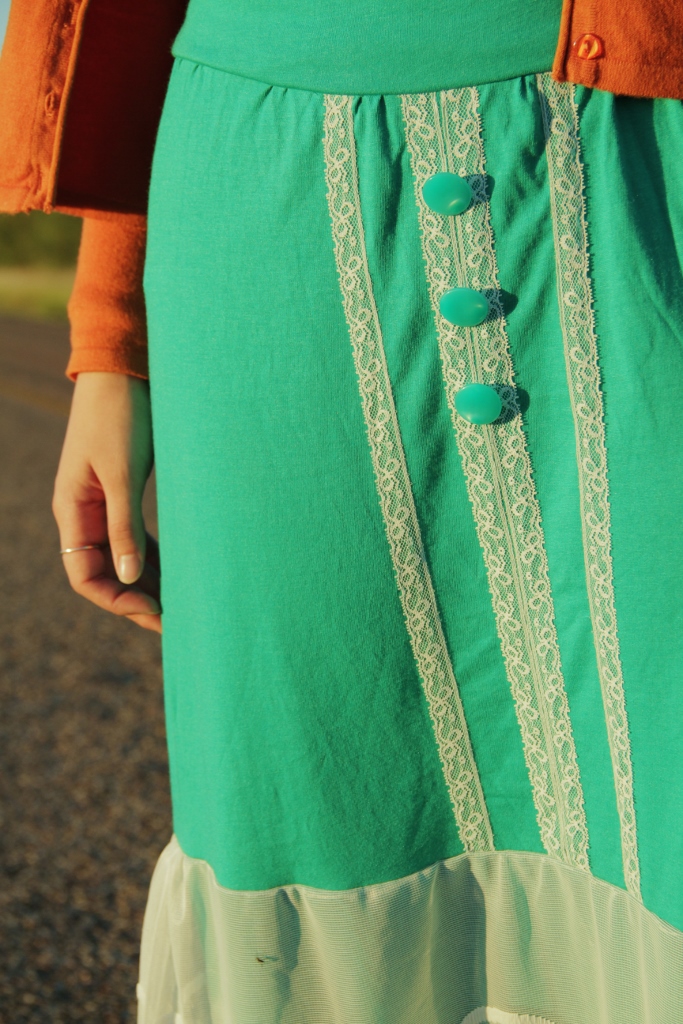
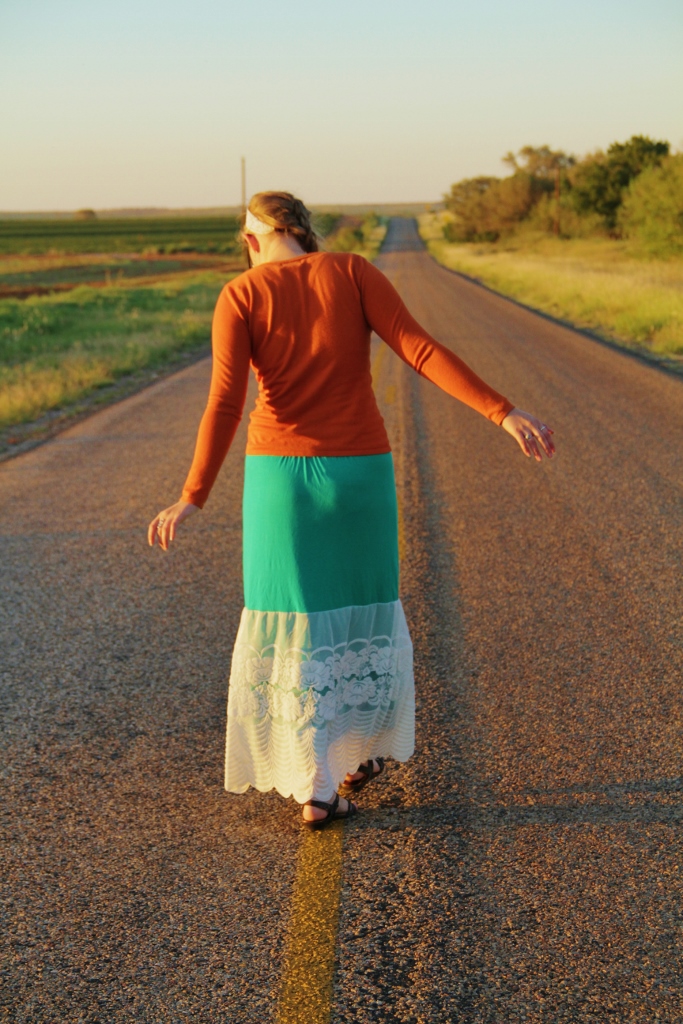
None the less, after lots…and lots…and lots of brainstorming and reworking, I
came up with a lacy maxi skirt, made from a dress, shirt and an old curtain!
Using a too-small dress, I detached the bottom from the bodice, and used it as the
top of my maxi skirt. Cutting a small strip from the remaining bodice, I made a
waist band which I attached to my skirt. Next, I chopped up the other shirt to
create another skirt tier. Before attaching that to the upper skirt portion however,
I cut a length of lace from an old curtain and basted it on, adding gathers at both
side seams. Then I sewed the two tiers together. To add a little interest, I sewed
on a few strips of lace and added three perfectly matching buttons I happened to
have in my stash! I even made a matching flower pin with some of the scraps!”
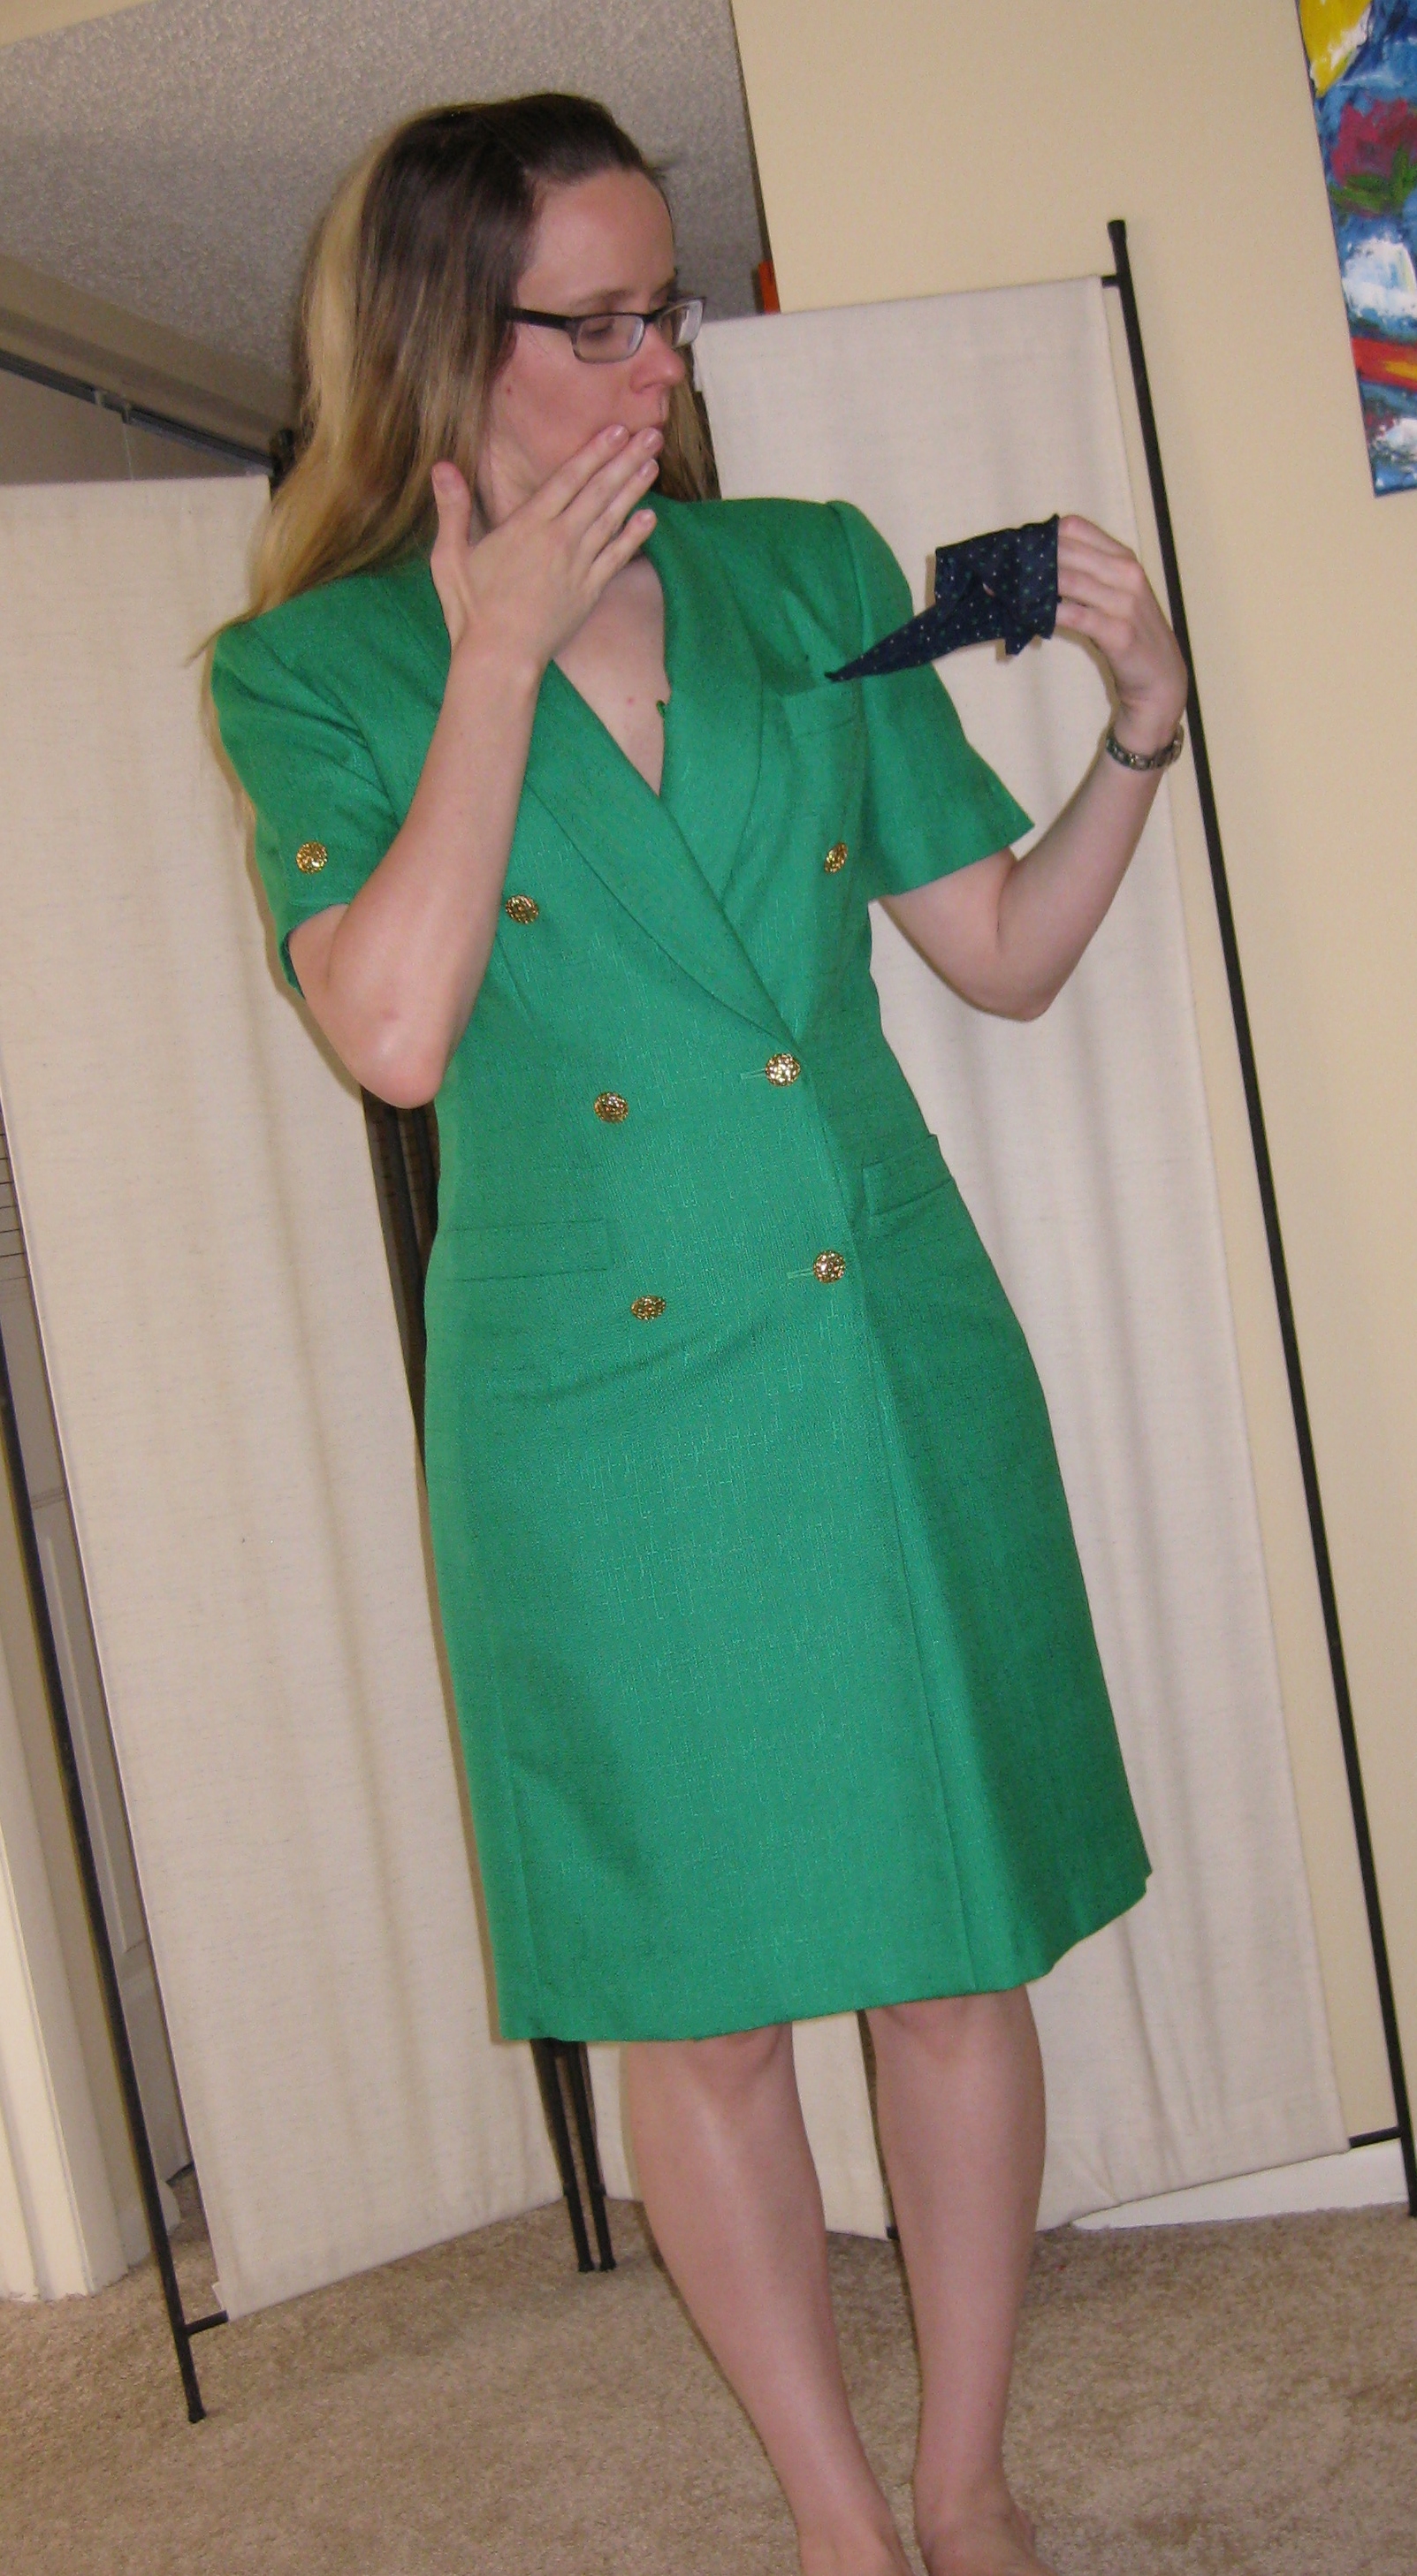
“Finding an emerald green item to refashion was quite the challenge. Finding anything
green period was near impossible. And finding something emerald! I found that people
have very different perceptions of what the color emerald is- it was interesting. I
did settle on this green dress straight from the 90s show Designing Women. Just call
me Suzanne Sugarbaker. Let’s bring back the Southern Accent! I took on the challenge
of turning this blazer-like dress, which had no zipper and just held on with
buttons!!! And wow the little hanky just came right on out!
I cut the dress in half and removed the buttons, sleeves, and that collar/lapel. I
created my own neckline as the old one was attempting to choke me. I had to even out
the skirt since it was lopsided because it was a wrap dress. I added a zipper to
only the skirt. I created a open back dress.I angled the open part of the dress in
the back in order to stop the fabric from gaping from my back. I still wanted the
option to wear a bra with this dress so I added a wide rectangle to the back of the
dress right where my strap would be. I added a little elastic to keep the dress
against my back while I moved and also let me put the dress on easily. To make it a
little more emerald I ombre dyed the skirt with RIT dye-dark green. What came out
was something I felt comfortable saying now has emerald green in the dress even if
subtle. The fabric was a challenge as I could at most rip out a seam twice otherwise
the loose weave would just unwind.
Overall I am really happy I turned this dress from 90s to modern, simple silhouette.
Paired with a cardigan or a jacket I can totally wear this to work.
Yay!! :)”- Lauren
***
Let’s head out across the Pacific to see what our winner from last week, Trish from Feeling Kinda Thrifty, has been busy doing:
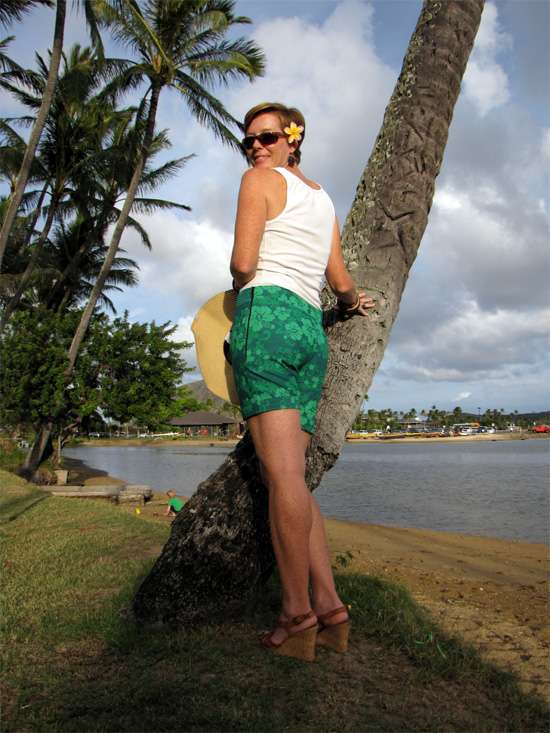
“Aloha from Hawaii! I thought that perhaps as we head into the Fall season,
a beachy ensemble might be an appropriate goodbye to summer. I found this
very emerald muumuu at a church thrift shop, and right away I knew that I
wanted to remake it into something with a retro flair. I also wanted to
challenge myself to get away from my usual dress or skirt refashion and
make a pair of shorts.
I began by taking the whole thing apart. Muumuus are generally great
refashioning items because they are made with so much fabric, but as I
deconstructed this emerald beauty, I realized that it was mainly made from
bits and pieces. It was quite a challenge to figure out. For the shorts,
I used an old pair of jean shorts as a pattern and cut them out of the
bottom ruffle of the dress. The sleeves of the dress became the cuffs and
band. Because they were fitted, I added a zipper down the side of the
shorts.
For the top, I used the middle section. I added a princess line
in the front. In the back, I added darts and a zipper. To give it some
pizzazz, I stitched on the applique (remember the bottom ruffle), gathered
the middle, and added neck straps. I think this retro refashion turned out
swell. For more details, check out my blog, Feeling Kinda Thrifty” – Trish
***
Now let’s go the other direction and head out across the Atlantic to see what Joelle from The Eco Wardrobe Warrior has been redesigning for us.
“This was more of a challenge as I had nothing emerald to work with, until
Monday, the day I started University. This is quite a simple refashion,
inspired again by Moschino, who showed a navy coat with yellow buttons and
yellow pocket flaps. I had this long navy polyester jacket from Sticky
Fingers, London, in my stash, I love the drape of the fabric, but it was
looking dated and boring with the pearly buttons.
The emerald satin shirt had long sleeves with cuffs.
I removed the cuffs and used them to make the
mock pocket flaps and to cover 4 buttons. I removed the emerald buttons
from the shirt and used them on the sleeves of the jacket.
Then the shirt, I simply shortened the sleeves and replaced the buttons with
some navy ones. Do go over to my blog for more detail. Blog link www.joelleharris.wordpress.com” – Joelle
***
Let’s continue our journey across the Atlantic to Portugal and see what Magda from House of Estrela has for us:
“For this week’s challenge I was a bit lost. I love emerald, but I had refashioned my
emerald pieces already. I made a pair of pants for my kid out of a women’s pants
first, and then I turned a very old and dated dress/skirt/whatever that was, into a
lovely mini dress I’m terrible in love with. So, I turned into my own wardrobe,
hoping to find something. I found 3 pieces, but two were out (check details on my
blog to know why). I was left with the knit tank top. I felt dissapointed that it
was my only option for the emerald challenge… UNTIL it came to my mind that I
still had a box somewhere which held a few more treasures meant for refashioning.
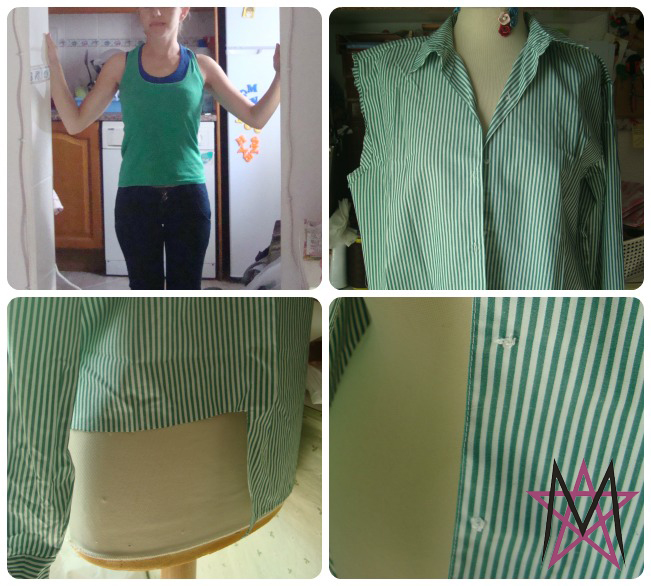
YAY! And guess what? I found a emerald and white striped button up shirt! How
lucky?! It was a women uniform’s shirt. Apparently, I had done a few cuts to it
already. It was missing a sleeve, all buttons and a scrap was cut on the back.
Pffff… what on earth will I be able to do with this?!
I’ve put the
shirt around (back to front and front to back), used the collar as a turtle neck and
pinned the front, side and back darts. Since my dress form is a bit bigger than I
am, I had to do it again with the shirt on me. I even played around with the tank
top, I envisioned a dress, using it as the skirt. Then I realised the BIG stain on
it and rested the top… not for too long though. I used the striped shirt for most
of the piece but I also used a band from the bottom of the tank top to create a band
on the waist, that is slightly tighter than the top. I love this effect. Then I cut
two smaller stripes and used them as bias tape to finish my arm seams. I added green
flower buttons to this that were already in my stash too. I thought about adding a
4th button down the back, but I actually liked the open effect it created without
it. I love the flower on the front. This, people, was a happy disaster, again, read
about it over House of Estrela.”- Magda
***
Ok, now it’s your turn.
Use the poll below to vote for your favorite Emerald refashion and be sure to tune in next Saturday to find out who won.
Whoa! What a great beginning of Refashion Runway: Season Two! Eight astonishing transformations from eight talented “Redesigners”.
A big thank you to everyone who voted, all the prize sponsors, and especially the hard working contestants.
I know you all have been waiting for the big announcement, so with out further adieu,
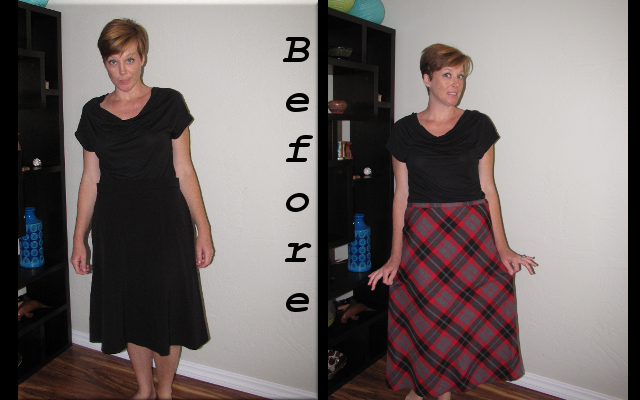
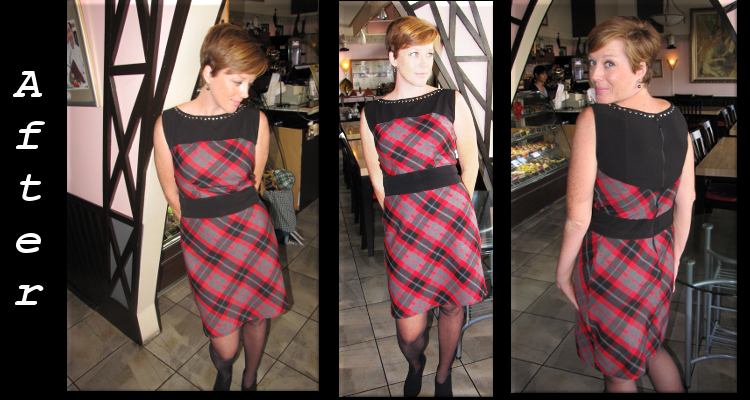
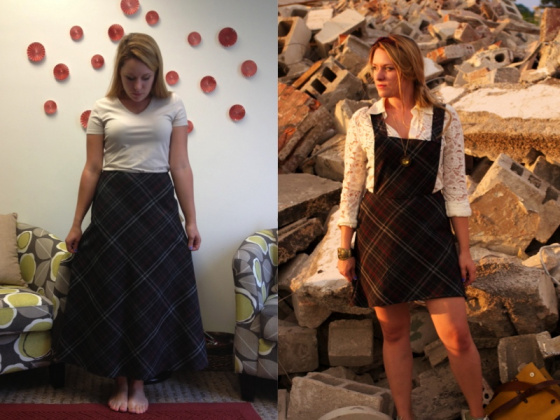
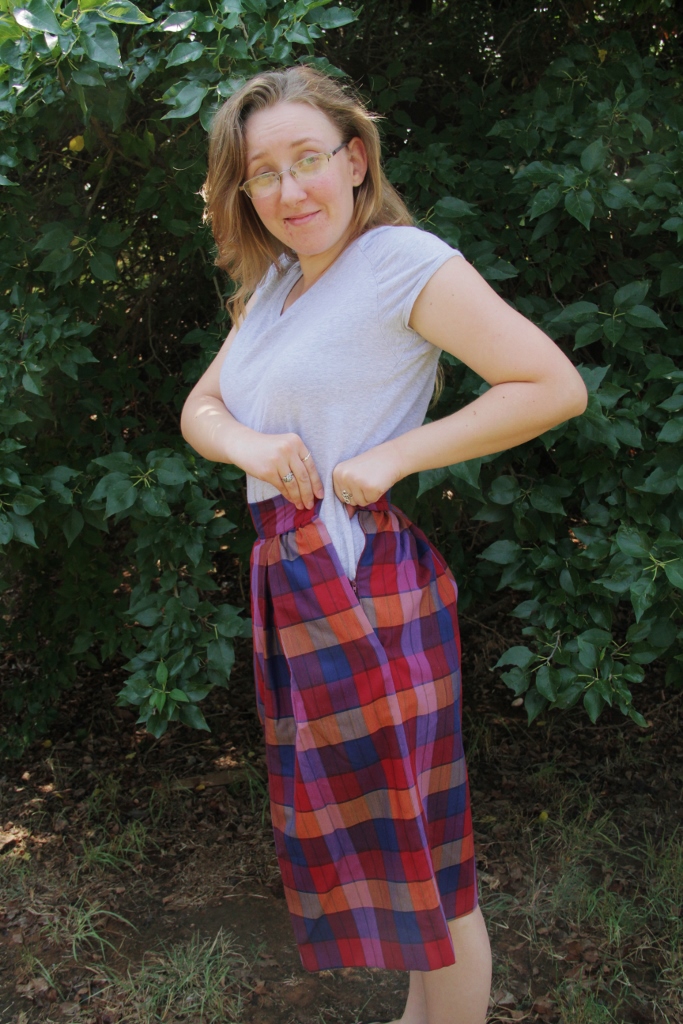
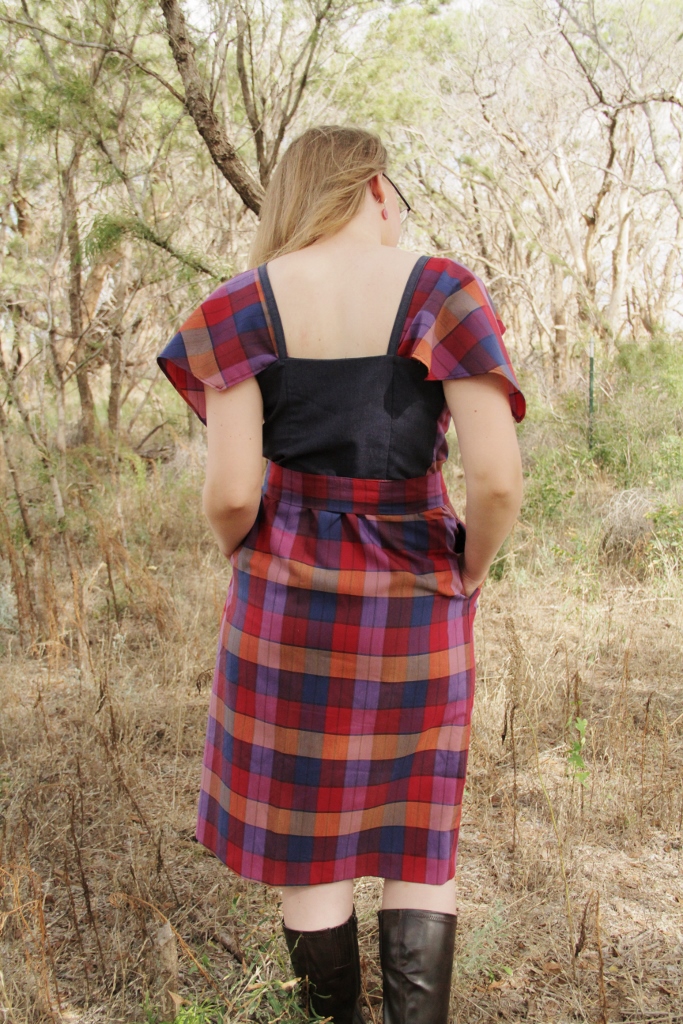
CONGRATULATIONS to Trish from Feeling Kinda Thrifty, you are the winner of this week’s plaid challenge!!!
YAY!
Your beautiful plaid dress transformation definitely wowed the voters this week! I know we are all super excited to see what you have in store for us next.
And now on to the hard part.
Where’s my box of tissues.
I mentioned last season that good-byes have always been hard for me. It just sounds too final. So as you know, I try to say, “See you later” instead. It sounds more hopeful to me.
So it is with a heavy heart that we must say, “See you later” to a long time blogging friend of mine, Deanna from Wedding Dress Blue. I hope you’ve been able to visit her site and see her beautiful quilts.
We won’t send Deanna home empty handed, though. We will send her with an Avon prize package from Cindy Tkachuck.
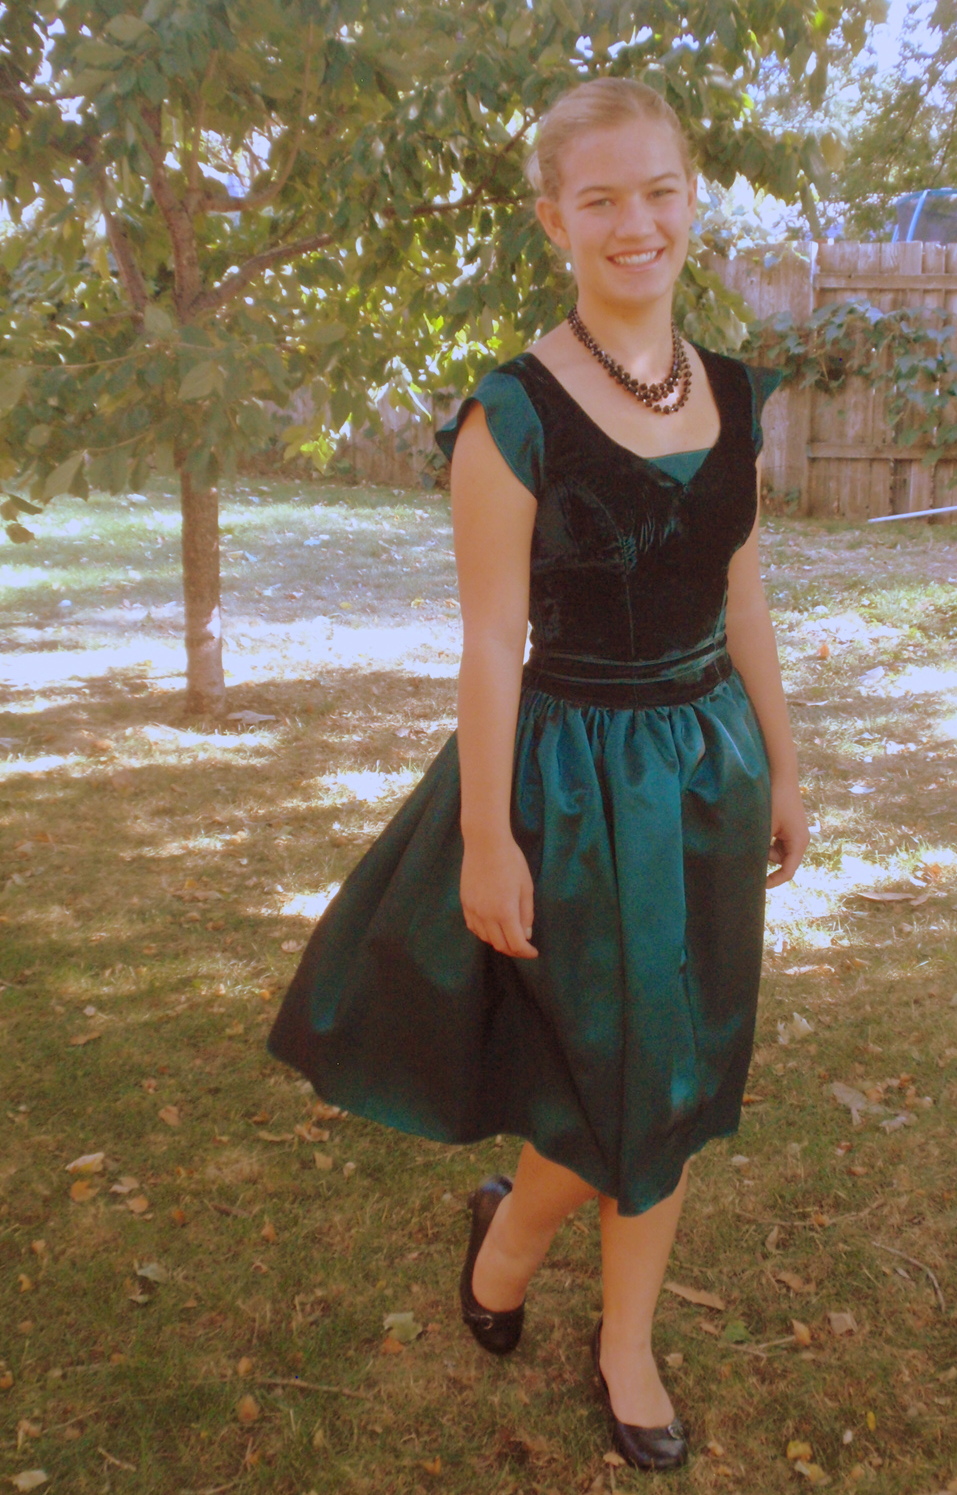
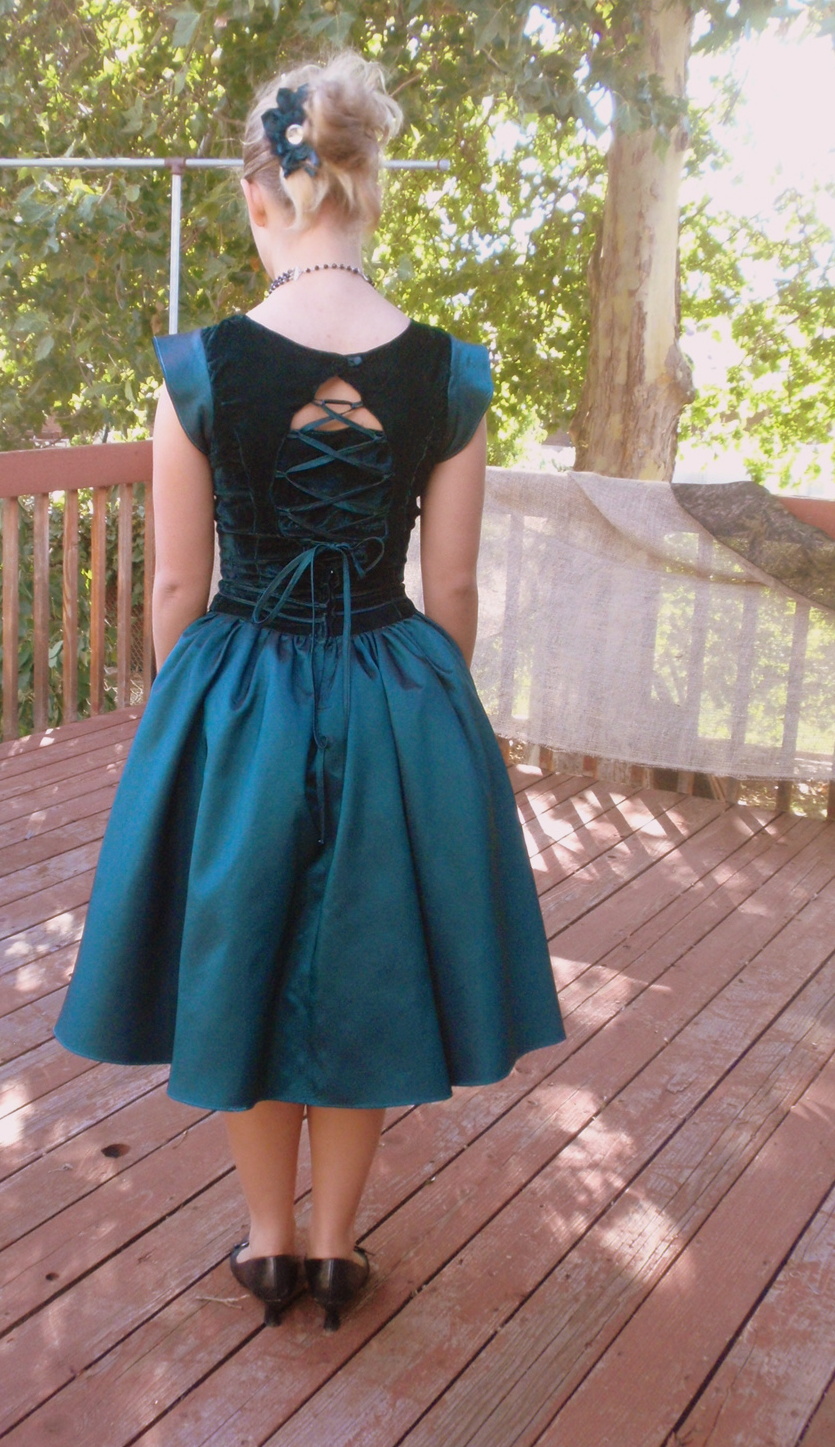
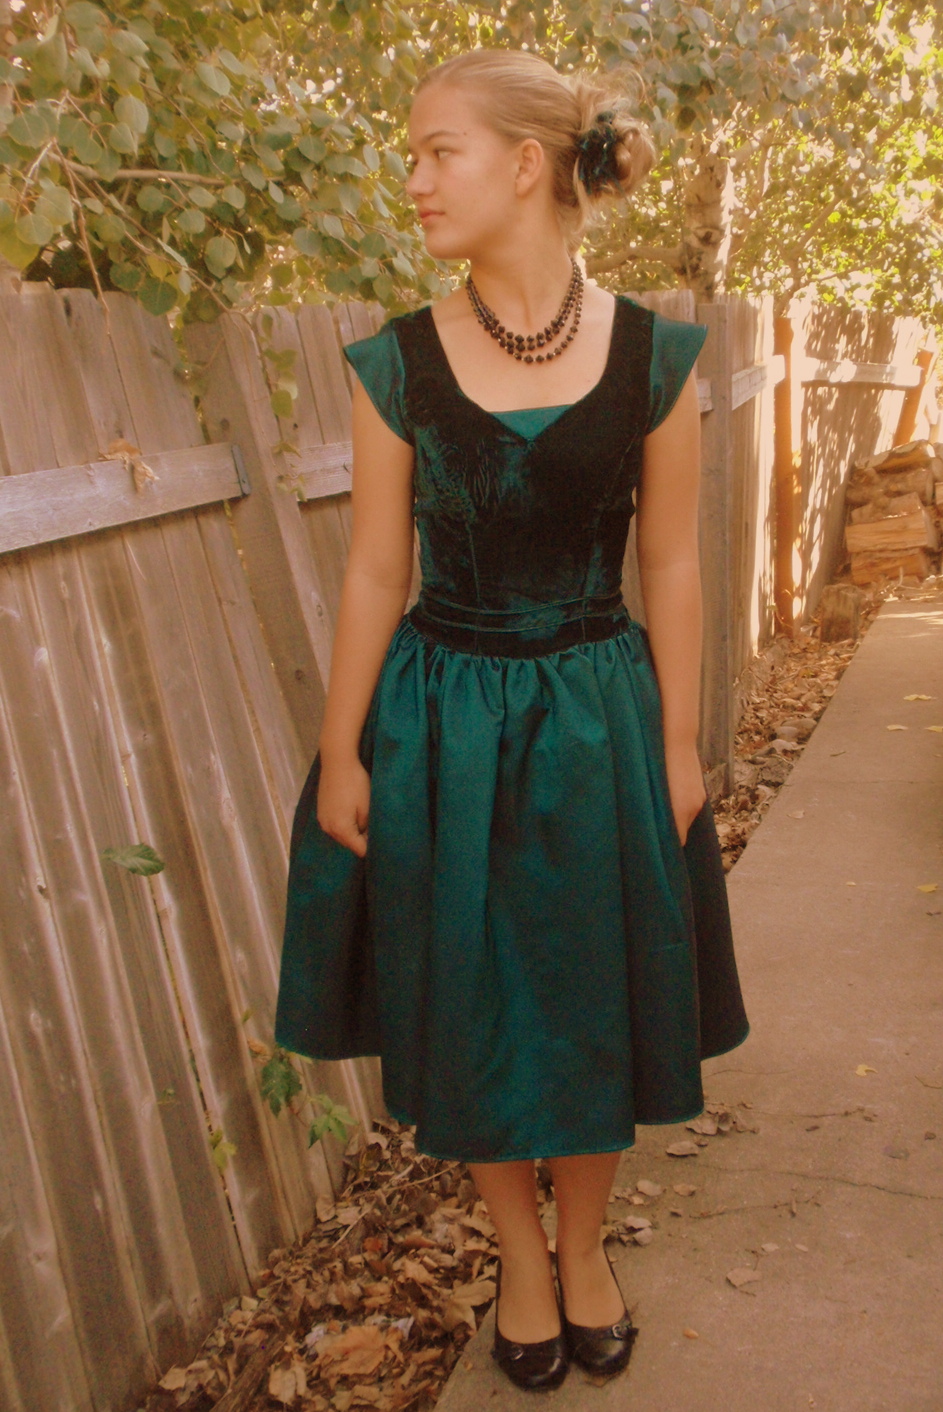
Before we go, let’s see what Deanna created for this week’s Emerald Challenge.
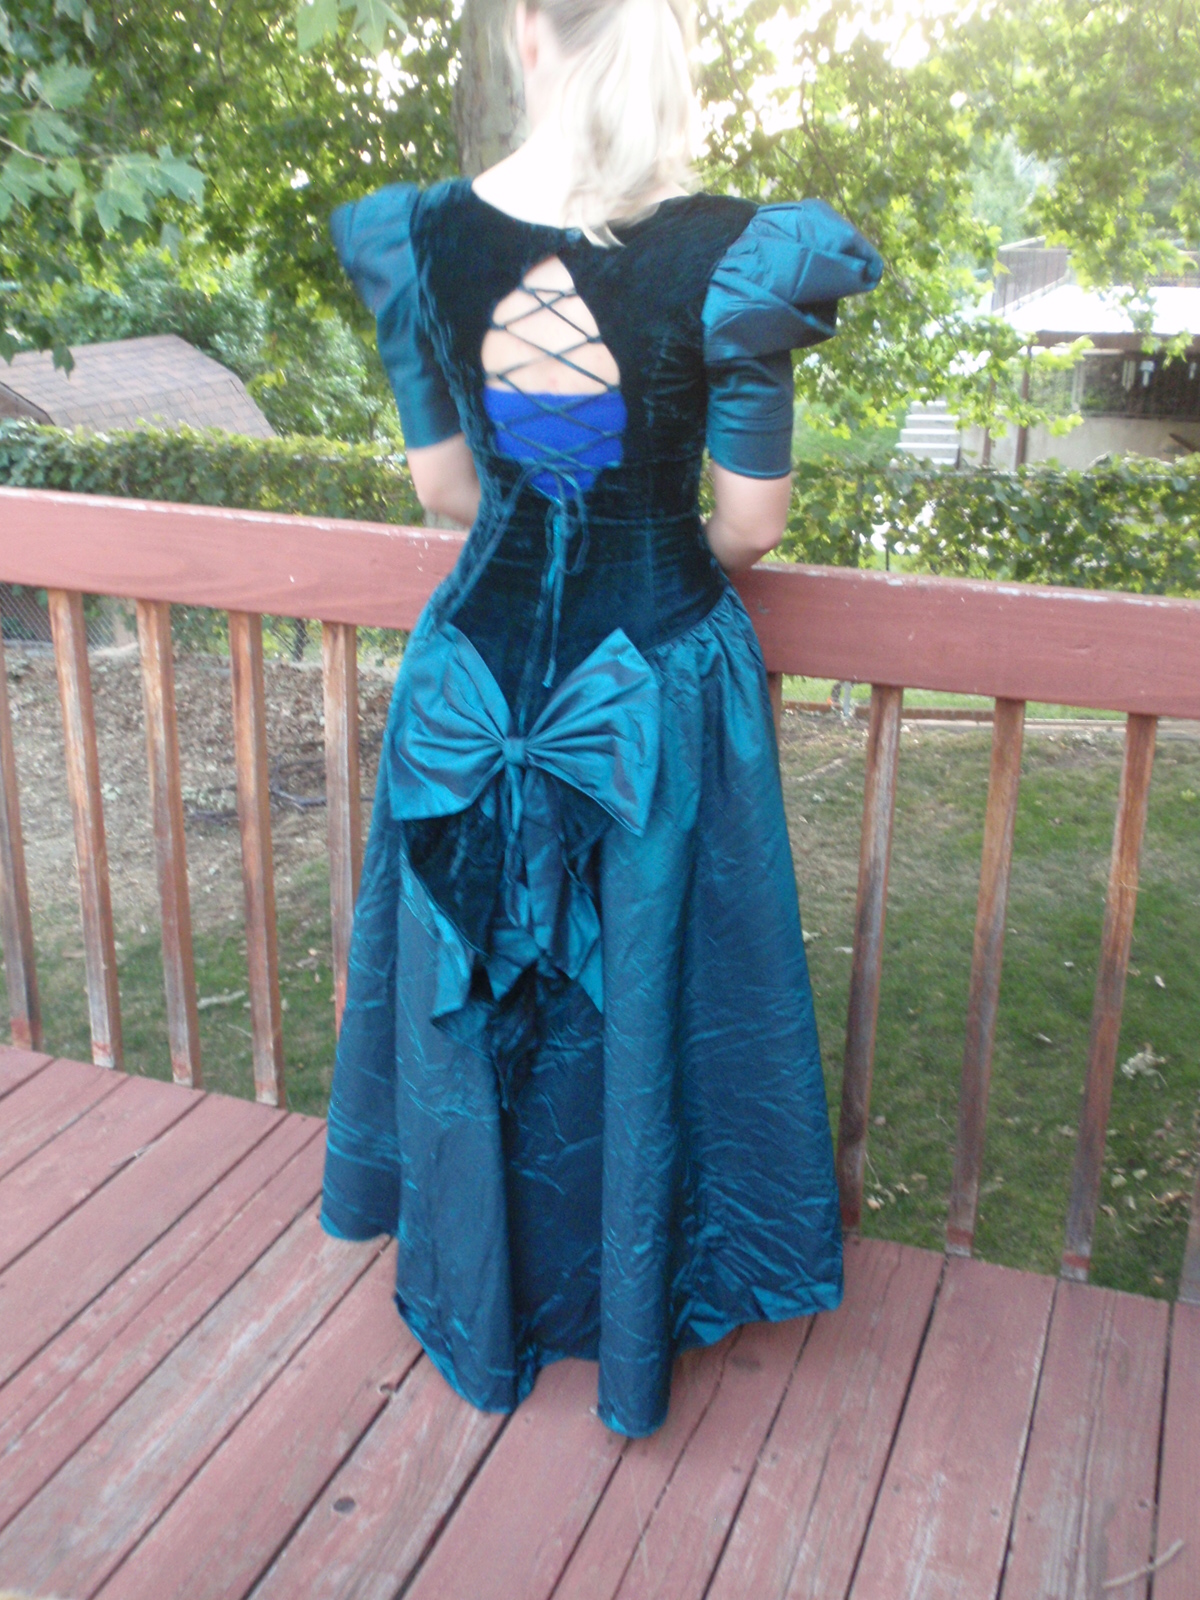
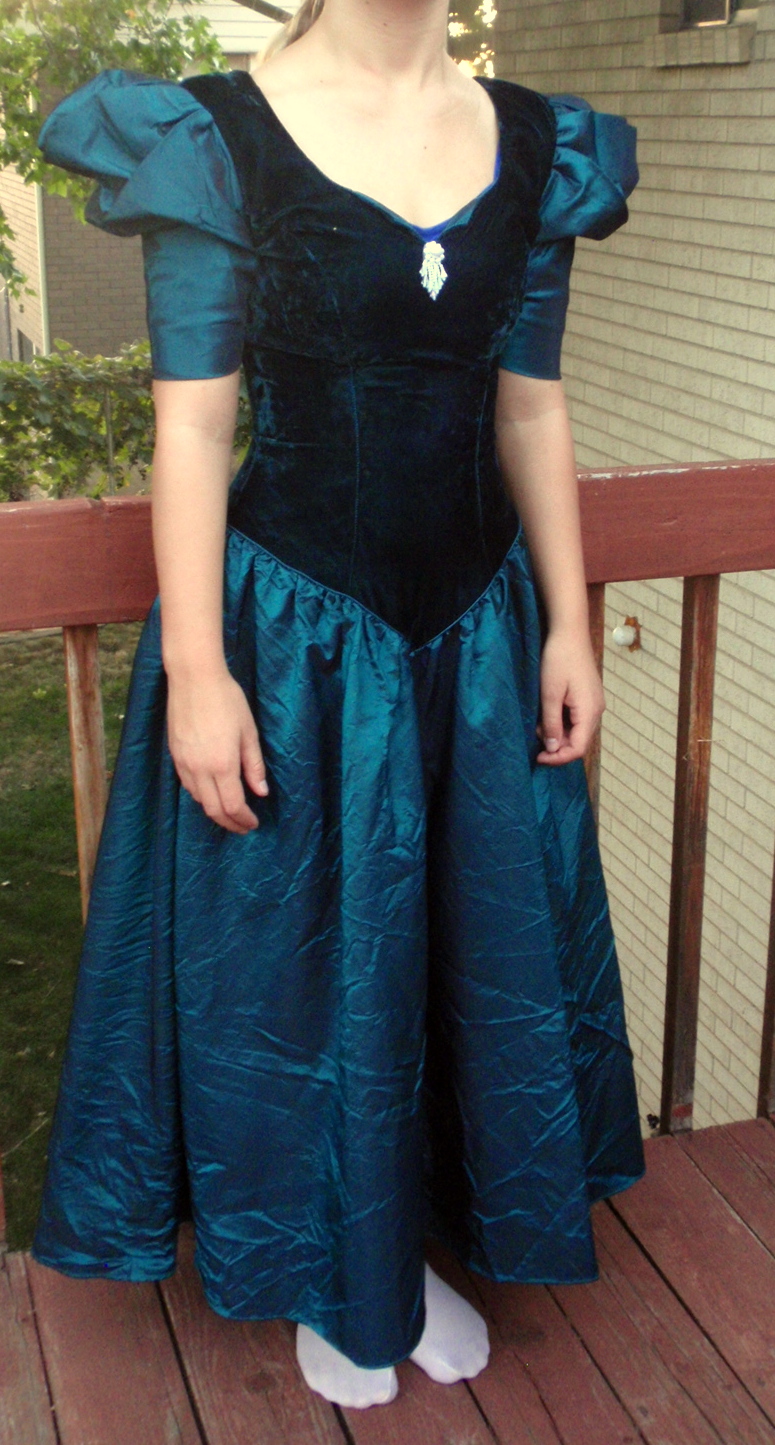
“Emerald Green? There is a wide-open challenge. And a fun one! If you have shopped
for fancy dresses lately, you know that the prices can be mind blowing. As Daughter
moves through her teens, we know that dresses are and will be oh-so important. Can
we make this thrift store find work?
This was a fairly complex re-fashion for me, because so many things needed to
change. I still wanted a dress when it was done, but a dress Daughter could wear
to her winter concert, not an 80’s revival party. The biggest change was to the
bodice–change the shape of the waist, add some detailing, new neck line and a
modesty fill to the back. Oh, and the skirt–shorter, no bustle, no bow.
From 80’s pioneer-rock to contemporary with a touch of the 50’s.
Yep, it is quite a change, and a change for the better. Daughter is pleased and
plans to wear it to her winter band concert in December. Ah, $6 and a few hours
well spent!”- Deanna
Your daughter looks beautiful, Deanna!! I hope she enjoys her winter concert.
Now stay tuned to see what the rest of this season’s Redesigners have created for the Pantone Color 2013: Emerald Challenge.
Jerri approached me a few months ago and asked if I’d like to be one of their monthly featured experts for the new crafts channel that they are launching.
OMG! Of course I would!!!
eHow has over 100 million unique visitors each month.
Yep, I said 100 MILLION!!
Whoa, hard for me to even fathom that many views. I am overwhelmed with gratitude that Jerri chose me for this job and excited to see where all of this goes.
I hope you’ll pop on over to eHow and see my first refashion post as an eHow Featured Sewing Expert. And if you’re really feeling generous, I’d love it if you left a comment about the project there.
You guys are the best! Thanks for being so supportive!
Remember Miche, from Refashion Runway: Season One? She took time out of her busy schedule to sew along with us this week! Did you know she has a gig sewing costumes for a movie? I think that is so cool!!! Congratulations, Miche!!
And Jen, fun as always and also from Refashion Runway: Season One, was kind enough to share her plaid sew along with us, too! This was actually a double refashion. She used this bathrobe to make an infinity scarf and then refashioned the rest to make this cute apron.
We’ve started this season with a trend we’ve been seeing on the fashion runways lately, Plaid. I know you will truly be wowed by what these ladies were able to create in just one week.
Please remember to vote for your favorite at the bottom of this post. Voting will be open until Friday, September 27. Your public votes and the competitor’s score of each other will be combined to determine a winner. We will announce the winner of this week’s challenge next Saturday. Also, the refashion with the lowest score will be “going home”, but we won’t send her home without some great prizes, I promise! Remember, this is a “Friendly Sewing Competition”.
So sit back, grab a cup of coffee, and enjoy the show!
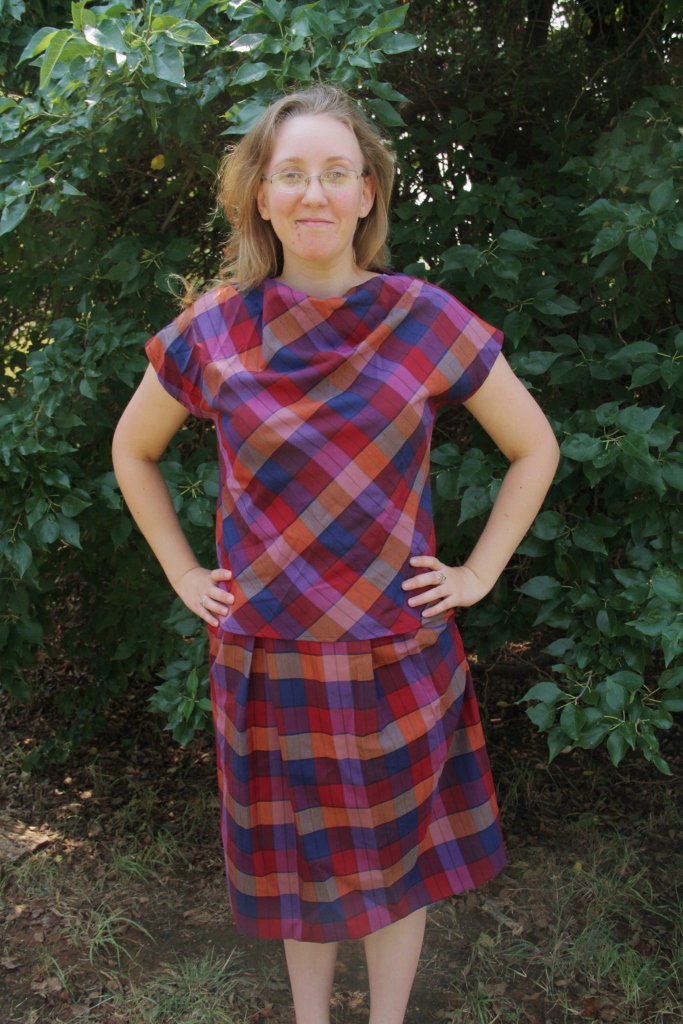
“I love plaid.
I did not, however, love this outfit.
When I first saw this poor ensemble in our local thrift store, I fell in love with
the colors. Rich, deep tones are my favorite. But the fit and style were terrible-
so I left it alone.
For several months it languished alone and unwanted on the rack…then I learned how
to sew! I quickly snatched that baby up (at a bag sale no less!) amid a few
questioning looks. In my mind, this was too pretty a fabric to simply start hacking
away at, so I laid it aside until the day arrived that I could bring out the
beautiful potential lurking in those folds.
When I found out this week’s refashion theme was plaid, I knew that day had come!
Like I said, I love plaid, but I have to admit there was just a little too much
plaid going on. So I decided to use a deep blue, tank top to break things up. It
had some lovely princess seams which made it perfect for a dress bodice.
Both the skirt and tank were too small. The skirt was an easy fix, I simply removed
the waist band and readjusted the pleats.
As for the top, I cut some panels from the
plaid shirt and inserted them at the sides of the tank top. From there, I attached
the skirt, made a long sash to tie at the waist, and added some flutter sleeves to
the straps of the tank! And voila! I am in love with my new dress! It even has the
original pockets!”-Desarae
***
Now let’s go to Portugal and see what Magda from House of Estrela has been sewing for us:
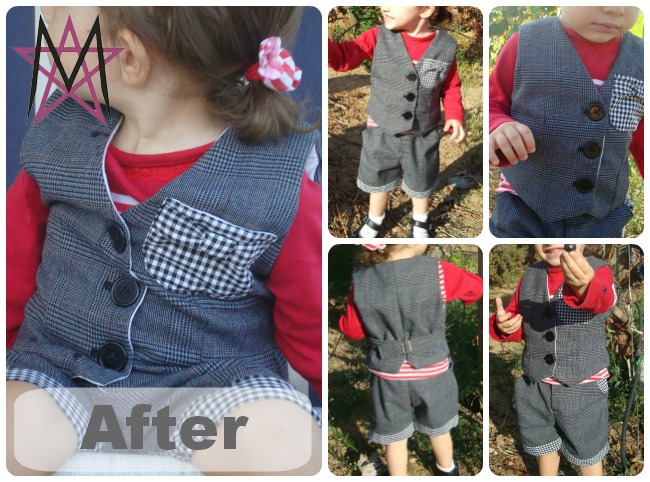
“I started by cutting the shorts pieces. I used a self drafted pattern. For this I
only used the bottom of the pants, I still had quite enough left to make the vest.
Let’s focus on the shorts, this one has a waist band with a fly at the front. It
closes up with a (showing) big black button (which matches the big buttons from the
vest, though it is a bit smaller than the other 3), and two little snaps that are
hidden when it’s closed. I also added an adjustable waist elastic. I used the pants
original waistband for the shorts. I only had to cut a bit of this out, and adjust
the side loops. For the side pockets and decoratice cuffs, I used a small scrap from
a fabric. I used leftovers from a white sheet for the linning.
I traced the vest from an exisiting one. I added a front pocket with the scraps. I
was going to make it plain but it was a bit yellow(ish) and as to cover it, I chose
to add a bow to the pocket. I used 3 big black buttons on the front, that match the
shorts button, and at the back I used a buckle that I had saved from an old bag I
dismissed long ago. It allows me to adjust the vest fit too.
For more details visit my blog House of Estrela.”-Magda
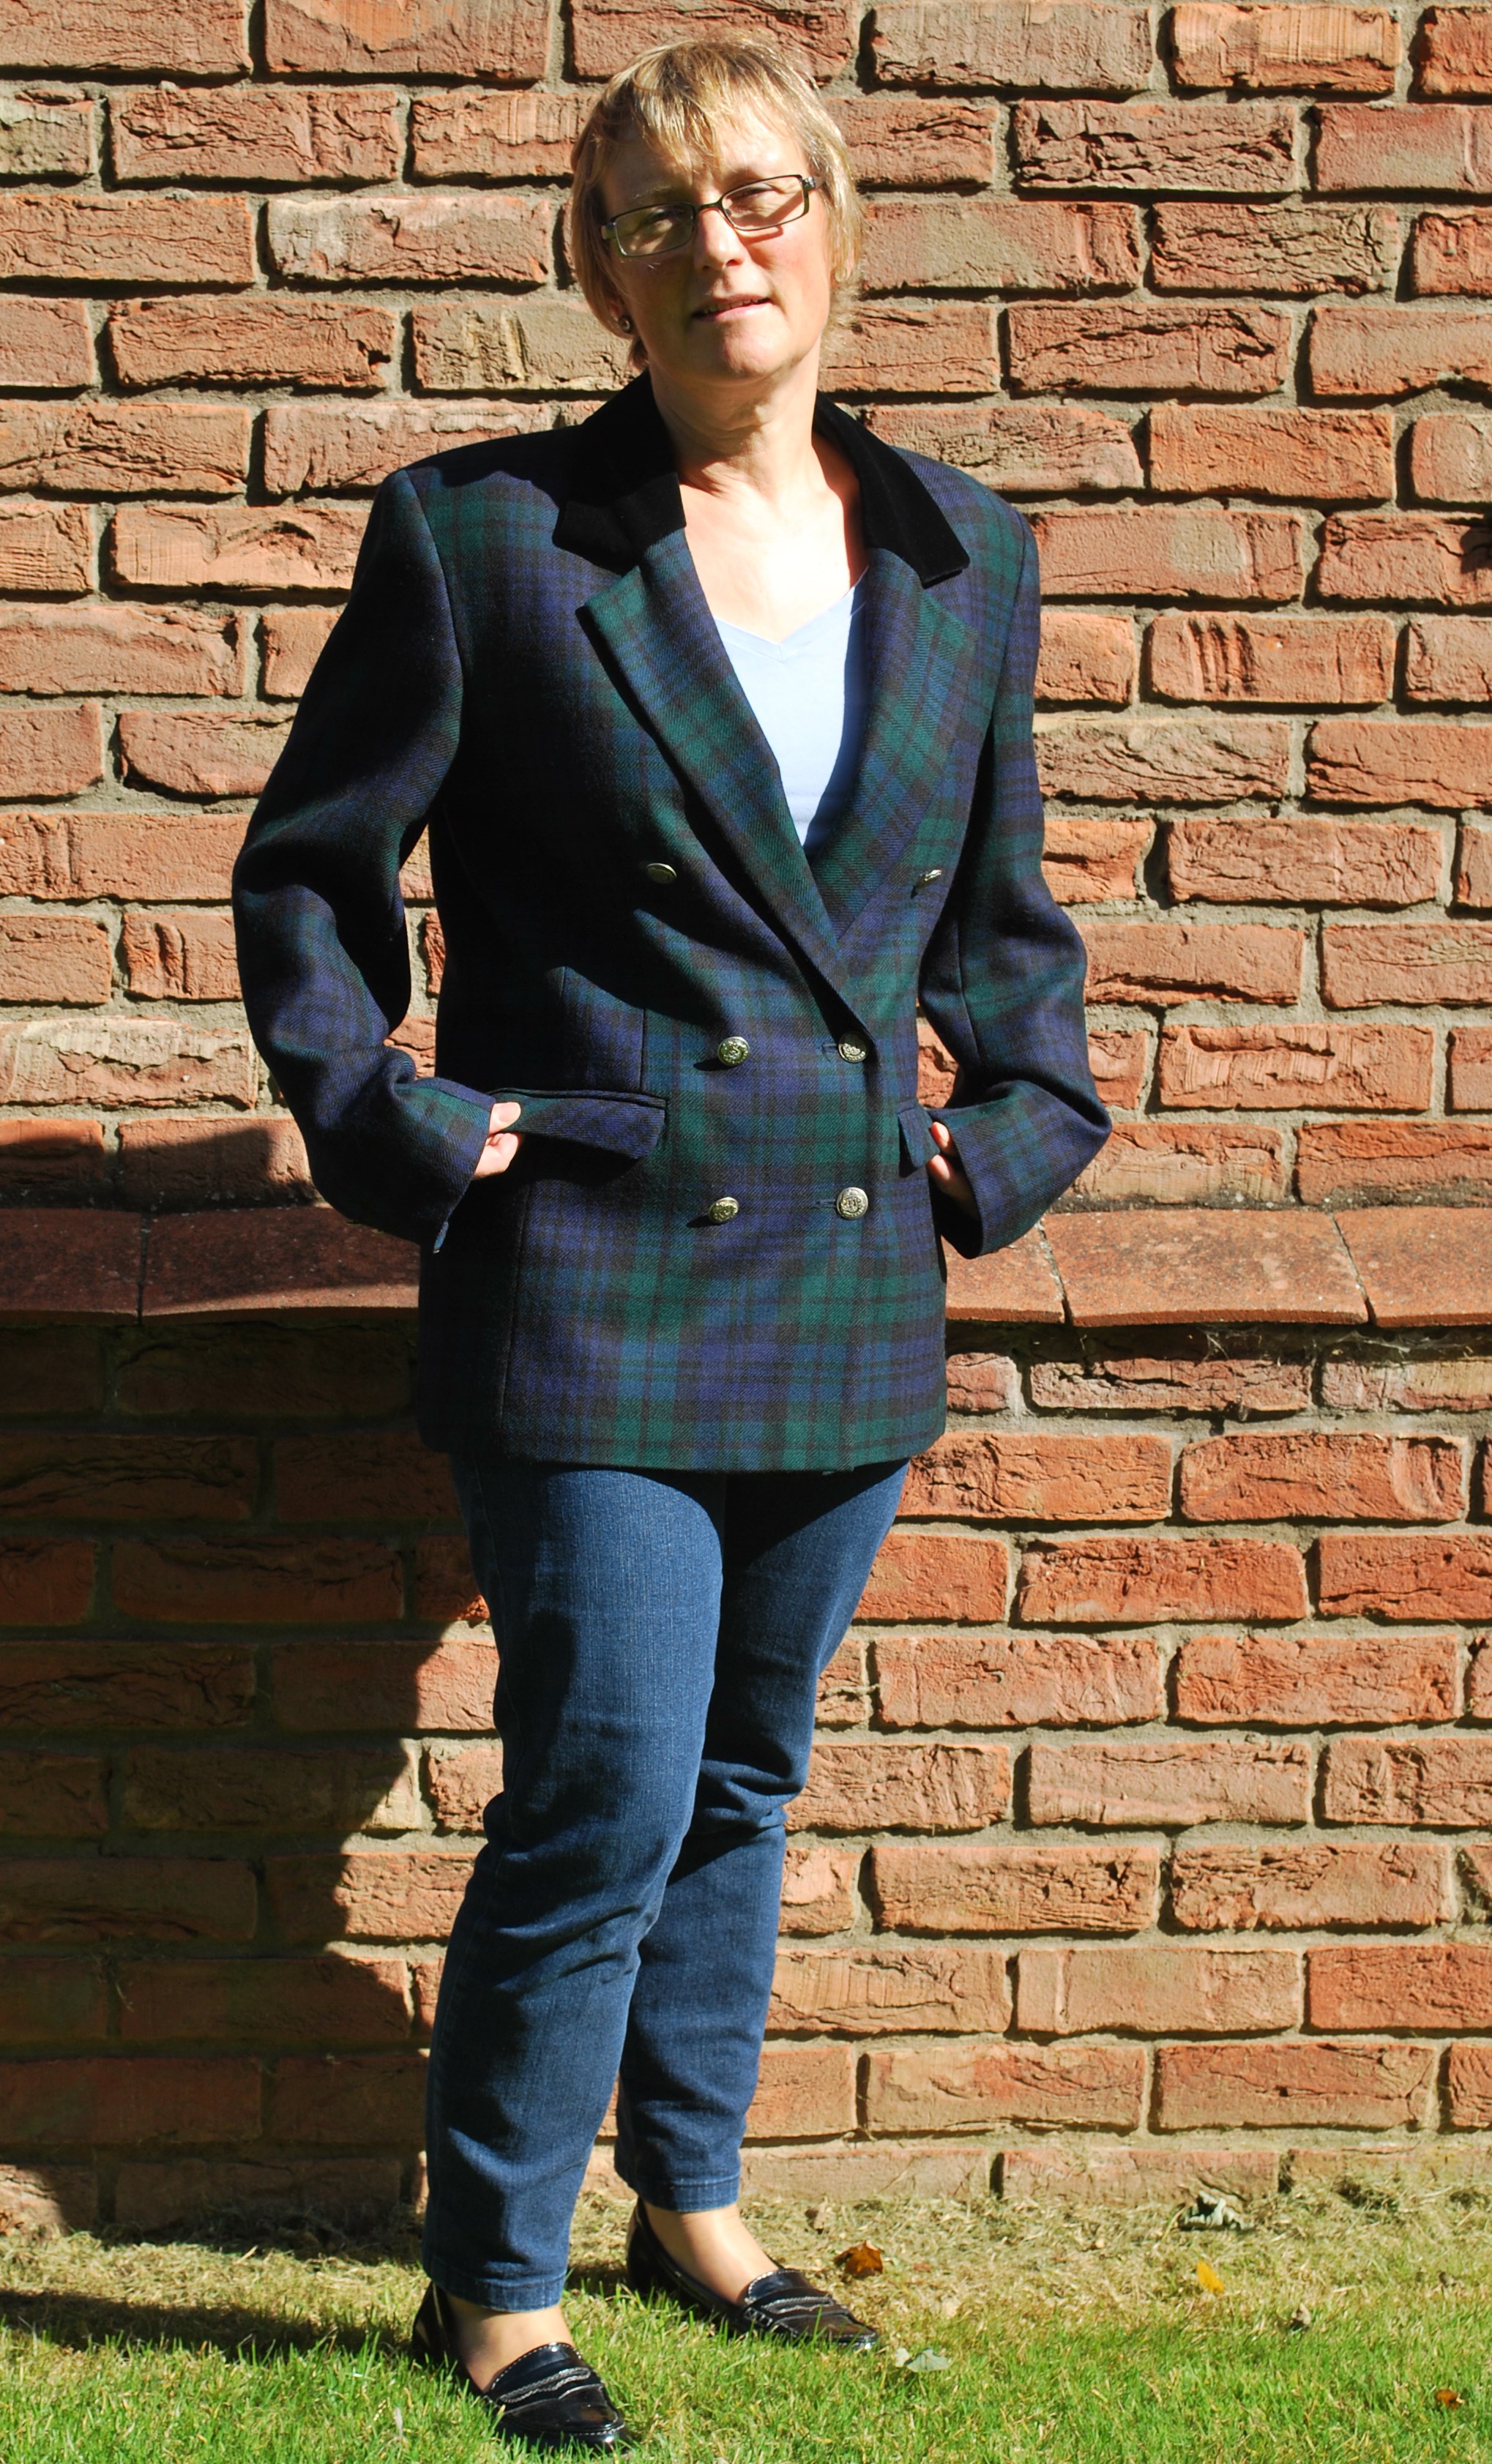
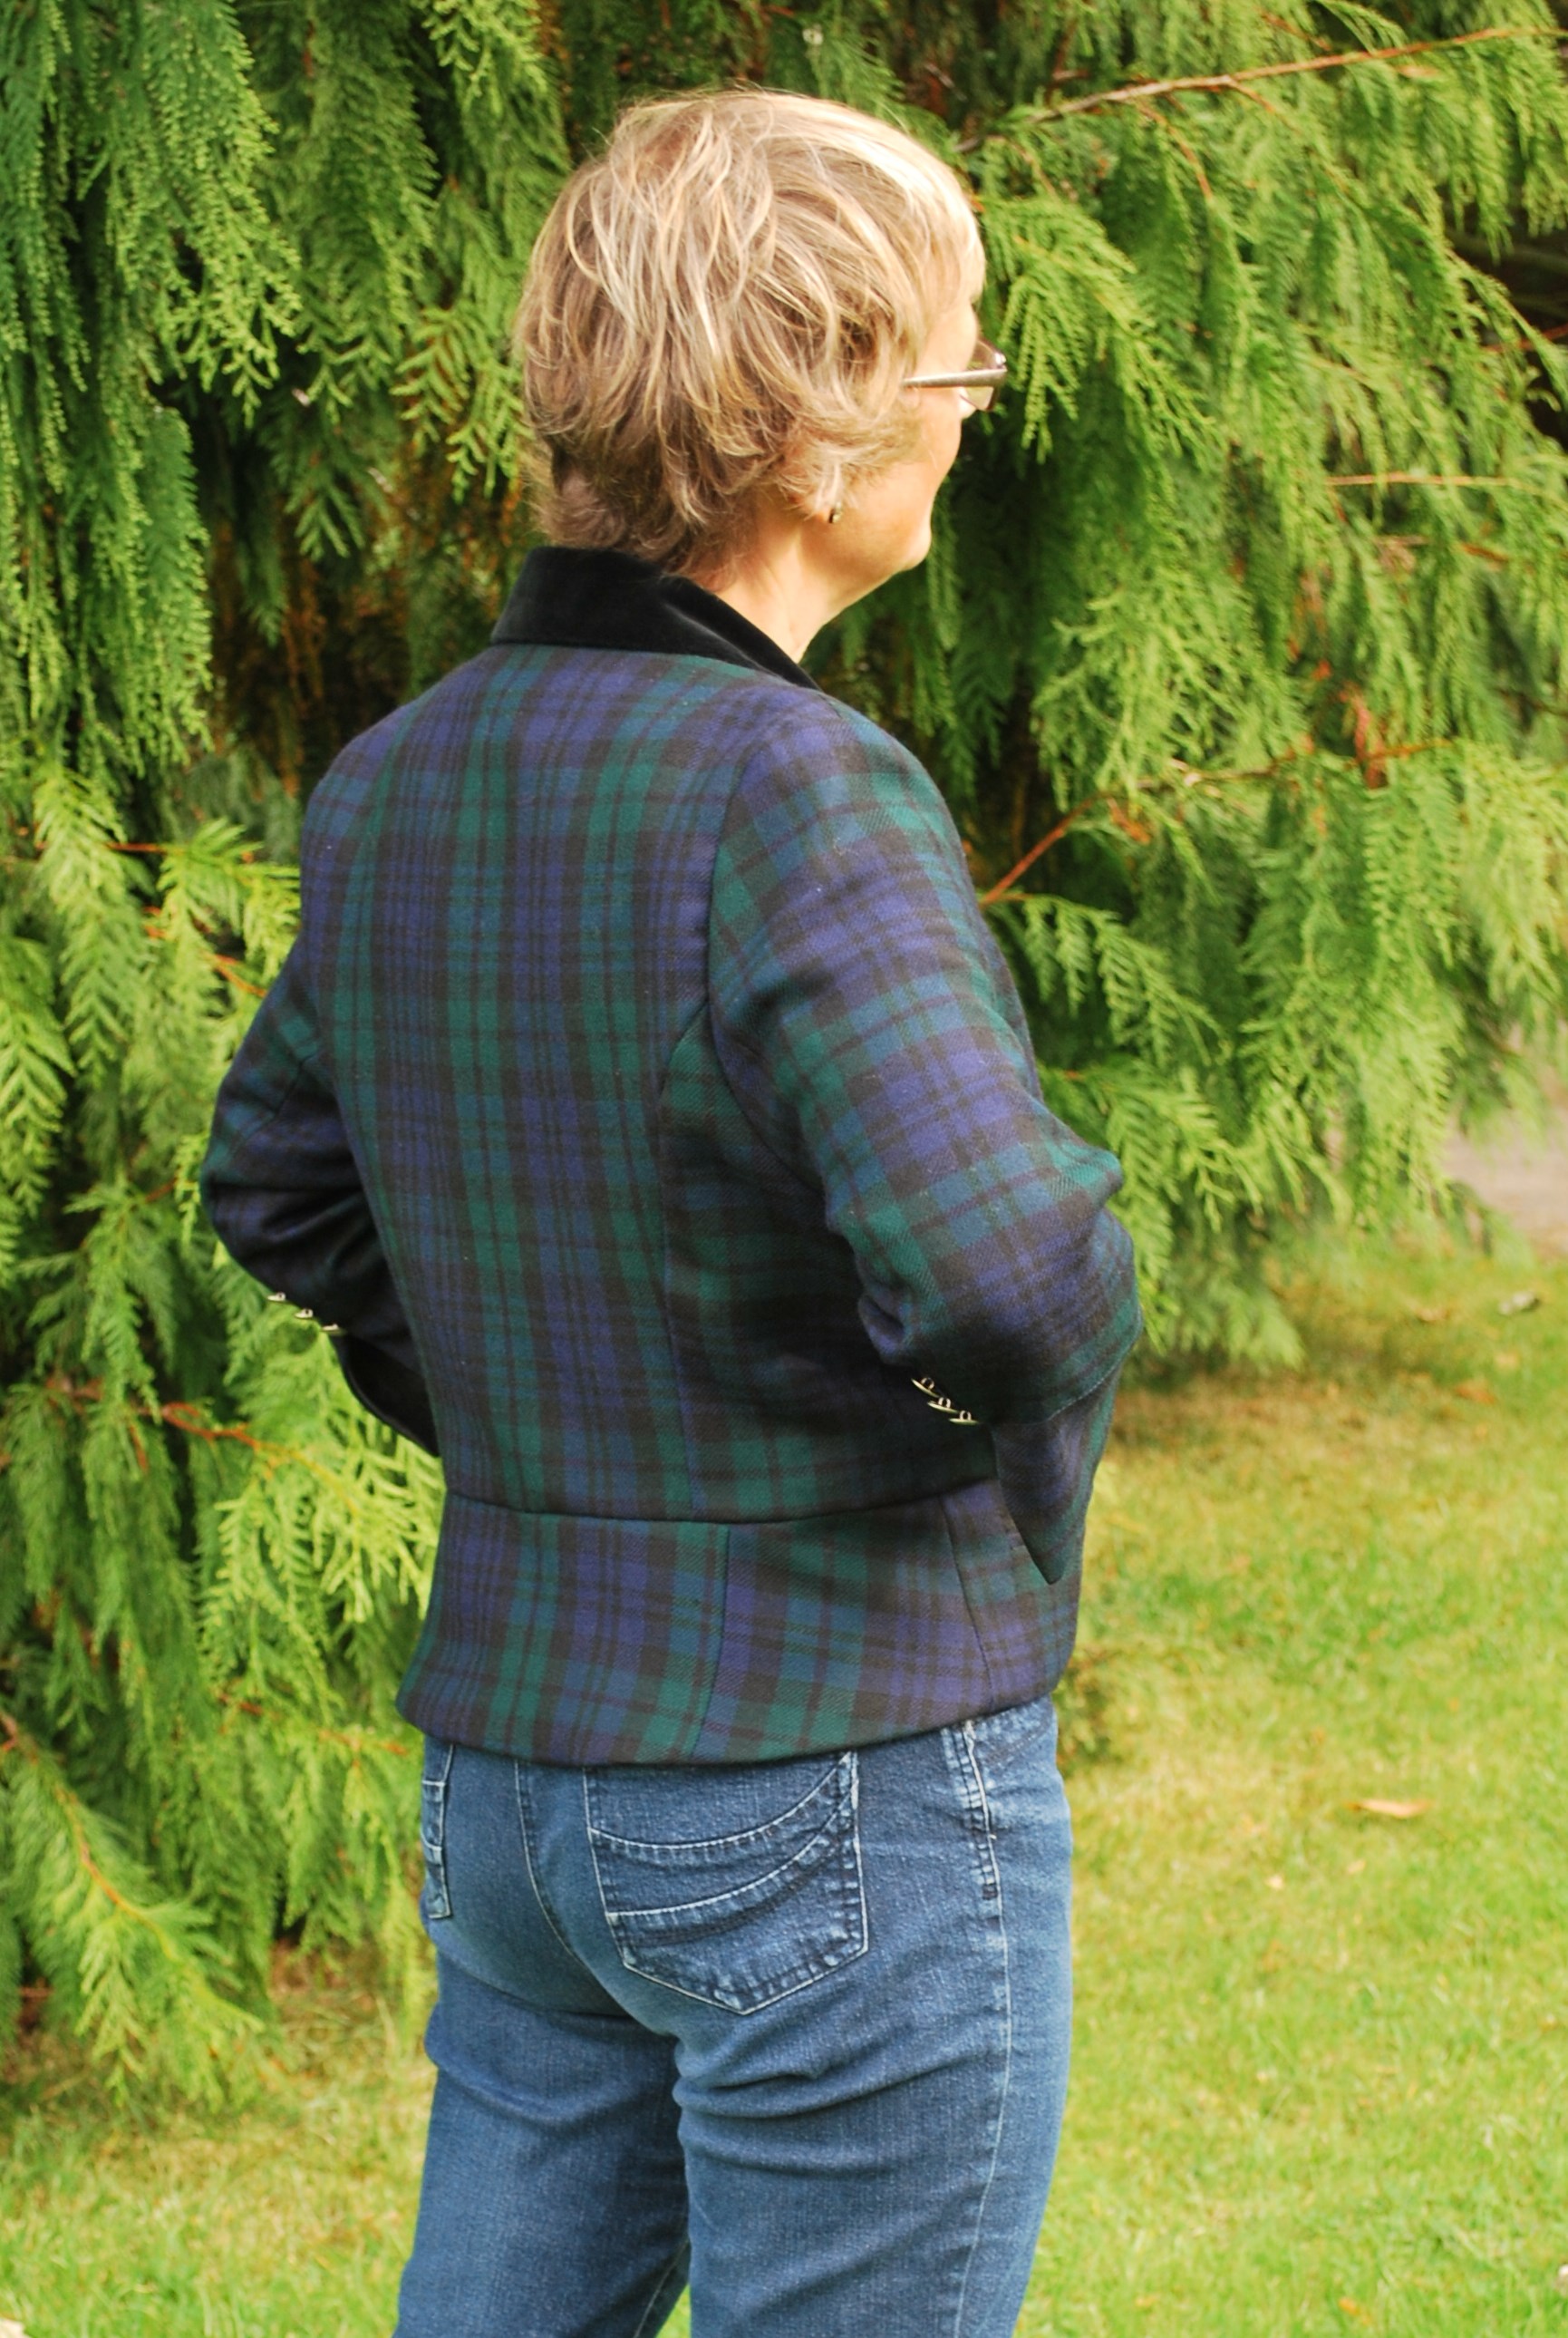
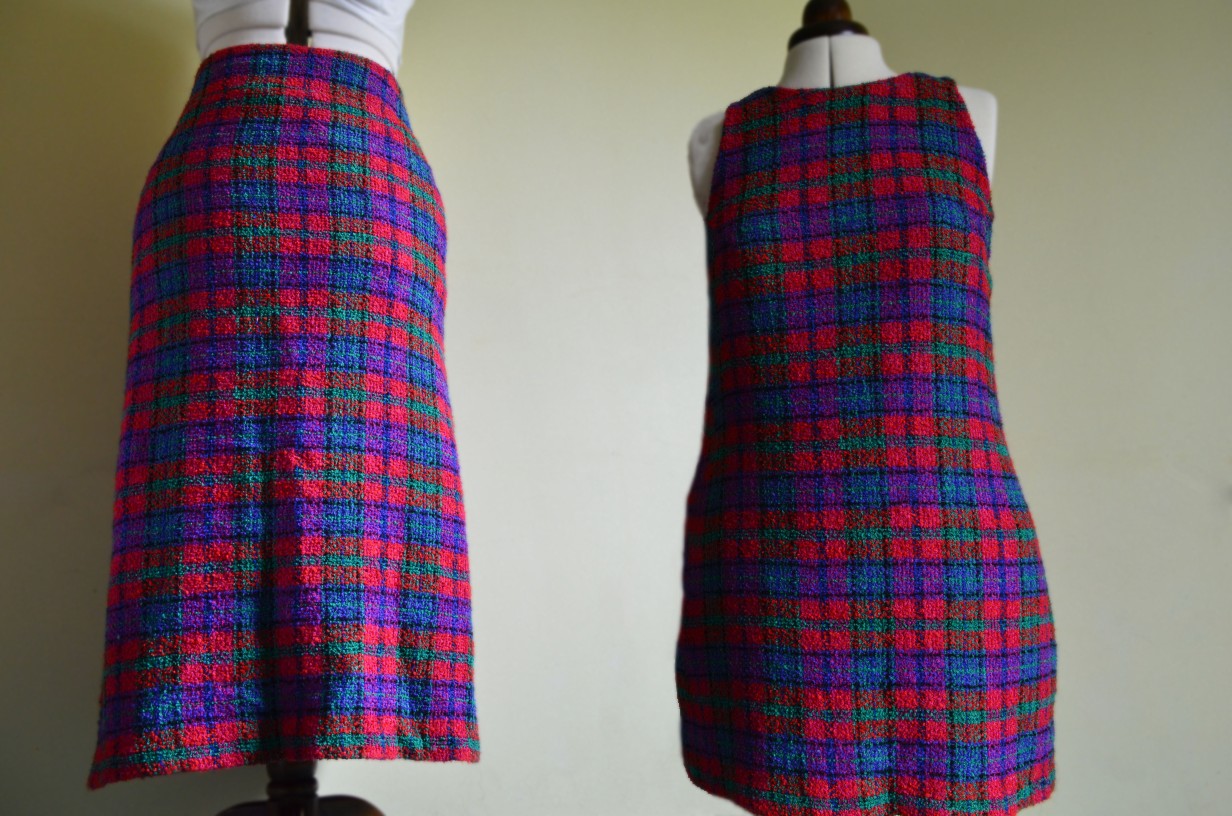
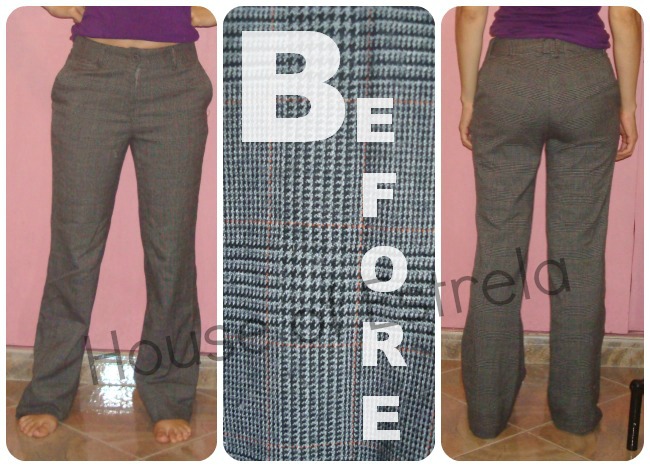
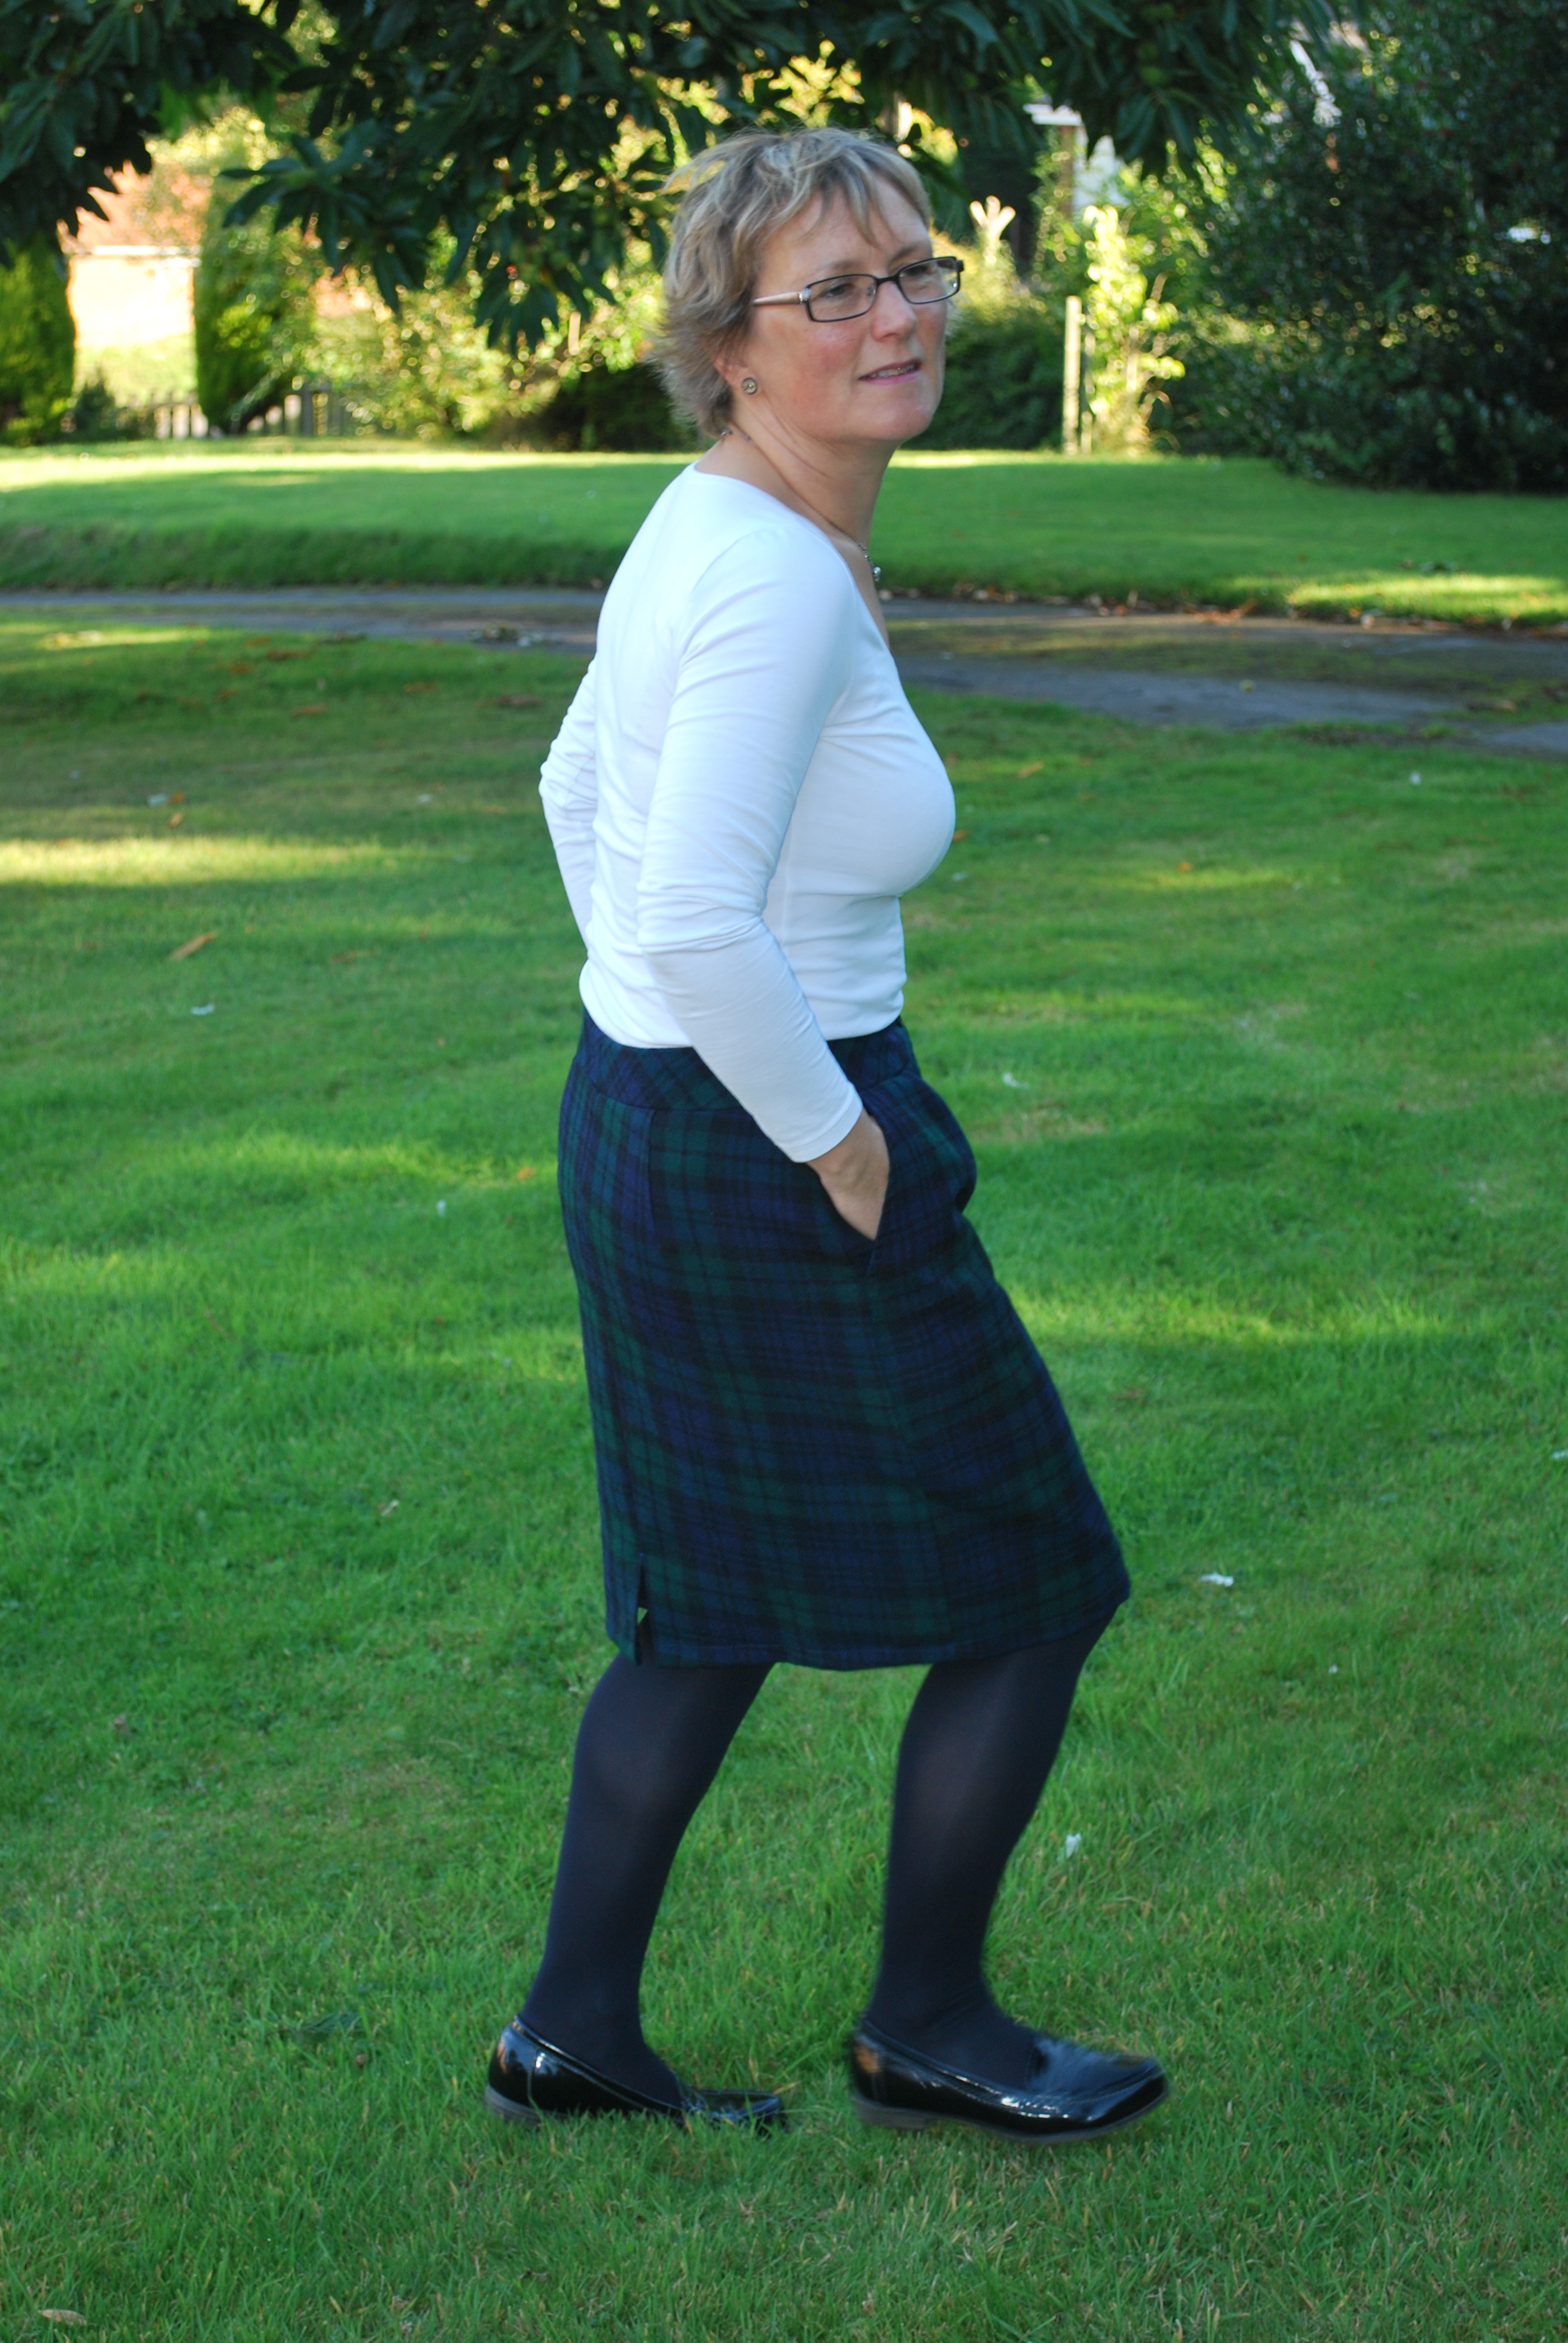
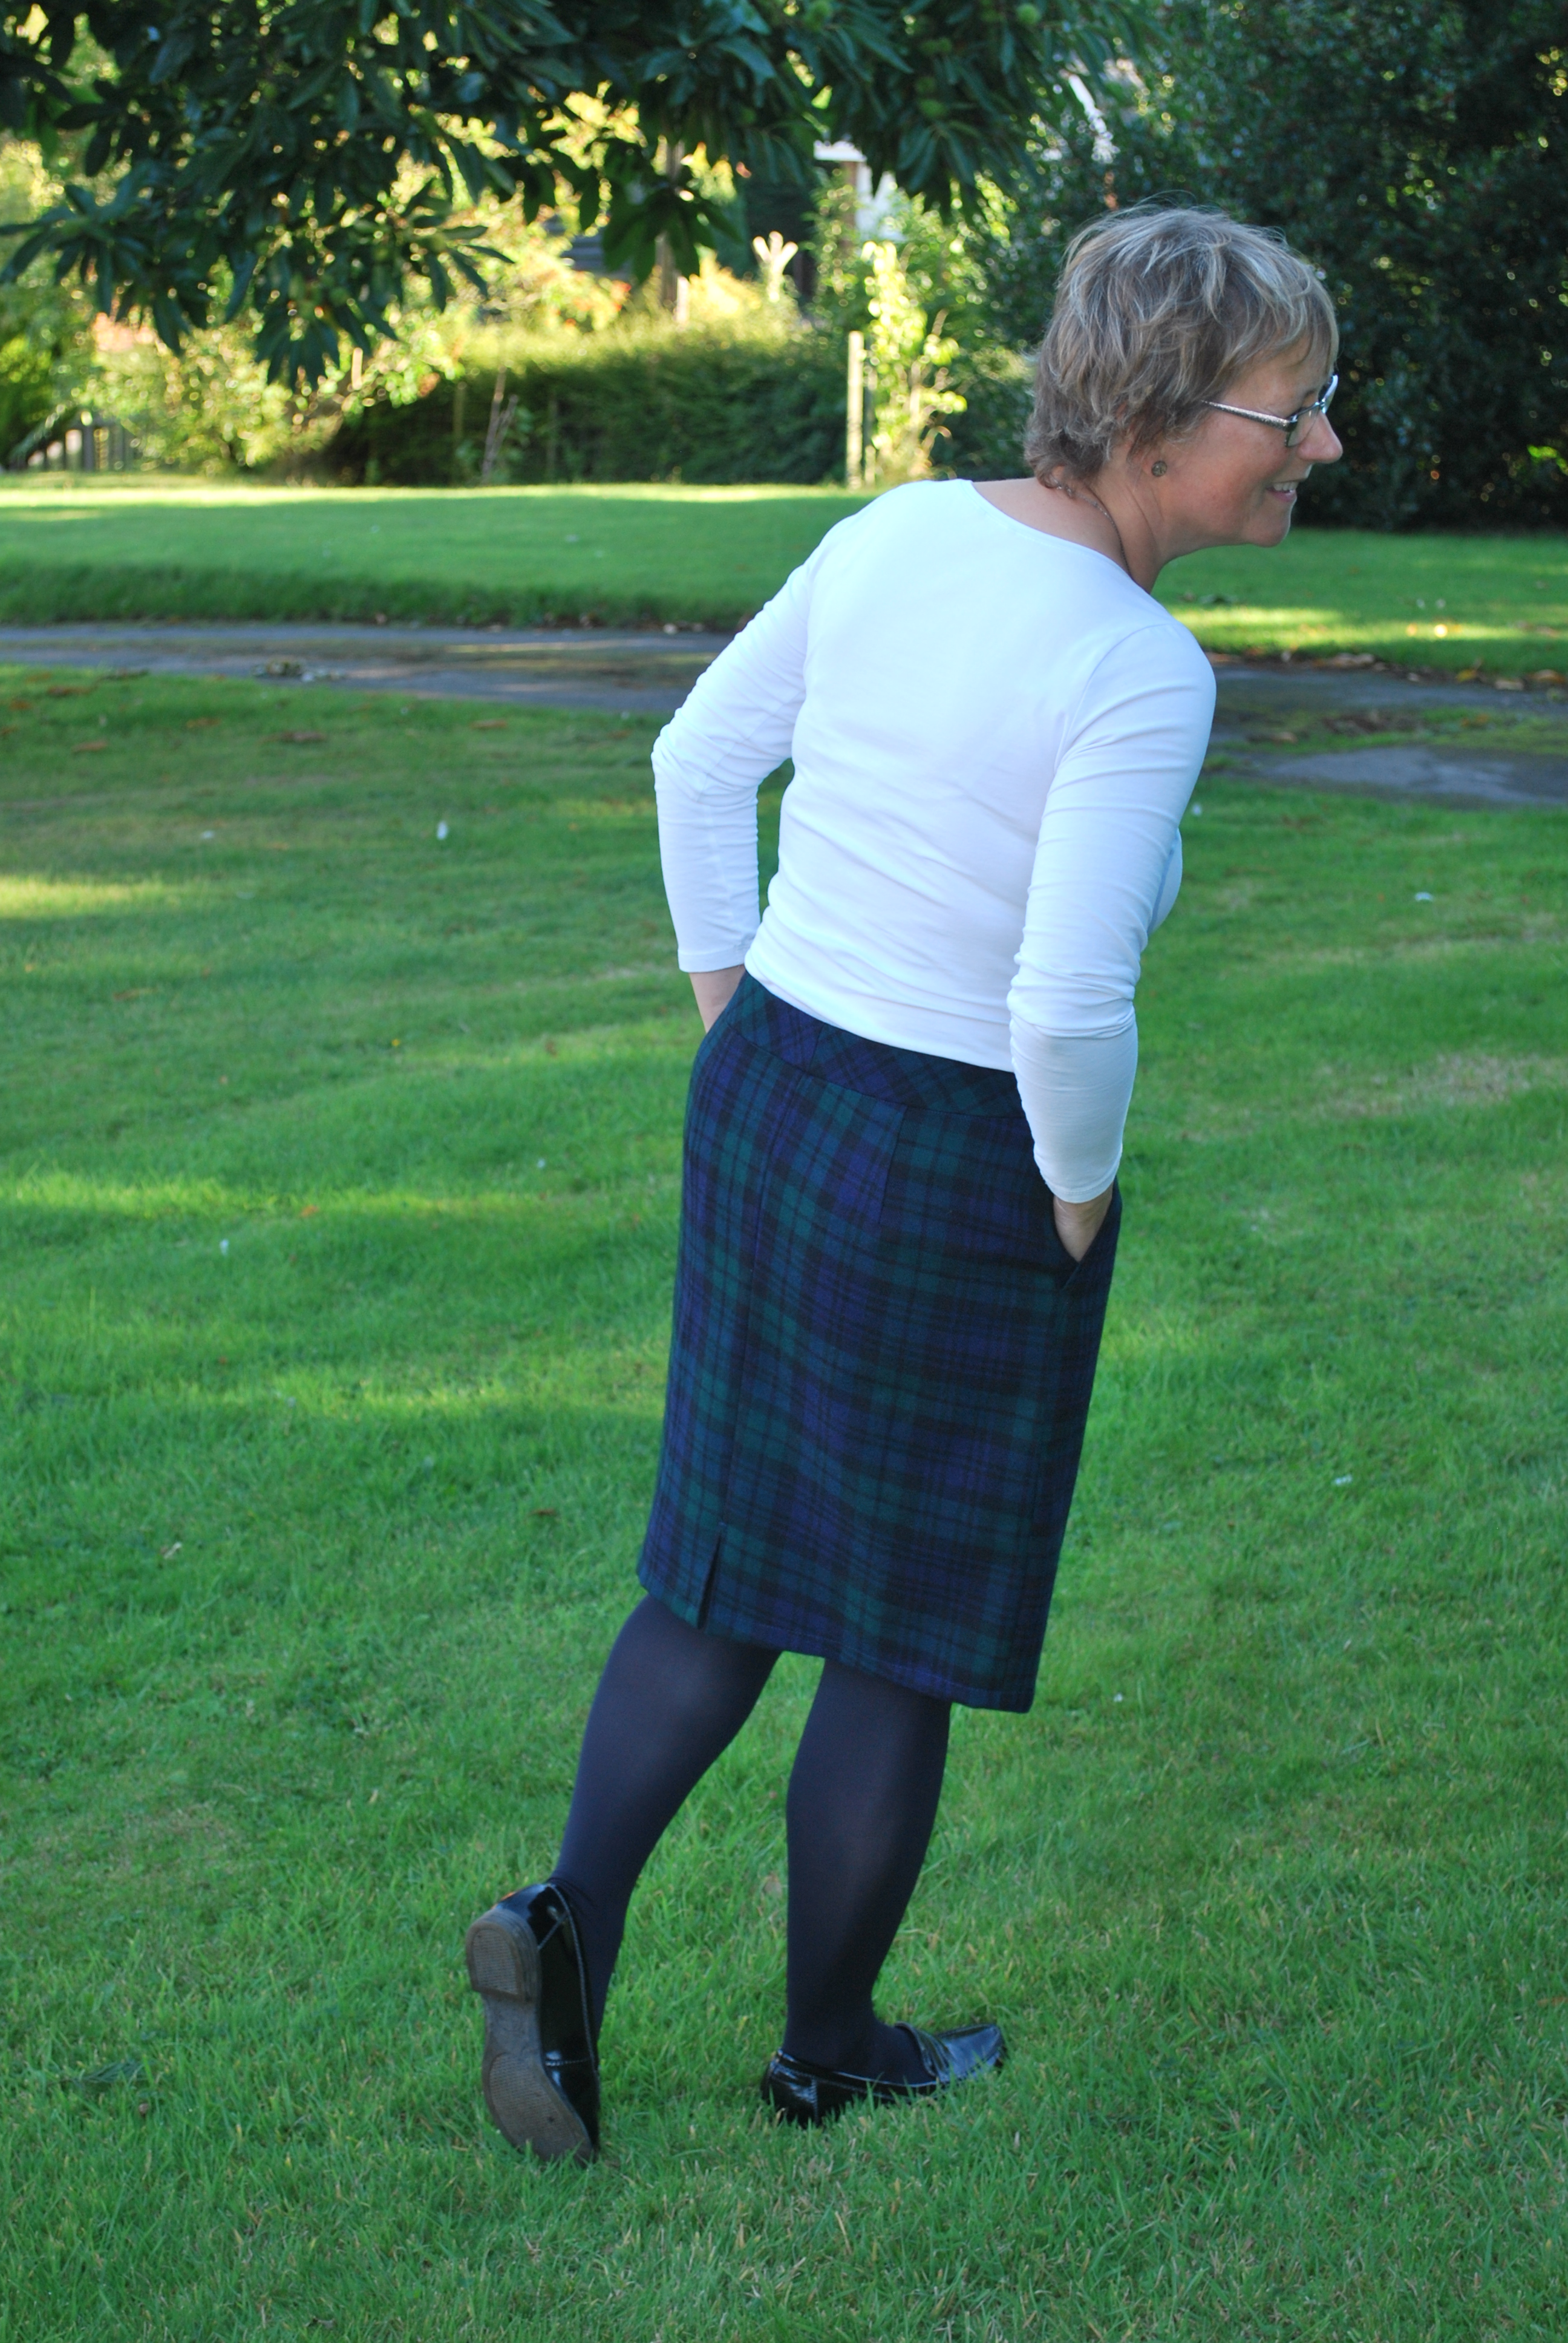
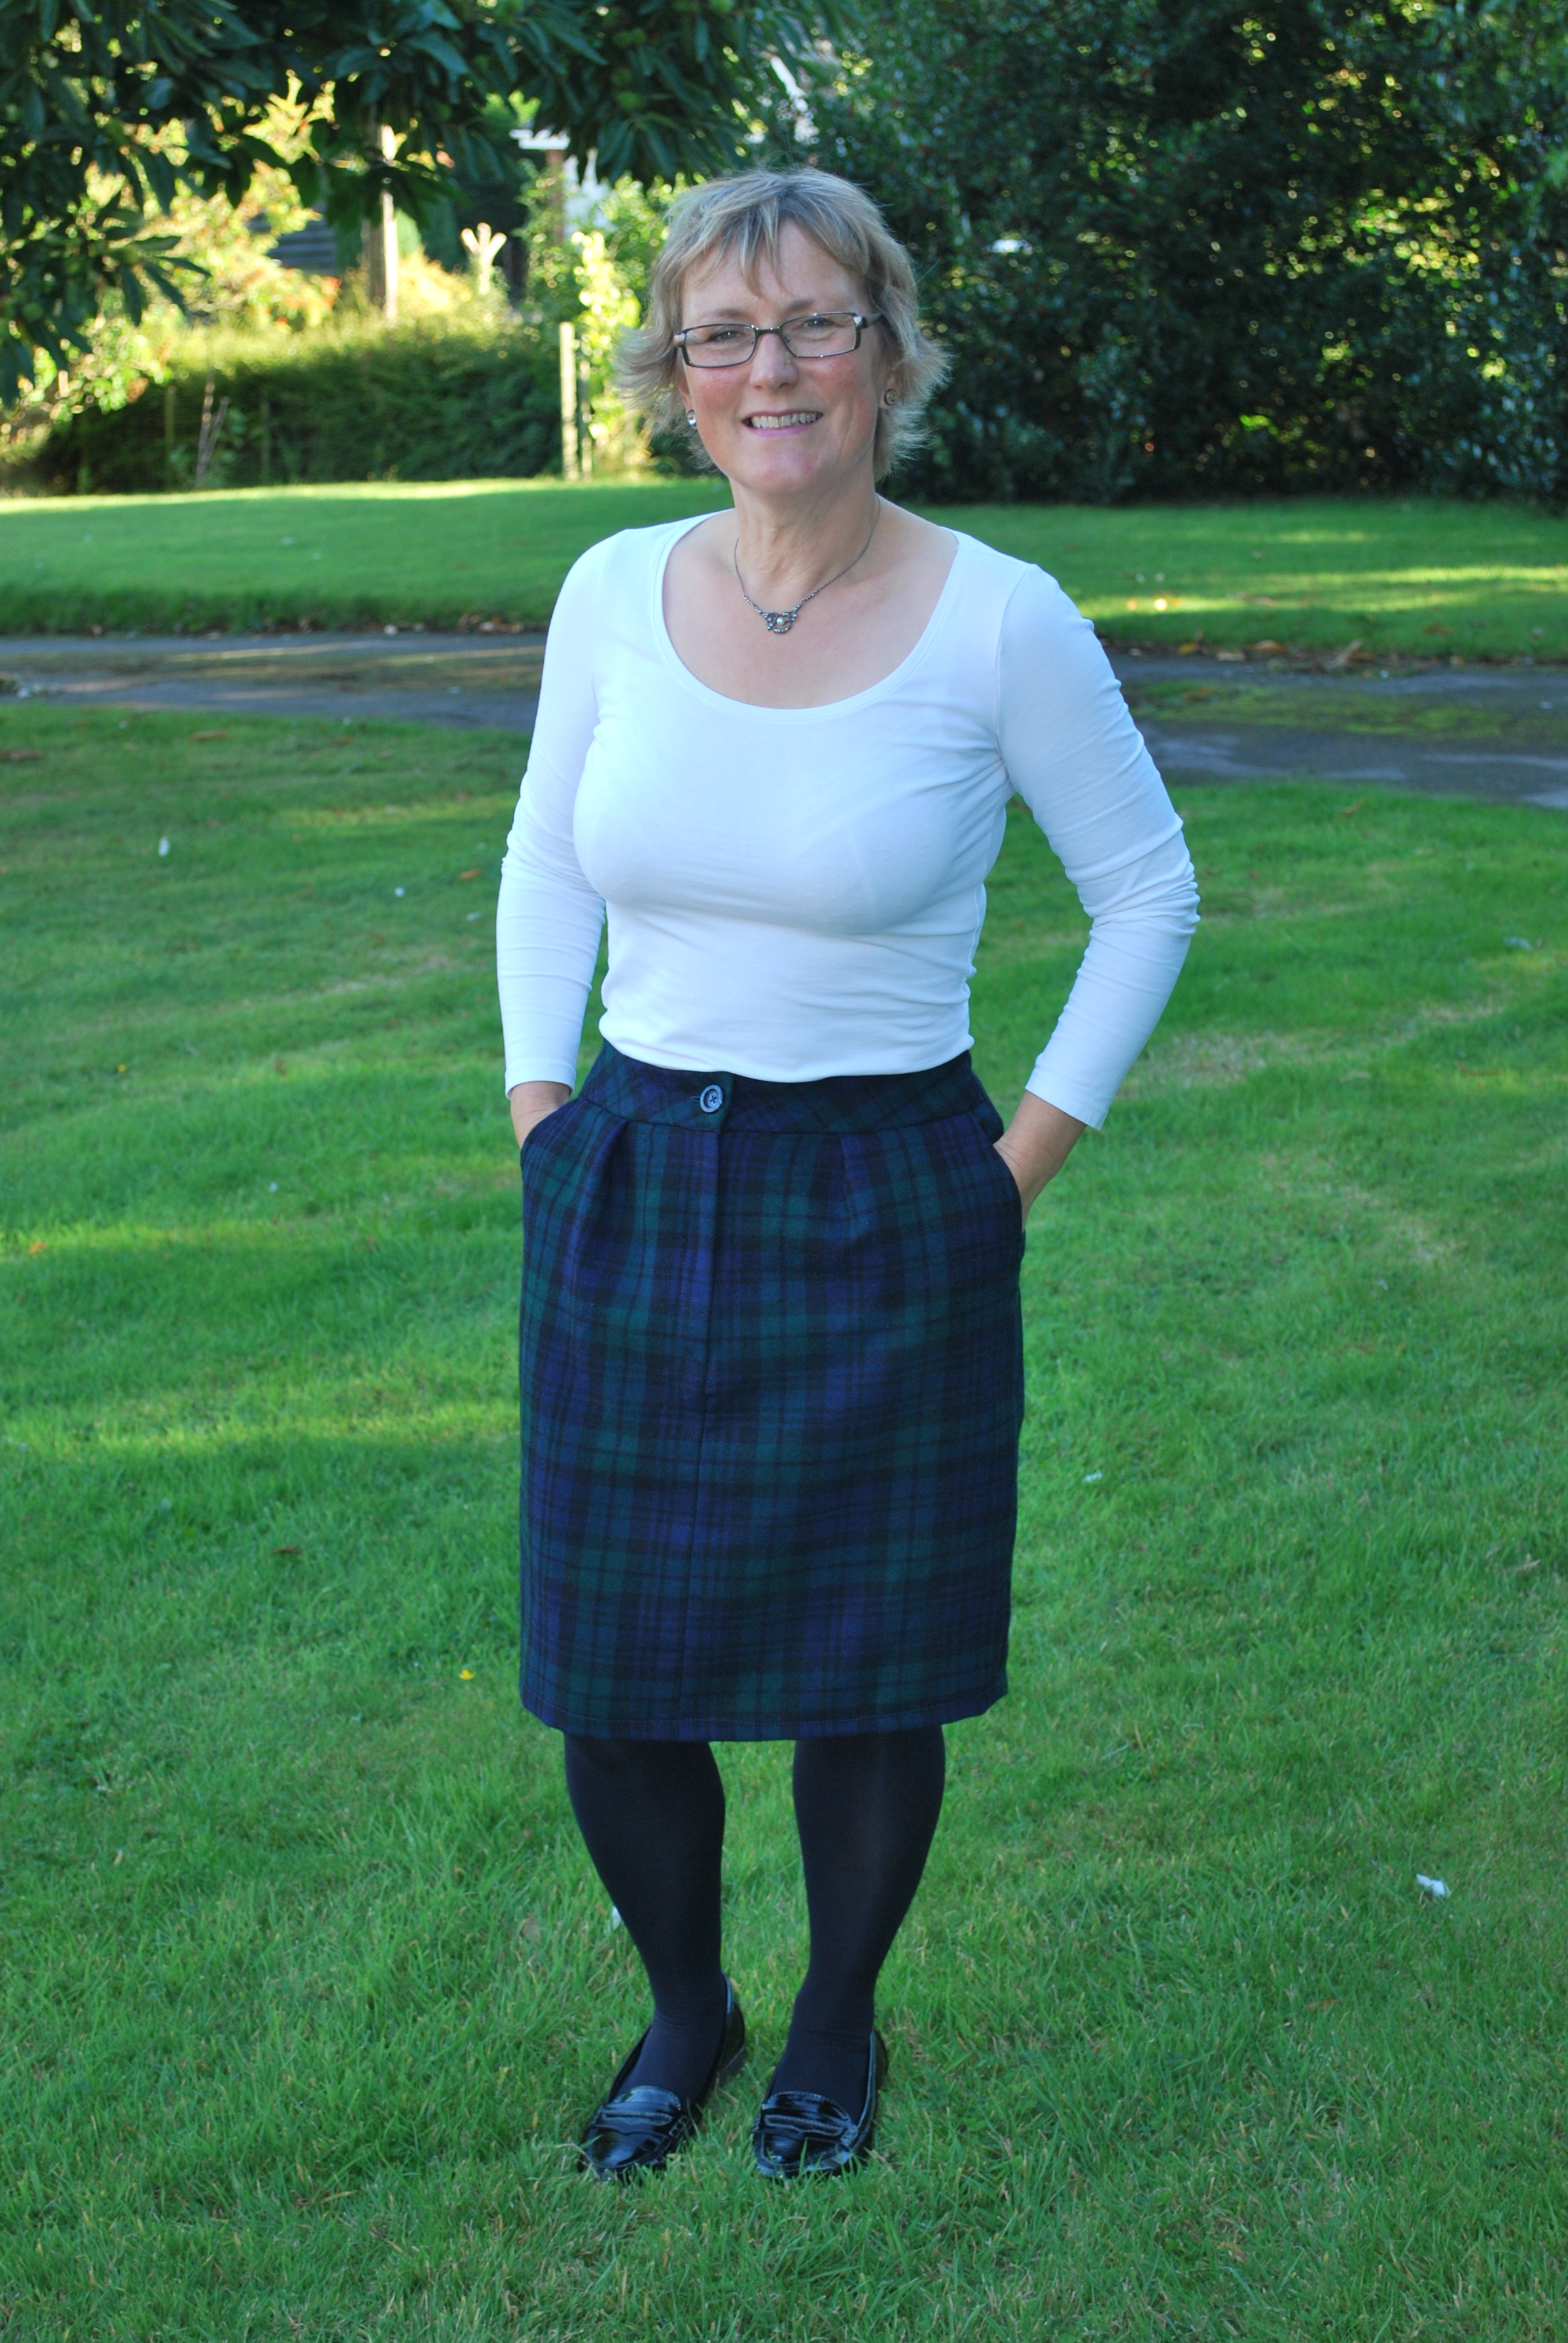
“I got these lovely high waisted plaid trousers with turn ups as part of a
wool suit for £3. I did consider just using the existing waist of the
trousers, but I find wool itchy against my skin. Instead I unpicked them
and managed to squeeze out a straight skirt utilising the existing front zip
fastening and pockets. I cut a curved waistband on the cross for added
interest, and to be able to get it out of the remaining fabric. I had
recently been given some pure silk satin off cuts by Stella and Alf which
made a luxurious lining (even if it did require an extra seam or two). I
finished it off with a button fastening at the front. I am looking forward
to wearing it for my 1st day at University on Monday. For more details and
photos pop over to my blog.”-Joelle
***
Instead of basking on the beaches of Hawaii, Trisha from Feeling Kinda Thrifty has been busy sewing for us this week.
“Luckily I snagged this beautiful red plaid skirt from Goodwill just in time
for our first refashion. I had originally planned to make it into a
strapless dress, using the top of another refashioned piece as a pattern.
However, it didn’t quite work out as I had planned. I remembered that I
had recently refashioned the full black skirt into a tight pencil skirt
that ended up being way too tight to walk in (oops). I flipped the black
skirt upside down on my dress form and created a sleeveless top. I then
attached the strapless portion of the plaid to the new top. I took out the
side zipper and trimmed up the bottom of the plaid skirt. Next, I sewed
the two pieces together in the middle with a long strip of the black skirt,
creating a belt. Lastly, I added a zipper down the back. These two frumpy
skirts were transformed into a stylish color block dress. To give it an
edge, I added metal brads around the collar. I love how it turned out!”-Trisha
***
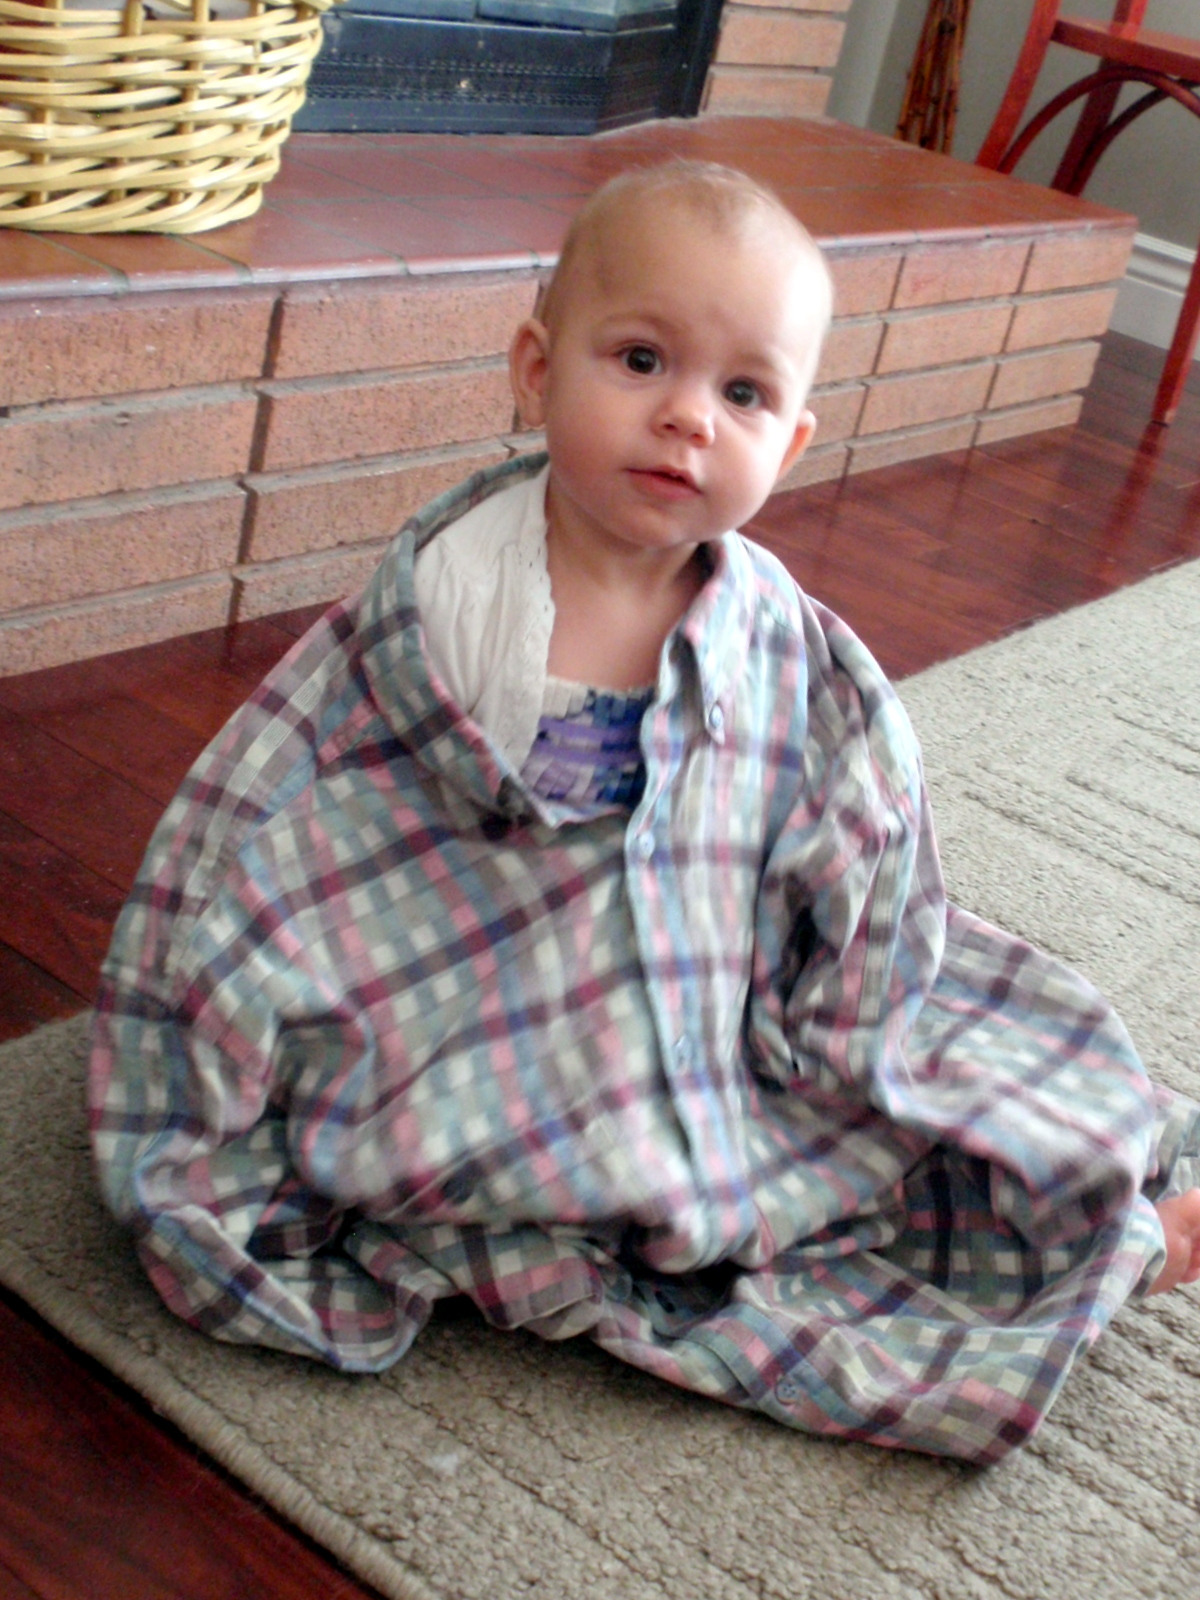
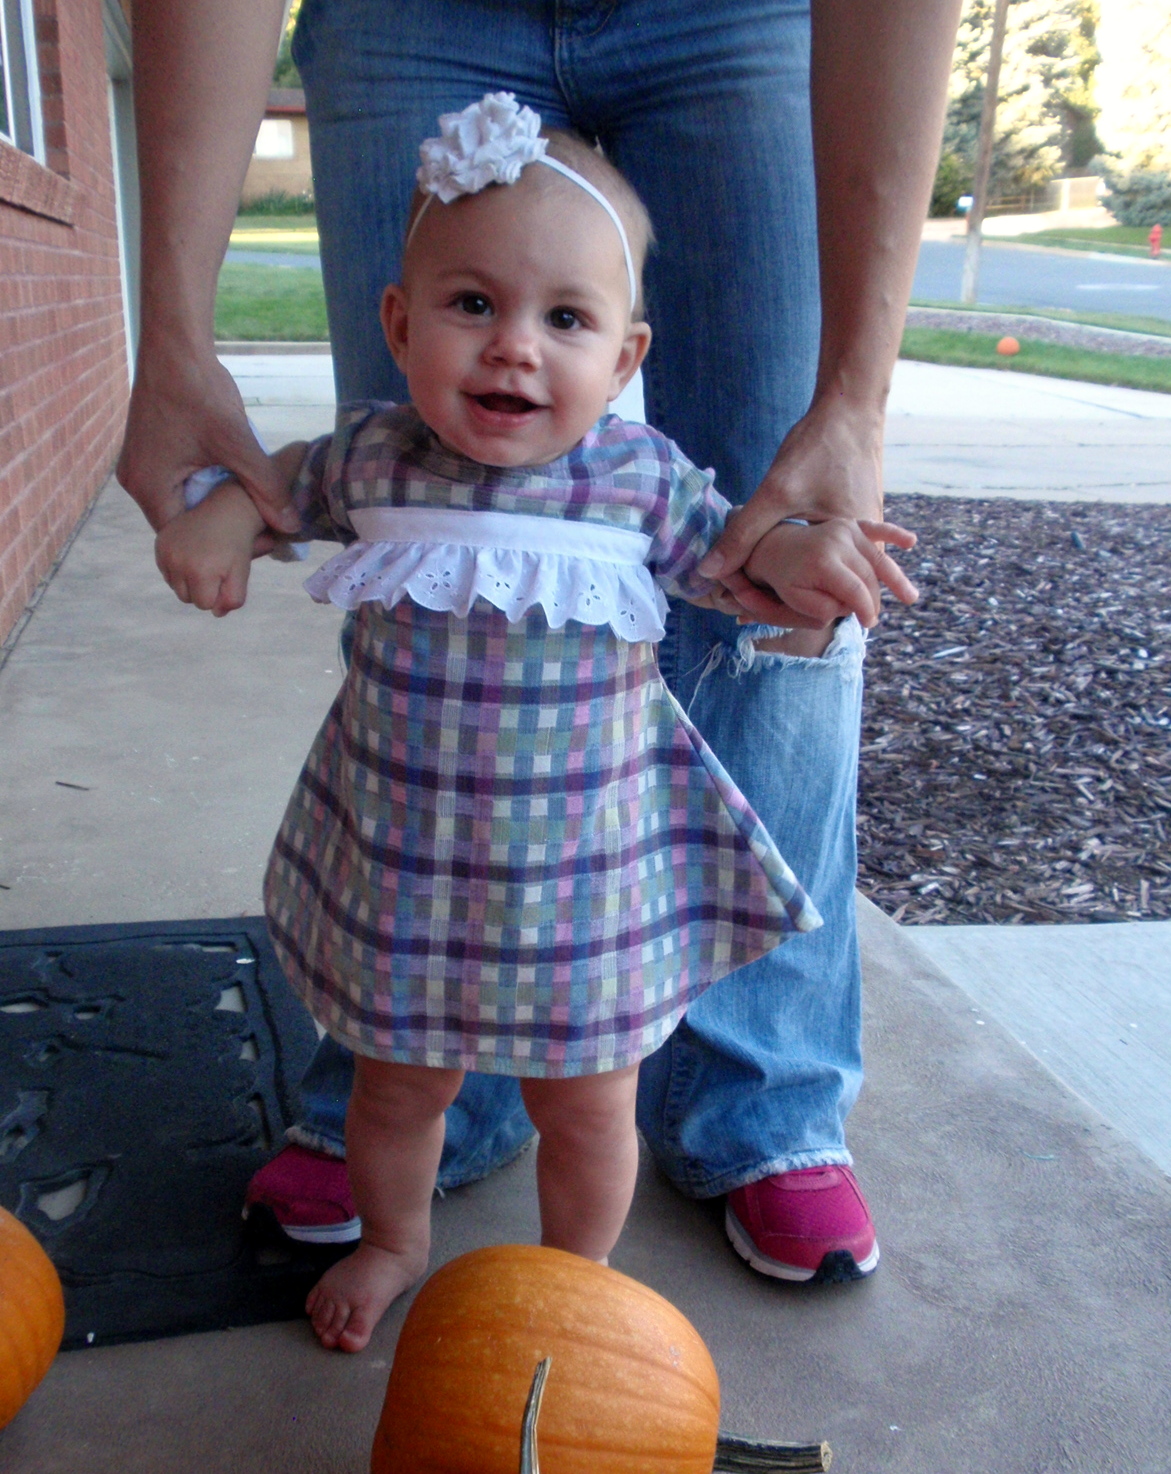
Deanna from Wedding Dress Blue chose a cute little model for us this week.
“Plaid challenge meant starting with a man’s shirt, good color but way too large, at
least when the refasion model is a baby. The open button back of the dress (used to
be the front) gives a fun flair and shows off the matching diaper cover. The former
yoke became the bodice and the center back the front skirt. Using all possible
existing design elements, like the hem, button holes and already-interfaced yoke,
makes even a drastic refashion go much faster than sewing from scratch. And, when
you start with a free hand-me-down shirt, the price is right, too.”-Deanna
***
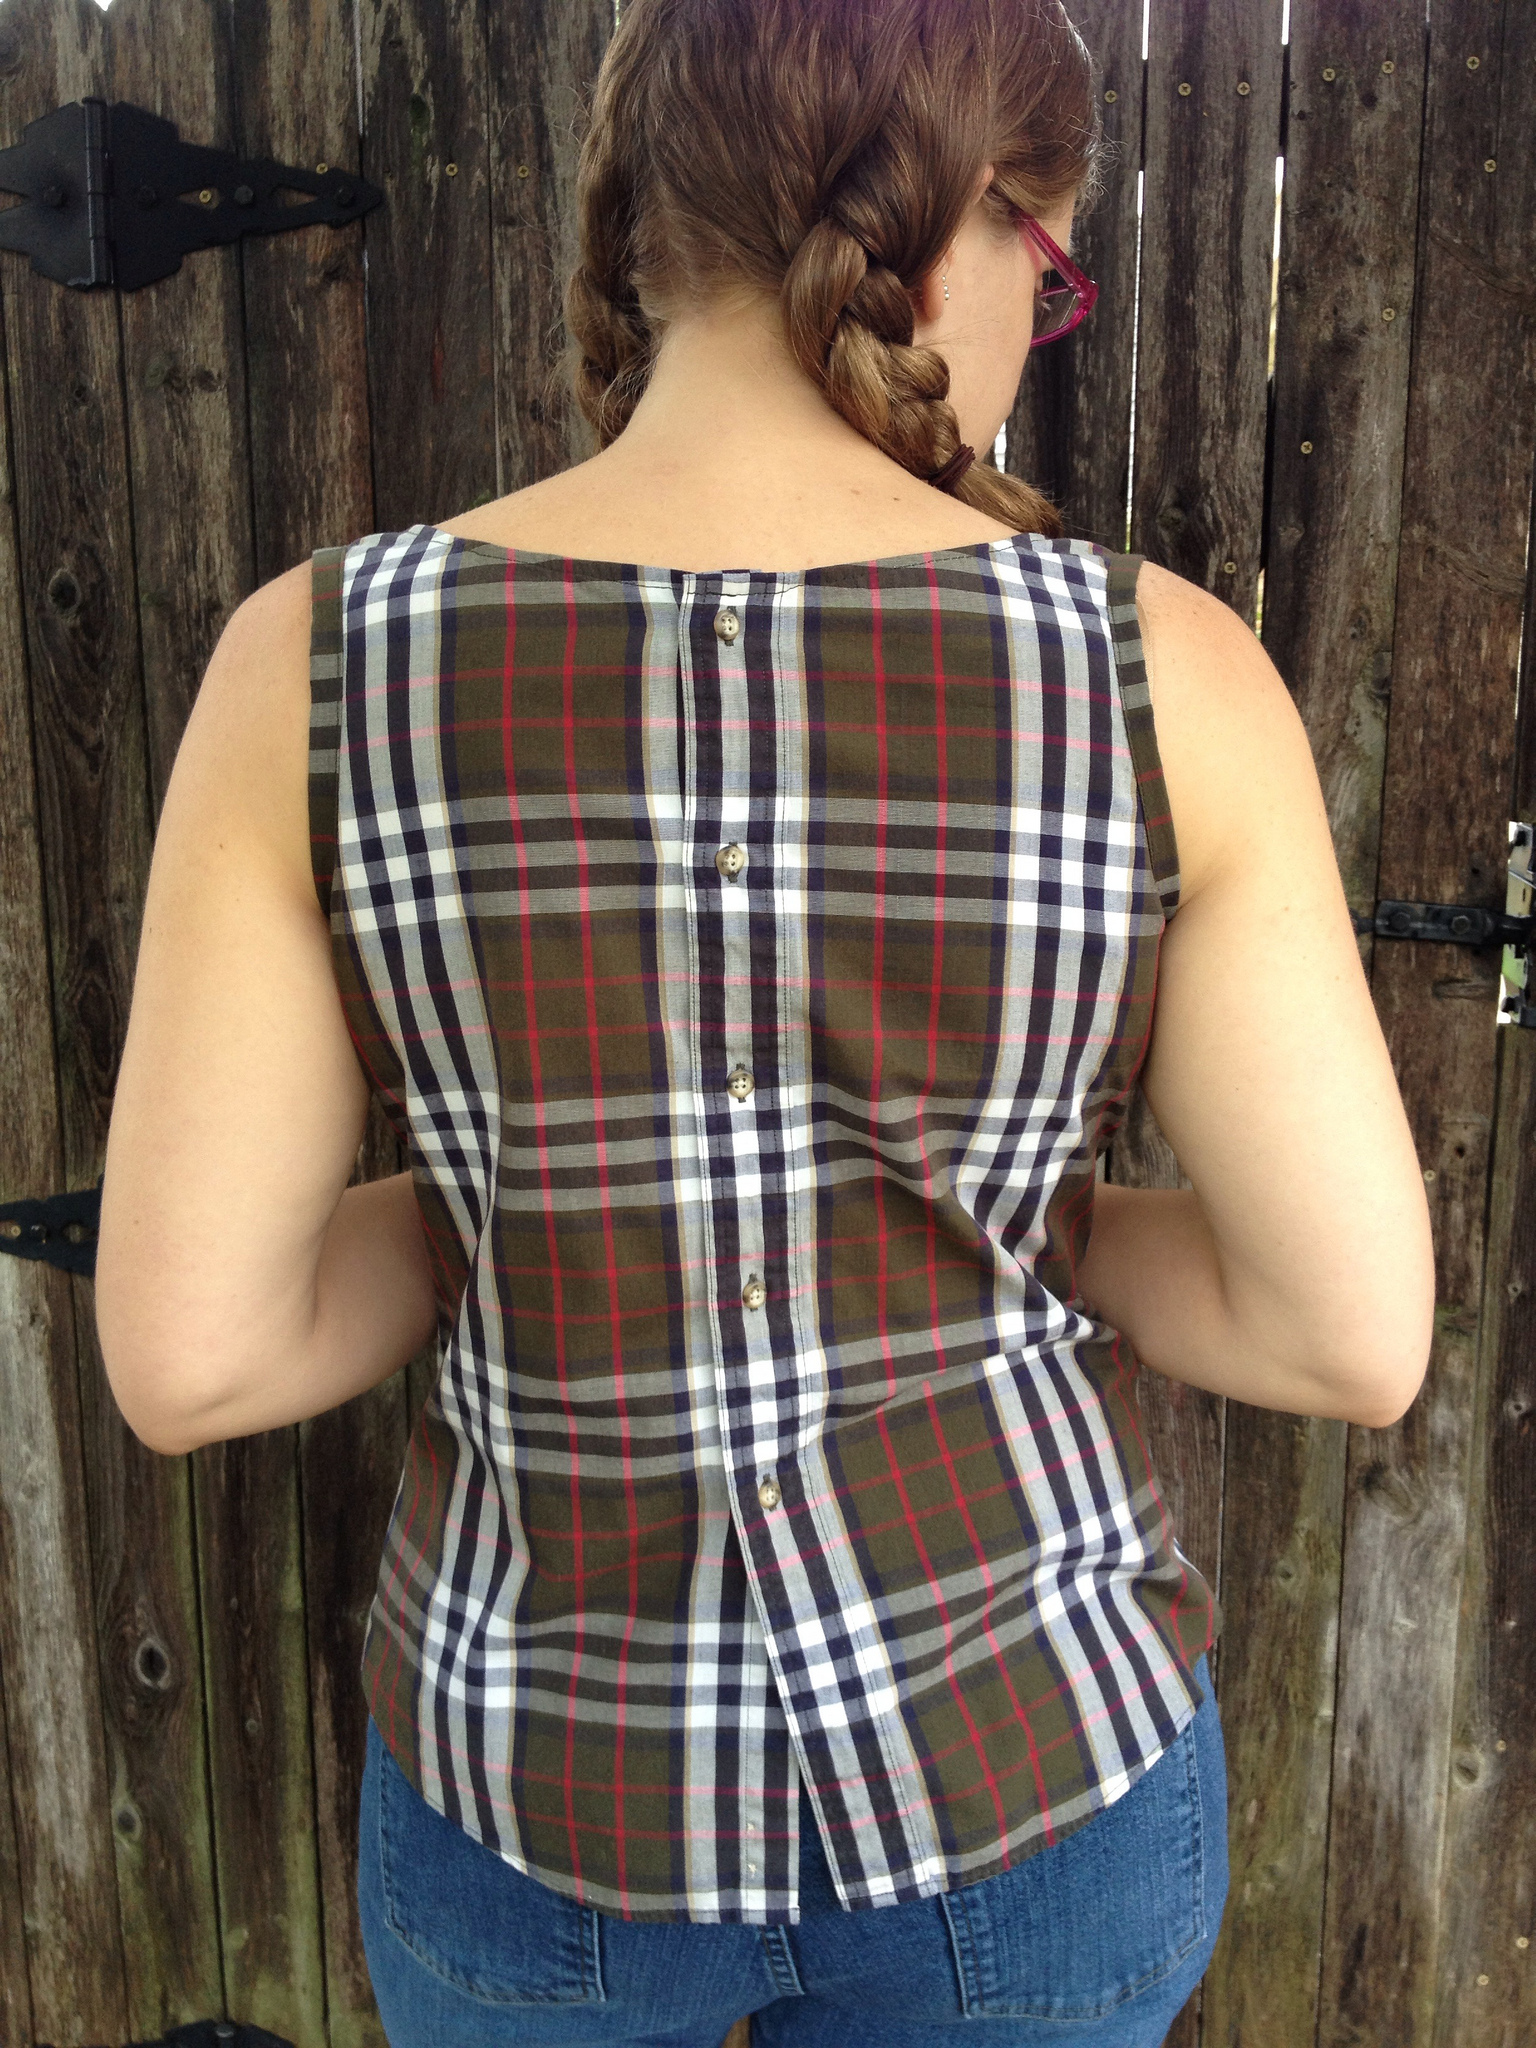
Let’s see what Carissa from Carissa Knits has been busy sewing this week:
“This project started with a basic button-down shirt from the back of my
husband’s closet. Having never seen him wear it in the fourteen years we’ve
known each other, and being the super nice wife I am, I offered to help him
find a better use for it.
First, I removed the sleeves and collar. I turned the whole thing around –
cutting my front out of the back and my back from its front – and added
bust darts and waist darts. The raw armhole edges were finished with strips
of fabric from the original sleeves. The final product features a drapey,
cowl-like neckline and the original buttons down the back.
I’ll have more photos of the entire process at CarissaKnits.com!”-Carissa
***
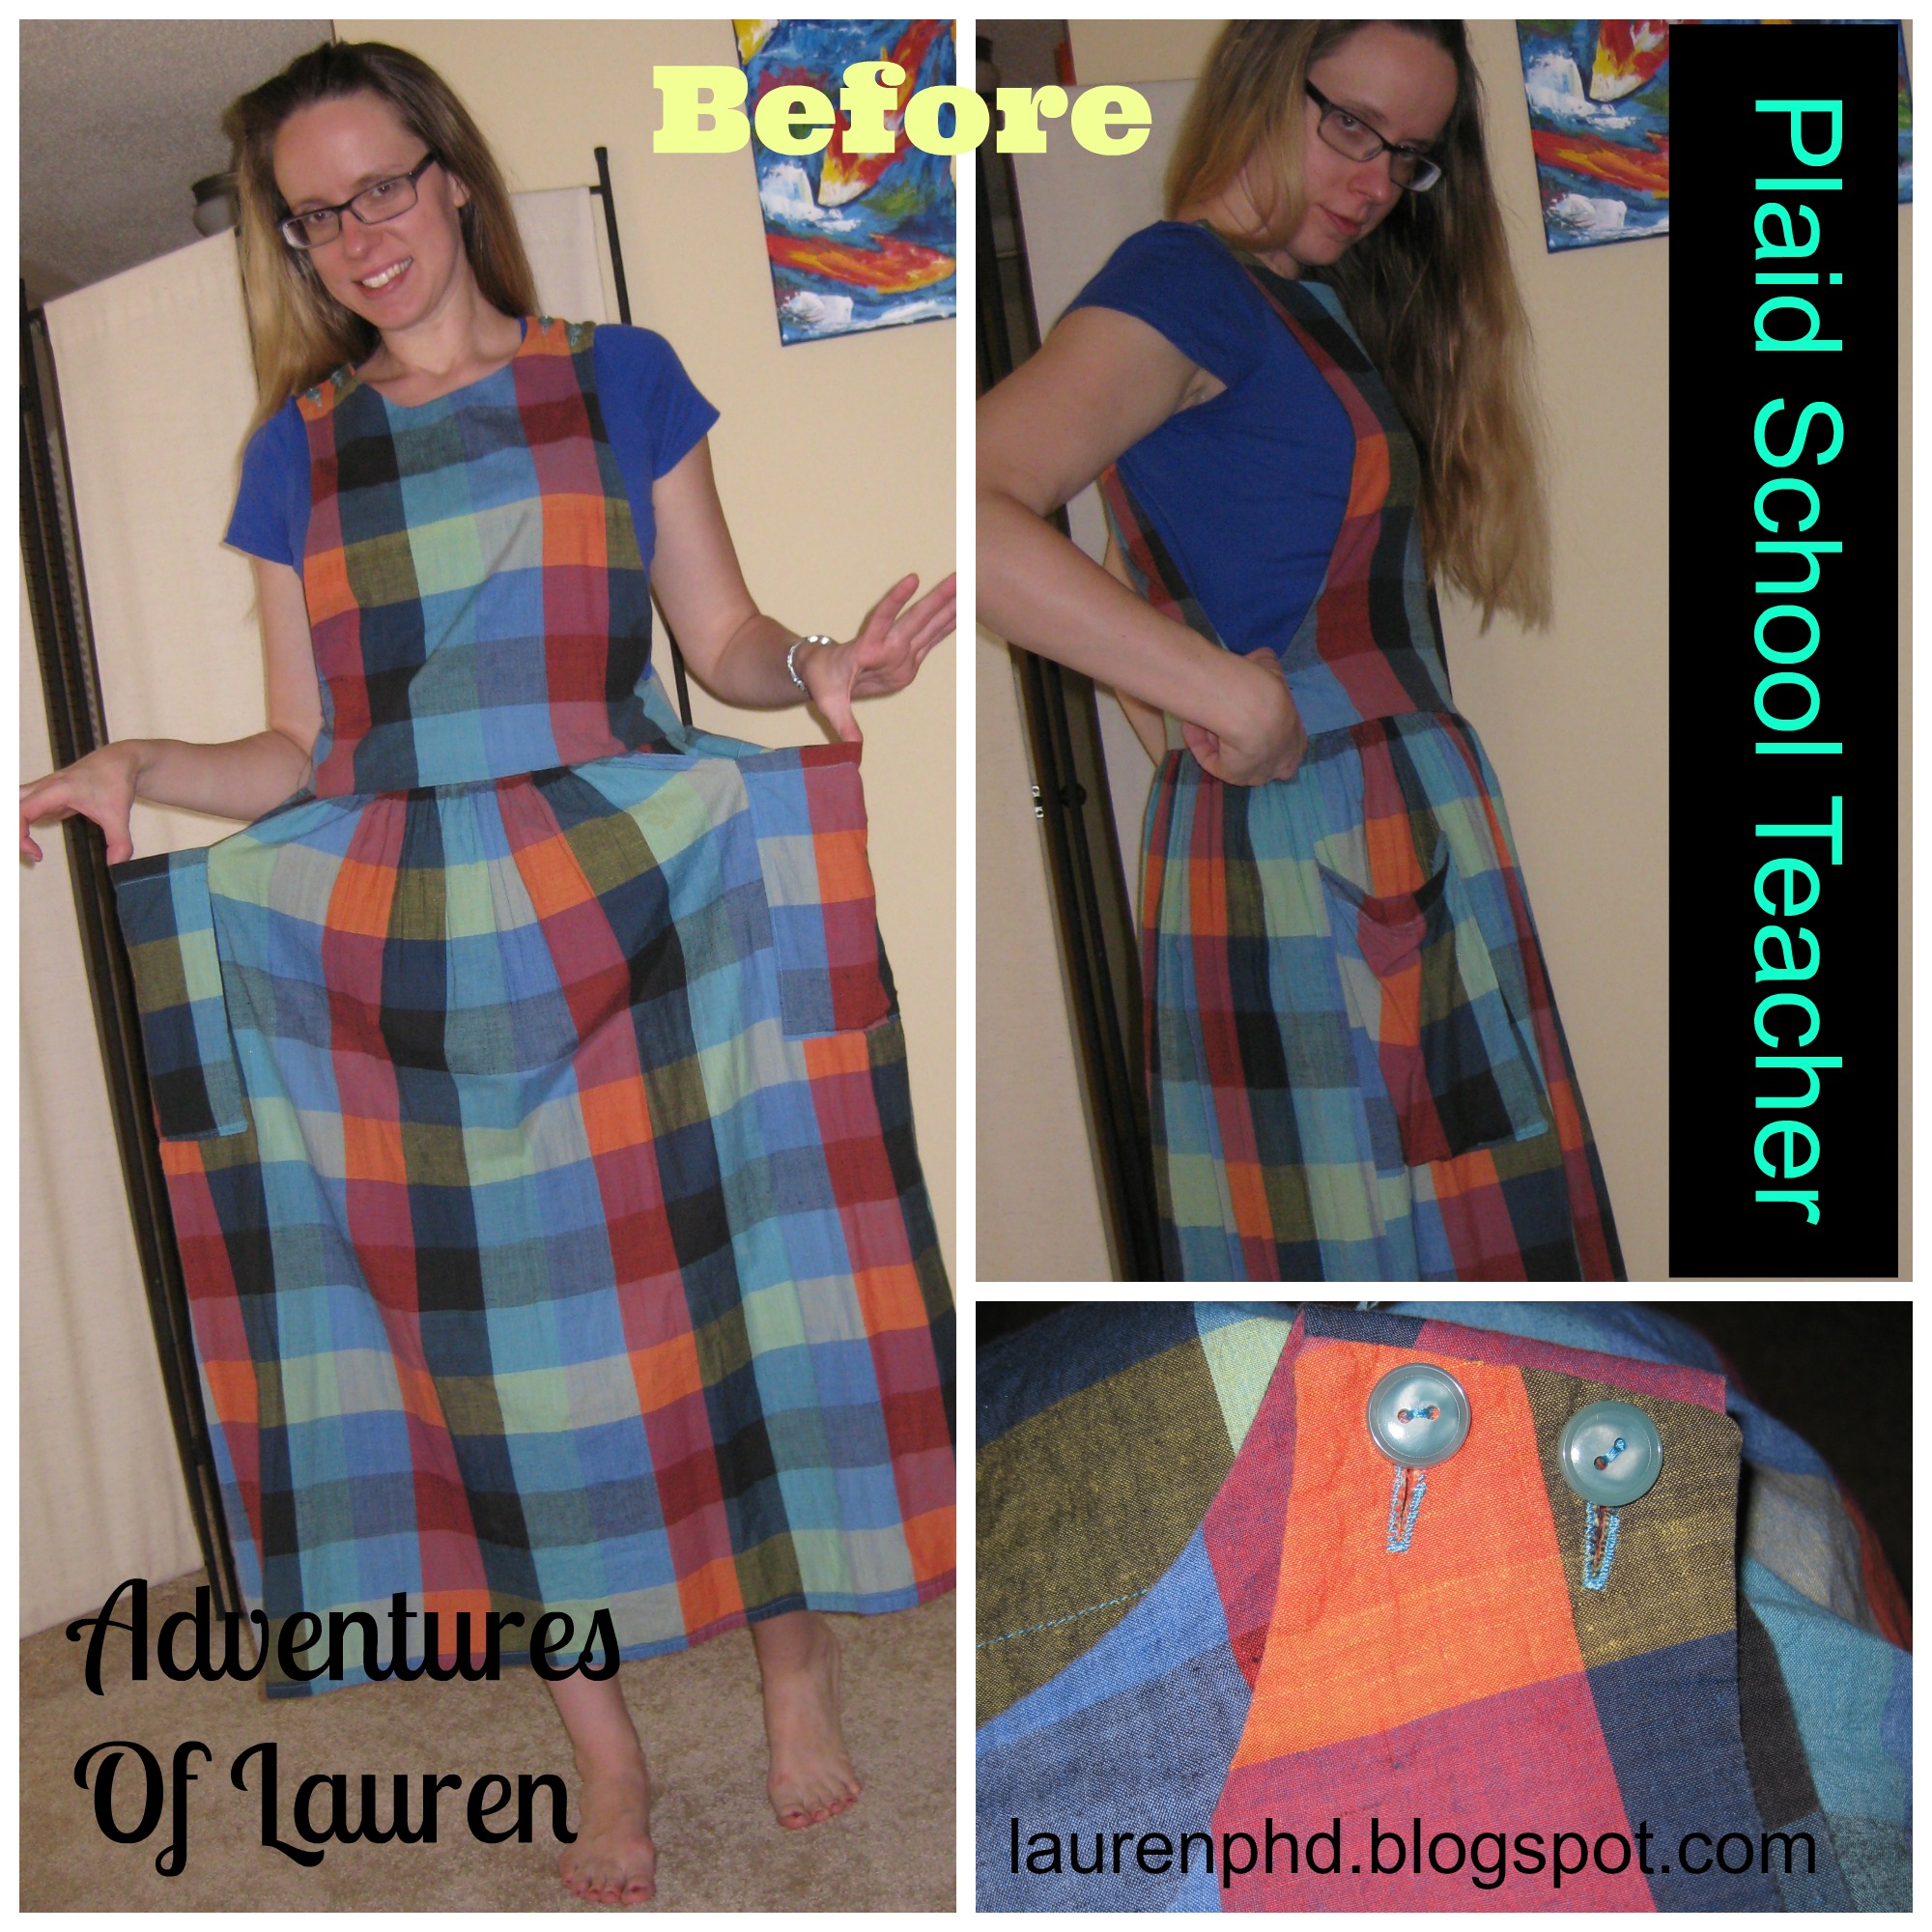
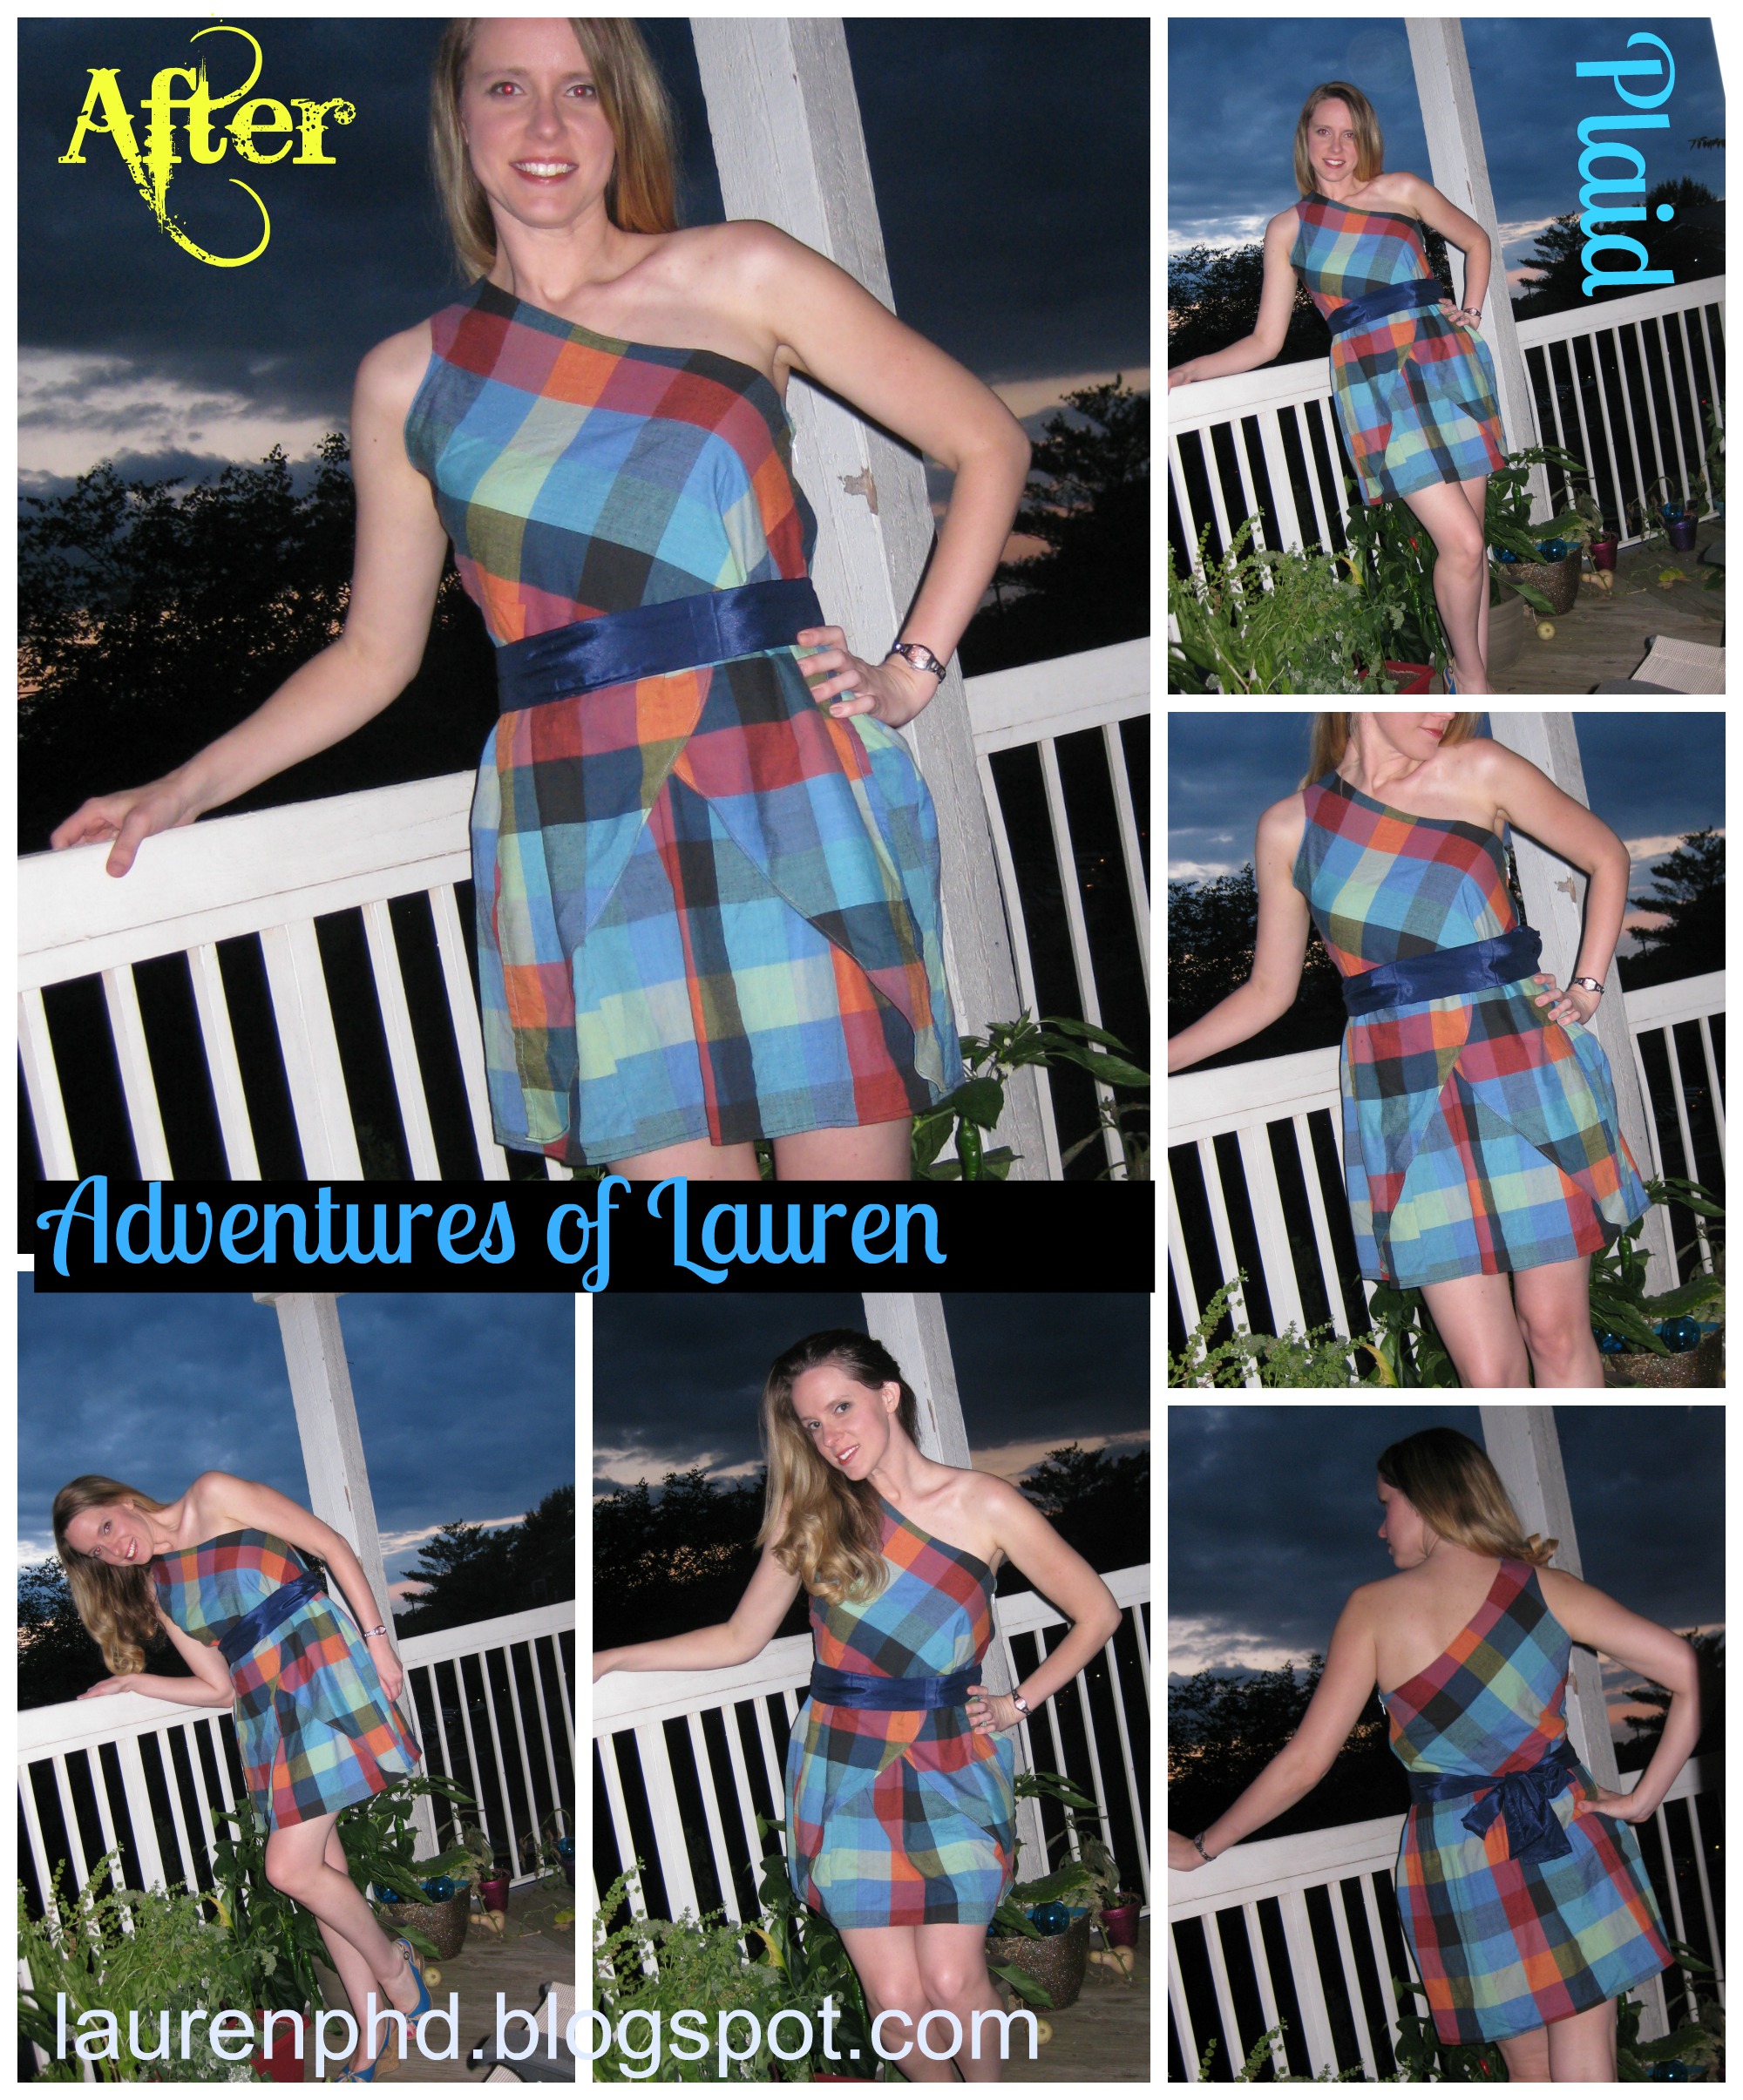
Although shaken by the turmoil in her home town of Washington DC this week, Lauren from The Adventures of Lauren was still able to refashion a plaid dress for us.
“I found this DIY (there were no tags! And sewn probably from
a pattern) school teacher plaid dress. I loved the plaid colors but hated the bib
with the really long arm holes… the big pockets… and that long skirt. I decided
to use the long arm holes to my advantage and use it in my decision. The front and
back parts of the bib were actually double sided of the same material. I took them
apart and used both back parts to make the main part of the bodice. The back part of
the bib had better coverage material-wise. I used the arm hole for the 2 shoulder
top part and used the neckline for the arm hole. I filled in the fabric holes by
using my dress form and the front part of the bib was the side part to complete a
full bodice. Next was tackling the skirt. I wanted something different so after I
cut the length off, I used the leftover fabric to make these sort of overlays- they
reminded me of flower petals for some reason. Cut them,
hemmed, and lastly I attached all 3 together to form the dress and added an
invisible zipper to complete it! I added a blue belt that I have previously
refashion from another project and my dress was done! I turned a bad plaid
schoolteacher dress to a one shoulder petal dress. 🙂
Best part was when my boyfriend got home and I was wearing it, he stopped and said
wow that looks great on! :)”-Lauren
***
And finally, let’s see what Susan from Second Chances has created this week:
“I started with four men’s shirts (although, the fourth was added after the “before”
picture.) I used one shirt for the bodice, turning it around so the dress would
button up the back. The other three shirts were cut into 3 1/2″ strips, sewn
together, pleated, then attached to the bodice. The scoop neck was trimmed from
some of the plaid fabric. I replaced the buttons in the back with dressier buttons.
It was a fun challenge….I hope you like it!”-Susan
***
There you have it, fun and inspiring plaid refashions from around the world.
So now it’s your turn. Please use the poll below and click to vote for your favorite. (I’ve left it secret so everyone will be surprised next Saturday.)
The winner will be announced next Saturday, September 28th.
The competitors will be scoring each other on five areas: following the challenge, originality, craftsmanship, design, and presentation.
The challenge for Week Two: Pantone 2013 Color Emerald Green
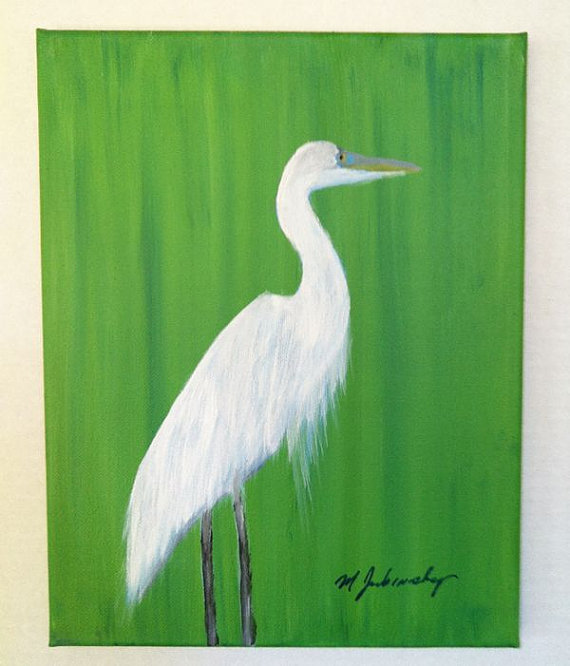
Wait ’til you see what Mil, Val, and Pam create! If you’re looking for some one of a kind paintings, vintage items, or handmade beauty for yourself or for a gift, this is the place to go.
I particularly love this painting. (I hope you’re listening, Santa…..)
If you’re anything like me lately, I’ve been trying to shop handmade and support as many hardworking, creative individuals as possible. Let’s get to know them a bit better.
Tell us about your Etsy shop.
Our shop is evolving over time, but one thing you will always find is variety. Not only do we each enjoy creating different things and have our own unique skills and perspective, but we also like to try new things.
What has been the most fun about having an Etsy shop?
It’s wonderful to have a forum for all the things we make, repurpose, and find. In the past we mostly made things for family and friends. It’s been great to join the creative community and connect with people who appreciate our creations! Having satisfied customers is really a driving force behind all we do. It’s also fun to work collaboratively with each other in a way that we really wouldn’t otherwise, since we don’t live near each other.
Any advice for someone who might want to open an Etsy shop?
The number one thing is to take good pictures. If the picture isn’t clear or well composed, people will pass it by. Also, become involved with promoting your shop and networking, whether through Pinterest, Facebook, or Twitter.
What is your favorite thing to do in your spare time?
All three of us absolutely crave spending time alone with no electronic distractions. This quiet time is essential to rejuvenate ourselves, to clear our minds and spirits, and allow creative thoughts to blossom. Since we all have grown (or nearly so) children, we also treasure the time spent with them and their families.
Who is your role model and why?
Our parents were both very creative in their own ways, and their example was certainly inspiring. They grew up during the depression, so they learned to make whatever they wanted or needed, or else do without. That mindset is a gift we treasure, because it has created in us the desire to make things, as well as an appreciation for hand-crafted beauty. Spiritually, we look to the Bible, where the Supreme Creator is our inspiration and example.
Where do you live? What is your favorite thing to do around town?
Mil is in the panhandle of Florida, Val is in Central Florida, and Pam is in Indiana. We are all homebodies, and would prefer to stay home and create if possible, but we also love to go thrifting or to yard sales. We are always excited to see the potential in someone else’s unwanted item just waiting to be brought out. This combination of economy and creativity in repurposing something cast off into something beautiful and useful is a truly gratifying feeling.
I hope you’ll take the time to visit their shop and support their creative efforts!