
Tunics are EVERYWHERE these days!!!
So comfortable, so cute and so many options.
Sarah Gunn and Julie Starr have just released their new book, The Tunic Bible, and guess what?! I had the honor of being featured in the book as part of their gallery of inspirational tunic tops. So cool!
🙂
They will be graciously giving away a copy of The Tunic Bible to the winner of the Tunic challenge this week.

So without further adieu, here are our All Stars version of the Refashioned Tunic.
Be sure to vote for your favorite at the bottom of this post.
Have fun!!!
**************************************************
Marisa from The Refash Stash
“Honestly the only thing that comes to mind when I think tunic is Robin Hood and
Peter Pan. Something long, with a sash, something worn in the renaissance period.
When my husband heard about the Tunic challenge he basically said the same thing and
proceeded to ask for me to make him a Robin Hood outfit. Unfortunately I denied him
his medieval outfit, for now at least.
I needed to take my Renaissance idea and give it a feminine and updated look.

I began with these gauzy white pants and breezy button down. I just love the color
of this button down! It actually had beautiful grey metallic beading at the collar
and cuffs.
For the pants:

I began by cutting off the existing elastic waistband and pinning a new casting for
new stretchy elastic.
I threaded through my new stretchy elastic.
I used a pair of my favorite skinny jeans as a template to transform my gauzy pants
into gauzy skinny pants! I pinned and stitched up the pant legs.
For the top:

I cut slits in each sleeve.
I evened out the front of my top by sewing a straight line across. This made the
front shorter than the back (common for a tunic).
I cut out the buttons and button holes and sew the 2 pieces together.
I cut out a square neckline. I also cut 2 slits in the sides.
I outline the square neckline, arm slits and sleeve cuffs.
Finishing touches:

I made tassels out of grey embroidery floss and stitched them to the collar of my top.
I took about 4 inches from this beautiful tasseled scarf and turned it into a sash
to complete my tunic!
Accessory:

I snagged these Ann Taylor wedges for 50% off! I sewed on a decorative gray metallic
button! (You know I love buttons!)


Happy Refashioning!!!
*********************************************************
Carissa from Carissa Knits:
“Taking inspiration from the traditional tunics commonly worn in southern
Asia, I knew I wanted to create an easy-to-wear, loose-fitting shirt from
this coral and cream patterned skirt and top set, but the linen fabric was
just a little too transparent for my taste. So I began thinking about how
to line it for modesty when it occurred to me that I could actually make it
reversible! Two shirts in one! Enter this lovely grey cotton muumuu with a
cool geometric pattern and nursing zippers hidden under its ruffles.
I removed the waistband and box pleats from the skirt and chopped off the
muumuu’s yoke, salvaging zippers and buttons along the way. I drafted a
pattern based on my own measurements, complete with bust darts and a slight
flare to accommodate my hips, and used it to cut a front and back panel
from each of the two fabrics. The muumuu’s sleeves were trimmed down
slightly to conform to my self-drafted pattern; the coral sleeves were cut
from the center panel of the old top once I had removed its pleats as well.
After assembling the pieces of each tunic separately, I stuck one inside
the other, with right sides facing, and stitched around the neck edge to
join the layers. Once it was flipped right-side-out again, I folded in the
edges of the sleeves and bottom hem and top-stitched all around, using grey
top thread to match the grey fabric and white thread on my bobbin to suit
the coral print.
I ended up with a super comfy, versatile top that can be bright and bold or
subtle and neutral, depending on my mood. And the linen and cotton are
perfect for Texas weather!”


http://www.carissaknits.com/2016/08/refashion-runway-4-week-4-tunic.html
***************************************************************
Gema from Sequins and Slippers
“*Tuning In to the Tunic*
Hello All!
Yes – the hardest part of it this week, for me personally, was tuning in to
what a tunic actually is. I was thinking ‘How would I describe it to a
foreigner?!’ – (that normally solidifies my thoughts…) but no, I couldn’t
come up with anything ‘firm’.
– Does it normally have sleeves? It can do…
– Is it long or short..? Well… past the waist, but no longer than the
knee… although there is such a thing as a tunic maxi dress…
– Does is always sit away from the body, with no ‘waistline’ to speak
of? There are tunics with a princess seam that create more of an hourglass
silhouette…
I had enough of trying to find a solid description – and started a
Pinterest board instead; if it was accepted there ‘visually’ as a tunic,
I’d accept it as a tunic. And that was that! Onwards and upwards…
As usual I had a false start with something I changed my mind about. In the
end I turned to a dress I’ve had in my wardrobe for a few years, that
carried lovely memories for me. I wore it to my Aunty Betty’s 90th birthday
party in Mallorca a few years ago, and it was such a special day with
everyone there, including my Nan, that I think of it with great fondness.

In fact, we even went in search of some of my family history while we were
there (on the Spanish side), and found a road sign with my father’s name on
it… Obviously I wasn’t trying to steal it or anything…

Anyway – I haven’t worn the dress since. It’s funny, I associate good
memories with it – but on a sunny day I always pick something else to wear.
Having said that, it feels wrong to throw it out… so here we are, at the
fork in the road, when it’s time to change it into something else – the
TUNIC! Yeay!
After removing waist ties, reversing the ‘front’ of the dress, adding a
halter style, and creating a high-lo hem accentuated with pompom trim… I
found I was left with something I’ll actually wear again in future!

I’m as excited as ever to see everyone’s makes this week… what a fab
season this has been!!
Until next week,
Gema x”

**********************************************************************
Jen from Diary of a Mad Mama
“For this week’s theme, I wanted to make a boho-gypsy style tunic. This is
a refashion that’s been brewing in my brain for a while and knowing how
time-consuming it would be, I’d been putting it off. Thanks to this
competition, I had the perfect excuse to finally get it done!

I started with this men’s vintage plaid shirt (snaps and all) and several
other shirts and scraps from my refash stash.

I cut off the bottom of the shirt at the waistline, and then removed the
sleeves and took in the sides of the shirt.

Then I spent the next few hours disassembling the shirts from my stash and
cutting and draping the pieces onto the waist of my shirt, using my dress
form. Once I was happy with the drape of each piece I sewed everything
together. Unfortunately I decided I didn’t like the way the back pieces
looked, so I started over and spent the next day redoing the back, using
the same technique but different clothing pieces. Once I was happy with the
back, I decided I didn’t like the way the front center of the tunic draped,
so I seam-ripped the front open, added a few more layers and was happy with
how it all looked. Now I was finally able to move onto the next step.

I needed to redo the sleeves, so I took them in, and shortened them to my
elbow. I then drafted a bell sleeve pattern. Using some plaid shirt scraps,
and my new pattern, I cut out the bell sleeves, and sewed them all together.

To finish my tunic, I handstitched some navy-blue trim onto the waistline,
around my sleeves and onto the collar.


I’m very happy with my new tunic and I can’t wait to see what my
incredibly talented competitors came up with this week!
If you want to see the full tutorial check it out on my blog, Diary of a
MadMama.
http://diaryofamadmama.wordpress.com/refashion-runway-
season-four-all-stars-week-four-tunic-challenge
**********************************************************************
Susan from Second Chances by Susan
“One thing about the weekly challenges I enjoy is that it gives me new fashion
avenues to explore. For instance, before this week, the only tunics I had made were
for my youngest son, as he has always enjoyed dressing up as Link from the Legend of
Zelda. Thanks to this challenge, though, I am excited about the many possibilities
of the versatile tunic!
I began with a men’s XL shirt. When I first found it on the rack, I really liked
the pattern, just not the price of $8.99. I put it back and walked away. After
unsuccessfully finding something I liked better, I went back to the store about a
week later to see if it was still there. Lucky me, it was! And, it was half price!
Woohoo!
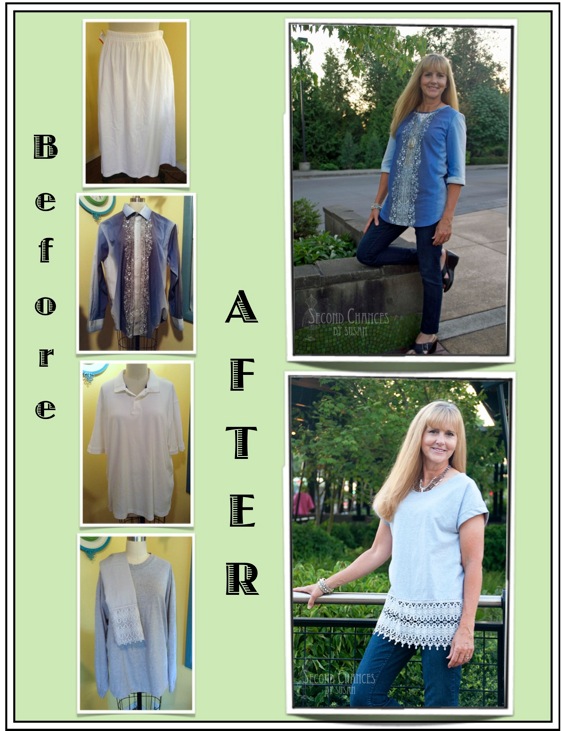
I began by removing the sleeves, collar, and button band, allowing a seam allowance
for the new center front seam. I cut the shirt down to size and added bust darts.
I cut a new neckline and added a lace insert. The neck was bound with self-made
bias tape from the sleeve scraps.

Whenever I refashion something, I really like to use as much of the original details
as possible in the new garment. In this case, there was a running stitch adorning
various parts of the shirt, including the back yoke.

I retained the back yoke and carried that theme into the new tunic by adding a
running stitch to the sleeve bands and the new hem.

The tunic is great with skinny jeans for a casual look.

I really liked the colors of the tunic and thought it would be great dressed up with
more of the contrasting white.
I made a pencil skirt from a men’s polo shirt. Since fabric had a lot of stretch
already, I kept the skirt simple with a yoga waistband.

I found a cotton knit skirt that I used to make a long, flowy vest. It has a rolled
shawl collar…

…and a yoke with pleats in the back.

The whole outfit is 100% cotton and so comfortable to wear!

Sometimes refashioning can be labor intensive and hard to replicate. I figured I
would add one more look that took about only about an hour to complete. I started
with a men’s long sleeved t-shirt. I cut the sleeves off about 1 3/4” from the
seam. I removed the neck ribbing. I took in the sides to fit, continuing the side
seams all the way through the armscyes, making the armscyes smaller and creating a
dropped shoulder effect. After turning the neckline to the inside and topstitching,
and turning the sleeves to the inside and stitching, I cut off some of the length
and added wide lace that once adorned a pillowcase. That was it! Simple.
Comfortable. Fun.

Thank you to everyone who has been following along, sewing along, leaving comments,
and voting! And, thanks to Beth for once again leading us on a new fashion
adventure!
If you would like to see more details of the steps involved in creating these looks,
you can check out my blog, Second Chances by Susan. Thank you, and happy sewing!”
***************************************************
Wow! Just Wow!!! Who knew the tunic could be so beautiful! Once again, great job ladies!!
Now it’s your turn to vote for your favorite tunic refashion. After clicking by your favorite’s name, be sure to scroll to the bottom and click the vote button so your vote will be counted.
The winner will be announced next Saturday, September 3.
If you’re sewing along this week, send a before and after picture to bhunting@eoni.com.
Next week’s challenge:
Pantone Blue: Riverside


This week’s were fantastic! I will miss the festival style of Meche – but, you know, I guess it’s not for everyone………..she totally reminds me of my babysitter’s dress in the late 60’s early 70’s – Betty and Marsha. Anyway, my daughter wants to move next door to Carissa because she loves simply everything she does! Each lady has her own style and I enjoy them all – it keeps getting harder and harder to vote yet – I force myself! 🙂 Thanks for the chance to look at cool things!
Ahh such sweet words, I LOVE LOVE LOVE the 60s and 70s! Totally agree about Carissa, her style is wonderful!
All of you continue to amaze me with your creativity. I’m especially impressed with Carissa’s reversible tunic, what a great way to double your mileage with a refashion! And Susan must have gotten nothing else done this week! What fabulous additions to a wardrobe. Thanks to all for your hard work and inspiration to the rest of us.
This week’s choices were super hard!
Great job done by all ladies!!! Once again a difficult decision!
I love tunics so I really had fun viewing all the ideas from this weeks challenge. Ladies you all did a fantastic job!!! I loved them all. But I could only vote for one sadly.
Thanks Beth for another great week of inspiration.
Reblogged this on Sew Re-purposed and commented:
Beth from Renegade Seamstress has been giving us so much inspiration with her Re-fashion Runway. She is holding a fun competition at her blog with ladies who are challenged each week with a different fashion style to re-fashion from something else.
It has been so much fun seeing how creative all the ladies are and getting inspired to create something myself.
So enjoy the entries and you can vote for your favorite each week.
Pingback: How to Make a Reusable Snack Bag | The Renegade Seamstress
Best over-all challenge so far. Everyone created something wearable and attractive. Congratulations to all on a job well done.
Great job ladies. It is very difficult to chose.
So much creativity on one blog! It boggles the mind. Wish I could vote for all of you.
So many fun styles! Carissa did such a great job–I never would have seen tunics looking at either dress, but the resulting tunic is a great fit! I love the mod print and its colors on her and how clever to make it reversible. I missed out on the fun this week due to working really hard to finish my entry for The Refashioners in my pastel denim trench coat.
Pingback: Refashion Runway Season Four: All Stars – Week Four: Tunic Challenge | Diary of a MadMama
Pingback: Refashion Runway: Tunic Sew Along | The Renegade Seamstress
Pingback: Refashion Runway All Stars: The Winner of the Tunic Challenge | The Renegade Seamstress
Pingback: Refashion Runway Sewalong: Swing Tunic (?) |
Pingback: What is Refashion Runway Anyway? A Look Back Through the Seasons | The Renegade Seamstress